Page 200 of 266

6
DO-IT-YOURSELF MAINTENANCE
6
CHANGING THE OIL AND FILTER
!
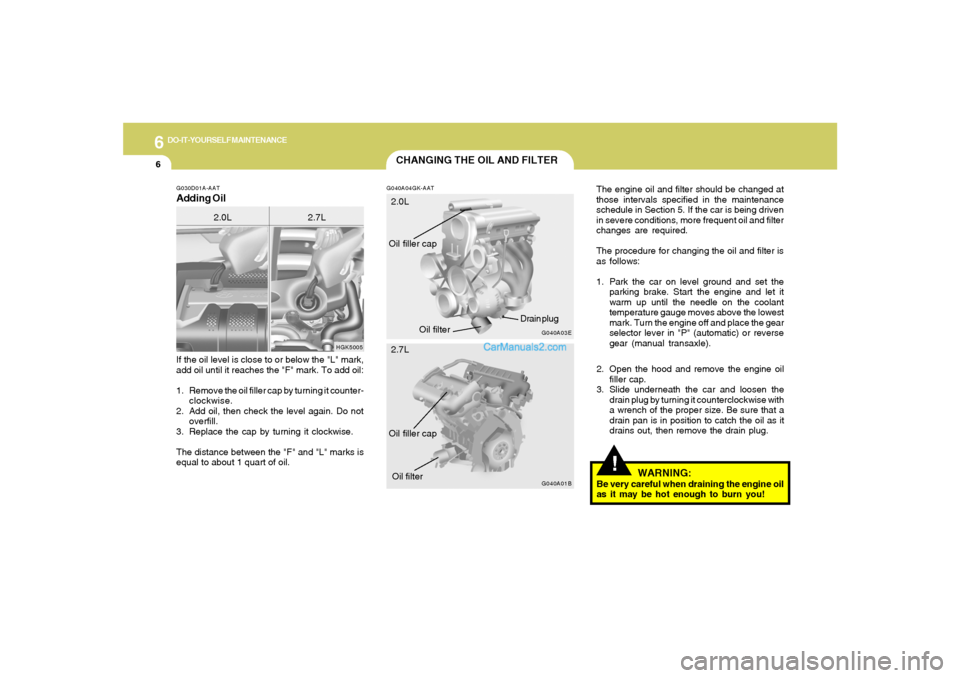
If the oil level is close to or below the "L" mark,
add oil until it reaches the "F" mark. To add oil:
1. Remove the oil filler cap by turning it counter-
clockwise.
2. Add oil, then check the level again. Do not
overfill.
3. Replace the cap by turning it clockwise.
The distance between the "F" and "L" marks is
equal to about 1 quart of oil.
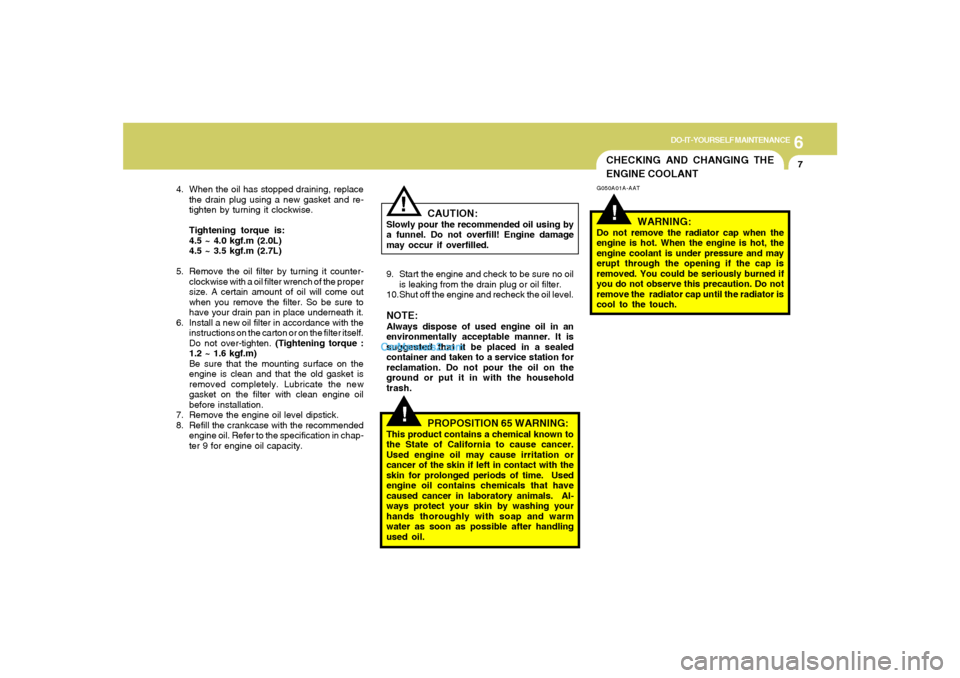
G040A04GK-AAT
2. Open the hood and remove the engine oil
filler cap.
3. Slide underneath the car and loosen the
drain plug by turning it counterclockwise with
a wrench of the proper size. Be sure that a
drain pan is in position to catch the oil as it
drains out, then remove the drain plug.
WARNING:
Be very careful when draining the engine oil
as it may be hot enough to burn you!
G030D01A-AATAdding Oil
HGK5005
2.0L 2.7LThe engine oil and filter should be changed at
those intervals specified in the maintenance
schedule in Section 5. If the car is being driven
in severe conditions, more frequent oil and filter
changes are required.
The procedure for changing the oil and filter is
as follows:
1. Park the car on level ground and set the
parking brake. Start the engine and let it
warm up until the needle on the coolant
temperature gauge moves above the lowest
mark. Turn the engine off and place the gear
selector lever in "P" (automatic) or reverse
gear (manual transaxle).
G040A03E
G040A01B
Oil filler cap
Oil filter2.0L
2.7L Oil filler cap
Oil filter
Drain plug
Page 201 of 266

6
DO-IT-YOURSELF MAINTENANCE
7
CHECKING AND CHANGING THE
ENGINE COOLANT!
G050A01A-AAT
WARNING:
Do not remove the radiator cap when the
engine is hot. When the engine is hot, the
engine coolant is under pressure and may
erupt through the opening if the cap is
removed. You could be seriously burned if
you do not observe this precaution. Do not
remove the radiator cap until the radiator is
cool to the touch.
!!
4. When the oil has stopped draining, replace
the drain plug using a new gasket and re-
tighten by turning it clockwise.
Tightening torque is:
4.5 ~ 4.0 kgf.m (2.0L)
4.5 ~ 3.5 kgf.m (2.7L)
5. Remove the oil filter by turning it counter-
clockwise with a oil filter wrench of the proper
size. A certain amount of oil will come out
when you remove the filter. So be sure to
have your drain pan in place underneath it.
6. Install a new oil filter in accordance with the
instructions on the carton or on the filter itself.
Do not over-tighten. (Tightening torque :
1.2 ~ 1.6 kgf.m)
Be sure that the mounting surface on the
engine is clean and that the old gasket is
removed completely. Lubricate the new
gasket on the filter with clean engine oil
before installation.
7. Remove the engine oil level dipstick.
8. Refill the crankcase with the recommended
engine oil. Refer to the specification in chap-
ter 9 for engine oil capacity.
CAUTION:
Slowly pour the recommended oil using by
a funnel. Do not overfill! Engine damage
may occur if overfilled.
9. Start the engine and check to be sure no oil
is leaking from the drain plug or oil filter.
10.Shut off the engine and recheck the oil level.NOTE:Always dispose of used engine oil in an
environmentally acceptable manner. It is
suggested that it be placed in a sealed
container and taken to a service station for
reclamation. Do not pour the oil on the
ground or put it in with the household
trash.
PROPOSITION 65 WARNING:
This product contains a chemical known to
the State of California to cause cancer.
Used engine oil may cause irritation or
cancer of the skin if left in contact with the
skin for prolonged periods of time. Used
engine oil contains chemicals that have
caused cancer in laboratory animals. Al-
ways protect your skin by washing your
hands thoroughly with soap and warm
water as soon as possible after handling
used oil.
Page 203 of 266

6
DO-IT-YOURSELF MAINTENANCE
9
!
WARNING:
The cooling fan is controlled by engine
coolant temperature and may sometimes
operate even when the engine is not run-
ning. Use extreme caution when working
near the blades of the coolant fan so that
you are not injured by a rotating fan blade.
As the engine coolant temperature de-
creases, the fan will automatically shut off.
This is a normal condition.
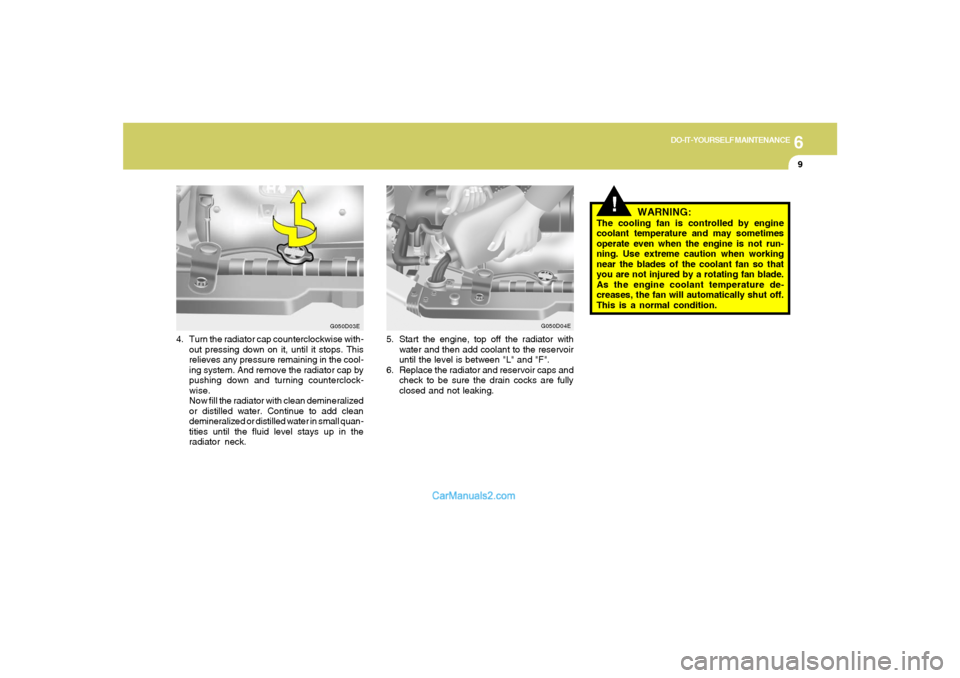
4. Turn the radiator cap counterclockwise with-
out pressing down on it, until it stops. This
relieves any pressure remaining in the cool-
ing system. And remove the radiator cap by
pushing down and turning counterclock-
wise.
Now fill the radiator with clean demineralized
or distilled water. Continue to add clean
demineralized or distilled water in small quan-
tities until the fluid level stays up in the
radiator neck.
G050D03E
5. Start the engine, top off the radiator with
water and then add coolant to the reservoir
until the level is between "L" and "F".
6. Replace the radiator and reservoir caps and
check to be sure the drain cocks are fully
closed and not leaking.
G050D04E
Page 222 of 266
6
DO-IT-YOURSELF MAINTENANCE
28
HGK5024
5. Turn the plastic cover counterclockwise
and remove it.
6. Disconnect the connector from the bulb
base in the back of the headlight.
REPLACEMENT OF LIGHT BULBS!
G260A02A-AATBefore attempting to replace a light bulb, be sure
the switch is turned to the "OFF" position.
The next paragraph shows how to reach the
light bulbs so they may be changed. Be sure to
replace the burned-out bulb with one of the
same number and wattage rating.
See page 6-38 for the wattage description.
CAUTION:
Keep the lamps out of contact with petro-
leum products, such as oil, gasoline, etc.
G270A01GK-AATHeadlight and Front Turn Signal Light1. Allow the bulb to cool. Wear eye protection.
2. Open the engine hood.
3. Always grasp the bulb by its plastic base,
avoid touching the glass.4. Disconnect the power cord from the bulb
base in the back of the headlight.
HGK5023
Page 224 of 266
6
DO-IT-YOURSELF MAINTENANCE
30
HGK5041
2. To remove the cover of the rear luggage trim,
turn the knob by hand to the counterclock-
wise.
!
WARNING:
This halogen bulb contains gas under pres-
sure and if impacted could shatter, result-
ing in flying fragments. Always wear eye
protection when servicing the bulb. Protect
the bulb against abrasions or scratches
and against liquids when lighted. Turn the
bulb on only when installing in a headlight.
Replace the headlight if damaged or cracked.
Keep the bulb out of the reach of children
and dispose of the used bulb with care.
G270A03OG270B01GK-GAT
Rear Combination Light
(Without woofer speaker)1. Open the tail gate.
HGK5037
(1)
(2)
(3) (4)
Page 225 of 266
6
DO-IT-YOURSELF MAINTENANCE
31
5. To replace the rear combination light (stop/
tail light, back-up light, turn signal light, side
mark light), take it out from the bulb holder by
turning it counterclockwise.
(1) Stop/Tail light
(2) Back-up light
(3) Turn signal light
(4) Side mark light
6. Install the new bulb.
HGK5044(1)
(2)(3) (4)
HGK5042
3. Remove the nut (8mm) with a spanner.
4. To detach the rear combination light hit it
strongly by hand.
HGK5043-1
Page 227 of 266
6
DO-IT-YOURSELF MAINTENANCE
33
HGK5044(1)
(2)(3) (4)
8. To replace the rear combination light (stop/
tail light, back-up light, turn signal light, side
mark light), take it out from the bulb holder by
turning it counterclockwise.
(1) Stop/Tail light
(2) Back-up light
(3) Turn signal light
(4) Side mark light
9. Install the new bulb.
HGK5041
5. To remove the cover of the rear luggae trim,
turn the knob by hand to the counterclock-
wise.
HGK5042
6. Remove the nut (8mm) with a wrench.
HGK5043-1
7. To detach the rear combination light hit it
strongly by hand.
Page 235 of 266

6
DO-IT-YOURSELF MAINTENANCE
41
DESCRIPTION
IG COIL
AMP
B/UP LAMP
A/BAG IND
A/BAG
HTD MIR
HAZARD
R/WIPER
TAIL-RH
F/WIPER
A/C SW
RR DEFOG
STOP
TAIL-LH
A/CON
ECU
CLUSTER
ROOM LP
P/WINDOW
T/GATE
IGN
RR FOG
C/LIGHT
S/ROOF
S/HTR
ABS
AUDIO
PROTECTED COMPONENTS
Ignition coil(2.7L), Electronic chrome mirror
AMP
Back-up lamp switch,Transaxle range switch,Cruise control module,Stop lamp switch
Instrument cluster (A/BAG IND.)
SRS control module
Mirror defogger
Hazard relay
Rear wiper motor,Rear intermittent wiper relay
Right tail lamps,Glove box lamp
Front wiper motor,Front wiper relay
Blower relay,Blower motor
Defogger relay
Stop lamp switch,Burglar alarm horn relay,Folding/Unfolding rely
Left tail lamps
A/C control module, Blower relay
ECM, Multi gauge unit, TCM, Vehicle speed sensor
Instrument cluster (Power), Per-excitation resister, DRL Control module,Generator
Room lamp,Clock,Audio,Data link connector,Multi gauge unit
Power window relay
Trunk lid switch
AQS sensor,Head lamp relay,DRL Control module
Rear fog lamp
Cigarette lighter,Outside mirror switch
Sunroof,Power door lock/Unlock relay
Seat warmer
ESP/ABS control module
Audio,Digital clock FUSERATING
20A
20A
10A
10A
15A
10A
10A
15A
10A
20A
10A
30A
15A
10A
10A
10A
10A
10A
30A
15A
10A
10A
15A
15A
20A
10A
10A
Page:
< prev 1-8 9-16 17-24