2006 Hyundai Terracan stop start
[x] Cancel search: stop startPage 439 of 539
2
DRIVING YOUR HYUNDAI
23
o Apply the parking brake only when the vehicle is at rest.
o Since the power assistance pro- vided by the brake servo is derived from the engine, coasting with theengine turned off or towing of the vehicle with the engine turned off will result in greatly increased pedalpressures being required to stop the vehicle.
o Do not hold the vehicle on the up- grade with the accelerator pedal.This can cause the transmission to overheat. Always use the brakepedal or parking brake.
o Use caution when parking on a hill.
Engage the parking brake and placethe gear selector lever in "P" (auto- matic transaxle) or in first or reverse gear (manual transaxle). If your caris facing downhill, turn the front wheels into the curb to help keep the car from rolling. If your car is facinguphill, turn the front wheels away from the curb to help keep the car from rolling. If there is no curb or if itis required by other conditions to keep the car from rolling, block the wheels.DRIVING FOR ECONOMY
C140A02A-EAT You can save fuel and get more miles from your car if you follow these sug-gestions:
o Drive smoothly. Accelerate at a moderate rate. Don't make "jack- rabbit" starts or full-throttle shifts and maintain a steady cruising speed. Don't race between stoplights. Try to adjust your speed to that of the other traffic so you don't have to change speeds unnecessarily. Avoid heavy traffic whenever possible. Always maintain a safe distance from other vehicles so you can avoid unneces- sary braking. This also reduces brake wear.
o Drive at a moderate speed. The faster you drive, the more fuel your car uses. Driving at a moderate speed, especially on the motorway, is one of the most effective ways to reduce fuel consumption.
o Don't "ride" the brake or clutch pedal. This can increase fuel consumption and also increase wear on these com- ponents. In addition, driving with your foot resting on the brake pedal may cause the brakes to overheat, which reduces their effectiveness and may lead to more serious consequences. o Take care of your tyres. Keep them
inflated to the recommended pres- sure. Incorrect inflation, either too much or too little, results in unnec- essary tyre wear. Check the tyrepressures at least once a month.
o Be sure that the wheels are aligned
correctly. Improper alignment canresult from hitting curbs or driving too fast over irregular surfaces. Poor alignment causes faster tyre wearand may also result in other prob- lems as well as greater fuel con- sumption.
o Keep your car in good condition. For better fuel economy and reducedmaintenance costs, maintain yourcar in accordance with the mainte- nance schedule in Section 5. If you drive your car in severe conditions,more frequent maintenance is re- quired (see Section 5 for details).
o Keep your car clean. For maximum service, your Hyundai should bekept clean and free of corrosive materials. It is especially importantthat mud, dirt, ice, etc. not be al- lowed to accumulate on the under- side of the car. This extra weight canresult in increased fuel consumption and also contribute to corrosion.
Page 446 of 539
2 DRIVING YOUR HYUNDAI
30
!
CAUTION:
If overheating should occur when towing, (temperature gauge reads near red zone), taking the following action may reduce or eliminate theproblem.
1. Turn off the air conditioner.
2. Reduce highway speed.
3. Select a lower gear when going uphill.
4. Whilst in stop and go traffic, place the gear selector in park or neu- tral and idle the engine at a higherspeed.
14. When going down a hill, shift into a
lower gear and use the engine brak-ing effect. When climbing a long grade, down- shift the transmission to a lowergear and reduce speed to reduce chances of engine overloading and/ or overheating.
15.If you have to stop whilst going uphill, do not hold the vehicle inplace by pressing on the accelera-tor. This can cause the automatic transmission to overheat. Use the parking brake or footbrake.
NOTE: When towing, check transmission fluid more frequently.
8. When parking your car and trailer,
especially on a hill, be sure to follow all the normal precautions. Turn your front wheels into the curb, set the parking brake firmly, and putthe transmission in 1st or Reverse (manual) or Park (automatic). In addition, we advise the use of wheelchocks at each of the trailer's tyres.
9. If the trailer has electric brakes,
start your vehicle and trailer mov-ing, and then apply the trailer brake controller by hand to be sure the brakes are working. This lets youcheck your electrical connection at the same time.
10.During your trip, check occasion- ally to be sure that the load issecure, and that the lights and any trailer brakes are still working.
11.Avoid jerky starts, sudden accel- eration or sudden stops.
12.Avoid sharp turns and rapid lane changes.
13.Avoid holding the brake pedal down
too long or too frequently. This couldcause the brakes to overheat, re- sulting in reduced braking efficiency.
Page 450 of 539
3 IN CASE OF EMERGENCY
4
!
1. Ensure that the booster battery is 12
volt type. If the booster battery is installed in another vehicle, ensure that the two vehicles are not touch- ing.
2. Turn off all unnecessary electrical equipment in both vehicles.
3. Ensure that the engine of the ve- hicle providing the jump start is run- ning prior to connection of the jump cables.
4. Connect the red jump cable to the positive (+) terminal of the boosterbattery and the other end to thepositive (+) terminal of the dis- charged battery.
5. Attach the black jump cable to the negative (-) terminal of the boosterbattery, and the other end to a ground point within the engine compartmentof the vehicle with the flat bat-tery. Do not connect to the negative bat- tery terminal of the flat battery sincesparks may be generated with the subsequent risk of explosion.
6. Raise the booster vehicle engine speed to 2,000 r.p.m. and start theengine of the vehicle with the flat battery. 7. Switch "ON" the main beam
headlamps before carefully remov-ing the jumper cables in the reverse order of attachment. Once the jumper cables have been removed,switch "OFF" the main beam headlamps.
CAUTION:
If the jump cables are incorrectly installed, damage to the vehicle elec- trical system may occur, in particu- lar the electronic components suchas the Fuel Injection system com- puter and the Automatic transmis- sion computer. The battery mustnever be disconnected whilst the engine is running.
IF THE ENGINE OVERHEATS
HPD040A2-E If the temperature gauge indicates overheating:
1. Pull off the road and stop as soon as it is safe to do so.
2. Place the gear selector lever in "P"
(automatic), or neutral (manual trans- mission) and set the parking brake. If the air conditioning is on, turn it off.
3. If coolant is running out under the car or steam is coming out from underthe bonnet, stop the engine. Do not open the bonnet until the coolant hasstopped running or the steaming has stopped. If there is no visible loss of coolant and no steam, leave theengine running and check to be sure the engine cooling fan is operating. If the fan is not running, turn theengine off.
4. Check to see if the water pump drive
belt is broken. If it is not missing,check to see that it is tight. If the drive belt seems to be satisfactory, check for coolant leaking from theradiator, hoses or under the car. (If the air conditioning had been in use, it is normal for cold water to bedraining from it).
Page 475 of 539
5
VEHICLE MAINTENANCE REQUIREMENTS
7
!
F060B01A-EAT
o Drive belts
Inspect all drive belts for evidence of cuts, cracks, excessive wear or oil contamination and replace if neces-sary. Drive belts should be checked periodically for proper tension and ad- justed as necessary. F060C01A-AAT
o Fuel filter
A clogged filter can limit the speed at
which the vehicle may be driven, dam- age the emission system and cause hard starting. If an excessive amountof foreign matter accumulates in the fuel tank, the filter may require re- placement more frequently. After installing a new filter, run the
engine for several minutes, and checkfor leaks at the connections. Fuel fil- ters should be installed by trained technicians.
F060D01TB-EAT
o Fuel lines, fuel hoses and con- nections
Check the fuel lines, fuel hoses and
connections for leakage and damage. Have a trained technician replace anydamaged or leaking parts immediately. WARNING (Diesel only):
Never work on injection system withengine running or within 30 sec-onds after shutting off engine. High pressure pump, rail, injectors and high pressure pipes are subject tohigh pressure even after the engine stopped. The fuel jet produced by fuel leaks may cause serious injury,if it contacts the body. People using pacemakers should ensure that they keep a distance of 30cm from theECU or wiring harness within the engine room while engine is run- ning, since the high currents in theCommon Rail system produce con- siderable magnetic fields.
EXPLANATION OF SCHED- ULED MAINTENANCE ITEMS
F060M01A-AAT
o Engine oil and filter
The engine oil and filter should be
changed at the intervals specified in the maintenance schedule. If the car is being driven in severe conditions,more frequent oil and filter changes are required.
Page 478 of 539
5VEHICLE MAINTENANCE REQUIREMENTS
10
F070J01A-AAT
o Brake pads, calipers and rotors
Check the pads for excessive wear, discs for run out and wear, and cali- pers for fluid leakage. F070K01A-EAT o Exhaust pipe and sliencer Visually inspect the exhaust pipes, sliencer and hangers for cracks, dete- rioration, or damage. Start the engineand listen carefully for any exhaust gas leakage. Tighten connections or replace parts as necessary. F070L01A-AAT
o Suspension mounting bolts
Check the suspension connections for
looseness or damage. Retighten to the specified torque.
F070M01B-AAT
o Steering gear box, linkage & boots/lower arm ball joint, upper arm ball joint
With the vehicle stopped and engine
off, check for excessive free-play in the steering wheel. Check the linkage for bends or dam-
age. Check the dust boots and ball joints for deterioration, cracks, or dam- age. Replace any damaged parts. F070N01A-AAT
o Power steering pump, belt and hoses
Check the power steering pump and
hoses for leakage and damage. Re- place any damaged or leaking parts immediately. Inspect the power steer-ing belt for evidence of cuts, cracks, excessive wear, oil contamination and proper tension. Replace or adjust it ifnecessary.
F070P01HP-AAT
o Drive shafts and boots
Check the drive shafts, boots and
clamps for cracks, deterioration, ordamage. Replace any damaged partsand, if necessary, repack the grease.
F070Q01A-AAT
o Air conditioning refrigerant
Check the air conditioning lines and
connections for leakage and damage. Check air conditioning performance ac- cording to the relevant shop manual ifnecessary.
Page 507 of 539
6
OWNER MAINTENANCE
29
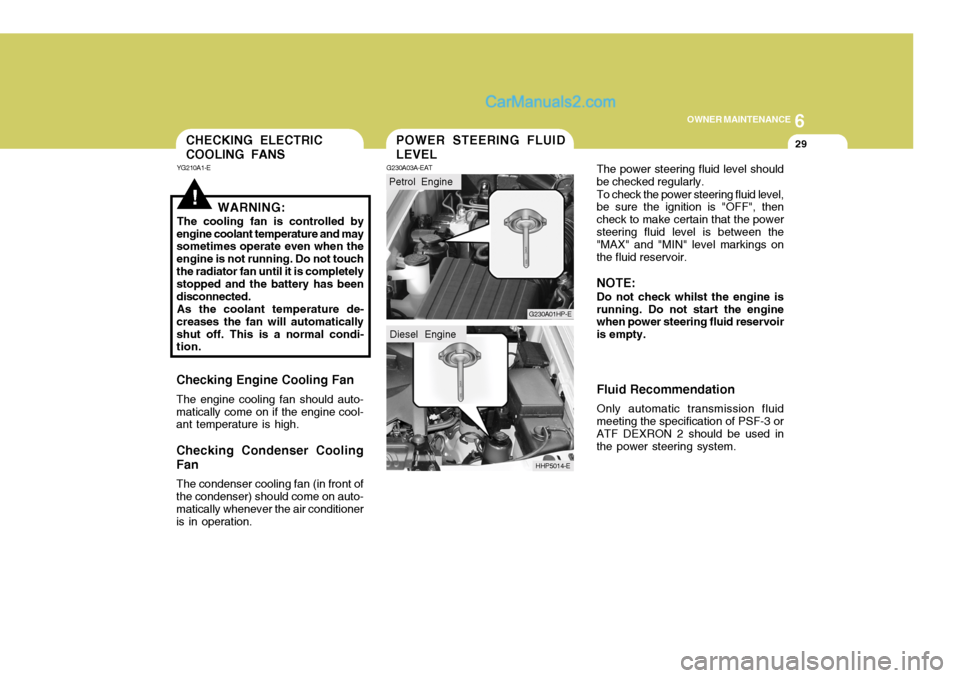
The power steering fluid level should be checked regularly. To check the power steering fluid level, be sure the ignition is "OFF", then check to make certain that the powersteering fluid level is between the "MAX" and "MIN" level markings on the fluid reservoir. NOTE: Do not check whilst the engine is running. Do not start the engine when power steering fluid reservoir is empty. Fluid Recommendation Only automatic transmission fluid meeting the specification of PSF-3 orATF DEXRON 2 should be used in the power steering system.POWER STEERING FLUID LEVEL
G230A03A-EAT
Petrol Engine
G230A01HP-E
HHP5014-E
Diesel Engine
!WARNING:
The cooling fan is controlled by
engine coolant temperature and may sometimes operate even when the engine is not running. Do not touchthe radiator fan until it is completely stopped and the battery has been disconnected. As the coolant temperature de-
creases the fan will automaticallyshut off. This is a normal condi- tion.
Checking Engine Cooling Fan The engine cooling fan should auto- matically come on if the engine cool- ant temperature is high.
Checking Condenser Cooling Fan The condenser cooling fan (in front of the condenser) should come on auto- matically whenever the air conditioner is in operation.
CHECKING ELECTRIC COOLING FANS
YG210A1-E
Page 508 of 539
6 OWNER MAINTENANCE
30
!
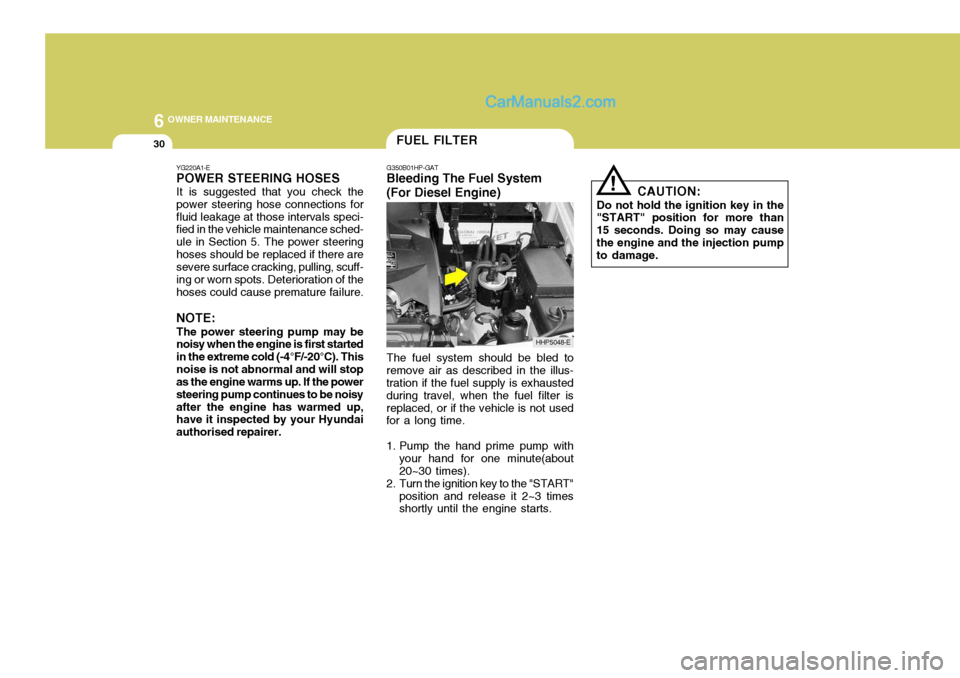
The fuel system should be bled to
remove air as described in the illus- tration if the fuel supply is exhausted during travel, when the fuel filter isreplaced, or if the vehicle is not used for a long time.
1. Pump the hand prime pump with your hand for one minute(about 20~30 times).
2. Turn the ignition key to the "START" position and release it 2~3 times shortly until the engine starts. CAUTION:
Do not hold the ignition key in the"START" position for more than 15 seconds. Doing so may causethe engine and the injection pump to damage.
FUEL FILTER
G350B01HP-GAT
Bleeding The Fuel System (For Diesel Engine)
HHP5048-E
YG220A1-E POWER STEERING HOSES It is suggested that you check the power steering hose connections forfluid leakage at those intervals speci- fied in the vehicle maintenance sched- ule in Section 5. The power steeringhoses should be replaced if there are severe surface cracking, pulling, scuff- ing or worn spots. Deterioration of thehoses could cause premature failure. NOTE: The power steering pump may be noisy when the engine is first started in the extreme cold (-4°F/-20°C). Thisnoise is not abnormal and will stop as the engine warms up. If the power steering pump continues to be noisyafter the engine has warmed up, have it inspected by your Hyundai authorised repairer.
Page 518 of 539
6 OWNER MAINTENANCE
40
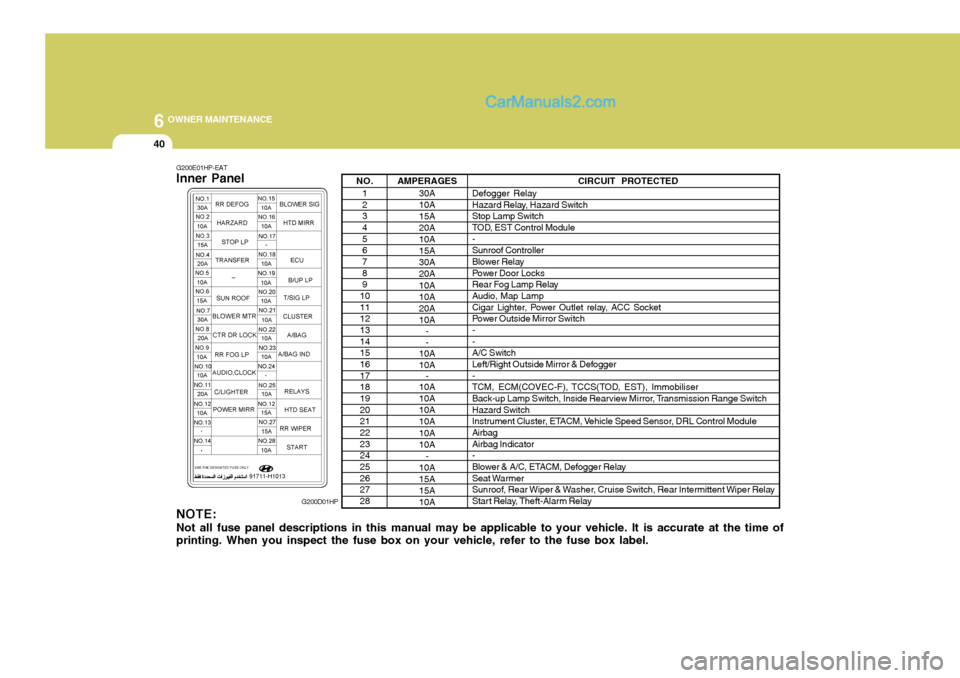
NO.1 2 34 5 67 8 9
10 11 1213 14 1516 17 1819 20 2122 23 2425 26 2728 AMPERAGES
30A 10A 15A 20A10A15A30A20A 10A 10A20A10A- -
10A 10A -
10A10A10A10A 10A 10A
-
10A15A15A 10A CIRCUIT PROTECTED
Defogger Relay
Hazard Relay, Hazard Switch Stop Lamp Switch
TOD, EST Control Module - Sunroof Controller
Blower Relay
Power Door Locks
Rear Fog Lamp RelayAudio, Map Lamp
Cigar Lighter, Power Outlet relay, ACC Socket
Power Outside Mirror Switch- - A/C Switch
Left/Right Outside Mirror & Defogger -
TCM, ECM(COVEC-F), TCCS(TOD, EST), Immobiliser
Back-up Lamp Switch, Inside Rearview Mirror, Transmission Range Switch Hazard Switch
Instrument Cluster, ETACM, Vehicle Speed Sensor, DRL Control ModuleAirbag Airbag Indicator -
Blower & A/C, ETACM, Defogger Relay
Seat Warmer
Sunroof, Rear Wiper & Washer, Cruise Switch, Rear Intermittent Wiper Relay
Start Relay, Theft-Alarm Relay
G200E01HP-EAT Inner Panel NOTE: Not all fuse panel descriptions in this manual may be applicable to your vehicle. It is accurate at the time of printing. When you inspect the fuse box on your vehicle, refer to the fuse box label. G200D01HP