2006 Hyundai Terracan ECO mode
[x] Cancel search: ECO modePage 173 of 539
2 DRIVING YOUR HYUNDAI
18
!
When driving on a snow-covered road or a slippery, muddy surface,make sure that you keep a suffi- cient distance between your ve- hicle and the one ahead of you.
(6) Since the driving torque is always applied to the 4 wheels, the perfor-mance of the full-time 4WD vehicleis greatly affected by the condition of the tires. Be sure to equip it with all four tires of the same size andtype.
o When replacement of any of the
tires or disc wheels is neces-sary, replace all of them.
o Rotate the tires and check the
tire pressure at regular inter-vals. (7)The full-time 4WD vehicle can-
not be towed by an ordinary towtruck. Make sure that the vehicle is towed with its four wheels raised off the ground.
o If the vehicle is towed with its only two wheels raised off theground, the 4WD system could be damaged.
o In unavoidable case, if the ve-
hicle is being towed with all fourwheels on the ground, it should be towed only forward directionwith rope.
WARNING:
Your vehicle is equipped with tiresdesigned to provide for safe rideand handling capability. Do not use a size and type of tire and wheel that is different from theone that was originally installed on your vehicle. It can affect the safety and performance of your vehicle,which could lead to handling fail-ure or rollover and serious injury. When replacing the tires, be sure to equip all four tires with the tire andwheel of the same size, type, tread, brand and load-carrying capacity. If you nevertheless decide to equipyour vehicle with any tire/wheel combination not recommended by Hyundai for off-road driving, youshould not use these tires for high- way driving.
LOW
��
��
� AUTO
1. Stop the vehicle.
2. Depress the clutch pedal (Manual Transmission) or put the shift lever into "N (neutral)" position (Automatic Transmission).
3. Turn the transfer shift knob to
"AUTO" mode.
Driving 4WD Safely
(1) Be sure to wear the seat belt.
(2) Drive at lower speeds in strong crosswinds. Because of yourvehicle's high center of gravity, its stability will be affected in cross- winds. Slower speeds ensure bet-ter vehicle control.
(3) Check the brake condition after
driving in wet or muddy conditions.Press the brake several times as you move slowly until you feel nor- mal braking forces return.
(4) Do not drive the vehicle through water. (i.e. streams, rivers, lakes,etc.)
(5) The stopping distance of the full- time 4WD vehicle differs very littlefrom that of the 2WD vehicle.
Page 175 of 539

2 DRIVING YOUR HYUNDAI
20
Water can wash the grease from wheel bearings, causing rusting and prema-ture failure, and may also enter the axles, transmission and transfer case, reducing the gear oil's lubricating quali-ties.
!
CAUTION:
o While the full-time 4WD vehicle is being raised on a jack, never start the engine or cause the tires to rotate. There is the danger that rotatingtires touching the ground could cause the vehicle to go off the jack and to jump forward.
o If one of the front or rear wheels begins to spin in mud, snow,etc., the vehicle can sometimesbe driven out by depressing the accelerator pedal further; how- ever, avoid running the enginecontinuously at high rpm be- cause doing so could damage the 4WD system.
Driving in Water Select the LOW mode and drive through slowly. The maximum advisable wading depthis approximately 40cm (15.7 in.). Before driving through water, such as when crossing shallow streams, firstcheck the depth of the water and the bottom of the river bed for firmness. Drive slowly at the speed of 5 km/h(3mph) and avoid deep water. Take all necessary safety measures to ensure that water damage to the en-gine or other vehicle parts does not occur. Water entering the engine air intakewill cause severe engine damage.
D090E01HP
40cm
Driving on sandy or muddy roads Select the LOW and then gradually depress the accelerator pedal for asmooth start. Keep the pressure on the accelerator pedal constant as pos- sible, and drive at low speed. Climbing sharp grades Select the LOW to maximize use the engine torque. Descending sharp grades Select the LOW, use the engine brake and descend slowly.
Page 178 of 539
2
DRIVING YOUR HYUNDAI
23
o Don't coast down hills with the car out of gear. This is extremely haz- ardous. Keep the car in gear at all times, use the brakes to slow down, then shift to a lower gear so thatengine braking will help you main- tain a safe speed.
o Don't "ride" the brake pedal. Rest- ing your foot on the brake pedalwhile driving can be dangerous be- cause it can result in the brakesoverheating and losing their effec- tiveness. It also increases the wear of thebrake components.
o If a tire goes flat while you are
driving, apply the brakes gently andkeep the car pointed straight ahead while you slow down. When you are moving slowly enough for it to besafe to do so, pull off the road and stop in a safe place.
o If your car is equipped with an auto- matic transmission, don't let yourcar creep forward. To avoid creep- ing forward, keep your foot firmly onthe brake pedal when the car is stopped.
o Use caution when parking on a hill. Engage the parking brake and place the gear selector lever in "P" (auto- matic transmission) or in first orreverse gear (manual transmission). If your car is facing downhill, turn the front wheels into the curb to helpkeep the car from rolling. If your car is facing uphill, turn the front wheels away from the curb to help keep thecar from rolling. If there is no curb or if it is required by other conditions to keep the car from rolling, block thewheels.
o Under some conditions your park-
ing brake can freeze in the engagedposition. This is most likely to hap- pen when there is an accumulation of snow or ice around or near therear brakes or if the brakes are wet. If there is a risk that the parking brake may freeze, apply it only tem-porarily while you put the gear se- lector lever in "P" (automatic) or in first or reverse gear (manual trans-mission) and block the rear wheels so the car cannot roll. Then release the parking brake.
o Do not hold the vehicle on the up- grade with the accelerator pedal.This can cause the transmission tooverheat. Always use the brake pedal or parking brake.DRIVING FOR ECONOMY
C140A02A-AAT You can save fuel and get more miles from your car if you follow these sug- gestions:
o Drive smoothly. Accelerate at a moderate rate. Don't make "jack- rabbit" starts or full-throttle shiftsand maintain a steady cruising speed. Don't race between stop- lights. Try to adjust your speed tothat of the other traffic so you don't have to change speeds unneces- sarily. Avoid heavy traffic wheneverpossible. Always maintain a safe distance from other vehicles so you can avoid unnecessary braking. Thisalso reduces brake wear.
o Drive at a moderate speed. The
faster you drive, the more fuel yourcar uses. Driving at a moderate speed, especially on the highway, is one of the most effective ways toreduce fuel consumption.
Page 312 of 539
1CONTROLS AND EQUIPMENT
4 RUNNING IN YOUR NEW HYUNDAI
B020A02FC-EAT PETROL ENGINE The longevity and performance of the vehicle are greatly affected by the careexercised during the first 1000 miles of motoring. Because of modern manu- facturing techniques, rigid guidelinesregarding maximum road speeds have become unnecessary. However, cer- tain precautions should be observed inorder to obtain the best possible per- formance and useful life from the ve- hicle.
1) Do not race the engine without a
load (i.e revving the engine in neu- tral).
2) During the first 500 miles the maxi-
mum engine speed should be re-stricted to 3000 rpm and gradually increased thereafter.
3) Avoid prolonged constant speed operation. The internal componentsof the engine will become more quickly run in if the operation speedis varied during the running in pe- riod. 4) Never allow the engine to labour. Use
the gearbox freely and avoid large throttle openings when the engine speed is below 1500 rpm.
5) Avoid rapid acceleration and maxi- mum throttle openings.
6) Avoid harsh braking during the first
100 miles of urban motoring or 1000 miles of motorway driving to allow the friction facings of the brake pads and shoes to bed against the discsand drums properly.
7) No trailer/caravan towing should be
undertaken during the 1000 mile run-ning-in period. 1) Do not race the engine without a load
(i.e revving the engine in neutral).
2) During the first 600 miles the maxi- mum engine speed should be re-stricted to 3000 rpm and graduallyincreased thereafter. And while driv- ing, keep under three quarters of maximum vehicle speed.
3) Avoid prolonged constant speed operation. The internal componentsof the engine will become morequickly run in if the operation speed is varied during the running in pe- riod.
4) Never allow the engine to labour. Use the gearbox freely and avoidlarge throttle openings when theengine speed is below 1500 rpm.
5) Avoid rapid acceleration and maxi-
mum throttle openings.
6) Avoid harsh braking during the first 100 miles of urban motoring or 1000miles of motorway driving to allowthe friction facings of the brake pads and shoes to bed against the discs and drums properly.
7) No trailer/caravan towing should be undertaken during the 1000 mile run-ning-in period.
B020B02FC-EAT DIESEL ENGINE The longevity and performance of the vehicle are greatly affected by the care exercised during the first 1000 miles of motoring. Because of modern manu-facturing techniques, rigid guidelines regarding maximum road speeds have become unnecessary. However, cer-tain precautions should be observed in order to obtain the best possible per- formance and useful life from the ve-hicle.
Page 317 of 539
1
CONTROLS AND EQUIPMENT
9
!WARNING:
o Before you drive away, be sure that all the doors are securely closed. It is also recommendedthat the child-protector rear door locks are in the 'lock' position so that children cannot open therear doors from inside the ve- hicle accidentally.
o Before opening the door, always look for and avoid oncoming traf- fic.
o In case of an accident, the door is unlocked automatically(Not allmodels).
DOOR LOCKS
B040A02Y-EAT B040B01A-EAT
Locking, Unlocking Front Doors With a Key
o The door can be locked or unlocked
with a key.
o Lock the door by turning the key
clockwise and unlock it by turning the key counterclockwise. B040C02Y-EAT Locking From the Outside The doors can be locked without a key. To lock the doors, first push the inside lock switch to the "LOCK" position so that the red mark on the switch is notvisible, then close the door. The door will not lock if the key is left in the ignition switch when the front doorsare closed. This is normal.
LOCK
UNLOCK
HHP2003-E
HHP2005-E
Page 319 of 539
1
CONTROLS AND EQUIPMENT
11
The child proof lock mechanism may be activated by opening the door andmoving the lever located by the door latch to the "
" locked position. Move
the lever to the "
" unlocked position
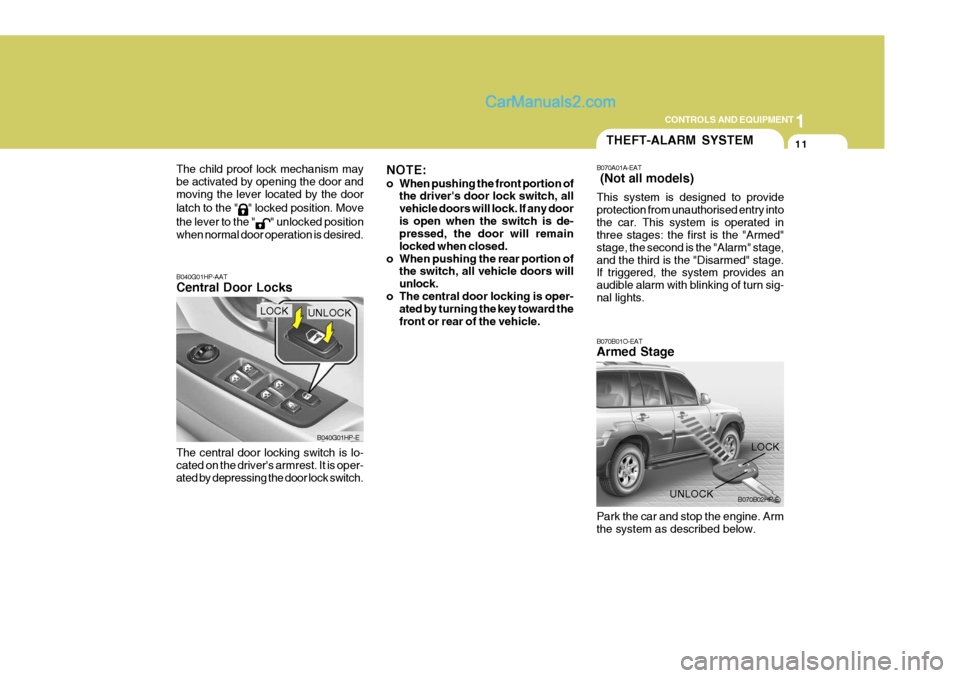
when normal door operation is desired. B040G01HP-AAT Central Door Locks The central door locking switch is lo- cated on the driver's armrest. It is oper- ated by depressing the door lock switch.
B040G01HP-E
LOCKUNLOCK NOTE:
o When pushing the front portion of
the driver's door lock switch, all vehicle doors will lock. If any dooris open when the switch is de- pressed, the door will remain locked when closed.
o When pushing the rear portion of the switch, all vehicle doors willunlock.
o The central door locking is oper- ated by turning the key toward thefront or rear of the vehicle.
THEFT-ALARM SYSTEM
B070A01A-EAT (Not all models) This system is designed to provide protection from unauthorised entry intothe car. This system is operated in three stages: the first is the "Armed" stage, the second is the "Alarm" stage,and the third is the "Disarmed" stage. If triggered, the system provides an audible alarm with blinking of turn sig-nal lights. B070B01O-EAT Armed Stage Park the car and stop the engine. Arm the system as described below.
LOCK
UNLOCK B070B02HP-E
Page 321 of 539
1
CONTROLS AND EQUIPMENT
13
!
NOTE: If any door,
tailgate door or engine
bonnet is not opened within 30 sec- onds, the system will be rearmedand all doors re-locked.
CAUTION:
Only the transmitter can disarm thearmed stage. If the transmitter doesnot disarm the system, it is neces- sary to take the following steps;
1. Unlock the door with the key, which will cause, the alarm to be acti- vated.
2. Insert the key in the ignition key cylinder and turn the ignition keyto "ON" position.
3. Wait for 30 seconds. After completion of the steps above, the system will be disarmed. B070F02A-EAT Keyless Entry System (Not all models) Locking doors
1. Close all doors.
2. Push the "LOCK" button on the trans-
mitter.
3. At the same time, all doors lock and the turn signal lights will blink once to indicate that the system is armed.
Unlocking doors
1. Push the "UNLOCK" button on the transmitter.
2. At the same time, all doors unlock and the turn signal lights will blink twice to indicate that the system isdisarmed.
NOTE: The transmitter will not work if any of following occur:
- The ignition key is in ignition switch.
- You exceed the operating distance limit (10 m). - The battery in the transmitter is
weak.
- Other vehicles or objects may be blocking the signal.
- The weather is extremely cold.
- The transmitter is close to a radio transmitter such as a radio stationor an airport which can interferewith normal operation of the trans- mitter.
When the transmitter does not work correctly, open and close the door with the ignition key. If you have a problem with the transmitter, con-tact an authorised Hyundai repairer. NOTE: Keep the transmitter away from wa- ter or any liquid. If the keyless entrysystem is inoperative due to expo- sure to water or liquids, it will not be covered by your manufacturer ve-hicle warranty.
Page 358 of 539
1CONTROLS AND EQUIPMENT
50
!
!
!
B260P02Y-EAT
ABS Service Reminder Indicator (SRI) (Not all models)
When the key is turned to the "ON" position, the Anti-Lock Brake System SRI will come on and then go off in a approximately seconds. If the ABS SRIremains on, comes on whilst driving, or does not come on when the key is turned to the "ON" position, this indi-cates that there may be a problem with the ABS. If this occurs, have your vehicle checked by your Hyundai authorisedrepairer as soon as possible. The nor- mal braking system will still be opera- tional, but without the assistance of theanti-lock brake system.
B260F01A-AAT High Beam Indicator Light B260G01A-EAT
Low Oil Pressure Warn- ing Light
CAUTION:
If the oil pressure warning light stays on whilst the engine is running, se- rious engine damage may result. The oil pressure warning light comeson whenever there is insufficient oil pressure. In normal operation, it should come on when the ignitionswitch is turned on, then go out when the engine is started. If the oil pressure warning light stayson whilst the engine is running, there is a serious malfunction. If this happens, stop the car as soonas it is safe to do so, turn off the engine and check the oil level. If the oil level is low, fill engine oil to theproper level and start the engine again. If the light stays on with the engine running, turn the engine offimmediately. In any instance where the oil light stays on when the engine is running, the engine should bechecked by a Hyundai authorised repairer before the car is driven again.
WARNING AND INDICATOR LIGHTS
B260D01A-AAT Turn Signal Indicator Lights
The blinking green arrows on the in- strument panel show the direction indi-cated by the turn signals. If the arrow comes on but does not blink, blinks more rapidly than normal, or does notilluminate at all, a malfunction in the turn signal system is indicated. Your Hyundai authorised repairer should beconsulted for repairs.
The high beam indicator light comes on whenever the headlights are switched to the high beam or flash position. WARNING:
If both ABS SRI and Parking Brake/ Low brake fluid level warning lights remain "ON" or come on whilst driv- ing, there may be a problem withE.B.D. (Electronic brake force distri- bution). If this occurs, avoid sudden stops and have your vehicle checkedby your Hyundai authorised repairer as soon as possible.