Page 65 of 320

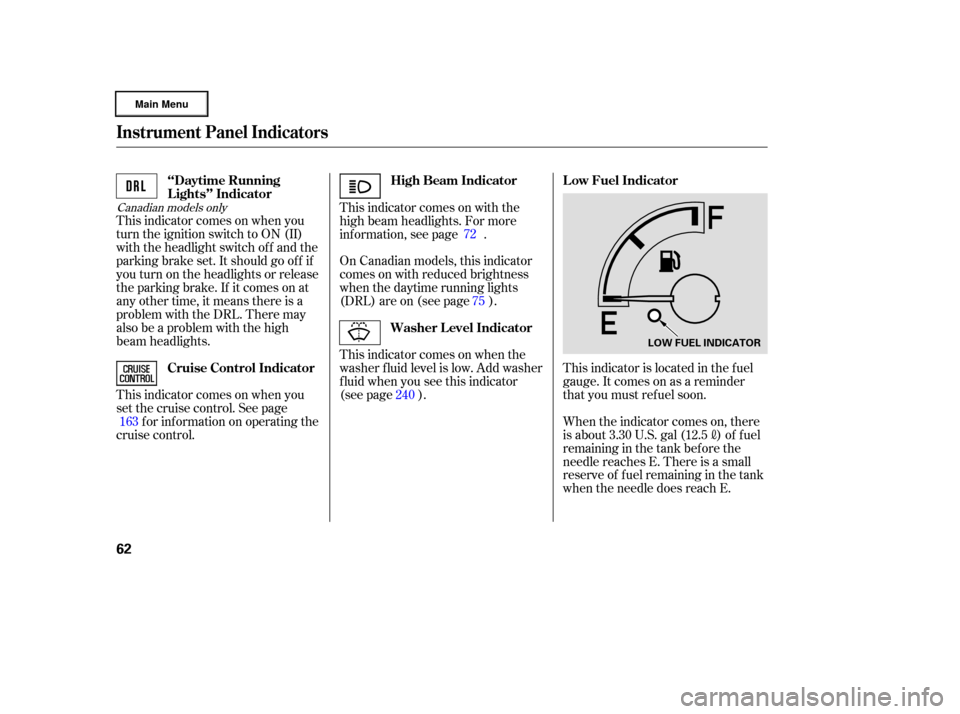
This indicator comes on when you
turn the ignition switch to ON (II)
with the headlight switch off and the
parking brake set. It should go of f if
youturnontheheadlightsorrelease
the parking brake. If it comes on at
any other time, it means there is a
problem with the DRL. There may
also be a problem with the high
beam headlights.
This indicator comes on when you
set the cruise control. See pagef or inf ormation on operating the
cruise control. This indicator comes on with the
high beam headlights. For more
inf ormation, see page .
This indicator is located in the f uel
gauge. It comes on as a reminder
that you must ref uel soon.
On Canadian models, this indicator
comes on with reduced brightness
when the daytime running lights
(DRL) are on (see page ).
This indicator comes on when the
washer f luid level is low. Add washer
f luid when you see this indicator
(see page ).
When the indicator comes on, there
is about 3.30 U.S. gal (12.5
)of fuel
remaining in the tank bef ore the
needle reaches E. There is a small
reserve of f uel remaining in the tank
when the needle does reach E.
163 72
75
240
Canadian models only
‘‘Daytime Running
Lights’’ Indicator
Cruise Control Indicator High Beam Indicator L ow Fuel Indicator
Washer Level Indicator
Instrument Panel Indicators
62
LOW FUEL INDICATOR
�����—�
���—�����y�
�������������y���
�(�����������y���������y
Page 76 of 320

�µ�µ
OFF
Parking and indicator lights
Headlights
Push down on the
multi-control lever to signal a lef t
turn and up to signal a right turn. To
signal a lane change, push lightly on
the lever and hold it. The lever will
return to center when you release it
or complete a turn.
To turn on the high
beams, push the multi-control lever
f orward until you hear a click. The
blue high beam indicator will come
on (see page ). Pull the lever back
to return to the low beams.
To f lash the high beams, pull the
lever back lightly, then release it.
The high beams will stay on as long
as you hold the lever back.
Your vehicle has heating wires at the
bottom of the windshield to help
heat the wiper blades and the
windshield. If the outside
temperature is near f reezing, the
heater turns on automatically when
you turn the ignition switch to ON
(II). The heater turns of f
automatically when the outside
temperature is above f reezing.
This f unction helps to increase wiper
perf ormance when the wiper arms
sit in the parked position in snowy or
icy conditions.
1.
2.
3.
62
CONT INUED
Multi-Control L ever, Headlights
Headlight Control Dial
Turn Signal
High BeamsAutomatic Heated Wiper Zone
Inst rument s and Cont rols
73
�����—�
���—�����y�
�������������y���
�(�����������y���������y
Page 77 of 320

�µIf you remove the key f rom the
ignition switch with the headlight
control dial on, but do not open the
door, the lights will turn of f af ter 10
minutes.
The lights will turn on again when
you unlock or open the driver’s door.
If you unlock the door, but do not
open it within 30 seconds, the lights
will go of f . With the driver’s door
open, you will hear a lights-on
reminder chime.
Turning the dial to
the ‘‘ ’’ position turns on the
parking lights, taillights, instrument
panel lights, and license plate lights.
Turning the dial to the ‘‘ ’’
position turns on the headlights. If
you leave the lights on and remove
the key from the ignition switch, you
will hear a reminder chime when you
open the driver’s door.
When the dial is in the ‘‘ ’’ or
‘‘ ’’ position, the lights on
indicator comes on as a reminder.
This indicator stays on if you leave
the lights on and turn the ignition
switch to ACCESSORY (I) or LOCK
(0). This f eature turns of f the headlights,
parking lights, taillights, and license
plate lights within 30 seconds of
removing the key from the ignition
switch and closing the driver’s door.
This feature activates if you leave
the headlight control dial in the
‘‘ ’’ or ‘‘ ’’ position, remove
the key, then open and close the
driver’s door.
Headlights
Automatic Lighting Of f Feature
Headlights
74
�����—�
���—�����y�
�������������y���
�(�����������y���������y
Page 78 of 320

If you do not insert the key in the
ignition switch af ter opening the
driver’s door, the illumination turns
of f about 30 seconds af ter you close
the door.
If you insert the key but do not turn
the ignition switch to ON (II), the
illumination turns of f in about 10
seconds.
The instrument panel brightness is
dimmedwhenyouturntheheadlight
controldialto‘‘ ’’or
‘‘ ’’ position to reduce glare at
night. To cancel it, turn the
instrument panel brightness control
dial upward f ully until you hear a
click.
The instrument panel will illuminate
with reduced brightness when you
unlock and open the driver’s door.
The brightness will increase slightly
when you insert the key in the
ignitionswitch,thengotonormal brightness when you turn the
ignition switch to ON (II).
The dial on the instrument panel
controls the brightness of the
instrument panel lights and the
console compartment light. Turn the
dial to adjust the brightness.
With the headlight control dial of f ,
the high beam headlights and the
high beam indicator come on with
reduced brightness when you turn
the ignition switch to ON (II) and
release the parking brake. They
remain on until you turn the ignition
switch of f , even if you set the
parking brake.
The headlights revert to normal
operation when you turn them on
with the headlight control dial.
Canadian models only
Instrument Panel Brightness
Daytime Running L ights
Headlights, Instrument Panel Brightness
Inst rument s and Cont rols
75
INSTRUMENT PANEL
BRIGHTNESS CONTROL DIAL
�����—�
���—�����y�
�������������y���
�(�����������y���������y
Page 110 of 320
Keeptheinsideandoutsidemirrors
clean and adjusted f or best visibility.
Be sure to adjust the mirrors bef ore
you start driving.
The inside mirror has day and night
positions. The night position reduces
glare f rom headlights behind you.
Flip the tab on the bottom edge of
the mirror to select the day or night
position.Therearviewmirrorhasacompass
function to indicate the vehicle’s
direction.
Refer to on page .
166
If equippedMirrors
Compass
Parking Brake, Mirrors
Inst rument s and Cont rols
107
TABDriving the vehicle with the parking
brake applied can damage the rear
brakes and axles. A beeper will sound
if the vehicle is driven with the parking
brake on.
�����—�
���—�����y�
�������������y���
�(�����������y���
�
���y
Page 165 of 320

The security system automatically
sets 15 seconds after you lock the
doors, hood, and the In-Bed Trunk.
For the system to activate, you must
lock the doors f rom the outside with
the key, driver’s lock tab, door lock
switch, or remote transmitter. The
security system indicator above the
driver’s door lock tab starts blinking
immediately to show you the system
is setting itself .Once the security system is set,
opening any door (without using the
key or the remote transmitter), the
hood, or the In-Bed Trunk, will cause
it to alarm. It also alarms if the radio
and navigation components are
removed f rom the dashboard or the
wiring is cut.
The security system helps to protect
your vehicle and valuables f rom thef t.
The horn sounds and a combination
of headlights, parking lights, license
plate lights, and taillights f lash if
someone attempts to break into your
vehicleorremovetheradio.This
alarm continues f or 2 minutes, then
the system resets. To reset an
alarming system before the 2
minutes have elapsed, unlock the
driver’s door with the key or the
remote transmitter.
The security system will not set if
the hood, In-Bed Trunk, or any door
is not f ully closed. If the system will
not set, check the door and tailgate
open monitor and In-Bed Trunk open
indicator on the instrument panel
(see pages and ) to see if the
doors and In-Bed Trunk are f ully
closed. Since it is not part of the
monitor display, manually check the
hood.
Use the remote transmitter
to quickly check that the hood,
In-Bed Trunk, and all doors are
closed. Push the lock button twice
within 5 seconds. There should be an
audible conf irmation beep.
Do not attempt to alter this system
or add other devices to it. 61 66
If equipped
Security System
162
NOTE:
SECURITY SYSTEM INDICATOR
�����—�
���—�����y�
�����������
�y���
�(�����������y���
�����y
Page 234 of 320
�µ�µ�µ
�µ
�µ �µ
Youshouldcheckthefollowing
items at the specif ied intervals. If
you are unsure of how to perf orm
any check, turn to the appropriate
page listed.
Engine oil level Check every
time you fill the fuel tank. See
page .
Engine coolant level Check the
radiator reserve tank every time
you f ill the f uel tank. See page .
Automatic transmission Check
the f luid level monthly. See page .
Brakes Check the f luid level
monthly. See page .
Tires Check the tire pressure
monthly. Examine the tread f or
wear and foreign objects. See page . Lights Check the operation of
the headlights, parking lights,
taillights, high-mount brake light,
and license plate lights monthly.
See page .
256 245
178 178
241 243
CONT INUED
Maintenance Minder
Owner’s Maintenance Checks
Maint enance
231
�����—�
���—�����y�
���������
���y���
�(�����������y���������y
Page 248 of 320

CONT INUED
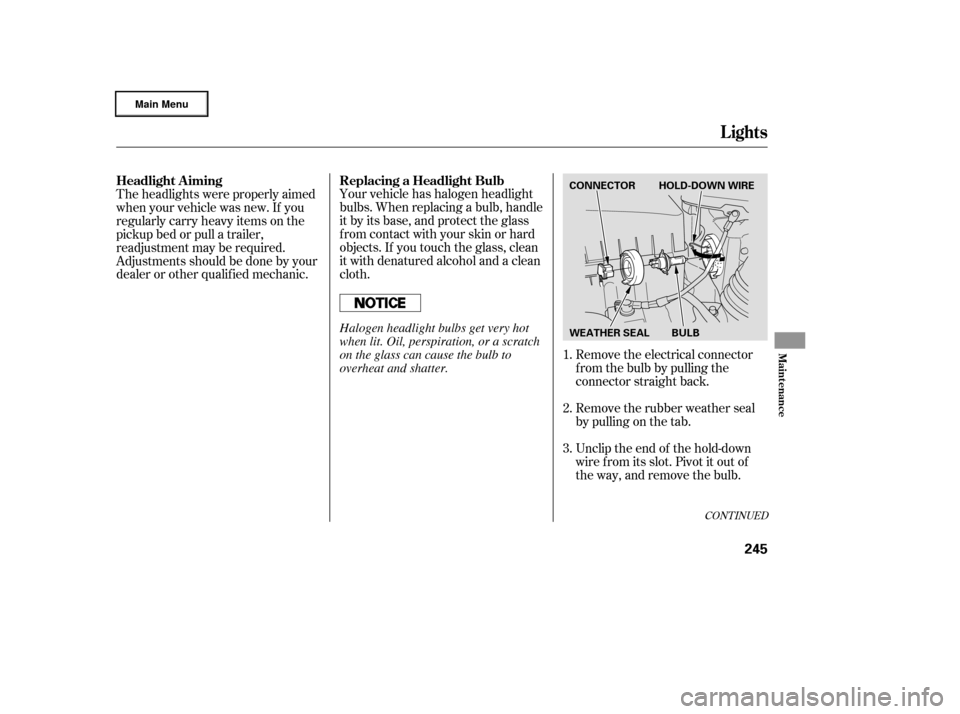
Your vehicle has halogen headlight
bulbs. When replacing a bulb, handle
it by its base, and protect the glass
f rom contact with your skin or hard
objects. If you touch the glass, clean
it with denatured alcohol and a clean
cloth.Remove the electrical connector
f rom the bulb by pulling the
connector straight back.
Remove the rubber weather seal
by pulling on the tab.
Unclip the end of the hold-down
wire f rom its slot. Pivot it out of
the way, and remove the bulb.
Theheadlightswereproperlyaimed
when your vehicle was new. If you
regularly carry heavy items on the
pickup bed or pull a trailer,
readjustment may be required.
Adjustmentsshouldbedonebyyour
dealer or other qualif ied mechanic.
1.
2.
3.
Headlight A iming Replacing a Headlight Bulb
Lights
Maint enance
245
WEATHER SEAL CONNECTOR HOLD-DOWN WIRE
BULBHalogen headlight bulbs get very hot
when lit. Oil, perspiration, or a scratch
on the glass can cause the bulb to
overheat and shatter.
�����—�
���—�����y�
�������������y���
�(�����������y���������y