Page 200 of 320

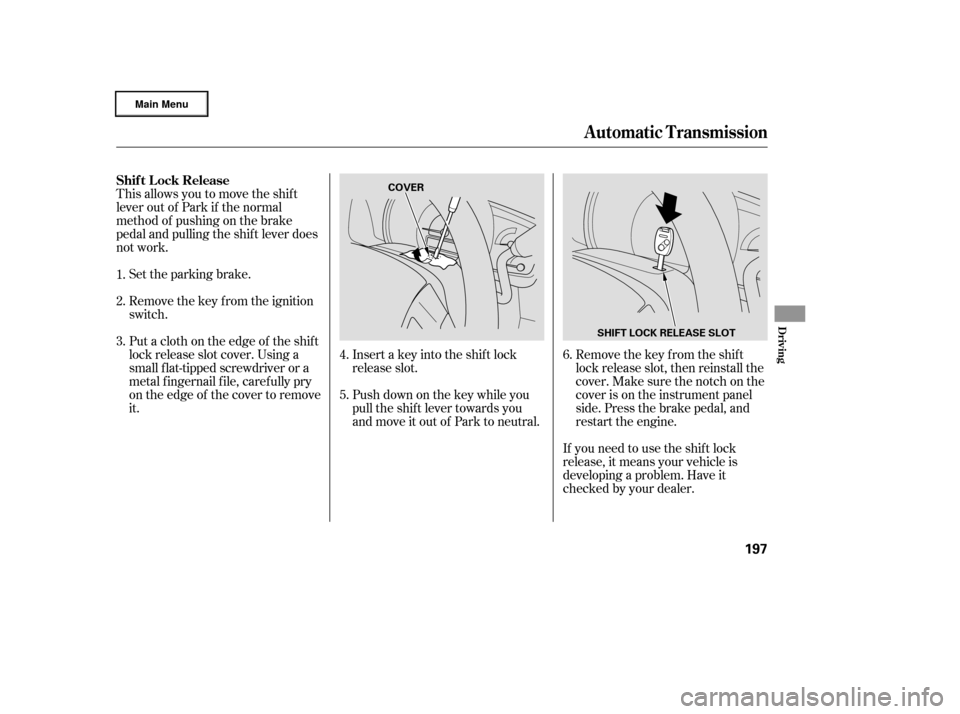
This allows you to move the shif t
lever out of Park if the normal
method of pushing on the brake
pedal and pulling the shif t lever does
not work.Push down on the key while you
pull the shif t lever towards you
and move it out of Park to neutral.Remove the key from the shift
lock release slot, then reinstall the
cover. Make sure the notch on the
cover is on the instrument panel
side. Press the brake pedal, and
restart the engine.
Set the parking brake.
Remove the key from the ignition
switch.
Put a cloth on the edge of the shif t
lock release slot cover. Using a
small f lat-tipped screwdriver or a
metal f ingernail f ile, caref ully pry
on the edge of the cover to remove
it.
Insert a key into the shift lock
release slot.
If you need to use the shif t lock
release, it means your vehicle is
developing a problem. Have it
checked by your dealer. 6.
1.
2.
3.
4.
5.
Automatic Transmission
Shif t L ock Release
Driving
197
SHIFT LOCK RELEASE SLOT
COVER
�����—�
���—�����y�
���������
���y���
�(�����������y���������y
Page 202 of 320

If the tire is f lat, or if the tire
pressure is too low to continue
driving, replace the tire with the
compact spare tire. If you think you can saf ely drive a
short distance to a service station,
proceed slowly, and inf late the tire to
the recommended pressure shown
on the driver’s doorjamb. When this indicator is on, one or
more of your tires is signif icantly
under inf lated. You should stop and
check your tires as soon as possible.
The VTM-4 Lock will temporarily
disengage when the vehicle speed
exceeds 18 mph (30 km/h). The
indicator in the button will remain on.
do
any of the f ollowing: Press the VTM-4 LOCK button. Each tire has its own pressure
sensor. If the air pressure of a tire
becomes signif icantly low, the
sensor in that tire immediately sends
a signal that causes the low tire
pressure indicator and the
appropriate tire on the tire pressure
monitor to come on. Your vehicle is equipped with a tire
pressure monitoring system (TPMS)
that turns on every time you start the
engine and monitors the pressure in
your tires while driving.
Move the shift lever to D.
Turn the ignition switch to the
LOCK (0) position.
CONT INUED
Low Tire Pressure
Indicator
To Disengage the VTM-4 L ock, Tire Pressure Monitoring System
(T PMS)
VTM-
4System, Tire Pressure Monitoring System (TPMS)
Driving
199
Do not continuously spin the f ront tires
of your vehicle. Continuously spinning
the f ront tires can cause transmission
or rear dif f erential damage.
�����—�����—�����y�
����
��������y���
�(�����������y���������y
Page 208 of 320

CONT INUED
The vehicle stability assist (VSA)
system helps to stabilize the vehicle
during cornering if the vehicle turns
more or less than desired. It also
assists you in maintaining traction
while accelerating on loose or
slippery road surf aces. It does this
by regulating the engine’s output and
by selectively applying the brakes.
The VSA system cannot enhance the
vehicle’s driving stability in all
situations and does not control your
vehicle’s entire braking system. It is
still your responsibility to drive and
corner at reasonable speeds and to
leave a sufficient margin of safety. When VSA activates, you may notice
that the engine does not respond to
the accelerator in the same way it
does at other times. There may also
be some unusual noise f rom the
modulator. You will also see the VSA
activation indicator blink.This indicator has three f unctions:
Itcomesonasareminderthatyou
have turned off the vehicle
stability assist (VSA) system.
It flashes when VSA is active.
It comes on along with the VSA
system indicator if there is a
problem with the VSA system.
This indicator normally comes on f or
a f ew seconds when you turn the
ignition switch to ON (II). This indicator normally comes on f or
a f ew seconds when you turn the
ignition switch to ON (II).
If itcomesonandstaysonatany
other time, or if it does not come on
when you turn the ignition switch to
ON (II), there is a problem with the
VSA system. Take your vehicle to a
dealer to have it checked. Without
VSA, your vehicle still has normal
driving ability, but will not have VSA
traction and stability enhancement.
1.
2.
3. VSA A ctivation Indicator Vehicle Stability A ssist
(VSA ) System Indicator
Vehicle Stability Assist (VSA) System
Driving
205
�����—�
���—�����y�
�������������y���
�(�����������y�����
���y
Page 228 of 320

�µ
�µ
�µ
�µ
�µ
�µ
�µ
�µ
�µ
�µ �µ
�µ
CONT INUED
Calculated Engine Oil Lif e (%)
100 % 91 % 90 % 81 %
80 % 71 %
70 % 61 %
60 % 51 %
50 % 41 %
40 % 31 %
30 % 21 %
20 % 16 %
15 % 11 %10 % 6 % 5% 1% 0% Displayed
Engine Oil Lif e (%) 100 %90 %
80 %
70 %
60 %
50 %
40 %
30 %
20 %
15 %
10 %5%
0%
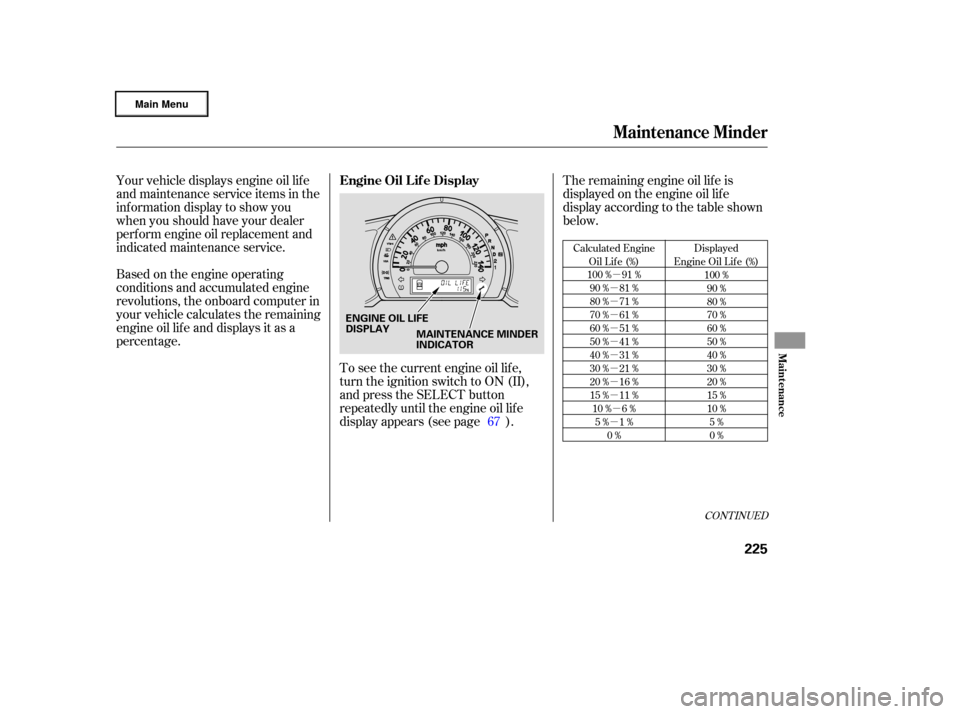
Your vehicle displays engine oil lif e
and maintenance service items in the
inf ormation display to show you
when you should have your dealer
perf orm engine oil replacement and
indicated maintenance service. The remaining engine oil lif e is
displayed on the engine oil lif e
display according to the table shown
below.
Based on the engine operating
conditions and accumulated engine
revolutions, the onboard computer in
your vehicle calculates the remaining
engine oil lif e and displays it as a
percentage. To see the current engine oil lif e,
turn the ignition switch to ON (II),
and press the SELECT button
repeatedly until the engine oil lif e
display appears (see page ).67
Maintenance Minder
Engine Oil L if e Display
Maint enance
225
MAINTENANCE MINDER
INDICATOR
ENGINE OIL LIFE
DISPLAY
�����—�
���—�����y�
�������������y���
�(�����������y���������y
Page 229 of 320
The maintenance item code(s)
indicate the main and sub items
required at the time of the oil change
(see page ).
If the engine oil lif e is 15 percent or
less, you will see ‘‘SERVICE dUE
SOON’’ message in the inf ormation
display every time you turn the
ignition switch to ON (II). The
maintenance minder indicator will
also come on, and the maintenance
item code(s) f or other scheduled
maintenance items needing service
will be displayed below the message. When the remaining engine oil lif e is
less than 5 percent, you will see a
‘‘SERVICE dUE NOW’’ message
along with the same maintenance
item code(s), every time you turn the
ignition switch to ON (II).
The message changes between
SERVICE and dUE NOW repeatedly.
The message changes between
SERVICE and dUE SOON
repeatedly.
232
Maintenance Minder
226
MAINTENANCE ITEM CODES MAINTENANCE MAIN ITEM
MAINTENANCE SUB ITEMS MAINTENANCE ITEM CODES
MESSAGE
MESSAGE
�����—�����—�����y�
�������������y���
�(�����������y�������
�y
Page 230 of 320
When you see this message, have
the indicated maintenance
perf ormed by your dealer as soon as
possible.
When the remaining engine oil lif e is
0 percent, you will see ‘‘SERVICE
PAST dUE’’ message every time you
turn the ignition switch to ON (II).
The message changes between
SERVICE and PAST dUE repeatedly. If you still do not perf orm the
indicated maintenance, you will see a
negative mileage, f or example ‘‘34
MI’’ with the message ‘‘PAST dUE.’’
This negative mileage means that
youshouldhaveperformedthe
indicated maintenance 34 miles ago.
Immediately have the indicated
maintenance perf ormed, and make
sure to reset the display as described
on page .
228
CONT INUED
Maintenance Minder
Maint enance
227
NEGATIVE MILEAGE
�����—�����—�����y�
���������
���y���
�(�����������y���������y
Page 231 of 320
You can change the display to the
engine oil lif e display, or the
odometer and trip meter by pushing
the SELECT button on the
instrument panel.All maintenance items displayed in
the trip meter are in code. For an
explanation of these maintenance
codes, see page .Your dealer will reset the display
af ter completing the required
maintenance service. You will see
‘‘OIL LIFE 100 %’’ on the inf ormation
display the next time you turn the
ignition switch to ON (II).
If maintenance service is done by
someone other than your dealer,
reset the maintenance minder as
f ollows:
Turn the ignition switch to ON (II).
Press the SELECT button
repeatedly until the engine oil lif e
display or the service message is
displayed.
1.
2.
232
Maintenance Main Items and Sub
Items
Resetting the Engine Oil Lif e
Display
Maintenance Minder
228
MAINTENANCE MAIN ITEM
MAINTENANCE SUB ITEMS
�����—�
���—�����y�
�������������y���
�(�����������y���������y
Page 256 of 320
Check the condition of the wiper
blades at least every 6 months.
Replace them if you f ind signs of
cracking in the rubber, and areas
that are getting hard, or if they leave
streaks and unwiped areas when
used.
To replace a wiper blade:To raise the wiper arm, turn the
ignition switch to ON (II) and
activate the wipers (see page ).
When the wipers are in the
upright position, turn the ignition
switchoff tostopthewipersin
that position. Raise the wiper arm of f the
windshield.
Disconnect the blade assembly
fromthewiperarmbypushingin
the lock tab. Hold the lock tab in
while you push the blade assembly
toward the base of the arm.
1.
2. 3.
72
CONT INUED
Wiper Blades
Maint enance
253
LOCK TAB
WIPER ARMS
Do not open the hood when the wiper
arms are raised, or you will damage the
hood and the wiper arms.
�����—�
���—�����y�
�������������y���
�(�����������y���������y