�Ú
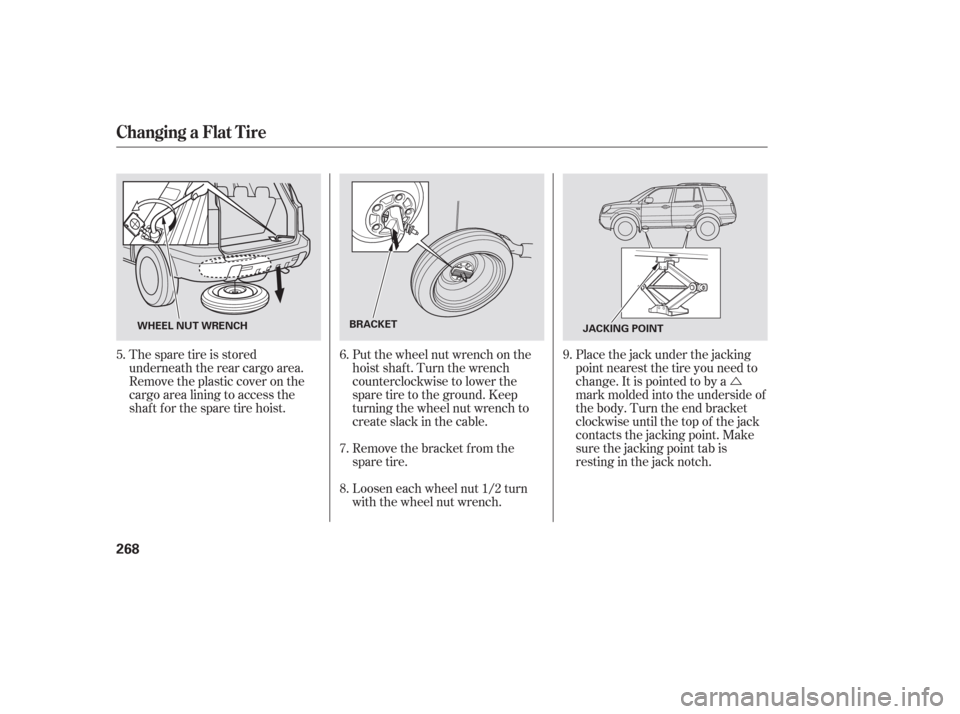
The spare tire is stored
underneath the rear cargo area.
Remove the plastic cover on the
cargo area lining to access the
shaft for the spare tire hoist. Put the wheel nut wrench on the
hoist shaf t. Turn the wrench
counterclockwise to lower the
spare tire to the ground. Keep
turning the wheel nut wrench to
create slack in the cable.
Remove the bracket from the
spare tire.Placethejackunderthejacking
point nearest the tire you need to
change. It is pointed to by a
mark molded into the underside of
the body. Turn the end bracket
clockwise until the top of the jack
contacts the jacking point. Make
sure the jacking point tab is
restinginthejacknotch.
Loosen each wheel nut 1/2 turn
with the wheel nut wrench.
8. 7. 6.
5. 9.
Changing a Flat Tire
268
BRACKET
JACKING POINT
WHEEL NUT WRENCH
........................................
Headlights .75
........................................
Aiming .248
..............
Automatic Lighting Off . 76
............
Daytime Running Lights . 76
..................
High Beam Indicator . 67
...........
High Beams, Turning on . 75
............
Low Beams, Turning on . 75
.........................
Reminder Chime .76
........
Replacing Halogen Bulbs . 248
...................................
Turning on .75
...................................
Headphones .172
..............................
Head Restraints .91
.................................
Heated Mirror .93
.....................................
Heater, Seat .86
.....................
Heating and Cooling .106
.............
High Altitude, Starting at . 199
.................
High-Low Beam Switch . 75
..............
High-mount Brake Light . 253
HomeLink Universal ................................
Transceiver .180
.......................
Hood, Opening the .188
...
Identif ication Number, Vehicle . 286Ignition
..............................................
Keys .79
...........................................
Switch .81
............
Timing Control System . 294
........................
Immobilizer System .79
...
Important Handling Inf ormation . iii
.........
Important Safety Precautions . 8
.........
Indicators, Instrument Panel . 61
...............................
Inf ant Restraint .43
......................................
Inf ant Seats .43
...................
Inf lation, Proper Tire . 257
...................................
Inside Mirror .92
.............................
Inspection, Tire .258
Installing a Child Seat .........................................
LATCH .47
..........
Tether Anchorage Points . 51
........................
Instrument Panel .5 ,61
........
Instrument Panel Brightness . 76
........................................
Introduction .i
.................
Jacking up the Vehicle . 268
.......................................
Jack, Tire .267
................................
Jump Starting .272 ..................................................
Keys .79
.......................
Label, Certif ication .286
.................
Lane Change, Signaling . 75
........................
Lap/Shoulder Belts .22
...........
LATCH Anchorage System . 47
.......................................
Lights .75, 102
....................
Bulb Replacement .248
.......................................
Indicator .61
.........................................
Parking .75
..................................
Turn Signal .75
....................................
Load Limits .194
......
LOCK (Ignition Key Position) . 81
Locks .......
Anti-thef t Steering Column . 81
............................
Fuel Fill Door .187
....................................
Glove Box .99
....................
Lockout Prevention . 82
.................................
Power Door .82
........................
Low Coolant Level .189
.........................
Low Fuel Indicator .67
...
Low Oil Pressure Indicator . 62,276
Index
I JK
L
IV