Page 265 of 316

Fill the f uel tank.
Change the engine oil and f ilter.Block the rear wheels.
If the vehicle is to be stored f or a
longer period, it should be
supported on jackstands so the
tires are of f the ground.
Wash and dry the exterior
completely.
Cleantheinterior.Makesurethe
carpeting, floor mats, etc., are
completely dry.
If you need to park your vehicle f or
an extended period (more than 1
month), there are several things you
should do to prepare it f or storage.
Proper preparation helps prevent
deterioration and makes it easier to
get your vehicle back on the road. If
possible, store your vehicle indoors. Leave one window open slightly (if
the vehicle is being stored
indoors).Cover the vehicle with a
‘‘breathable’’ cover, one made
f rom a porous material such as
cotton. Non-porous materials, such
as plastic sheeting, trap moisture,
which can damage the paint.
Support the f ront wiper blade
arms with a f olded towel or rag so
they do not touch the windshield. Disconnect the battery.
Leave the parking brake off. Put
the transmission in Park. To minimize sticking, apply a
silicone spray lubricant to all door
and tailgate seals. Also, apply a
vehiclebodywaxtothepainted
surfaces that mate with the door
and tailgate seals.If possible periodically run the
engine until it reaches normal
operating temperature (the
cooling f ans cycle twice).
Pref erably, do this once a month.
Vehicle Storage
Maint enance
263
Page 268 of 316

Use the compact spare tire as a
temporary replacement only. Get
your regular tire repaired or replaced,
and put it back on your vehicle as
soon as you can.
Check the inf lation pressure of the
compact spare tire every time you
check the other tires. It should be
inf lated to:Replace the tire when you can see
the tread wear indicator bars. The
replacement should be the same size
and design tire, mounted on the
same wheel. The spare tire is not
designed to be mounted on a regular
wheel, and the spare wheel is not
designed f or mounting a regular tire.
Follow these precautions:
Never exceed 50 mph (80 km/h).
This tire gives a harsher ride and
less traction on some road sur-
f aces. Use greater caution while
driving.
Do not mount snow chains on it.
Do not use the compact spare tire
if you are towing a trailer.
Do not use your compact spare
tire on another vehicle unless it is
thesamemakeandmodel.
Turn of f the VSA system (see
page ). Driving with the
compact spare tire may activate
the VSA system. 212
Compact Spare Tire
266
INDICATOR LOCATION MARK
TREAD WEAR INDICATOR BAR
60 psi (420 kPa , 4.2 kgf/cm)
Page 270 of 316
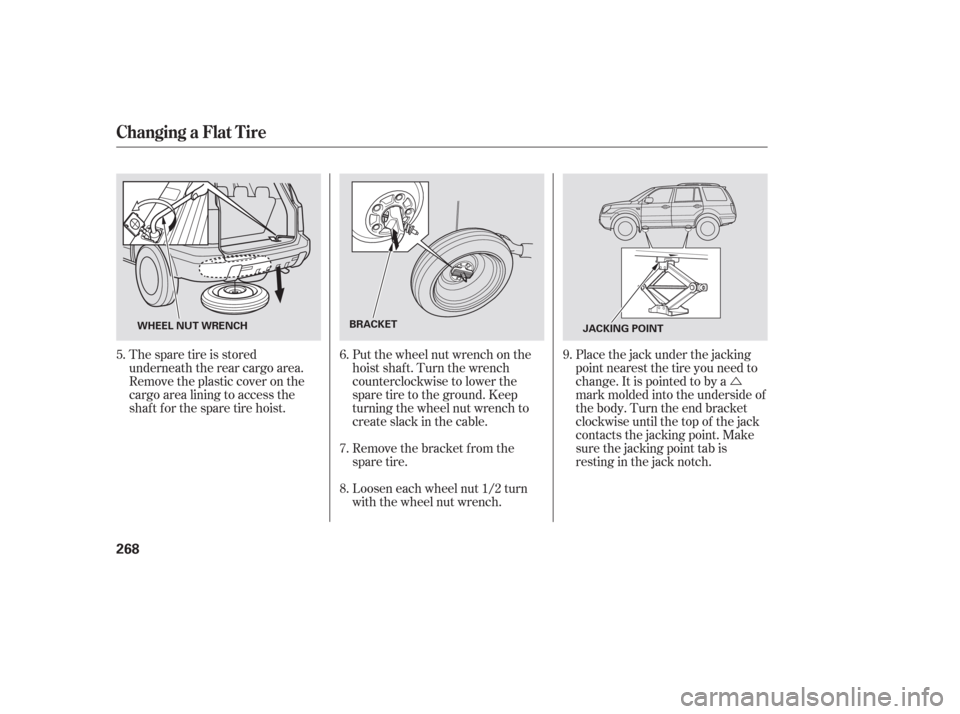
�Ú
The spare tire is stored
underneath the rear cargo area.
Remove the plastic cover on the
cargo area lining to access the
shaft for the spare tire hoist. Put the wheel nut wrench on the
hoist shaf t. Turn the wrench
counterclockwise to lower the
spare tire to the ground. Keep
turning the wheel nut wrench to
create slack in the cable.
Remove the bracket from the
spare tire.Placethejackunderthejacking
point nearest the tire you need to
change. It is pointed to by a
mark molded into the underside of
the body. Turn the end bracket
clockwise until the top of the jack
contacts the jacking point. Make
sure the jacking point tab is
restinginthejacknotch.
Loosen each wheel nut 1/2 turn
with the wheel nut wrench.
8. 7. 6.
5. 9.
Changing a Flat Tire
268
BRACKET
JACKING POINT
WHEEL NUT WRENCH
Page 271 of 316

Use the extension and the wheel
nut wrench as shown to raise the
vehicle until the f lat tire is of f the
ground.
Remove the wheel nuts, then
remove the flat tire. Place the flat
tire on the ground with the outside
surface facing up.Bef ore mounting the spare tire,
wipeanydirtoff themounting
surface of the wheel and hub with
a clean cloth. Wipe the hub
carefully;itmaybehotfrom
driving.
Lower the vehicle to the ground,
and remove the jack.
Put on the spare tire. Put the
wheel nuts back on f inger-tight,
then tighten them in a crisscross
pattern with the wheel nut wrench
until the wheel is f irmly against
the hub. Do not try to tighten
them f ully. Tighten the wheel nuts securely in
the same crisscross pattern. Have
the wheel nut torque checked at
the nearest automotive service
f acility.
Tighten the wheel nuts to:
Remove the center cap from the
flat tire, and place the flat tire up
under the hoist.
10.
11.
12.
13.14.
15.
16.
CONT INUED
Changing a Flat Tire
Taking Care of the Unexpected
269
EXTENSION
BRAKE HUB
WHEEL NUT WRENCH
80 lbf·ft (108 N·m , 11 kgf·m)
Page 272 of 316
Insert the hoist bracket into the
center hole of the f lat tire.
Slowly turn the wheel nut wrench
clockwisetotakeuptheslackof
the hoist cable. Make sure the
bracketisseatedinthecenter
hole of the spare tire.Store the jack in its holder. Turn
the jacks’ end bracket to lock it in
place and replace the tools and
cover. Turn the wheel nut wrench
clockwise until the f lat tire rests
against the underbody of the
vehicle and you hear the hoist
click.
17. 18. 19.
20.
Changing a Flat Tire
270
Loose items can fly around the
interiorinacrashandcould
seriously injure the occupants.
Store the wheel, jack, and tools
securely before driving.
Always raise the spare tire hoist, even
if you are not stowing a tire. If the
hoist is lef t down, it will be damaged
during driving and need to be replaced.
Page 280 of 316

If you must drive the vehicle a short
distance in this condition, drive
slowly and caref ully.
If the ABS indicator and the VSA
indicator come on with the brake
system indicator, have the vehicle
inspected by your dealer
immediately.
design will still give you braking at
two wheels. You will f eel the brake
pedal go down much f arther bef ore
the vehicle begins to slow down, and
you will have to press harder on the
pedal.
Slow down by shif ting to a lower
gear, and pull to the side of the road
when it is saf e. Because of the long
distance needed to stop, it is
hazardous to drive the vehicle. You
should have it towed and repaired as
soon as possible (see
The brake system
indicator normally
comes on when
you turn the ignition switch to the
ON (II) position, and as a reminder
to check the parking brake. It will
stay on if you do not f ully release the
parking brake.
If the f luid level is low, take the
vehicle to your dealer and have the
brake system inspected f or leaks or
worn brake pads. If the brake system indicator comes
on while driving, the brake f luid level
is probably low. Press lightly on the
brake pedal to see if it f eels normal.
If it does, check the brake f luid level
the next time you stop at a service
station (see page ). 246 Emergency
T owing
278
U.S. Canada
Brake System IndicatorEmergency Towing
,
However, if the brake pedal does not
f eel normal, you should take
immediate action. A problem in one
part of the system’s dual circuit on page
278).
Emergency T owing
If your vehicle needs to be towed,
call a prof essional towing service or
organization. Never tow your vehicle
with just a rope or chain. It is very
dangerous.
Any other method of towing will
damage the drive system. When you
contact the towing agency, inf orm
them a f lat-bed is required. The operator will load
your vehicle on the back of a truck. The only way you can saf ely tow
your vehicle is with f lat-bed
equipment.
Towing your vehicle with two tires on
the ground will damage parts of the
4WD system. It s hould be transported
on a f lat-bed truck or trailer.
Page 281 of 316

The vehicle’s f uses are located in
f our f use boxes. The interior f use
boxes are located under the
dashboard on the driver’s and
passenger’s side.
CONT INUED
Emergency Towing, Fuses
Taking Care of the Unexpected
279
DRIVER’ S SIDE INTERIOR
If , due to damage, your vehicle must
be towed with all f our wheels on the
ground, do the f ollowing:With all f our wheels on the ground,
it is best to tow the vehicle no farther
than 50 miles (80 km), and keep the
speed below 35 mph (55 km/h).
Release the parking brake.
Start the engine.
Shif t to D f or several seconds,
then to N.
Turn of f the engine.
Improper towing preparation will
damage the transmission. Follow the
above procedure exactly. If you cannot
shif t the transmission or start the
engine, your vehicle must be
transported with the all f our wheels of f
the ground. The steerin
g system can be damaged if
the steering wheel is locked. Leave the
ignition switch in the ACCESSORY (I)
position, and make sure the steering
wheel turns f reely bef ore you begin
towing.
Trying to lif t or tow your vehicle by the
bumpers will cause serious damage.
The bumpers are not designed to
support the vehicle’s weight. Fuses
Page 290 of 316

2.43 US gal (9.2)
4.5 US qt (4.3
)
4.2 US qt (4.0
)
5.3 US qt (5.0")
�µ�µ�Î
�Î
�Î
�Î
�µ
�Î�Î �Î
�Î
Specif ications
288
Dimensions
Weights
Air Conditioning
Battery Capacities1.93 US gal (7.3
)
2.43 US gal (9.2)
4.5 US qt (4.3
)
4.2 US qt (4.0
)
5.3 US qt (5.0
)
20.34 US gal (77.0
)
188.0 in (4,775 mm)
76.5 in (1,943 mm)
ND-OIL8
24.7 26.5 oz (700 750 g) HFC-134a (R-134a)
Length
Width
Height
Wheelbase
Track
66.3 in (1,685 mm)
106.3 in (2,700 mm) 70.5 in (1,790 mm)
Gross vehicle weight rating
Gross combined weight
rating (GCWR) See the tire information label atta-
ched to the driver’s doorjamb.
9,700 lbs (4,400 kg)
Equipped with transmission fluid cooler and power steering
fluid cooler.
The GCWR must be reduced 2 percent for every 1,000 feet (305
meters) of elevation.
Refrigerant type
Charge quantity
Lubricant type 77.5 in (1,968 mm)
71.7 in (1,821 mm)
70.1 in (1,780 mm)
71.3 in (1,811 mm)
66.5 in (1,690 mm)
66.5 in (1,690 mm)
66.7 in (1,694 mm)
12 V 72 AH/20 HR
Capacity Excluding the oil remaining in the engine 0.193 US gal (0.73
)
Including the coolant in the reserve tank and that remaining in the
engine
Reserve tank capacity: 2.79 US qt (2.64
)
4.8 US qt (4.5
)
Fuel tank
Engine
coolant
Engine oil
Automatic
transmission
fluid
Rear
differential
fluid (4WD)
Windshield
washer
reservoir
8.3 US qt (7.9
)
3.5 US qt (3.3
)
8.9 US qt (8.4
)
4.0 US qt (3.8
)
Approx.
1:
2:
1:
2: Front
Rear
4WD
2WD
LX
EX
LX
EX
LX
EX
Front
Rear
4WD
2WD Change
Total
Change
Including
filter
Without
filter
Total
Change
Total
Change 4WD
2WD
4WD
2WD
2
1 1
2