Page 82 of 316
 This devicemay not cause harmf ul interf erence, and(2) this device")
As required by the FCC:This device complies with Part 15 of theFCC rules. Operation is subject to thef ollowing two conditions: (1) This devicemay not cause harmf ul interf erence, and(2) this device must accept anyinterf erence received, includinginterf erence that may cause undesiredoperation.
Changes or modif ications not expresslyapproved by the party responsible f orcompliance could void the user’sauthority to operate the equipment.
This device complies with IndustryCanada Standard RSS-210.Operation is subject to the f ollowing twoconditions: (1) this device may not causeinterf erence, and (2) this device mustaccept any interf erence that may causeundesired operation of the device.The immobilizer system protects
your vehicle f rom thef t. If an
improperly-coded key (or other
device) is used, the engine will not
start.
When you turn the ignition switch to
the ON (II) position, the immobilizer
system indicator should come on f or
a f ew seconds, then go out. If the
indicator starts to blink, it means the
system does not recognize the
coding of the key. Turn the ignition
switch to the LOCK (0) position,
remove the key, reinsert it, and turn
the ignition switch to the ON (II)
position again. The system may not recognize your
key’s coding if another immobilizer
key or other metal object (i.e. key
f ob) is near the ignition switch when
you insert the key.
If the system repeatedly does not
recognize the coding of your key,
contact your dealer.
Do not attempt to alter this system
or add other devices to it. Electrical
problems could result that may make
your vehicle undrivable.
If you lose your key and you cannot
start the engine, contact your dealer.
Immobilizer System
80
Page 83 of 316
, ACCESSORY
(I), ON (II), and START (III).
You can insert or
remove the key only in this position.
To turn the key, the shift lever must")
�µ�µ
�µ
�µ
The ignition switch has f our
positions: LOCK (0), ACCESSORY
(I), ON (II), and START (III).
You can insert or
remove the key only in this position.
To turn the key, the shift lever must
be in Park, and you must push the
key in slightly. This is the normal key
position when driving. Several of the
lights on the instrument panel come
on as a test when you turn the
ignition switch f rom the
ACCESSORY (I) to the ON (II)
position. You can
operate the audio system and the
accessory power sockets in this
position. If the f ront wheels are turned, the
anti-theft lock may make it difficult
to turn the key. Firmly turn the
steering wheel to the lef t or right as
you turn the key.
Use this position
only to start the engine. The switch
returns to the ON (II) position when
you let go of the key. You will hear a reminder beeper if
you leave the key in the LOCK (0) or
the ACCESSORY (I) position and
open the driver’s door. Remove the
key to turn of f the beeper.
TheshiftlevermustbeinPark
bef ore you can remove the key f rom
the ignition switch.
LOCK (0) ON (II) A CCESSORY (I)
ST A RT (III)
Ignition Switch
Instruments and Controls
81
Page 84 of 316

To lock the doors and the tailgate,
press the master door lock switch on
either f ront door, press the lock tab
down on the driver’s door, or use the
keyontheoutsidelockonthedriver’s
door.
Pressing up on either master door
lock switch will unlock all of the
doors and the tailgate.The lock tab on any door locks and
unlocks that door. To unlock the
driver’s door f rom the outside, turn
the key and release it. If you turn
and hold it, all doors and the tailgate
unlock.
To lock the all doors when getting
out of the vehicle, push the lock tab
down and close the door. To lock the
driver’s door, remove the key f rom
the ignition switch and push the lock
tab down or push the under of the
master switch, then close the door.
With the key in the ignition switch,
you cannot lock the all doors f rom
the outside by master door lock
switch or the lock tab on the driver’s
door.
To open the tailgate, pull the handle,
then lif t up. To close the tailgate, use
the inner handle to pull it down, then
press down on the back edge.
Keep the tailgate and the hatch glass
closed at all times while driving to
avoid damaging the tailgate and the
hatch glass, and to prevent exhaust
gas from getting into the interior.
See
on
page . 57
Power Door L ocks
Tailgate
Carbon Monoxide Hazard
Door L ocks
L ockout Prevent ion
82
MASTER DOOR LOCK SWITCH LOCK TAB
Page 85 of 316

�µ
�µ
The childproof door locks are
designed to prevent children seated
in the rear f rom accidentally opening
the rear doors. Each rear door has a
lock lever near the edge. With the
lever in the LOCK position, the door
cannot be opened f rom the inside
regardless of the position of the lock
tab. To open the door, pull the lock
tab up, and use the outside door
handle. Pressthisbuttononce
to unlock the driver’s door. Push it
twice to unlock the other doors and
the tailgate. Some exterior lights will
f lash twice each time you press the
button.
Press this button once to
lock all doors and the tailgate. Some
exterior and interior lights will f lash.
When you push LOCK twice within 5
seconds, you will hear a beep to
verify that the security system has
set. You cannot lock it if any door is
not f ully closed or the key is in the
ignition switch. When you press the UNLOCK
button, the f ront and rear individual
map lights, depending on the interior
light control switch position, will
come on (see page ). If you do
not open any door, the lights stay on
f or about 30 seconds, then go out. If
you relock the doors and the tailgate
with the remote transmitter before
30 seconds have elapsed, the lights
will go of f immediately.
If you do not open any door within 30
seconds, the doors automatically
relock and the security system sets.
102
CONT INUED
Childproof Door L ocks
UNL OCK
LOCK Remote Transmitter
Childproof Door L ocks, Remote T ransmitter
Instruments and Controls
83
PANIC
BUTTON LOCK
BUTTON UNLOCK
BUTTON
LED
LOCK LEVER Unlock
Lock
Page 86 of 316
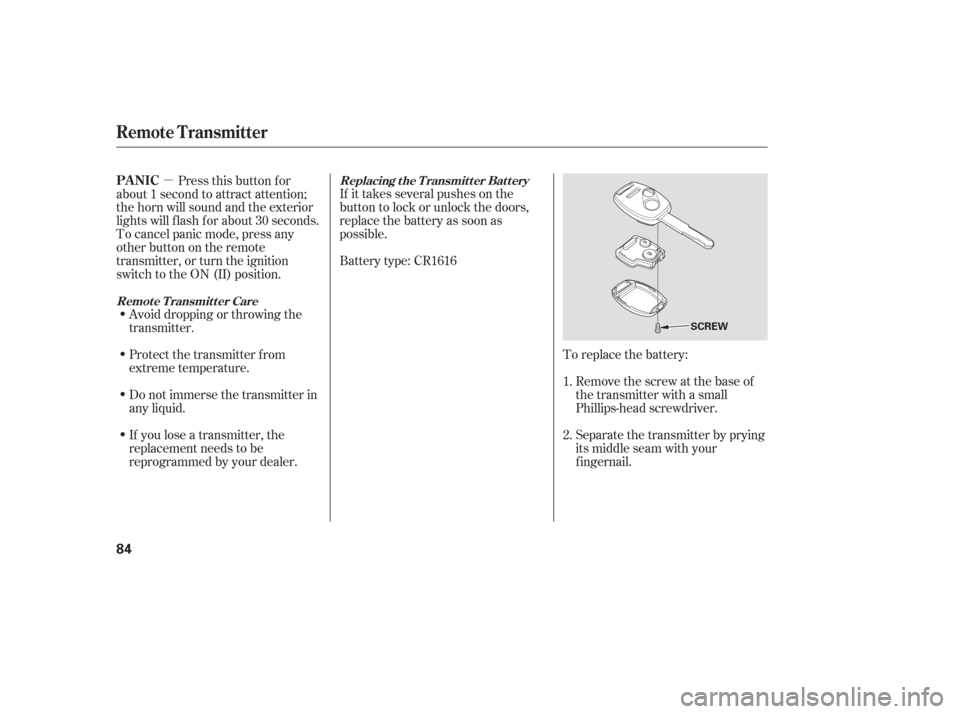
�µTo replace the battery:Remove the screw at the base of
the transmitter with a small
Phillips-head screwdriver.
Separate the transmitter by prying
its middle seam with your
f ingernail.
Battery type: CR1616 If it takes several pushes on the
button to lock or unlock the doors,
replace the battery as soon as
possible.
Pressthisbuttonfor
about 1 second to attract attention;
thehornwillsoundandtheexterior
lights will f lash f or about 30 seconds.
To cancel panic mode, press any
other button on the remote
transmitter, or turn the ignition
switch to the ON (II) position.
Avoid dropping or throwing the
transmitter.
If you lose a transmitter, the
replacement needs to be
reprogrammed by your dealer. Do not immerse the transmitter in
any liquid. Protect the transmitter from
extreme temperature. 1.
2.Replacing the Transmitter Battery
Remote Transmitter CarePA NIC
Remote Transmitter
84
SCREW
Page 90 of 316
To change the seat-back angle of the
f ront seat, pull up on the lever on the
outside of the seat bottom.The height of your driver’s seat is
adjustable. Turn the front dial on the
outside of the seat cushion to raise
the front of the seat bottom, and turn
the rear dial to raise the rear.
To adjust the seat forward and
backward, pull up on the lever under
the f ront seat cushion. Then try to
movetheseattomakesureitis
locked into position.
On LX models
Manual Seat A djustments
Driver’s Seat Height A djustment
Seats
88
Page 91 of 316

To change the angle of the seats in
the second row seat-backs, pull up
the handle on the seat-back. Moving
the short vertical switch f orward or
backward adjusts the seat back in
those directions.The left and right halves can be
f olded separately.
Push the whole seat backwards until
f ully latches. Make sure the seat is
locked and secured bef ore driving.
If you are f olding the lef t half of
the seat, use the ignition key to
release the center seat belt from
thedetachableanchor(seepage
).
Lower the head restraint f ully.
Pull up the handle on the outside
of the seat-back.
Fold the seat-back forward.
Reverse this procedure to return the
seat to its upright position. Make
sure the seat is locked and secured
bef ore driving. To get into the third row seats, pull
up the lever on the outside of the
passenger’s side second row seat-
back. The seat-back will tilt f orward,
and the seat will slide f orward.
To adjust the seats forward and
backward, pull up on the lever under
the seat cushion. Af ter moving the
seat, make sure it is locked into
position. 2.
3. 1.
4.
18
A djusting the Second Row Seats Folding the Second Row Seats T hird Seat A ccess
Seats
Instruments and Controls
89
SECOND
ROW SEAT
RELEASE LEVER
Page 92 of 316

Remove the head restraints by
pushing the release buttons and
pulling the restraints out.
Store the head restraints under
the cargo area floor. Insert the
shafts into the holes in the sides of
the storage compartment.Use the ignition key to release the
seat belt from the detachable
anchor (see page ).
Unlock the seat-back by pulling
the handle. Push the seat-back
forward.
Make sure you clip the small latch
plate of each outer shoulder belt to
the seat belt webbing whenever the
third seat is f olded.
Pull the handle on the back of the
seat, move the seat-back to the
desired position and release the
handle. Let the seat-back latch into
the new position. Make sure all items in the cargo area
are secured. Loose items can f ly
f orward and cause injury if you have
to brake hard (See
on page ). Reinstall the head restraints,
reconnect the seat belts, and make
sure the seats are secured bef ore
driving. Reverse this procedure to return the
seat to its upright position.
1.
2. 3.
4.
18
193
A djusting the T hird Row Seat Folding the T hird Row Seat
Carrying Cargo
Seats
90
THIRD ROW
SEATHANDLE