Page 142 of 316
Setting the Clock
140
CLOCKH BUTTON
M BUTTON
CLOCK CLOCK BUTTON
H BUTTON RESET BUTTON
M BUTTON
SET BUTTON
LX models
EX and EX-L models
Page 143 of 316
 button. Change the hours by
pressing the H (preset 4) button
until")
�µ�´
If your vehicle’s battery is
disconnected or goes dead, you will
need to set the clock.
Press and hold the CLOCK (SCAN/
RPT) button. Change the hours by
pressing the H (preset 4) button
until the numbers advance to the
desired time. Change the minutes by
pressing the M (preset 5) button
until the numbers advance to the
desired time. When you are f inished,
release the CLOCK button. You can quickly set the time to the
nearest hour. If the displayed time is
bef ore the half hour, pressing and
holding the clock button, then
pressing the RESET (preset 6)
buttonsetstheclockbacktothe
previous hour. If the displayed time
is af ter the half hour, the clock sets
f orward to the beginning of the next
hour.
For example: 1:06 will reset to 1:00
1:52 will reset to 2:00 Thedisplayshowsthetimewhenthe
ignition is in the ACCESSORY (I) or
the ON (II) position.
Press and hold the SET (TUNE)
button until the numbers f lash.
Change the hours by pressing the
H ( ) button until the numbers
advance to the desired time. Change
the minutes by pressing the M ( )
button until the numbers advance to
the desired time. When you are
finished, press the SET button again.
Ref er to the Navigation system
manual f or how to adjust the time.
On models with Navigation System
EX and EX-L models
LX models
Setting the Clock
Features
141
Page 149 of 316
�Û�Ý
�Û�Ý
�Û �Ý
Use the and buttons to select a
station f rom the radio preset buttons.
Press the button to search up
the channels in the channel mode.
The system will search up the
channels within the category when
the radio is in the category mode.
Press the button to search
down the channels in the channel
mode. The system will search down
the channels within the category when the radio is in the category
mode.
Use the and buttons to select a
station f rom the radio preset buttons.
Press the button to tune the radio
to a higher f requency, or press the
button to tune to a lower f requency.
Pressing the or button
causes the system to search up or
down the band for a station with a
strong signal. You will see SEEK in
the display.
CONT INUED
Rear Entertainment System
To Play the Radio f rom the Rear
Control Panel
To Play the XM Radio f rom the
Rear Control Panel
Features
147
Page 159 of 316
�Ý�Û�Ý�Û
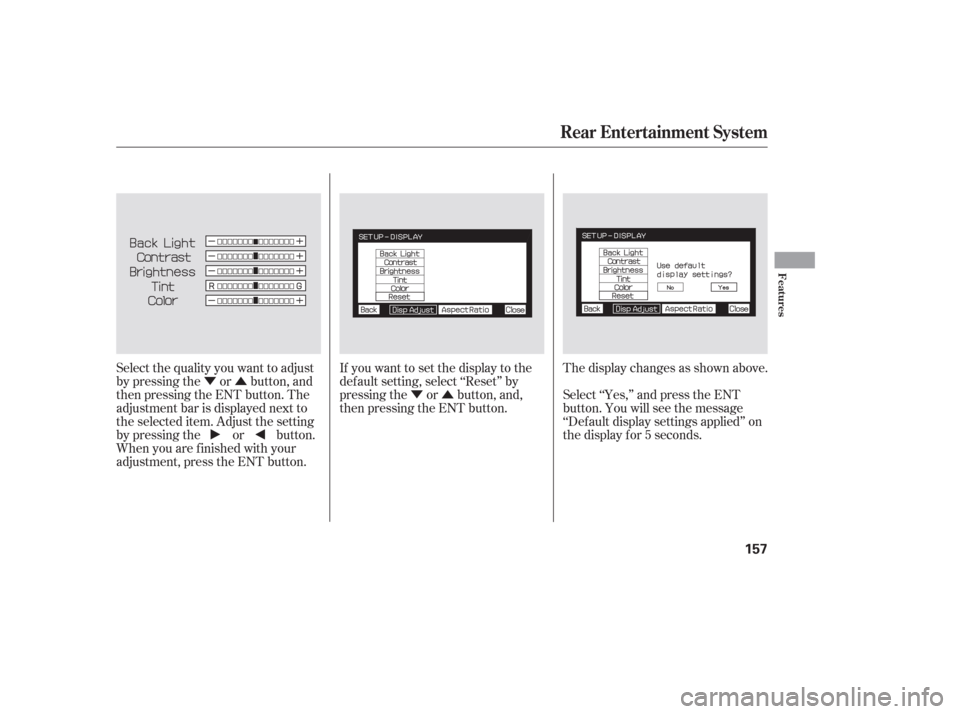
Select the quality you want to adjust
by pressing the or button, and
then pressing the ENT button. The
adjustment bar is displayed next to
the selected item. Adjust the setting
by pressing the or button.
When you are f inished with your
adjustment, press the ENT button. If you want to set the display to the
def ault setting, select ‘‘Reset’’ by
pressing the or button, and,
then pressing the ENT button.
The display changes as shown above.
Select ‘‘Yes,’’ and press the ENT
button. You will see the message
‘‘Def ault display settings applied’’ on
the display f or 5 seconds.
Rear Entertainment System
Features
157
Page 176 of 316

The security system helps to protect
your vehicle and valuables f rom thef t.
The horn sounds and a combination
of headlights, parking lights, side
marker lights, and taillights f lash if
someone attempts to break into your
vehicle. This alarm continues for 2
minutes, then the system resets. To
reset an alarm system bef ore the 2
minutes have elapsed, unlock the
driver’s f ront door with the key or
the remote transmitter.Once the security system is set,
opening any door without using the
key or the remote transmitter, or the
hood, will cause it to alarm. It also
alarms if the radio is removed from
the dashboard or the wiring is cut.The security system will not set if
the hood, the tailgate, or any door is
not f ully closed. If the system will not
set, check the Door and Tailgate
Open Monitor on the instrument
panel (see page ) to see if the
doors and the tailgate are f ully
closed. Since it is not part of the
monitor display, manually check the
hood.
Do not attempt to alter this system
or add other devices to it.
The security system automatically
sets 15 seconds after you lock the
doors, hood, and the tailgate. For the
system to activate, you must lock the
doors f rom the outside with the key,
lock tab, door lock switch, or remote
transmitter. The security system
indicator next to the driver’s door
lock starts blinking immediately to
show you the system is setting itself . 66
On EX and EX-L models
Security System
174
SECURITY SYSTEM INDICATOR
Page 213 of 316
.If this indicator comes on while
driving, pull to the side of the road
when it is saf e, and turn of f the
engine. Reset")
When VSA activates, you will see the
VSA activation indicator blink (see
page ).If this indicator comes on while
driving, pull to the side of the road
when it is saf e, and turn of f the
engine. Reset the system by
restarting the engine. If the VSA
system indicator stays on, or comes
back on while driving, have the VSA
system inspected by your dealer.
The vehicle stability assist (VSA)
system helps to stabilize the vehicle
during cornering if the vehicle turns
more or less than desired. It also
assists you in maintaining traction
while accelerating on loose or
slippery road surf aces. It does this
by regulating the engine’s output,
and by selectively applying the
brakes.
When VSA activates, you may notice
that the engine does not respond to
the accelerator in the same way it
does at other times.
The VSA system cannot enhance the
vehicle’s driving stability in all
situations and does not control your
vehicle’s entire braking system. It is
still your responsibility to drive and
corner at reasonable speeds and to
leave a sufficient margin of safety. 212
CONT INUED
VSA A ctivation Indicator
VSA System Indicator
Vehicle Stability Assist (VSA) System
Driving
211
Page 231 of 316

100 % 91 % 90 % 81 %
80 % 71 %
70 % 61 %
60 % 51 %
50 % 41 %
40 % 31 %
30 % 21 %
20 % 16 %
15 % 11 %10 % 6 %")
�µ
�µ
�µ
�µ
�µ
�µ
�µ
�µ
�µ
�µ �µ
�µ
CONT INUED
Calculated Engine Oil Lif e (%)
100 % 91 % 90 % 81 %
80 % 71 %
70 % 61 %
60 % 51 %
50 % 41 %
40 % 31 %
30 % 21 %
20 % 16 %
15 % 11 %10 % 6 % 5% 1% 0% Displayed
Engine Oil Lif e (%) 100 %90 %
80 %
70 %
60 %
50 %
40 %
30 %
20 %
15 %
10 %5%
0%
Your vehicle displays engine oil lif e
and maintenance service items in the
inf ormation display to show you
when you should have your dealer
perf orm engine oil replacement and
indicated maintenance service.
Based on the engine operating
conditions and accumulated engine
revolutions, the onboard computer in
your vehicle calculates the remaining
engine oil lif e and displays it as a
percentage. The remaining engine oil lif e is
displayed on the engine oil lif e
display according to this table:
To see the current engine oil lif e,
turn the ignition switch to the ON
(II) position, and push and release
the Select/Reset knob repeatedly
until the engine oil lif e display
appears (see page ). 70
Maintenance Minder
Engine Oil L if e Display
Maint enance
229
ENGINE OIL LIFE
DISPLAY SELECT/RESET
KNOB
Page 233 of 316
 position. When
you see this")
�µ
When the remaining engine oil lif e is
0 percent, the engine oil lif e indicator
will be blinking. The display comes
oneverytimeyouturntheignition
switch to the ON (II) position. When
you see this message, have the
indicated maintenance perf ormed by
your dealer as soon as possible. The maximum total mileage shown
is ‘‘ 9999.’’
You can change the inf ormation
display f rom the engine oil lif e
display to the odometer, the trip
meter, or the outside temperature (if
equipped) every time you press and
release the Select/Reset knob.
When the engine oil lif e display is 0
percent or negative mileage, the
maintenance minder indicator
remainsonevenif youchangethe
inf ormation display.
Immediately have the service
perf ormed, and make sure to reset
the display as described in the next
page.
If you still do not perf orm the
indicated maintenance, you will see a
negative mileage. It is displayed
when you drive over 10 miles (f or
U.S. models) or 10 km (f or Canadian
models) af ter seeing the 0 percent
message.Afterward,itshowsyour
driving distance if you continue to
drive. Immediately have the
indicated maintenance done by your
dealer.
Maintenance Minder
Maint enance
231