Page 66 of 420
 system.
It flashes when VSA is active (see
page ).
On the Touring m")
CONT INUED
This indicator has three f unctions:It comes on as a reminder that you
have turned off the vehicle
stability assist (VSA) system.
It flashes when VSA is active (see
page ).
On the Touring model, you will
also see a ‘‘CHECK VSA
SYSTEM’’ message in the multi-
inf ormation display.
This indicator normally comes on f or
a f ew seconds when you turn the
ignition switch to the ON (II)
position.
This indicator normally comes on f or
a f ew seconds when you turn the
ignition switch to the ON (II)
position. See page f or more
inf ormation.It comes on along with the VSA
system indicator if there is a
problem with the VSA system.
This indicator normally comes on f or
a f ew seconds when you turn the
ignition switch to the ON (II)
position, and when the ignition
switch is turned to START (III). If it
comes on at any other time, there is
a problem in the ABS; have your
vehicle checked at a dealer. With the
ABS indicator on, your vehicle still
has normal braking ability but no
anti-lock braking. For more
inf ormation, see page .
On the Touring model, you will also
see a ‘‘CHECK ABS SYSTEM’’
message in the multi-inf ormation
display. If itcomesonandstaysonatany
other time or it does not come on
when you turn the ignition switch to
the ON (II) position, there is a
problem with the VSA system. Take
your vehicle to a dealer to have it
checked. Without VSA, your vehicle
still has normal driving ability, but
will not have VSA traction and
stability enhancement.
On the Touring model, you will also
see a ‘‘CHECK VSA SYSTEM’’
message in the multi-inf ormation
display.
For more inf ormation, see page .1.
2.
3.
306 307
307
307
Instrument Panel Indicators
Vehicle Stability Assist
(VSA ) System Indicator VSA A ctivation Indicator
Anti-lock Brake System
(A BS) Indicator
Inst rument s and Cont rols
65
Page 88 of 420
Check ABS System
If there is a problem in the anti-lock
brake system (ABS), you will see
‘‘CHECKABSSYSTEM’’inthe
multi-inf ormation display. If you see
this message, have your vehicle
checked by a dealer (see page ).
Check Transmission
If there is a problem with the
automatic transmission, you will see
‘‘CHECK TRANSMISSION’’ in the
multi-inf ormation display. Avoid
rapid acceleration, and have the
transmission checked by a dealer as
soon as possible.
Check Brake System
If there is a problem with the brake
system, you will see ‘‘CHECK
BRAKE SYSTEM’’ in the multi-
inf ormation display. The parking
brake and brake system indicator in
the instrument panel will also come
on. See page f or more
inf ormation.
379 306
CONT INUED
Multi-Inf ormation Display
Inst rument s and Cont rols
87
U.S.
Canada
Page 137 of 420
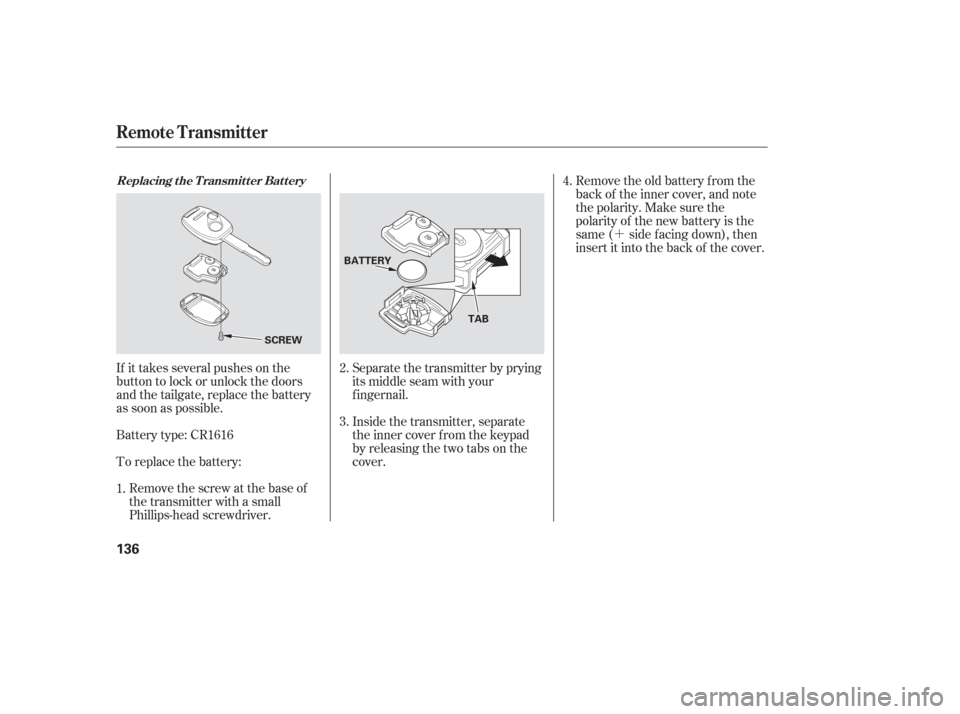
�´
If it takes several pushes on the
button to lock or unlock the doors
and the tailgate, replace the battery
as soon as possible.
Battery type: CR1616
To replace the battery: Remove the screw at the base of
the transmitter with a small
Phillips-head screwdriver. Separate the transmitter by prying
its middle seam with your
f ingernail.
Inside the transmitter, separate
the inner cover f rom the keypad
by releasing the two tabs on the
cover.Remove the old battery from the
back of the inner cover, and note
the polarity. Make sure the
polarity of the new battery is the
same ( side f acing down), then
insert it into the back of the cover.
3. 4.
1. 2.
Replacing the Transmitter Battery
Remote Transmitter
136
SCREW
BATTERY
TAB
Page 160 of 420

Both seats can be removed to give
more cargo capacity.
Make sure the seat is securely
locked in place bef ore driving. A seat
thatisnotlockedinplacecouldfly
around and cause injury in a sudden
stop or crash.
Reversethisproceduretomovethe
seat back to the outside.
When the passenger’s side bucket
seat is in the outside position, and
theplus-oneseatorthesecondrow
console is not used, install the f loor
mat and the cover over the center
f loor anchors between the bucket
seats. Make sure to f asten the
buttons on the mat to the floor.
Install the cover over the outer floor
anchor and install the floor mat over
the cover. Insert the tabs on the f loor
mat into the slit on the f loor. Fasten
the buttons on the floor mat to the
f loor. To remove a seat:
Pull up the seat-back angle
adjustment lever, and fold the seat-
back f orward.
Unlock the seat f rom the f loor by
pulling the lock release lever under
the seat cushion’s f ront edge and
lifting the rear of the seat.
CONT INUED
Seats
Removing the Bucket Seats in the
Second Row
Inst rument s and Cont rols
159
LOCK RELEASE LEVER
SLIT
COVER
TABS
FLOOR MAT
Page 281 of 420
orcloser.
The rear center sensor senses a")
The range of the corner sensors and
the rear center sensor are limited.
Each corner sensor is capable of
sensing an obstacle only when your
vehicleis20in(50cm)orcloser.
The rear center sensor senses an
obstacle that is behind your vehicle
70 in (1.8 m) or closer.
Do not put any accessories on or
around the sensors.The system may not f unction
properly under these conditions:
The sensors are covered with
snow,ice,mud,etc.
When the vehicle is on a rough
road, on grass, or on a hill.
After the vehicle has been sitting
out in hot or cold weather. When the system is af f ected by
some electrical equipment or
devices generating an ultrasonic
wave.
When operating the vehicle in bad
weather.
The system may not sense thin or
low objects, or sonic-absorptive
materials such as snow, cotton, or
sponge.
The system cannot sense objects
directly under the bumper.
Canadian Owners: This device complies with IndustryCanada Standard RSS-210. Operation issubject to the f ollowing two conditions:(1) this device may not causeinterf erence, and (2) this device mustaccept any interf erence that may causeundesired operation of the device.
Parking Sensor System
280
Within about 20 in (50 cm) Within about 70 in (1.8 m)
Page 296 of 420
You can use the cargo net to secure
items in the cargo area, and store
small items between the two halves
of the net. To install the cargo net,
hook the loops on the f our corners of
the net to the tabs at both sides of
the tailgate sill.There are cargo hooks f or plastic
grocery bags on the back of the third
row seat. They are designed to hold
light items. Heavy objects may
damage the hooks.
On EX, EX-L and Touring models
Carrying Cargo
Cargo Net
Cargo Hooks
Bef ore Driving
295
CARGO HOOKS
Page 298 of 420
This section gives you tips on
starting the engine under various
conditions, and how to operate the
automatic transmission. It also
includes important inf ormation on
parking your vehicle, the braking
system, the vehicle stability assist
system, the tire pressure monitoring
system, and f acts you need if you are
planning to tow a trailer.........................
Preparing to Drive .298
.......................
Starting the Engine .299
..............
Automatic Transmission .300
..................................
Parking Tips .304
.............................
Braking System .305
...............
Anti-lock Brakes (ABS) .306
Vehicle Stability Assist (VSA)
........................................
System .307
Tire Pressure Monitoring System ......................................
(TPMS) .309
...........................
Towing a Trailer .312
Driving
Driving
297
Page 306 of 420

Check the brakes after driving
through deep water. Apply the
brakes moderately to see if they f eel
normal. If not, apply them gently and
f requently until they do. Be extra
cautious in your driving.
The hydraulic system that operates
the brakes has two separate circuits.
Each circuit works diagonally across
the vehicle (the lef t-f ront brake is
connected with the right-rear brake,
etc.). If one circuit should develop a
problem, you will still have braking
at two wheels.If the brake pads need replacing, you
will hear a distinctive, metallic
screeching sound when you apply
the brake pedal. If you do not have
the brake pads replaced, they will
screech all the time. It is normal f or
the brakes to occasionally squeal or
squeak when you apply them.
Your vehicle is equipped with disc
brakes at all f our wheels. A power
assist helps reduce the ef f ort needed
on the brake pedal. The anti-lock
brake system (ABS) helps you retain
steering control when braking very
hard.
Constant application of the brakes
when going down a long hill builds
up heat and reduces their ef f ective-
ness. Use the engine to assist the
brakes by taking your f oot of f the
accelerator and downshif ting to a
lower gear. Resting your f oot on the pedal keeps
the brakes applied lightly, builds up
heat, and reduces their ef f ectiveness.
It also keeps your brake lights on all
the time, conf using drivers behind
you.
Braking System
Braking System Design
Brake Wear Indicators
Driving
305
, you will see
‘‘CHECKABSSYSTEM’’inthe
multi-inf ormation display. If you see
this message, have your vehicle
checked")