Page 156 of 420
�µ
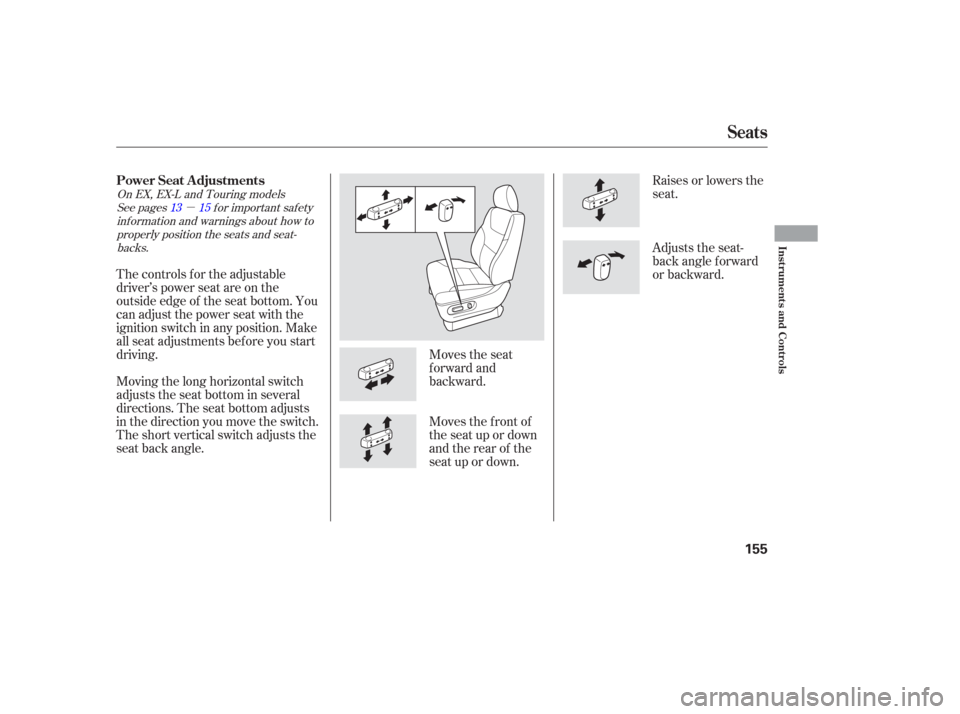
Moves the seat
forward and
backward.Raises or lowers the
seat.
The controls f or the adjustable
driver’s power seat are on the
outside edge of the seat bottom. You
can adjust the power seat with the
ignition switch in any position. Make
all seat adjustments bef ore you start
driving.
Moving the long horizontal switch
adjusts the seat bottom in several
directions. The seat bottom adjusts
in the direction you move the switch.
The short vertical switch adjusts the
seat back angle. Moves the f ront of
the seat up or down
and the rear of the
seat up or down.Adjusts the seat-
back angle f orward
or backward.
See pages f or important saf ety
inf ormation and warnings about how toproperly position the seats and seat-backs. 13 15
On EX, EX-L and Touring models
Power Seat A djustments
Seats
Inst rument s and Cont rols
155
Page 157 of 420

See page f or important saf etyinf ormation and a warning about how toproperly position the head restraints. 15
On EX, EX-L and Touring models On EX-L and Touring models
Your vehicle is equipped with head
restraints in all seating positions to
help protect you and your
passengers f rom whiplash and other
injuries.
An armrest is located on each of the
frontseatsandoneachsideof the
second row seats. Pivot it down to
use it. When you remove the bucket
seats in the second row, pivot the
armrests up out of the way.
To change the lumbar support, move
the lever on the right side of the
seat-back forward or backward.
Keep moving the lever f orward or
backward until you f ind a suitable
position. They are most ef f ective when you
adjust them so the back of the
occupant’s head rests against the
center of the restraint.
Theangleof thearmrestoneach
f ront seat is adjustable. Pivot the
armrest down, and pull it up to the
desired angle. Head Restraints
Armrests
Driver’s L umbar Support
Seats
156
Page 159 of 420
Unlock the seat f rom the f loor by
pulling the lock release lever under
the seat cushion’s f ront edge and
lifting the rear of the seat.
Slide the seat toward the center of
the vehicle.
The second row bucket seat on the
passenger’s side can be moved to the
center to provide access to the third
row seat.
To get into or out of the third row
seat, pull up the release lever on the
shoulder of each second row bucket
seat. The seat-back will tilt forward
and the whole seat will slide f orward.
Push the back of the seat down over
the f loor hooks. Make sure the seat
is securely locked in place.
Remove the f loor mat and the cover
f rom under the passenger’s side
bucket seat. To remove the floor mat,
unfasten the two buttons on the rear
edge. Moving the Second Row Bucket
Seat
Seats
158
LOCK
RELEASE
LEVER
BUTTONS
FLOOR MAT
Page 160 of 420

Both seats can be removed to give
more cargo capacity.
Make sure the seat is securely
locked in place bef ore driving. A seat
thatisnotlockedinplacecouldfly
around and cause injury in a sudden
stop or crash.
Reversethisproceduretomovethe
seat back to the outside.
When the passenger’s side bucket
seat is in the outside position, and
theplus-oneseatorthesecondrow
console is not used, install the f loor
mat and the cover over the center
f loor anchors between the bucket
seats. Make sure to f asten the
buttons on the mat to the floor.
Install the cover over the outer floor
anchor and install the floor mat over
the cover. Insert the tabs on the f loor
mat into the slit on the f loor. Fasten
the buttons on the floor mat to the
f loor. To remove a seat:
Pull up the seat-back angle
adjustment lever, and fold the seat-
back f orward.
Unlock the seat f rom the f loor by
pulling the lock release lever under
the seat cushion’s f ront edge and
lifting the rear of the seat.
CONT INUED
Seats
Removing the Bucket Seats in the
Second Row
Inst rument s and Cont rols
159
LOCK RELEASE LEVER
SLIT
COVER
TABS
FLOOR MAT
Page 161 of 420
You can install the stowable plus-one
seat between the second row bucket
seats.
To reinstall the seat, hook the f ront
of the seat to the f loor, then push the
backintothelocks.Makesureboth
the f ront and the back of the seat are
securely latched bef ore driving.
Unhook the f ront of the seat f rom
the f loor by pulling it back slightly,
then pivoting it upward.
Always remove an unsecured seat
f rom the vehicle bef ore driving. A
seat that is not locked in place could
be thrown about and cause injury in
a sudden stop or crash.
On EX and EX-L models
Seats
Installing the Stowable Second
Row Plus-One Seat
160
Page 162 of 420
CONT INUED
To remove the seat, lower the head
restraint all the way down. Remove
the seat cushion by pulling the strap
on the seat cushion, and f old the
seat-back forward.
To install the stowable plus-one seat,
hook the f ront of the seat to the f loor,
then push down the back until it
locks. Make sure both the f ront and
back of the seat are securely latched.
Pull up the seat-back, and adjust the
seat-back angle to the desired
position while pulling the seat-back
angle adjustment strap on the
outside of the seat bottom. Install the seat cushion on the seat
bottom plate. To install the cushion,
hook the f ront of the cushion f irst,
then push down the rear until the
cushion is securely positioned.
To use the plus-one seat as a center
console, remove its seat cushion by
pulling up the seat cushion strap.
Then pivot the seat-back forward
until it is f lat. Store the seat cushion
in the f loor storage area.
Seats
Inst rument s and Cont rols
161
ANGLE ADJUSTMENT STRAP
Page 163 of 420

To create more cargo space, you can
f old the one-motion third row ‘‘Magic
Seat’’ into the floor recess.Unlatch the detachable seat belt
anchor center seat belt, and let the
belt retract all the way into the
ceiling. Place the latch plate and
anchor latch into their holding
slots.
Lower the head restraints f ully.
Always remove an unsecured seat
f rom the vehicle bef ore driving. A
seat that is not locked in place could
be thrown about and cause injury in
a sudden stop or crash.
Thestowableplus-oneseatassembly
canbestoredinthefloorstorage
area between the f ront seats and the
secondrowseats.Todothis,remove
theLazySusanfromthefloor
storage area.
Unlock the seat f rom the f loor by
pulling the lock release lever and the
leg f olding lever on the bottom of the
seat-back, and lift the rear of the seat.
Unhook the f ront of the seat f rom
the f loor by pulling it back slightly,
then pivoting it upward. 1.
2.
Seats
Folding the One-Motion T hird
Row ‘‘Magic Seat’’
162
LOCK RELEASE LEVER
LEG FOLDING LEVER
Page 164 of 420
Pull the seat-back upright with the
strap. Make sure the seat is
securely locked.
To return the seat to the upright
position:
Pull the seat out of the recess by
pulling on the handle. Pivot the
seat forward all the way. The front
seat legs will automatically latch.
Pull the handle on each seat-back
to unlock the f ront seat legs.
Pivot the seat into the cargo area
f loor recess.
Make sure all items in the cargo area
are secured. Loose items can f ly
f orward and cause injury if you have
to brake hard See
on page . 1.
2.
3.
4.
292
Seats
Carrying Cargo
Inst rument s and Cont rols
163
HANDLE