Page 331 of 420

�Ì
�Î
�Ì �Ì
�Ì
�Î
Maintenance Minder
330
:
If the message ‘‘SERVICE DUE NOW’’ does not appear more than 12 months
after the display is reset, change the engine oil every year.
See information on maintenance and emissions warranty on page .
Independent of the maintenance messages in the multi-information
display, replace the brake fluid every 3 years.
Inspect idle speed every 160,000 miles (256,000 km).
Adjust the valves during services A, B, 1, 2, or 3 only if they are noisy.
NOTE: 1:
329
Maintenance Sub Items
Rotate tires
Replace air cleaner element If you drive in dusty conditions, replace
every 15,000 miles (24,000 km).
Replace dust and pollen filter If you drive primarily in urban areas that have high
concentrations of soot in the air from industry and
from diesel-powered vehicles, replace every 15,000
miles (24,000 km).
Inspect drive belt
Replace transmission fluid Driving in mountainous areas at very low vehicle
speeds or trailer towing results in higher
transmission temperatures.
This requires transmission fluid changes more
frequently than recommended by the Maintenance
Minder. If you regulary drive your vehicle under these
conditions, have the transmission fluid changed
every 30,000 miles (48,000 km).
Replace spark plugs
Replace timing belt and inspect water pump If you drive regularly in very high temperatures (over
110°F, 43°C), or in very low temperatures (under-20°F,
29°C), replace every 60,000 mile (U.S.)/100,000 km
(Canada)
Inspect valve clearance
Replace engine coolant
Maintenance Main Items
Replace engine oil
Replace engine oil and oil filter
Rotate tires
Inspect front and rear brakes
Check parking brake adjustment
Inspect these items: Tie rod ends, steering gear box, and boots
Suspension components
Driveshaft boots
Brake hoses and lines (including ABS)
All fluid levels and condition of fluids
Exhaust system
Fuel lines and connections
A
B
Symbol
Symbol
1
2
3
4
51
Maintenance Minder
Page 334 of 420
Fluid Locations
Maint enance
333
ENGINE OIL DIPSTICK
(Orange loop)WASHER FLUID
(Blue cap)
POWER STEERING
FLUID (Red cap)
RADIATOR CAP ENGINE OIL FILL CAPAUTOMATIC
TRANSMISSION
FLUID DIPSTICK
(Yellow loop)
BRAKE FLUID
(Gray cap)
ENGINE COOLANT
RESERVOIR
Page 336 of 420
You may use a synthetic motor oil if
it meets the same requirements
given f or a conventional motor oil: it
displays the API Certif ication Seal,
and it is the proper weight. You must
f ollow the oil and f ilter change
intervals shown on the odometer/
trip meter display or on the multi-
inf ormation display.Changing the oil and f ilter requires
special tools and access f rom
underneath the vehicle. The vehicle
should be raised on a service station-
type hydraulic lif t f or this service.
Unless you have the knowledge and
proper equipment, you should have
this maintenance done by a skilled
mechanic.
Run the engine until it reaches
normal operating temperature,
then shut it off.
Your vehicle’s engine does not
require any oil additives. Additives
may adversely af f ect engine or
transmission perf ormance and
durability.
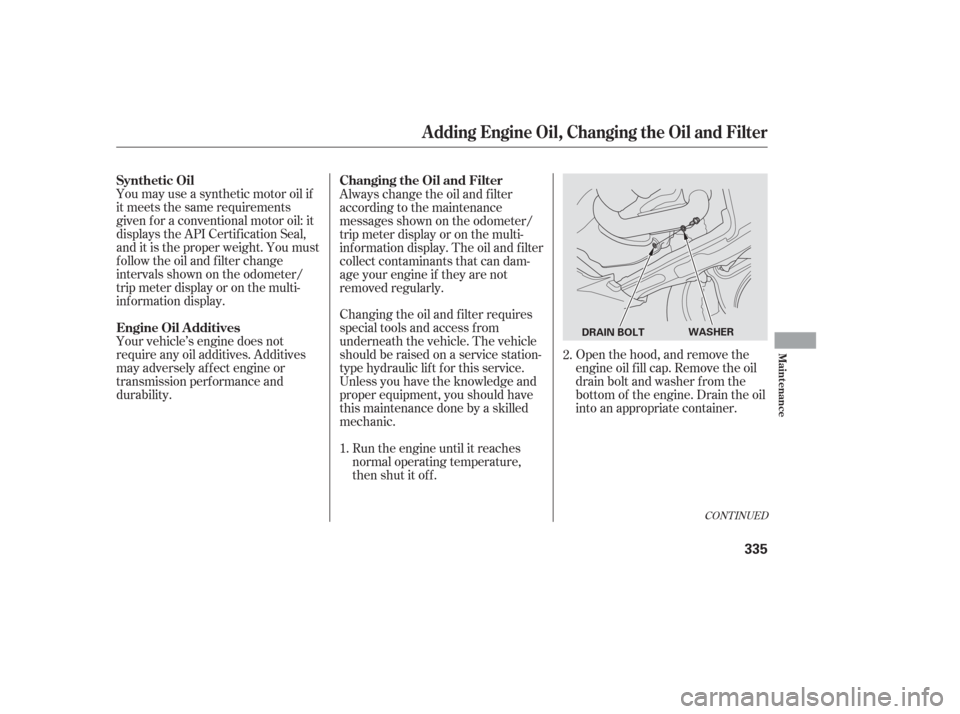
Open the hood, and remove the
engine oil f ill cap. Remove the oil
drain bolt and washer f rom the
bottom of the engine. Drain the oil
into an appropriate container.
Always change the oil and f ilter
according to the maintenance
messages shown on the odometer/
trip meter display or on the multi-
inf ormation display. The oil and f ilter
collect contaminants that can dam-
age your engine if they are not
removed regularly.
1.
2.
CONT INUED
Synthetic Oil
Changing the Oil and Filter
Engine Oil A dditives
A dding Engine Oil, Changing the Oil and Filter
Maint enance
335
WASHER
DRAIN BOLT
Page 341 of 420
Pour the f luid slowly and caref ully
so you do not spill any. Clean up
any spill immediately; it could
damage components in the engine
compartment.
Always use Honda ATF-Z1
(automatic transmission f luid). If
it’s not available, you may use a
DEXRON
III automatic
transmission f luid as a temporary
replacement. However, continued
use can af f ect the shif t quality.
Have the transmission flushed and
ref illed with Honda ATF-Z1 as
soon as it is convenient.
Check the f luid level with the engine
at normal operating temperature.
Park the vehicle on level ground.
Shut of f the engine.
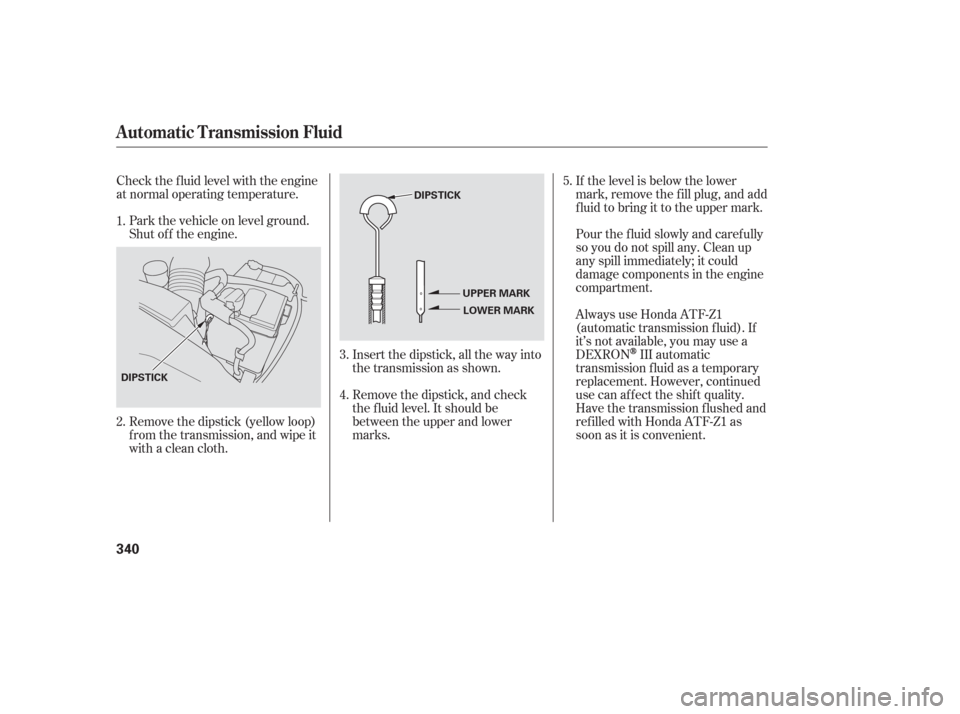
Remove the dipstick (yellow loop)
f rom the transmission, and wipe it
with a clean cloth. Insert the dipstick, all the way into
the transmission as shown.If the level is below the lower
mark, remove the f ill plug, and add
f luid to bring it to the upper mark.
Remove the dipstick, and check
the f luid level. It should be
between the upper and lower
marks. 5.
3.
4.
1.
2.
Automatic Transmission Fluid
340
DIPSTICK
UPPER MARKLOWER MARK
DIPSTICK
Page 342 of 420
Always use Honda Heavy Duty
Brake Fluid DOT 3. If it is not
available, you should use only DOT 3
or DOT 4 f luid, f rom a sealed
container, as a temporary
replacement.
Using any non-Honda brake f luid can
cause corrosion and decrease the lif e
of the system. Have the brake
system f lushed and ref illed with
Honda Heavy Duty Brake Fluid
DOT 3 as soon as possible.
Brake f luid marked DOT 5 is not
compatible with your vehicle’s
braking system and can cause
extensive damage.
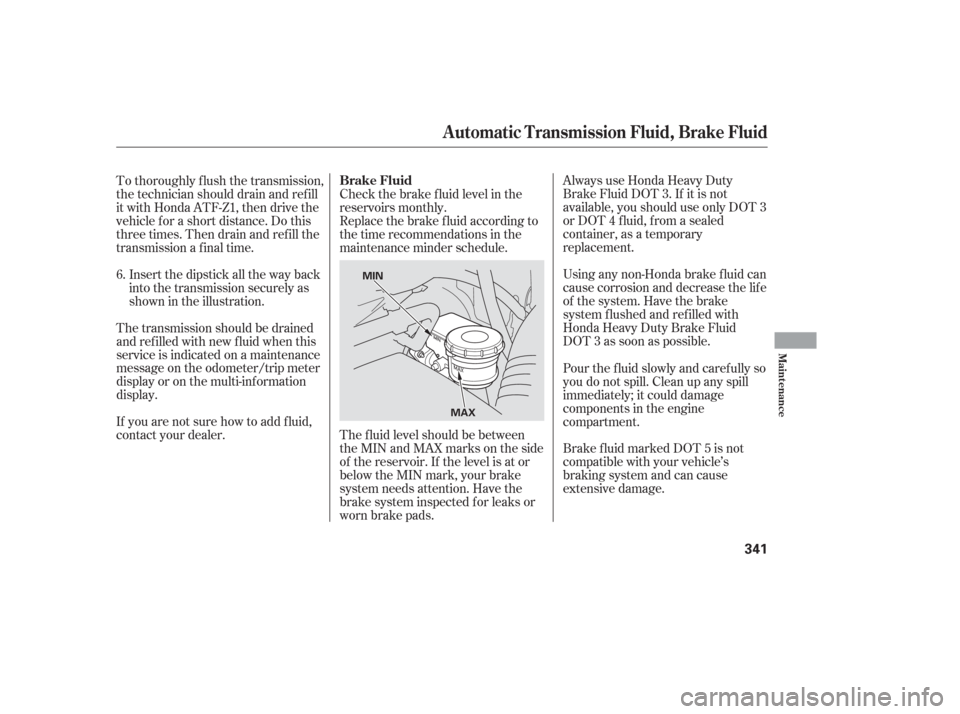
Check the brake f luid level in the
reservoirs monthly.
The f luid level should be between
theMINandMAXmarksontheside
of the reservoir. If the level is at or
below the MIN mark, your brake
system needs attention. Have the
brake system inspected f or leaks or
worn brake pads.
To thoroughly f lush the transmission,
the technician should drain and ref ill
it with Honda ATF-Z1, then drive the
vehicle f or a short distance. Do this
three times. Then drain and ref ill the
transmission a f inal time.
Insert the dipstick all the way back
into the transmission securely as
shown in the illustration.
The transmission should be drained
and ref illed with new f luid when this
service is indicated on a maintenance
message on the odometer/trip meter
display or on the multi-inf ormation
display.
If you are not sure how to add f luid,
contact your dealer. Replace the brake f luid according to
thetimerecommendationsinthe
maintenance minder schedule.
Pour the f luid slowly and caref ully so
you do not spill. Clean up any spill
immediately; it could damage
components in the engine
compartment.
6.
Automatic Transmission Fluid, Brake Fluid
Brake Fluid
Maint enance
341
MAX
MIN
Page 361 of 420
If you need to park your vehicle f or
an extended period (more than 1
month), there are several things you
should do to prepare it f or storage.
Proper preparation helps prevent
deterioration and makes it easier to
get your vehicle back on the road. If
possible, store your vehicle indoors.Fill the f uel tank.
Change the engine oil and f ilter.
Wash and dry the exterior
completely.
Cleantheinterior.Makesurethe
carpeting, floor mats, etc., are
completely dry.
Leave the parking brake off. Put
the transmission in Park. Block the rear wheels.
If the vehicle is to be stored f or a
longer period, it should be
supported on jackstands so the
tires are of f the ground.
Leave one window open slightly (if
the vehicle is being stored
indoors).
Disconnect the battery.
Support the f ront and rear wiper
blade arms with a f olded towel or
ragsotheydonottouchthe
windshield.
To minimize sticking, apply a
silicone spray lubricant to all door
and tailgate seals. Also, apply a
vehiclebodywaxtothepainted
surfaces that mate with the door
and tailgate seals.Cover the vehicle with a
‘‘breathable’’ cover, one made
f rom a porous material such as
cotton. Non-porous materials, such
as plastic sheeting, trap moisture,
which can damage the paint.
If possible, periodically run the
engine until it reaches f ull
operating temperature (the
cooling f ans cycle twice).
Pref erably, do this once a month.
Vehicle Storage
360
Page 367 of 420
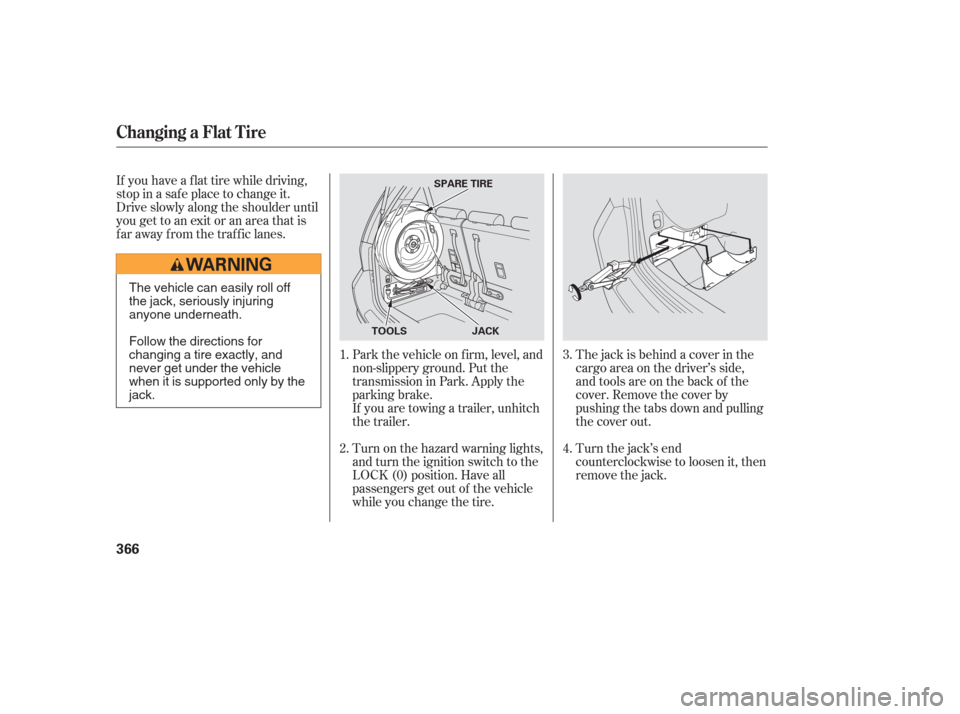
If you have a f lat tire while driving,
stop in a saf e place to change it.
Drive slowly along the shoulder until
you get to an exit or an area that is
far away from the traffic lanes.The jack is behind a cover in the
cargo area on the driver’s side,
and tools are on the back of the
cover. Remove the cover by
pushing the tabs down and pulling
the cover out.
Turn the jack’s end
counterclockwise to loosen it, then
remove the jack.
Park the vehicle on f irm, level, and
non-slippery ground. Put the
transmission in Park. Apply the
parking brake.
If you are towing a trailer, unhitch
the trailer.
Turn on the hazard warning lights,
and turn the ignition switch to the
LOCK (0) position. Have all
passengers get out of the vehicle
while you change the tire.
2. 1.
3.
4.
Changing a Flat Tire
366
JACK
SPARE TIRE
TOOLS
The vehicle can easily roll off
the jack, seriously injuring
anyone underneath.
Follow the directions for
changing a tire exactly, and
never get under the vehicle
when it is supported only by the
jack.
Page 373 of 420

Diagnosing why the engine won’t
start f alls into two areas, depending
on what you hear when you turn the
ignition switch to the START (III)
position:Check the transmission interlock.
The transmission must be in Park
or neutral or the starter will not
operate.
Turn the ignition switch to the ON
(II) position. Turn on the
headlights, and check their
brightness. If the headlights are
very dim or do not come on at all,
the battery is discharged. See
on page . If the headlights dim noticeably or
go out when you try to start the
engine, either the battery is
discharged or the connections are
corroded. Check the condition of the
battery and terminal connections
(see page ). You can then try
jump starting the vehicle from a
booster battery (see page ).
In this case, the starter motor’s
speed sounds normal, or even f aster
than normal, when you turn the
ignition switch to the START (III)
position, but the engine does not run.
Are you using the proper starting
procedure? Ref er to on page .
Turn the ignition switch to the
START (III) position. If the
headlights do not dim, check the
condition of the f uses. If the f uses
areOK,thereisprobably
something wrong with the
electrical circuit for the ignition
switch or starter motor. You will
need a qualif ied technician to
determine the problem (see
on page ).
Check these things: When you turn the ignition switch to
the START (III) position, you do not
hear the normal noise of the engine
trying to start. You may hear a
clicking sound or series of clicks, or
nothing at all. You can hear the starter motor
operating normally, or the starter
motor sounds like it is spinning
f aster than normal, but the engine
does not start up and run. You hear nothing, or almost
nothing. The engine’s starter
motor does not operate at all, or
operates very slowly.
373
387 373
299
359
Jump Starting T he Starter Operates Normally
Starting the
Engine
Emergency T owing
Nothing Happens or the Starter
Motor Operates Very Slowly
If theEngineWon’tStart
372