Page 69 of 267
The inf ormation display in the
instrument panel shows you the
engine oil lif e and maintenance
service items when the ignition
switch is in the ON (II) position. This
inf ormation helps to keep you aware
of the periodic maintenance your
vehicle needs f or continued trouble-
f ree driving. Ref er to page f or
more inf ormation.
If the system still detects a loose or
missing f uel f ill cap, the malf unction
indicator lamp (MIL) comes on.
Turn the engine of f , and check or
retighten the f uel f ill cap until it
clicks at least once. The MIL goes
out af ter 3 days of normal driving
once the cap is tightened or replaced.
If it does not go out, have your
dealer inspect the vehicle. For more
inf ormation, see page .
181
230
Gauges
Maintenance Minder
68
�����—�����—�����y�
����
��������y���
�(�#���������y�������
�y
Page 70 of 267
�Î�Î
�Î
�Î
�Î
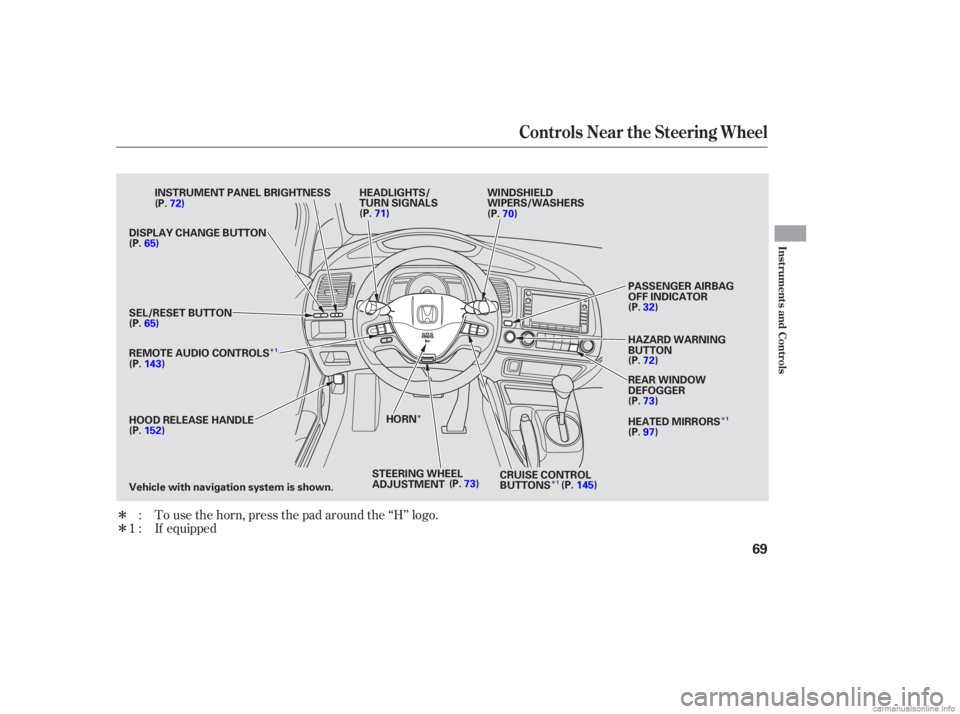
�ÎTo use the horn, press the pad around the ‘‘H’’ logo.
:
1 : If equipped
Controls Near the Steering Wheel
Inst rument s and Cont rols
69
HEADLIGHTS/
TURN SIGNALS
HAZARD WARNING
BUTTON PASSENGER AIRBAG
OFF INDICATOR
SEL/RESET BUTTON
HORN
HOOD RELEASE HANDLE (P.65)
(P.143)
(P.152) (P.71)
(P.70) WINDSHIELD
WIPERS/WASHERS
CRUISE CONTROL
BUTTONS (P.145)
STEERING WHEEL
ADJUSTMENT
REMOTE AUDIO CONTROLS INSTRUMENT PANEL BRIGHTNESS
DISPLAY CHANGE BUTTON (P.72)
(P.65)
REAR WINDOW
DEFOGGER
(P.73)
HEATED MIRRORS
(P.97)
(P.73) (P.32)
(P.72)
Vehicle with navigation system is shown.
1
1
1
�����—�����—�����y�
����
��������y���
�(�#���������y���������y
Page 72 of 267
 �µ
�µ �µ
Push down on the
lef t lever to signal a lef t turn and up
to signal a right turn. To signal a lane
change, push lightly on the lever,
and hold it. The lever will return to
center when you")
�µ
�µ �µ
Push down on the
lef t lever to signal a lef t turn and up
to signal a right turn. To signal a lane
change, push lightly on the lever,
and hold it. The lever will return to
center when you release it or
complete a turn.
Turning the switch to
the ‘‘ ’’ position turns on the
parking lights, taillights, instrument
panel lights, side-marker lights, and
rear license plate lights.
Turn signal
Of f
Parking and interior lights
Headlights
High beams
Flashhighbeams Turning the switch to the ‘‘ ’’
position turns on the headlights. If you leave the lights on with the
key removed f rom the ignition
switch, you will hear a reminder
chime when you open the driver’s
door.
When the light switch is in the
‘‘ ’’ or ‘‘ ’’ position, the
lights on indicator comes on as a
reminder. This indicator stays on if
you leave the light switch on and
turn the ignition switch to the
ACCESSORY (I) or LOCK (0)
position. Push the lever
f orward until you hear a click. The
high beam indicator will come on
(see page ). Pull it back to return
to low beams.
To f lash the high beams, pull the
lever back lightly, then release it.
The high beams will stay on as long
as you hold the lever back.
1.
2.
3.
4.
5.
6. 62
Turn Signal
Headlights
High Beams
Turn Signal and Headlights
Inst rument s and Cont rols
71
�����—�����—�����y�
����
��������y���
�(�#���������y���������y
Page 73 of 267
 �´�µ
The headlights revert to normal
operation when you turn them on
with the switch.
The buttons under the lef t side vent
control the brightness of the
instrument panel. Push the or
button to adju")
�´�µ
The headlights revert to normal
operation when you turn them on
with the switch.
The buttons under the lef t side vent
control the brightness of the
instrument panel. Push the or
button to adjust the brightness.Pushthebuttontoturnonthe
hazard warning lights (f our-way
flashers). This causes all four
outside turn signals and both turn
indicators in the instrument panel to
f lash. Use the hazard warning lights
if you need to park in a dangerous
area near heavy traffic, or if your
vehicle is disabled.
With the headlight switch of f , only
the high beam headlights come on
with reduced brightness when you
turn the ignition switch to the ON
(II) position and release the parking
brake. They remain on until you turn
the ignition switch of f , even if you
set the parking brake.
Separate adjustments can be made
when the headlights are on and of f .
Headlights, Instrument Panel Brightness, Hazard Warning Button
Daytime Running L ightsInstrument Panel Brightness Hazard Warning Button
72
INSTRUMENT PANEL BRIGHTNESS
CONTROL BUTTONS
�����—�����—�����y�
����
��������y���
�(�#���������y���������y
Page 75 of 267
Push the lever under the steering
column all the way down.
Move the steering wheel up or
down, and in or out to the desired
position. Make sure you can see
the instrument panel gauges and
the indicators.Push the lever up to lock the
steering wheel in that position.
Make sure you have securely
locked the steering wheel in place
by trying to move it up, down, in,
and out.
The master key fits all the locks on
your vehicle.
1. 4.
2. 3.
Steering Wheel A djustment, K eys and L ocks
Keys and Locks
74
U.S. EX model
MASTER KEY
WITH REMOTE
TRANSMITTER VALET
KEY
(Gray)
KEY
NUMBER
TAG
�����—�����—�����y�
����
��������y���
�(�#���������y���������y
Page 78 of 267
 �µ
�µ �µ
�µ
The ignition switch has f our
positions: LOCK (0), ACCESSORY
(I), ON (II), and START (III). If the f ront wheels are turned, the
anti-theft lock may make it difficult
to turn the key.")
�µ
�µ �µ
�µ
The ignition switch has f our
positions: LOCK (0), ACCESSORY
(I), ON (II), and START (III). If the f ront wheels are turned, the
anti-theft lock may make it difficult
to turn the key. Firmly turn the
steering wheel to the lef t or right as
you turn the key.
This is the normal key
position when driving. Several of the
indicators on the instrument panel
come on as a test when you turn the
ignition switch f rom the
ACCESSORY (I) to the ON (II)
position.
You can insert or
remove the key only in this position.
To turn the key, push it in slightly. If
your vehicle has an automatic
transmission, the shif t lever must
also be in park. You can
operate the audio system and the
accessory power socket in this
position. You will hear a reminder beeper if
you leave the key in the LOCK (0) or
the ACCESSORY (I) position and
open the driver’s door. Remove the
key to turn of f the beeper.
If your vehicle has an automatic
transmission, the shif t lever must be
in Park bef ore you can remove the
key f rom the ignition switch.
Use this position
only to start the engine. The switch
returns to the ON (II) position when
you let go of the key.
Ignition Switch
ON (II)
LOCK (0) A CCESSORY (I)
ST A RT (III)
Inst rument s and Cont rols
77
Removing the key from the
ignition switch while driving
locks the steering. This can
cause you to lose control of the
vehicle.
Remove the key from the
ignition switch only when
parked.
�����—�����—�����y�
����
��������y���
�(�#���������y���������y
Page 98 of 267
The outside mirrors are heated to
remove fog and frost. With the
ignition switch in the ON (II)
position, turn on the heaters by
pressing the button. The indicator in
the button comes on as a reminder.
Press the button again to turn the
heaters off. Pressing this button also
turns the rear window def ogger on
and off.To apply the parking brake, pull the
lever up f ully. To release it, pull up
slightly, push the button, and lower
the lever. The parking brake
indicator on the instrument panel
should go out when the parking
brake is f ully released (see page ).
60
On Canadian LX and EX models
Mirrors, Parking Brake
Parking Brake
Heated Mirrors
Inst rument s and Cont rols
97
PARKING BRAKE LEVER
HEATED MIRROR BUTTON
Driving the vehicle with the parking
brake applied can damage the rear
brakes and axles. A beeper will sound
if the vehicle is driven with the parking
brake on.
�����—�����—�����y�
�������������y���
�(�#���������y���
�����y
Page 112 of 267
 �µ�µ
�µ
These two
modes adjust the strength of the
sound coming f rom each speaker.
BALANCE adjusts the side-to-side
strength, while FADER adjusts the
front-to-back strength. You can use the instru")
�µ�µ
�µ
These two
modes adjust the strength of the
sound coming f rom each speaker.
BALANCE adjusts the side-to-side
strength, while FADER adjusts the
front-to-back strength. You can use the instrument panel
brightness control buttons to adjust
the illumination of the audio system
(see page ). The audio system
illuminates when the parking lights
are on, even if the radio is turned of f .
The SVC
mode controls the volume based on
vehicle speed. The f aster you go, the
louder the audio volume becomes.
As you slow down, the audio volume
decreases.
The SVC has f our modes; SVC OFF,
SVC LOW, SVC MID, and SVC
HIGH. The def ault setting is MID.
Turn the SOUND (TUNE) knob to
adjust the setting to your liking.
If you f eel the sound is too loud,
choose low. If you f eel the sound is
too quiet, choose high.
Use the TREBLE/
BASS modes to adjust the tone to
your liking.
72
Playing the Radio
Balance/FaderA udio System L ighting
Speed-sensitive volume
compensation (SVC)
Treble/Bass
Features
111
�����—�����—�����y�
�������������y���
�(�#���������y���
�
���y
 The inf ormation display in the
instrument panel shows you the
engine oil lif e and maintenance
service items when the ignition
switch is in the ON (II) position. This
inf ormation helps to keep you a")
 Push the lever under the steering
column all the way down.
Move the steering wheel up or
down, and in or out to the desired
position. Make sure you can see
the instrument panel gauges and
the indicato")
 The outside mirrors are heated to
remove fog and frost. With the
ignition switch in the ON (II)
position, turn on the heaters by
pressing the button. The indicator in
the button comes on as a reminder")