Page 5 of 267
�Î
�Î�Î
�Î
: If equipped
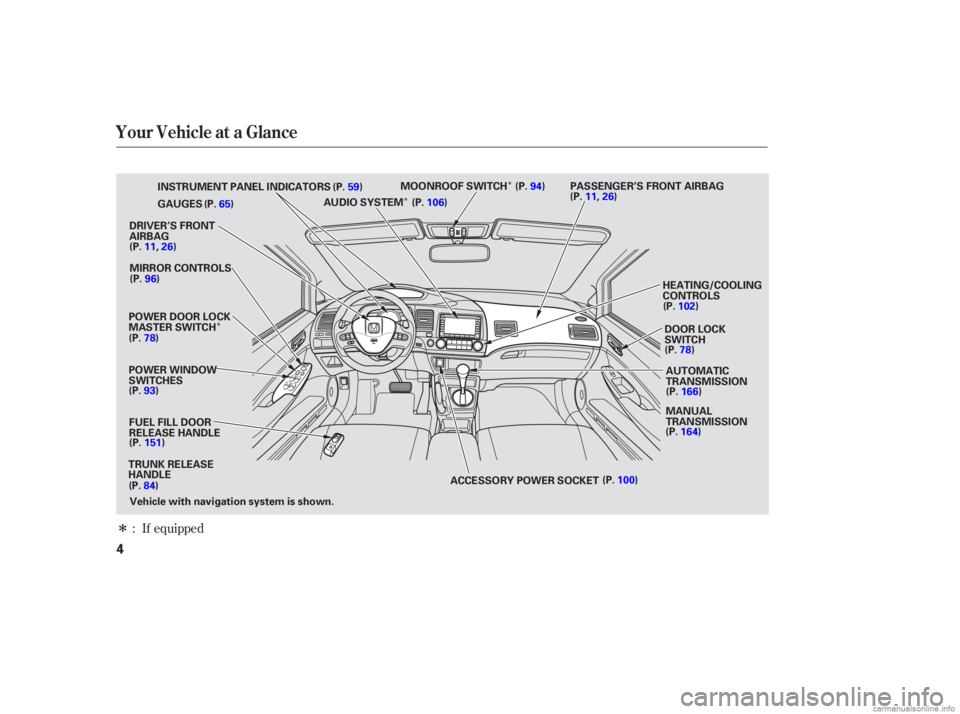
Your Vehicle at a Glance
4
POWER WINDOW
SWITCHESGAUGES
POWER DOOR LOCK
MASTER SWITCH FUEL FILL DOOR
RELEASE HANDLE
TRUNK RELEASE
HANDLE DRIVER’S FRONT
AIRBAG
HEATING/COOLING
CONTROLS
AUTOMATIC
TRANSMISSION
MANUAL
TRANSMISSION
ACCESSORY POWER SOCKET DOOR LOCK
SWITCH
MIRROR CONTROLS INSTRUMENT PANEL INDICATORS
AUDIO SYSTEMMOONROOF SWITCH
(P.59)
(P.65)
(P.11,26) (P.96)
(P.78)
(P.93) (P. 151)
(P. 84) (P.
106) (P.
94)
(P.11, 26)
(P.102 )
(P. 78)
(P. 166)
(P. 164)
(P. 100)
Vehicle with navigation system is shown. PASSENGER’S FRONT AIRBAG
�����—�����—�����y�
�������������y���
�(�#���������y���������y
Page 6 of 267
�Î
�Î
�Î
�Î
�Î
�Î�Î
�Î
To use the horn, press the pad around the ‘‘H’’ logo.
Only on vehicles equipped with navigation system. Ref er to the navigation system manual.
:
1:
2: If equipped
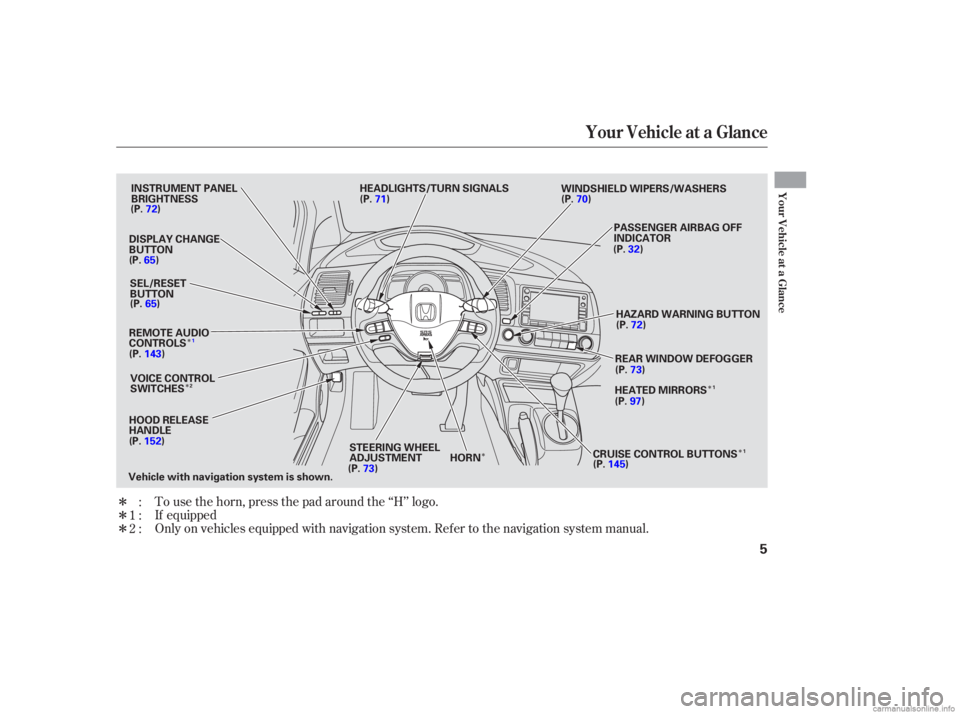
Your Vehicle at a Glance
Your Vehicle at a Glance
5
HEADLIGHTS/TURN SIGNALS
INSTRUMENT PANEL
BRIGHTNESS
DISPLAY CHANGE
BUTTON
(P.65) SEL/RESET
BUTTON
REMOTE AUDIO
CONTROLS VOICE CONTROL
SWITCHES
STEERING WHEEL
ADJUSTMENT HAZARD WARNING BUTTON
PASSENGER AIRBAG OFF
INDICATOR
HORN REAR WINDOW DEFOGGER
(P.73)
(P.72)
(P.65)
(P.143)
(P.152) (P.73)(P.71)
(P.70)
(P.32)
(P.72)
(P.97)
(P.145)
HOOD RELEASE
HANDLE WINDSHIELD WIPERS/WASHERS
HEATED MIRRORS
CRUISE CONTROL BUTTONS
Vehicle with navigation system is shown.
1
2 1
1
�����—�����—�����y�
�������������y���
�(�#���������y���������y
Page 58 of 267
 This section gives inf ormation about
the controls and displays that
contribute to the daily operation of
your vehicle. All the essential
controls are within easy reach............................
Con")
This section gives inf ormation about
the controls and displays that
contribute to the daily operation of
your vehicle. All the essential
controls are within easy reach............................
Control Locations .58
............................
Instrument Panel .59
..........
Instrument Panel Indicators .60
.............................................
Gauges .65
.....................................
Odometer .65
..............
Display Change Button .65
...................................
Trip Meter .66
..................................
Fuel Gauge .66
...................
Temperature Gauge .66
Outside Temperature
...................................
Indicator .67
..........
Check Fuel Cap Indicator .67
..................
Maintenance Minder .68
Controls Near the Steering ...........................................
Wheel .69
.
Windshield Wipers and Washers .70
...........
Turn Signal and Headlights .71
............
Daytime Running Lights .72
........
Instrument Panel Brightness .72
.................
Hazard Warning Button .72
.................
Rear Window Def ogger .73
..........
Steering Wheel Adjustment .73
...............................
Keys and Locks .74
........................
Immobilizer System .76
................................
Ignition Switch .77 ......................................
Door Locks .78
......................
Power Door Locks .78
..............
Childproof Door Locks .79
.
Auto Door Locking/Unlocking .79
.....................
Auto Door Locking .79
.................
Auto Door Unlocking .81
................................................
Trunk .84
........
Emergency Trunk Opener .84
.......................
Remote Transmitter .85
.................................................
Seats .88
..............................
Power Windows .93
.........................................
Moonroof .94
.............................................
Mirrors .96
.................................
Parking Brake .97
.................................
Interior Lights .98
...........
Interior Convenience Items .99
.....................
Beverage Holders .100
.........
Accessory Power Socket .100
..................................
Glove Box .100
.............
Console Compartment .100
Instruments and Controls
Inst rument s and Cont rols
57
�����—�����—�����y�
����
������
�y���
�(�#���������y���������y
Page 59 of 267
�Î
�Î �Î
�Î: If equipped
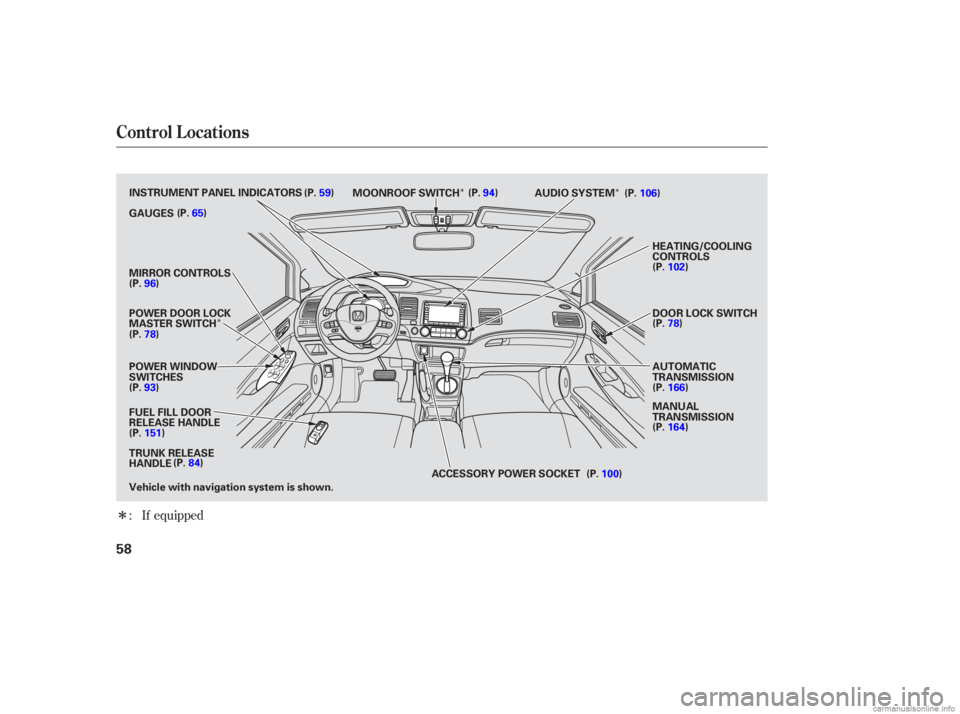
Control L ocations
58
POWER WINDOW
SWITCHES
AUDIO SYSTEM
HEATING/COOLING
CONTROLS
POWER DOOR LOCK
MASTER SWITCH MIRROR CONTROLS
FUEL FILL DOOR
RELEASE HANDLE AUTOMATIC
TRANSMISSION
ACCESSORY POWER SOCKET MANUAL
TRANSMISSIONDOOR LOCK SWITCH
MOONROOF SWITCH
(P.94)
GAUGES
(P.96)
(P.78)
(P.93)
(P.151) (P.106)
(P.102)
(P.78)
(P.166)
(P.164)
(P.100)
(P.65)
TRUNK RELEASE
HANDLE (P.84)
Vehicle with navigation system is shown. INSTRUMENT PANEL INDICATORS (P.59)
�����—�����—�����y�
����
��������y���
�(�#���������y�������
�y
Page 70 of 267
�Î�Î
�Î
�Î
�Î
�ÎTo use the horn, press the pad around the ‘‘H’’ logo.
:
1 : If equipped
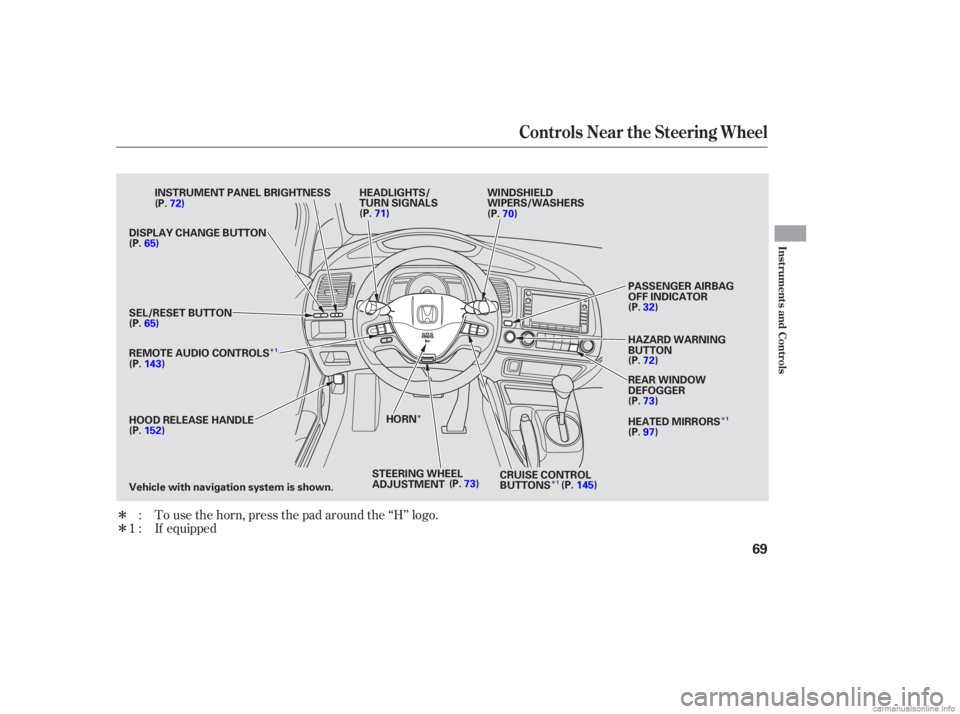
Controls Near the Steering Wheel
Inst rument s and Cont rols
69
HEADLIGHTS/
TURN SIGNALS
HAZARD WARNING
BUTTON PASSENGER AIRBAG
OFF INDICATOR
SEL/RESET BUTTON
HORN
HOOD RELEASE HANDLE (P.65)
(P.143)
(P.152) (P.71)
(P.70) WINDSHIELD
WIPERS/WASHERS
CRUISE CONTROL
BUTTONS (P.145)
STEERING WHEEL
ADJUSTMENT
REMOTE AUDIO CONTROLS INSTRUMENT PANEL BRIGHTNESS
DISPLAY CHANGE BUTTON (P.72)
(P.65)
REAR WINDOW
DEFOGGER
(P.73)
HEATED MIRRORS
(P.97)
(P.73) (P.32)
(P.72)
Vehicle with navigation system is shown.
1
1
1
�����—�����—�����y�
����
��������y���
�(�#���������y���������y
Page 74 of 267
 The rear window def ogger will clear
fog, frost, and thin ice from the
window. Push the def ogger button to
turn it on and off. The indicator in
the button comes on to show the
def ogger is on. If you")
The rear window def ogger will clear
fog, frost, and thin ice from the
window. Push the def ogger button to
turn it on and off. The indicator in
the button comes on to show the
def ogger is on. If you do not turn it
of f , the def ogger will shut itself of f
af ter about 15 minutes. It also shuts
of f when you turn of f the ignition
switch. You have to turn the
def ogger on again when you restart
the vehicle.Make sure the rear window is clear
and you have good visibility bef ore
starting to drive.
The def ogger and antenna wires on
the inside of the rear window can be
accidentally damaged. When
cleaning the glass, always wipe side-
to-side.
Make any steering wheel adjustment
bef ore you start driving.
Pushing this button also turns the
mirror heaters on or of f . For more
inf ormation, see page . 97
CONT INUED
On Canadian LX and EX models
Rear Window Def ogger Steering Wheel A djustment
Rear Window Def ogger, Steering Wheel A djustment
Inst rument s and Cont rols
73
Canadian
LX and EX
models
Adjusting the steering wheel
position while driving may
cause you to lose control of the
vehicle and be seriously injured
inacrash.
Adjust the steering wheel only
when the vehicle is stopped.
�����—�����—�����y�
����
����
���y���
�(�#���������y���������y
Page 97 of 267
Push the appropriate edge of the
adjustment switch to move the
mirrorright,left,up,ordown.
When you f inish, move the
selector switch to the center (off)
position. This turns the
adjustment switch of f to keep your
settings.
Keeptheinsideandoutsidemirrors
clean and adjusted f or best visibility.
Be sure to adjust the mirrors bef ore
you start driving.
The inside mirror has day and night
positions. The night position reduces
glare f rom headlights behind you.
Flip the tab on the bottom edge of
the mirror to select the day or night
position.
Turn the ignition switch to the ON
(II) position.
Move the selector switch to L
(driver’s side) or R (passenger’s
side).
2. 3.
4.
1.On all models except DX
Mirrors
Adjusting the Power Mirrors
96
SELECTOR SWITCH
ADJUSTMENT SWITCH
TAB
�����—�����—�����y�
�����������
�y���
�(�#���������y���������y
Page 98 of 267
The outside mirrors are heated to
remove fog and frost. With the
ignition switch in the ON (II)
position, turn on the heaters by
pressing the button. The indicator in
the button comes on as a reminder.
Press the button again to turn the
heaters off. Pressing this button also
turns the rear window def ogger on
and off.To apply the parking brake, pull the
lever up f ully. To release it, pull up
slightly, push the button, and lower
the lever. The parking brake
indicator on the instrument panel
should go out when the parking
brake is f ully released (see page ).
60
On Canadian LX and EX models
Mirrors, Parking Brake
Parking Brake
Heated Mirrors
Inst rument s and Cont rols
97
PARKING BRAKE LEVER
HEATED MIRROR BUTTON
Driving the vehicle with the parking
brake applied can damage the rear
brakes and axles. A beeper will sound
if the vehicle is driven with the parking
brake on.
�����—�����—�����y�
�������������y���
�(�#���������y���
�����y
 Push the appropriate edge of the
adjustment switch to move the
mirrorright,left,up,ordown.
When you f inish, move the
selector switch to the center (off)
position. This turns the
adjustment switch of")
 The outside mirrors are heated to
remove fog and frost. With the
ignition switch in the ON (II)
position, turn on the heaters by
pressing the button. The indicator in
the button comes on as a reminder")