Page 146 of 267

With the system set, you can still
open the trunk with the master key
or the remote transmitter without
triggering the alarm. The alarm will
sound if the trunk lock is forced, or
the trunk is opened with the trunk
release handle.
The security system will not set if
the hood, trunk, or any door is not
fully closed. If the system will not set,
check the door and trunk open
indicators on the instrument panel
(see page ) to see if the doors and
trunk are f ully closed. Since it is not
part of the monitor display, manually
check the hood.
To see if the system is set
af ter you exit the vehicle, press the
LOCK button on the remote
transmitter within 5 seconds. If the
system is set, the horn will beep
once.
The security system helps to protect
your vehicle and valuables f rom thef t.
The horn sounds and a combination
of headlights (low beam), parking
lights, side marker lights, and
taillights f lash if someone attempts
to break into your vehicle or remove
the radio. This alarm continues f or 2
minutes, then it stops. To reset an
alarming system before the 2
minutes have elapsed, unlock the
driver’s door with the key or the
remote transmitter.
The security system automatically
sets 15 seconds after you lock the
doors, hood, and trunk. For the
system to activate, you must lock the
doors f rom the outside with the key,
driver’s lock tab, door lock switch, or
remote transmitter. The security
system indicator on the instrument
panel starts blinking immediately to
show you the system is setting itself .
Once the security system is set,
opening any door, the trunk, or the
hood without using the key or the
remote transmitter will cause it to
alarm. It also alarms if the radio is
removed f rom the dashboard or the
wiring is cut.
Do not attempt to alter this system
or add other devices to it.62
Security System
144
NOTE:
SECURITY SYSTEM
INDICATOR
�����—�����—�����y�
����
����
���y���
�(�#���������y���
�����y
Page 151 of 267
Bef ore you begin driving your
vehicle, you should know what
gasoline to use and how to check the
levels of important f luids. You also
need to know how to properly store
luggage or packages. The
inf ormation in this section will help
you. If you plan to add any
accessories to your vehicle, please
read the information in this section
first..............................
Break-in Period .150
.................
Fuel Recommendation .150
.........
Service Station Procedures .151
....................................
Ref ueling .151
OpeningandClosingthe
.......................................
Hood .152
...................................
Oil Check .153
.............
Engine Coolant Check .154
...............................
Fuel Economy .154
...
Accessories and Modif ications .156
.............................
Carrying Cargo .158
Bef ore Driving
Bef ore Driving
149
�����—�����—�����y�
����
��������y���
�(�#���������y���
�����y
Page 154 of 267

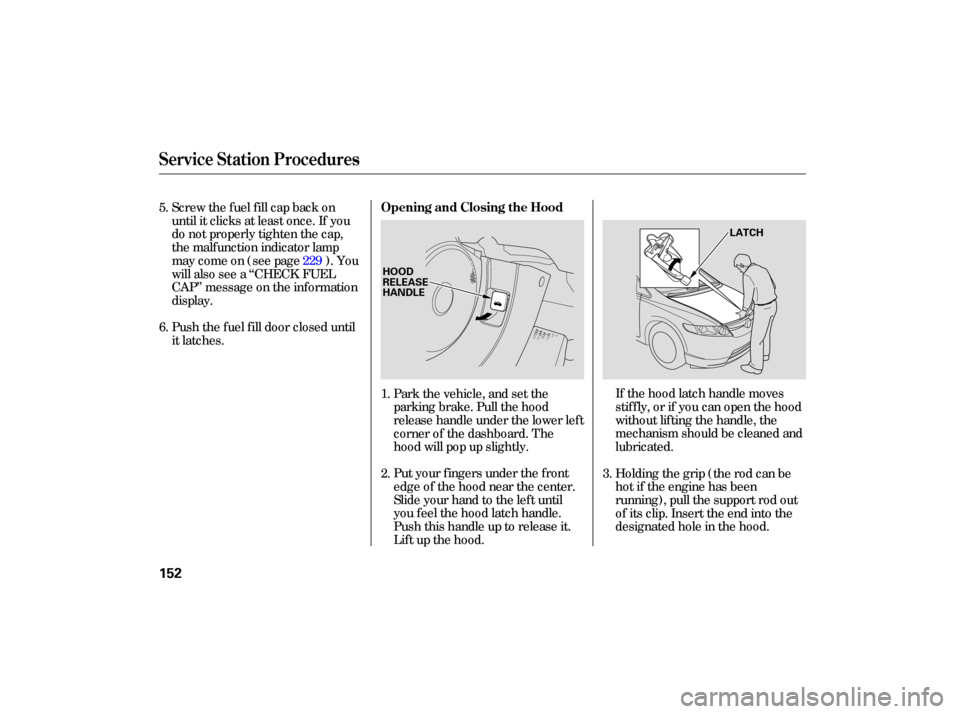
If the hood latch handle moves
stiffly, or if you can open the hood
without lifting the handle, the
mechanism should be cleaned and
lubricated.
Put your fingers under the front
edge of the hood near the center.
Slide your hand to the left until
you feel the hood latch handle.
Push this handle up to release it.
Lift up the hood.
Push
the fuel fill door closed until
it latches.
Screw
the fuel fill cap back on
until it clicks at least once. If you
do not properly tighten the cap,
the malf unction indicator lamp
maycomeon(seepage ).You
will also see a ‘‘CHECK FUEL
CAP’’ message on the inf ormation
display.
Park the vehicle, and set the
parking brake. Pull the hood
release handle under the lower lef t
corner of the dashboard. The
hood will pop up slightly.Holding the grip (the rod can be
hot if the engine has been
running), pull the support rod out
of its clip. Insert the end into the
designated hole in the hood.
2. 1.
3.
5.
6.
229
Service Station Procedures
Opening and Closing the Hood
152
HOOD
RELEASE
HANDLE LATCH
�����—�����—�����y�
����
����
���y���
�(�#���������y���
�����y
Page 192 of 267

Your vehicle does not require any oil
additives. Additives may adversely
af f ect the engine or transmission
perf ormance and durability. You may use a synthetic motor oil if
it meets the same requirements
given f or a conventional motor oil: it
displays the API Certif ication Seal,
and it is the proper weight. You must
f ollow the oil and f ilter change
intervals shown on the information
display.Always change the oil and f ilter
according to the maintenance
messages shown on the inf ormation
display. The oil and f ilter collect
contaminants that can damage your
engine if they are not removed
regularly.
Changing the oil and f ilter requires
special tools and access f rom
underneath the vehicle. The vehicle
should be raised on a service station-
type hydraulic lif t f or this service.
Unless you have the knowledge and
proper equipment, you should have
this maintenance done by a skilled
technician.
Run the engine until it reaches
normal operating temperature,
then shut it off.
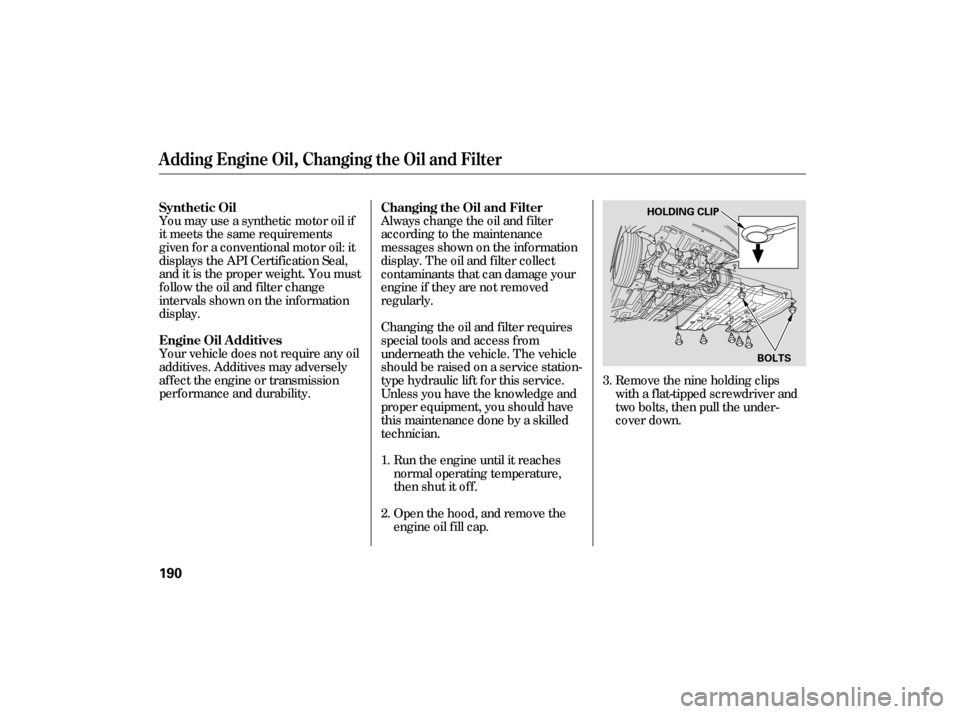
Open the hood, and remove the
engine oil f ill cap. Removethenineholdingclips
with a flat-tipped screwdriver and
two bolts, then pull the under-
cover down.
1.
2. 3.
Changing the Oil and Filter
Synthetic Oil
Engine Oil A dditives
A dding Engine Oil, Changing the Oil and Filter
190
HOLDING CLIP
BOLTS
�����—�����—�
���y�
������
��
���y���
�(�#���������y���
�����y
Page 193 of 267

Refill the engine with the
recommended oil.
Engine oil change capacity
(including filter):
Let the engine run for several
minutes, then check the drain bolt
and oil filter for leaks.
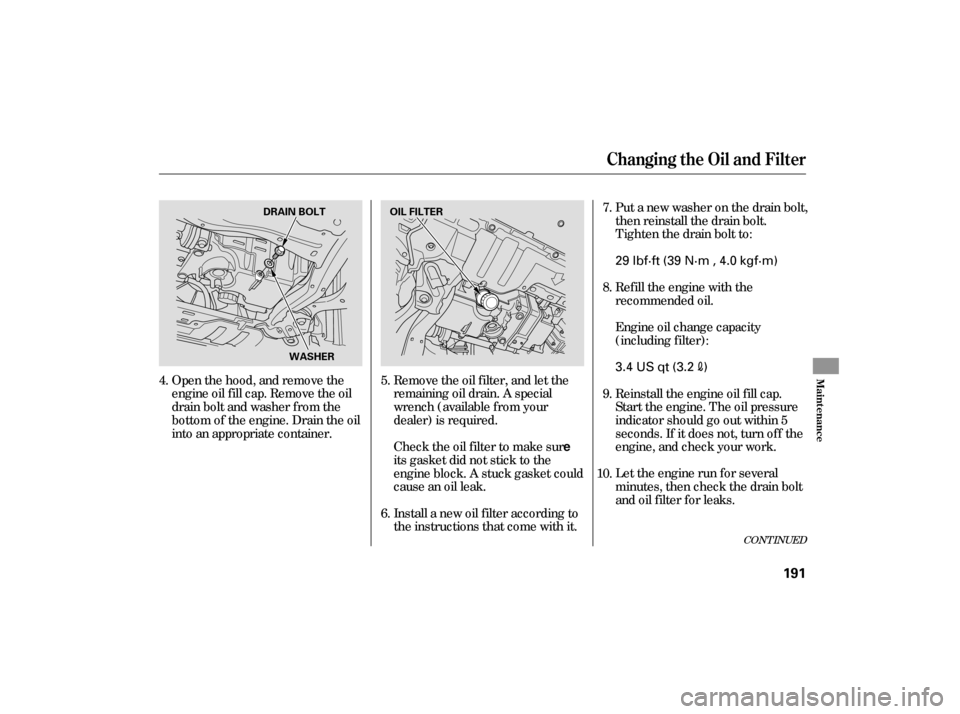
Remove
the oil filter, and let the
remaining oil drain. A speci al
wrench (available from your
dealer) is required. Put
a new washer on the drain bolt,
then reinstall the drain bolt.
Tighten the drain bolt to:
Open the hood, and remove the
engine oil fill cap. Remove the oil
drain bolt and washer from the
bottom of the engine. Drain the oil
into an appropriate container.
Install a new oil filter according to
the instructions that come with it.
Check
the oil filter to make sure
its gasket did not stick to the
engine block. A stuck gasket could
cause an oil leak. Reinstall the engine oil f ill cap.
Start the engine. The oil pressure
indicator should go out within 5
seconds. If it does not, turn of f the
engine, and check your work.
7.
8.
9.
4.
5.
6. 10.
CONT INUED
Changing the Oil and Filter
Maint enance
191
DRAIN BOLT
WASHER OIL FILTER
3.4 US qt (3.2)
29 lbf·ft (39 N·m , 4.0 kgf·m)
�����—�����—�����y�
������
������y���
�(�#���������y���
�����y
Page 199 of 267
CONT INUED
Theheadlightswereproperlyaimed
when your vehicle was new. If you
regularly carry heavy items in the
trunk, readjustment may be required.
Adjustment should be done by your
dealer or other qualif ied mechanic.
Your vehicle has halogen headlight
bulbs. When replacing a bulb, handle
it by its base, and protect the glass
f rom contact with your skin or hard
objects. If you touch the glass, clean
it with denatured alcohol and a clean
cloth.Open the hood.
To change a bulb on the lef t side,
remove the coolant tube f rom the
two clips.Remove the reserve tank f rom its
holder by pulling it straight up.
1.
Headlight A iming
Replacing a Headlight Bulb
Lights
Maint enance
197
COOLANT TUBE
CLIP
CLIP HOLDER
Halogen headlight bulbs get very hot
when lit. Oil, perspiration, or a scratch
on the glass can cause the bulb to
overheat and shatter.
�����—�����—�
���y�
�������������y���
�(�#���������y���������y
Page 207 of 267
CONT INUED
To replace a wiper blade:Lift the wiper arm off the
windshield, raising the driver’s
side first, then the passenger’s
side. Remove the cover, by squeezing
the two tabs and pulling it straight
out.
As shown above, cover the tip of a
f lat-tipped screwdriver with a cloth
and move the screwdriver in the
direction of the arrow.
2.
1.
Wiper Blades
Maint enance
205
COVER
WIPER ARMS
Do not open the hood when the wiper
arms are raised, or you will damage the
hood and wiper arms.
�����—�����—�����y�
�������������y���
�(�#���������y���������y
Page 225 of 267

�´�´
Although this seems like a simple
procedure, you should take several
precautions.
To jump start your vehicle:
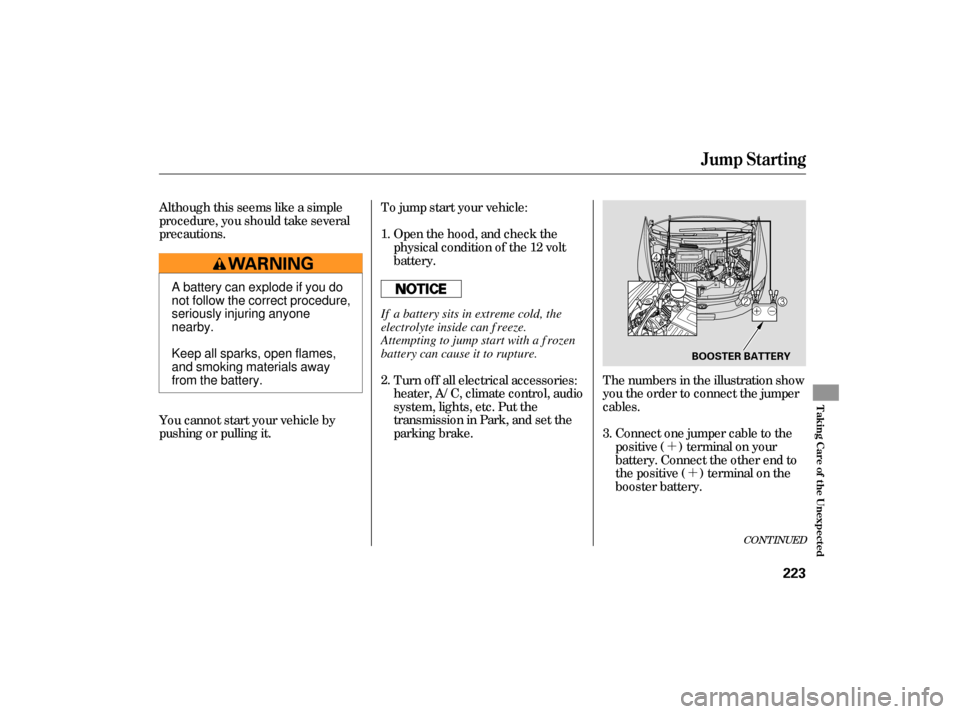
The numbers in the illustration show
you the order to connect the jumper
cables.Connect one jumper cable to the
positive ( ) terminal on your
battery. Connect the other end to
the positive ( ) terminal on the
booster battery.
You cannot start your vehicle by
pushing or pulling it. Open the hood, and check the
physical condition of the 12 volt
battery.
Turn of f all electrical accessories:
heater, A/C, climate control, audio
system, lights, etc. Put the
transmission in Park, and set the
parking brake.
1.
2.
3.
CONT INUED
Jump Starting
T aking Care of t he Unexpect ed
223
BOOSTER BATTERY
A battery can explode if you do
not follow the correct procedure,
seriously injuring anyone
nearby.
Keep all sparks, open flames,
and smoking materials away
from the battery.If a battery sits in extreme cold, the
electrolyte inside can f reeze.
Attempting to jump start with a f rozen
battery can cause it to rupture.
�����—�����—�����y�
���������
���y���
�(�#���������y���������y