Page 204 of 307

�µ�µ �µ
This position is similar
to D, except only the first three
gears are selected. Use D to provide
engine braking when going down a
steep hill. D can also keep the
transmission f rom cycling between
third and f ourth gears in stop-and-go
driving.
To shif t to second,
pressthereleasebuttononthefront
of the shif t lever. This position locks
the transmission in second gear. It
does not downshif t to f irst gear
when you come to a stop.
Use second gear: For more power when climbing.
To increase engine braking when
going down steep hills.
For starting out on a slippery
surf ace or in deep snow.
To help reduce wheel spin. To shif t f rom second to
first, press the release button on the
f ront of the shif t lever. This position
locks the transmission in f irst gear.
By upshif ting and downshif ting
through 1, 2, D , and D, you can
operate the transmission much like a
manual transmission without a
clutch pedal. If you exceed the maximum speed
f or the gear you are in, the engine
speed will enter into the tachometer’s
red zone. If this occurs, you may f eel
the engine cut in and out. This is
caused by a limiter in the engine’s
computer controls. The engine will
run normally when you reduce the
rpm below the red zone.
3
3 3
Automatic Transmission
Engine Speed L imiter
Drive (D )
Second (2) First (1)3
200
�����—�����—�����y�
���������
���y���
�(�+���������y���������y
Page 205 of 307

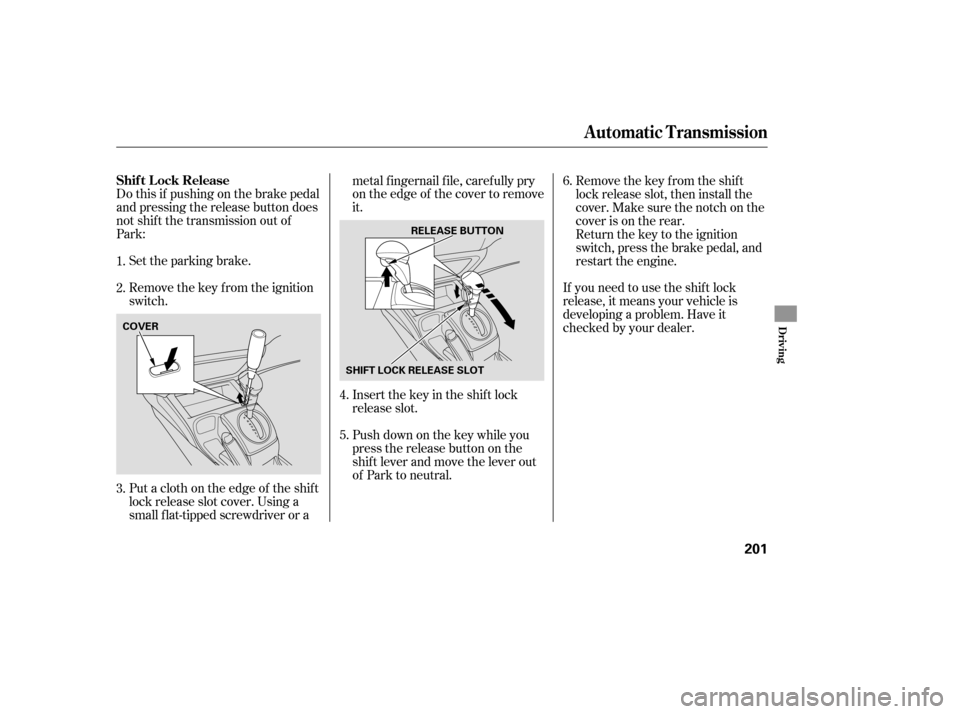
Do this if pushing on the brake pedal
and pressing the release button does
not shif t the transmission out of
Park:Set the parking brake.
Remove the key from the ignition
switch.
Put a cloth on the edge of the shif t
lock release slot cover. Using a
small f lat-tipped screwdriver or a metal f ingernail f ile, caref ully pry
on the edge of the cover to remove
it.
Insert the key in the shift lock
release slot.
If you need to use the shif t lock
release, it means your vehicle is
developing a problem. Have it
checked by your dealer.
Push down on the key while you
pressthereleasebuttononthe
shif t lever and move the lever out
of Park to neutral. Remove the key from the shift
lock release slot, then install the
cover. Make sure the notch on the
cover is on the rear.
Return the key to the ignition
switch, press the brake pedal, and
restart the engine.
1.
2.
3. 4.
5.6.
Automatic Transmission
Shif t L ock Release
Driving
201
COVER
SHIFT LOCK RELEASE SLOTRELEASE BUTTON
�����—�����—�����y�
�������������y���
�(�+���������y���������y
Page 207 of 307

Check the brakes after driving
through deep water. Apply the
brakes moderately to see if they f eel
normal. If not, apply them gently and
f requently until they do. Be extra
cautious in your driving.
The hydraulic system that operates
the brakes has two separate circuits.
Each circuit works diagonally across
the vehicle (the lef t-f ront brake is
connected with the right-rear brake,
etc.). If one circuit should develop a
problem, you will still have braking
at two wheels.
Resting your f oot on the pedal keeps
the brakes applied lightly, builds up
heat, and reduces their ef f ectiveness.
It also keeps your brake lights on all
the time, conf using drivers behind
you.
Constant application of the brakes
when going down a long hill builds
up heat and reduces their ef f ective-
ness. Use the engine to assist the
brakes by taking your f oot of f the
accelerator and downshif ting to a
lower gear. Your vehicle is equipped with f ront
disc brakes. The brakes on the rear
wheels may be disc or drum,
depending on the model. A power
assist helps reduce the ef f ort needed
on the brake pedal. The ABS helps
you retain steering control when
braking very hard. If the brake pads need replacing, you
will hear a distinctive, metallic
screeching sound when you apply
the brake pedal. If you do not have
the brake pads replaced, they will
screech all the time. It is normal f or
the brakes to occasionally squeal or
squeak when you apply them.
Braking System Design Brake Wear Indicators
Braking System
Driving
203
�����—�����—�����y�
�����������
�y���
�(�+���������y���������y
Page 211 of 307

This section explains why it is
important to keep your vehicle well
maintained and how to f ollow basic
maintenance saf ety precautions.
If you have the skills and tools to
perf orm more complex maintenance
tasks on your vehicle, you may want
to purchase the service manual. See
page f or inf ormation on how to
obtain a copy, or see your dealer. This section also includes
instructions on how to read the
maintenance minder messages in the
inf ormation display, a maintenance
record, and instructions f or simple
maintenance tasks you may want to
take care of yourself .......................
Maintenance Saf ety .208
....................
Maintenance Minder .209
....................
Maintenance Record .216
..............................
Fluid Locations .218
........................
Adding Engine Oil .220
.......
Recommended Engine Oil .220
..............................
Synthetic Oil .221
................
Engine Oil Additives .221
.........
Changing the Oil and Filter .222
..............................
Engine Coolant .224
....................
Windshield Washers .227
....
Automatic Transmission Fluid .228
........
Manual Transmission Fluid .229
................
Brake and Clutch Fluid .230
....................
Power Steering Fluid .231
.............................................
Lights .232
................
Cleaning the Seat Belts .237
.....................................
Floor Mats .238
..................
Dust and Pollen Filter .239
.................................
Wiper Blades .239
...............................................
Tires .241
...................
Checking the Battery .248
.............................
Vehicle Storage .250
291
Maintenance
Maint enance
207
�����—�����—�����y�
���������
���y���
�(�+���������y�����
���y
Page 212 of 307

To eliminate potential hazards, read
the instructions bef ore you begin,
and make sure you have the tools
and skills required.Do
not run the engine unless
instructed to do so.
Some of the most important saf ety
precautions are given here. However,
we cannot warn you of every
conceivable hazard that can arise in
perf orming maintenance. Only you
can decide whether or not you
should perf orm a given task.
All service items not detailed in this
section should be perf ormed by a
certif ied technician or other qualif ied
mechanic.
Make sure your vehicle is parked
on level ground, the parking brake
is set, and the engine is of f .
To clean parts, use a commercially
available degreaser or parts
cleaner, not gasoline.
To reduce the possibility of f ire or
explosion, keep cigarettes, sparks,
and flames away from the battery
and all f uel-related parts.
Wear eye protection and
protective clothing when working
with the battery or compressed air. Be sure there is
adequate ventilation whenever you
operate the engine.
Let the
engine and exhaust system cool
bef ore touching any parts.
Maintenance Saf ety
Important Saf ety Precautions Injury f rom moving parts.
Potential Vehicle Hazards Carbon Monoxide poison f rom
engine exhaust.
Burns f rom hot parts.
208
Failure to properly follow
maintenance instructions and
precautions can cause you to
be seriously hurt or killed.
Always follow the procedures
and precautions in this owner’s
manual.
Improperly maintaining this
vehicle, or failing to correct a
problem before driving can
cause a crash in which you can
be seriously hurt or killed.
Always follow the inspection
and maintenance
recommendations and
schedules in this owner’s
manual.
�����—�����—�����y�
�������������y���
�(�+���������y�����
�
�y
Page 213 of 307

�µ
�µ
�µ
�µ
�µ
�µ
�µ
�µ
�µ
�µ �µ
�µ�µ
�Î
�Î
�Î
�Î
�Î
CONT INUED
Calculated Engine Oil Lif e (%)
100 % 91 % 90 % 81 %
80 % 71 %
70 % 61 %
60 % 51 %
50 % 41 %
40 % 31 %
30 % 21 %
20 % 16 %
15 % 11 % 10 % 6 %
15 % 6 % 5% 1% 0% Displayed
Engine Oil Lif e (%) 100 %90 %
80 %
70 %
60 %
50 %
40 %
30 %
20 %
15 %
10 %
15 %5%
0%
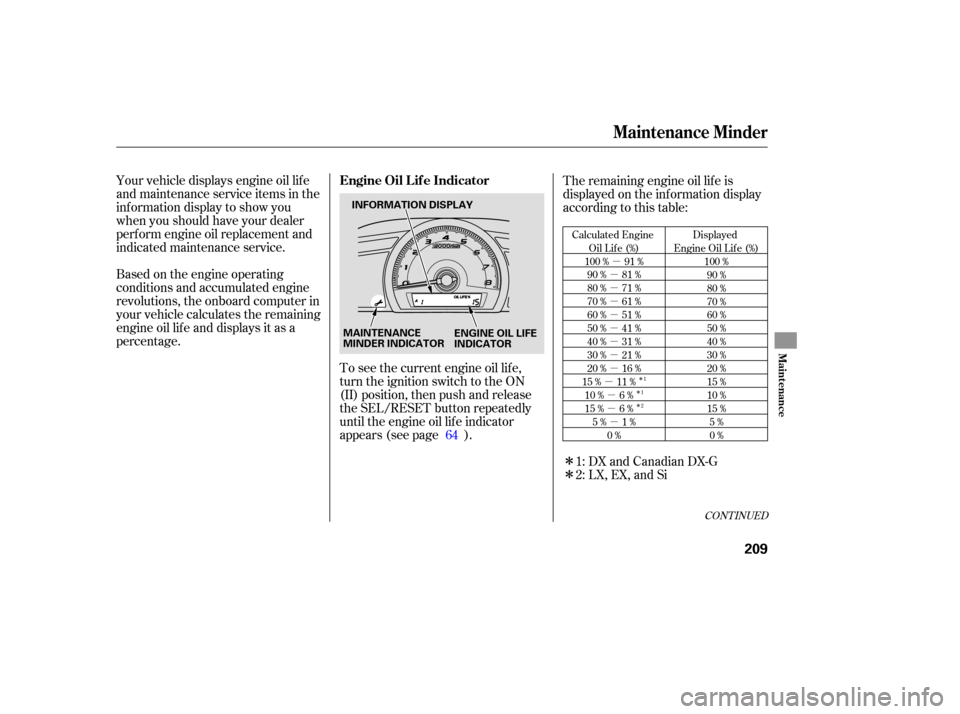
Your vehicle displays engine oil lif e
and maintenance service items in the
inf ormation display to show you
when you should have your dealer
perf orm engine oil replacement and
indicated maintenance service.
Based on the engine operating
conditions and accumulated engine
revolutions, the onboard computer in
your vehicle calculates the remaining
engine oil lif e and displays it as a
percentage. The remaining engine oil lif e is
displayed on the inf ormation display
according to this table:
To see the current engine oil lif e,
turn the ignition switch to the ON
(II) position, then push and release
the SEL/RESET button repeatedly
until the engine oil lif e indicator
appears (see page ). 64
1: DX and Canadian DX-G
2: LX, EX, and Si
1
1
2
Maintenance Minder
Engine Oil L if e Indicator
Maint enance
209
MAINTENANCE
MINDER INDICATOR ENGINE OIL LIFE
INDICATOR
INFORMATION DISPLAY
�����—�����—�����y�
�������������y���
�(�+���������y�����
���y
Page 214 of 307

The maintenance item code or codes
indicate the main and sub items
required at the time of the oil change
(see page ).
If the oil lif e is 15 percent or less,
you will see the oil lif e indicator
everytimeyouturntheignition
switch to the ON (II) position. The
maintenance minder indicator will
also come on, and the maintenance
item code(s) f or other scheduled
maintenance items needing service
will be displayed next to the engine
oil lif e indicator. When the remaining engine oil lif e is
less than 5 percent, you will see a
‘‘SERVICE’’ message on the
inf ormation display, along with the
same maintenance item code(s),
everytimeyouturntheignition
switch to the ON (II) position.You can switch the display to the
odometer, the trip meter, and the
outside temperature indicator (if
equipped) by pushing the SEL/
RESET button on the dashboard
repeatedly.
215
Maintenance Minder
210
ENGINE OIL LIFE
INDICATOR
MAINTENANCE
ITEM CODE(S) SERVICE MESSAGE
�����—�����—�����y�
�������������y���
�(�+���������y�����
���y
Page 215 of 307

�µ
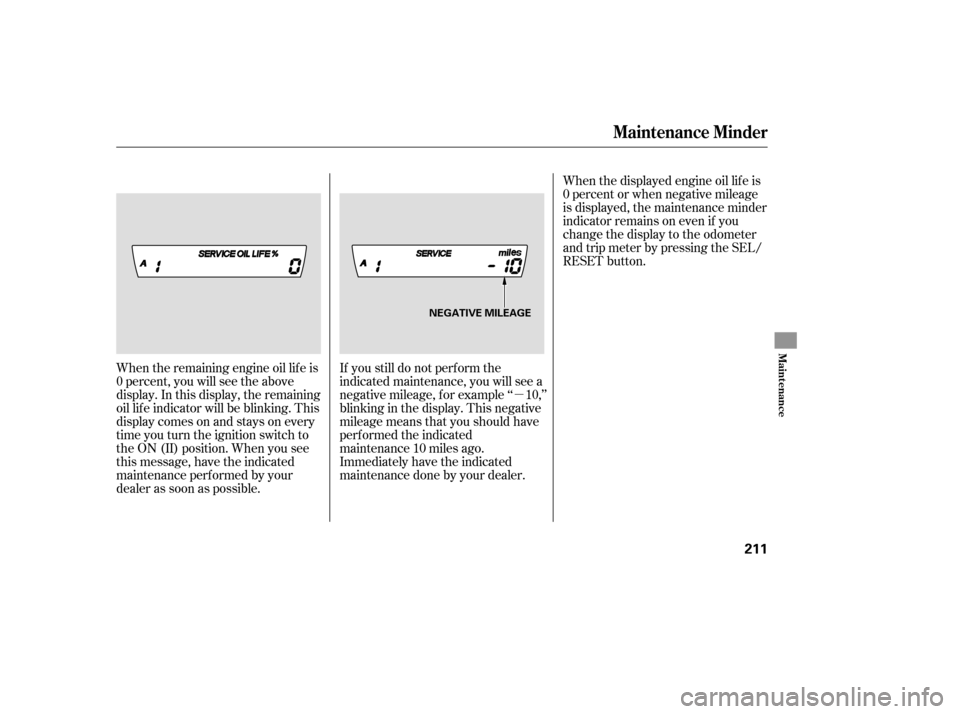
When the remaining engine oil lif e is
0percent,youwillseetheabove
display. In this display, the remaining
oil lif e indicator will be blinking. This
display comes on and stays on every
time you turn the ignition switch to
the ON (II) position. When you see
this message, have the indicated
maintenance perf ormed by your
dealer as soon as possible. If you still do not perf orm the
indicated maintenance, you will see a
negative mileage, f or example ‘‘ 10,’’
blinking in the display. This negative
mileage means that you should have
perf ormed the indicated
maintenance 10 miles ago.
Immediately have the indicated
maintenancedonebyyourdealer.When the displayed engine oil lif e is
0 percent or when negative mileage
is displayed, the maintenance minder
indicator remains on even if you
change the display to the odometer
and trip meter by pressing the SEL/
RESET button.
Maintenance Minder
Maint enance
211
NEGATIVE MILEAGE
�����—�����—�����y�
�������������y���
�(�+���������y�����
���y