Page 71 of 307
The inf ormation display in the
instrument panel shows you the
engine oil lif e and maintenance
service items when the ignition
switch is in the ON (II) position. This
inf ormation helps to keep you aware
of the periodic maintenance your
vehicle needs f or continued trouble-
f ree driving. Ref er to page f or
more inf ormation.
If the system still detects a loose or
missing f uel f ill cap, the malf unction
indicator lamp (MIL) comes on.
Turn the engine of f , and check or
retighten the f uel f ill cap until it
clicks at least once. The MIL goes
out after several days of normal
driving once the cap is tightened or
replaced. If it does not go out, have
your dealer inspect the vehicle. For
more information, see page .
209
264
Gauges
Maintenance Minder
Inst rument s and Cont rols
67
�����—�����—�����y�
�����������
�y���
�(�+���������y���������y
Page 101 of 307

�µ
When you push the MAIN switch in,
the switch is OFF, and the
passenger’s window cannot be raised
or lowered. To cancel this f eature,
push on the switch again to get it to
pop out. Keep the MAIN switch off
whenyouhavechildreninthe
vehicle so they do not injure
themselves by operating the window
unintentionally.
If the driver’s
window runs into any obstacle while
it is closing automatically, it will
reverse direction, and then stop. To
close the window, remove the
obstacle, then use the window switch
again.
Auto reverse stops sensing when the
window is almost closed. You should
always check that all passengers and
objects are away from the window
bef ore closing it. Start the engine. Push down and
hold the driver’s window switch
until the window is f ully open.
If the power windows do not operate
properly af ter resetting, have your
vehicle checked by your dealer. Pull and hold the driver’s window
switch to close the window
completely, then hold the switch
f or about 2 seconds.
If your vehicle’s battery is
disconnected or goes dead, or the
driver’s window f use is removed, the
AUTO f unction could be disabled. If
the power window system needs to
be reset af ter reconnecting the
battery or installing the f use, do this:
1.
2.
AUTO REVERSE
Power Windows
Inst rument s and Cont rols
97
�����—�����—�����y�
�������������y���
�(�+���������y���
�����y
Page 183 of 307
Bef ore you begin driving your
vehicle, you should know what
gasoline to use and how to check the
levels of important f luids. You also
need to know how to properly store
luggage or packages. The
inf ormation in this section will help
you. If you plan to add any
accessories to your vehicle, please
read the information in this section
first..............................
Break-in Period .180
.................
Fuel Recommendation .180
.........
Service Station Procedures .181
....................................
Ref ueling .181
Opening and Closing
................................
the Hood .182
...................................
Oil Check .183
.............
Engine Coolant Check .185
...............................
Fuel Economy .185
...
Accessories and Modif ications .186
.............................
Carrying Cargo .188
Bef ore Driving
Bef ore Driving
179
�����—�����—�����y�
�������������y���
�(�+���������y���
�����y
Page 187 of 307

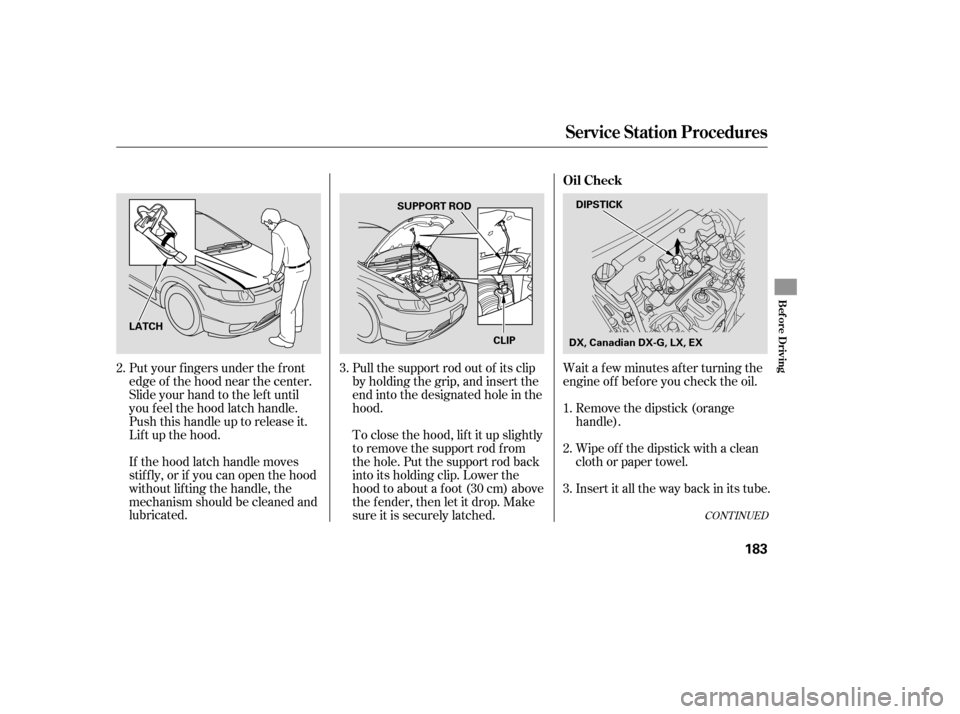
Wait a f ew minutes af ter turning the
engine of f bef ore you check the oil.
Put your f ingers under the f ront
edge of the hood near the center.
Slide your hand to the lef t until
you f eel the hood latch handle.
Push this handle up to release it.
Lif t up the hood.
If the hood latch handle moves
stif f ly, or if you can open the hood
without lifting the handle, the
mechanism should be cleaned and
lubricated. Pull the support rod out of its clip
by holding the grip, and insert the
end into the designated hole in the
hood.
To close the hood, lif t it up slightly
to remove the support rod f rom
the hole. Put the support rod back
into its holding clip. Lower the
hood to about a f oot (30 cm) above
the fender, then let it drop. Make
sure it is securely latched.
Remove the dipstick (orange
handle).
Insert it all the way back in its tube. Wipe of f the dipstick with a clean
cloth or paper towel.
3. 1.
2.
3.
2.
CONT INUED
Service Station Procedures
Oil Check
Bef ore Driving
183
DIPSTICK
SUPPORT ROD
CLIP
LATCH
DX, Canadian DX-G, LX, EX
�����—�����—�����y�
������
��
���y���
�(�+���������y���
�����y
Page 188 of 307
Remove the dipstick again, and
check the level. It should be
between the upper and lower
marks.If it is near or below the lower mark,
see on page .
220
4.
Service Station Procedures
A dding Engine Oil
184
LOWER MARK UPPER MARK Si
Si DIPSTICK
UPPER MARK
LOWER MARK
DX, Canadian DX-G, LX, EX
�����—�����—�����y�
������
������y���
�(�+���������y���
�����y
Page 189 of 307

CONT INUED
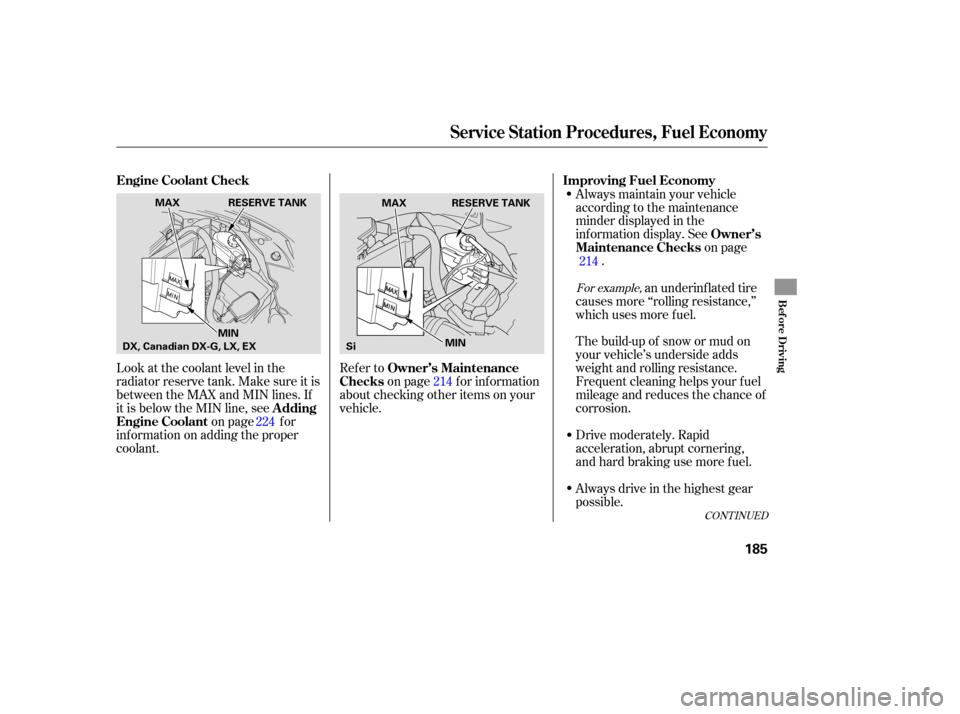
Look at the coolant level in the
radiator reserve tank. Make sure it is
between the MAX and MIN lines. If
it is below the MIN line, seeon page f or
inf ormation on adding the proper
coolant. Refer to
on page f or inf ormation
about checking other items on your
vehicle. Always maintain your vehicle
according to the maintenance
minder displayed in the
inf ormation display. See
on page
.
Always drive in the highest gear
possible. Drive moderately. Rapid
acceleration, abrupt cornering,
and hard braking use more f uel. The build-up of snow or mud on
your vehicle’s underside adds
weight and rolling resistance.
Frequent cleaning helps your f uel
mileage and reduces the chance of
corrosion. an underinf lated tire
causes more ‘‘rolling resistance,’’
which uses more f uel.
214
224 214
For example,
A dding
Engine Coolant Owner’s Maintenance
Checks
Engine Coolant Check
Improving Fuel Economy
Owner’s
Maintenance Checks
Service Station Procedures, Fuel Economy
Bef ore Driving
185
RESERVE TANK
SiRESERVE TANK
MAX
MIN
MAX
MIN
DX, Canadian DX-G, LX, EX
�����—�����—�����y�
������
������y���
�(�+���������y���
�����y
Page 197 of 307

Fasten your seat belt. Check that
your passengers have f astened
their seat belts (see page ).
Make sure the doors are securely
closed and locked. Check the steering wheel
adjustment (see page ). Check the adjustment of the
inside and outside mirrors (see
page ). Check that any items you may be
carrying are stored properly or
f astened down securely.
Check the seat adjustment (see
page ).
Make sure all windows, mirrors,
and outside lights are clean and
unobstructed. Remove f rost, snow,
or ice.
Youshoulddothefollowingchecks
and adjustments bef ore you drive
your vehicle.
Check that the hood is f ully closed.
Check that the trunk is f ully
closed. When you start the engine, check
the gauges and indicators in the
instrument panel (see page ).
Visually check the tires. If a tire
looks low, use a gauge to check its
pressure (see page ).
1.
2.
14
3.
4. 5.
6.
7.
8.
9.
11.
10.
241 90
100 73 55
Preparing to Drive
Driving
193
�����—�����—�����y�
�������������y���
�(�+���������y���
�����y
Page 201 of 307

If you exceed the maximum speed
f or the gear you are in, the engine
speed will enter into the tachometer’s
red zone. If this occurs, you may f eel
the engine cut in and out. This is
caused by a limiter in the engine’s
computer controls. The engine will
run normally when you reduce the
rpm below the red zone.
Bef ore downshif ting, make sure the
engine will not go into the
tachometer’s red zone.
Your vehicle has a rev limit indicator
to show you when the engine speed
is near the tachometer’s red zone
(see page ).If you are still unable to shif t to
reverse, apply the parking brake,
and turn the ignition key to the
ACCESSORY (I) or LOCK (0)
position.
With the clutch pedal still pressed,
start the engine. Press the clutch pedal, and shif t to
reverse.
If you need to use this procedure to
shif t to reverse, your vehicle may be
developing a problem. Have the
vehicle checked by your dealer.
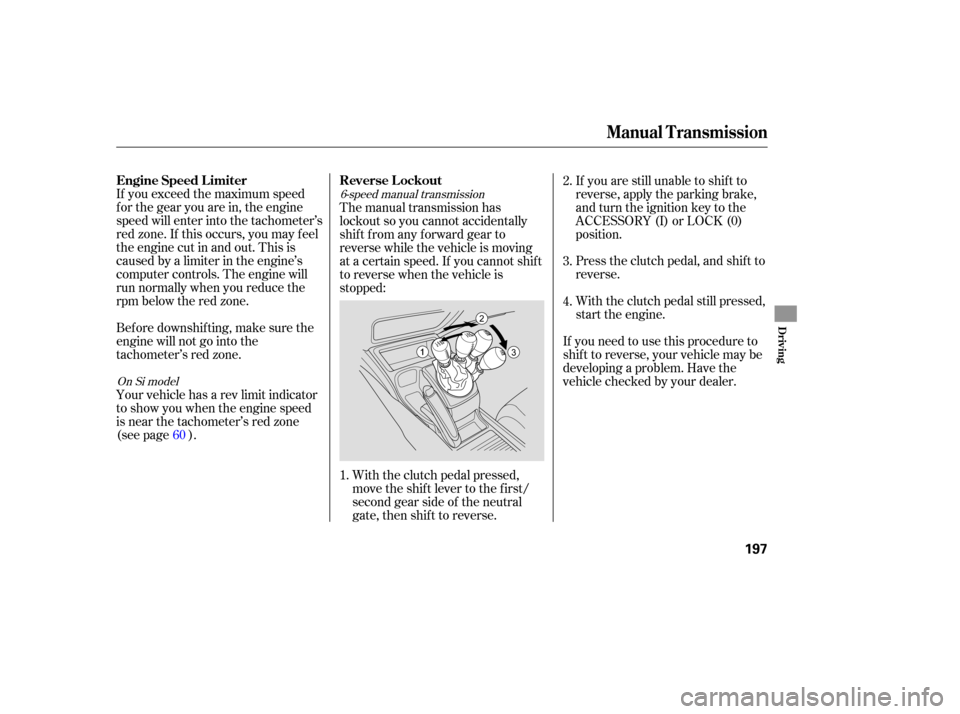
The manual transmission has
lockout so you cannot accidentally
shif t f rom any f orward gear to
reverse while the vehicle is moving
at a certain speed. If you cannot shif t
to reverse when the vehicle is
stopped:
With the clutch pedal pressed,
move the shift lever to the first/
second gear side of the neutral
gate, then shif t to reverse.
60
1. 2.
3.
4.
On Si model
6-speed manual transmission
Engine Speed L imiter
Reverse L ockout
Manual T ransmission
Driving
197
�����—�����—�����y�
�������������y���
�(�+���������y���������y