Page 57 of 319
�Î
�Î
�ΠIf equipped.
:
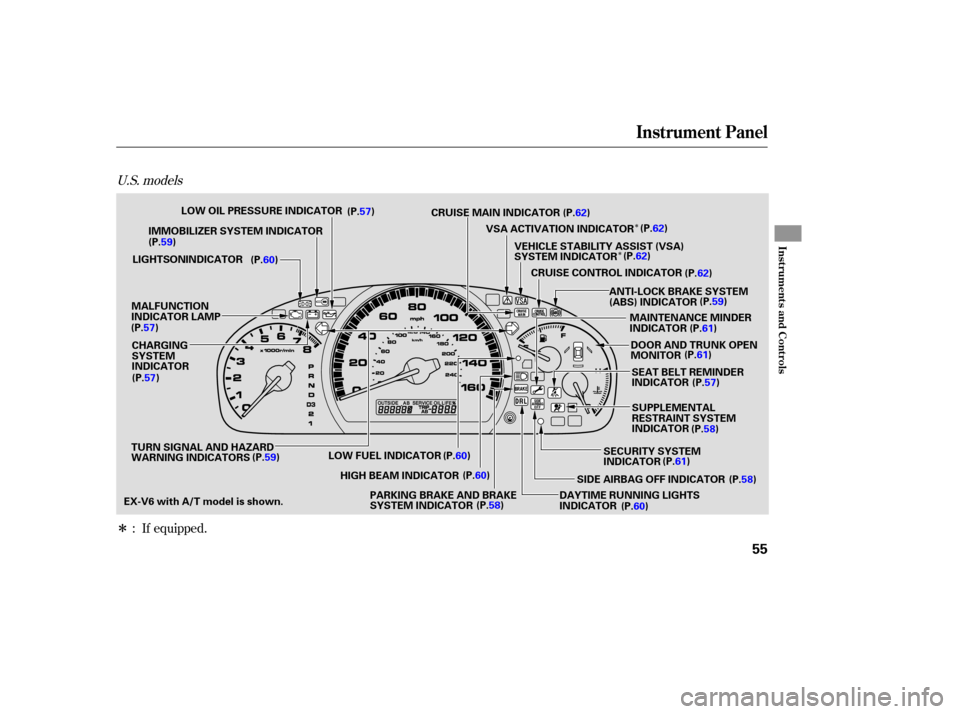
U.S. models
Instrument Panel
Instru m ent sand Cont ro ls
55
LOW OIL PRESSURE INDICATOR
CRUISE MAIN INDICATOR
VSA ACTIVATION INDICATOR
VEHICLE STABILITY ASSIST (VSA)
SYSTEM INDICATOR
CRUISE CONTROL INDICATOR
ANTI-LOCK BRAKE SYSTEM
(ABS) INDICATOR
DOOR AND TRUNK OPEN
MONITOR
SEAT BELT REMINDER
INDICATOR
SIDE AIRBAG OFF INDICATOR
DAYTIME RUNNING LIGHTS
INDICATOR
LOW
FUEL INDICATOR
HIGH BEAM INDICATOR
PARKING BRAKE AND BRAKE
SYSTEM INDICATOR
TURN
SIGNAL AND HAZARD
WARNING INDICATORS
IMMOBILIZER
SYSTEM INDICATOR
MALFUNCTION
INDICATOR LAMP
CHARGING
SYSTEM
INDICATOR
SECURITY SYSTEM
INDICATOR
(P.57)
(P.59)
LIGHTS ON INDICATOR (P.60)
(P.57) (P.57)
(P.59) (P.60)
(P.60)
(P.58) (P.60)(P.58)
(P.61)
SUPPLEMENTAL
RESTRAINT
SYSTEM
INDICATOR (P.58)(P.57)
(P.61)
MAINTENANCE
MINDER
INDICATOR (P.61)(P.59)
(P.62)
(P.62) (P.62)
(P.62)
EX-V6 with A/T model is shown.
�����—�����—�����y�
�������������y���
�(���%�������y���������y
Page 58 of 319
�Î�Î
�Î
If equipped.
:
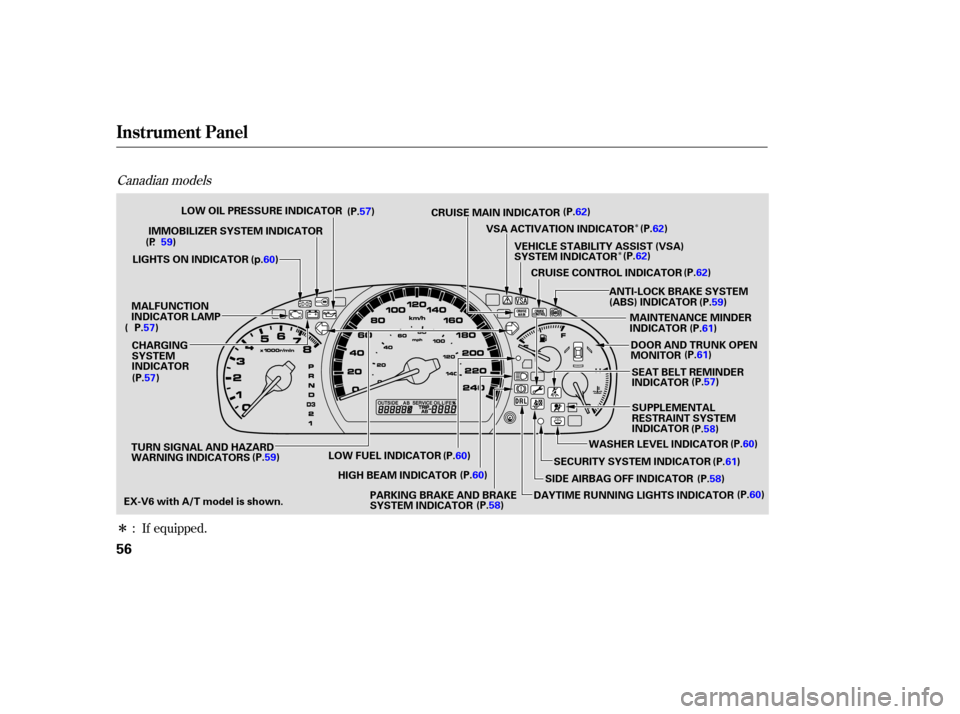
Canadian models
Instrument Panel
56
LOW OIL PRESSURE INDICATOR
CRUISE MAIN INDICATOR
VEHICLE STABILITY ASSIST (VSA)
SYSTEM INDICATOR
CRUISE CONTROL INDICATOR
ANTI-LOCK BRAKE SYSTEM
(ABS) INDICATOR
SEAT BELT REMINDER
INDICATOR
SUPPLEMENTAL
RESTRAINT SYSTEM
INDICATOR
SIDE AIRBAG OFF INDICATOR
LOW
FUEL INDICATOR
HIGH BEAM INDICATOR
PARKING BRAKE AND BRAKE
SYSTEM INDICATOR
TURN
SIGNAL AND HAZARD
WARNING INDICATORS
IMMOBILIZER
SYSTEM INDICATOR
MALFUNCTION
INDICATOR LAMP
CHARGING
SYSTEM
INDICATOR (P.57)
(P . 59)
LIGHTS ON INDICATOR
(p.60 )
( P.57)
(P.57)
(P.59) (P.60)
(P.60)
(P.58) (P.62)
VSA ACTIVATION INDICATOR (P.62)
(P.62) (P.62)
(P.59)
MAINTENANCE MINDER
INDICATOR (P.61)
DOOR AND TRUNK OPEN
MONITOR (P.61)
(P.57)
(P.58)
SECURITY SYSTEM INDICATOR
WASHER
LEVEL INDICATOR (P.60)
(P.61)
DAYTIME RUNNING LIGHTS INDICATOR (P.60)
(P.58)
EX-V6 with A/T model is shown.
�����—�����—�����y�
�������������y���
�(���%�������y���������y
Page 62 of 319
of
fuel remaining in the tank before")
This indicator is located in the fuel
gauge. It comes on as a reminder
that you must refuel soon.
When the indicator comes on, there
are about 2.72 U.S. gal (10.3
)of
fuel remaining in the tank before the
needle reaches E. There is a small
reserve of fuel remaining in the tank
when the needle does reach E.
This indicator reminds you that the
exterior lights are on. It comes on
when the light switch is in either the
or position. If you turn the
ignition switch to the ACCESSORY
(I) or LOCK (0) position without
turning off the light switch, this
indicator will stay on. A reminder
chime will also sound when you open
the driver’s door.
This indicator c omes on when the
washer fluid level is low. Add washer
fluid when you see this indicator (see page ).
If this indicator comes on when the
ignition switch is turned to the ON
(II) position and the parking brake is
released, it means there is a problem
in the high beam headlight’s circuit.
Have your vehicle c
hecked by your
dealer.
When the daytime running lights
(DRL) are on, this indicator comes
on with reduced brightness (see
page ).
This
indicator comes on with the
high beam headlights. For more
info rmation, see p age .69
70 238
Canadian models only
Instrument Panel Indicators
‘‘Daytime Running
Lights’’ Indicator Low Fuel Indicator
Lights On Indicator
Washer Level Indicator
High Beam Indicator
60
LOW FUEL INDICATOR
�����—�����—�����y�
�����������
�y���
�(���%�������y���������y
Page 71 of 319

�µ
�µ
�µ
Turning the
switch to the ‘‘ ’’ position turns
on the parking lights, taillights, side-
marker lights, and rear license plate
lights. Push
down on the
lever to signal a left turn and up to
signal a right turn. To signal a lane
change, push lightly on the lever,
and hold it. The lever will return to
center when you release it or
complete a turn.
Tu rn signal
Off
Parking and interior lights
Headlights
High beams
Flashhighbeams Turning
the switch to the ‘‘ ’’
position turns on the headlights. If
you leave the lights on with the
key removed from the ignition
switch, you will hear a reminder
chime when you open the driver’s
door.
Push the lever
f orward until you hear a click to turn
on the high beams. The blue high
beam indicator will come on (see page ). Pull the lever back to
return to the low beams.
To f lash the high beams, pull the
lever back lightly, then release it.
The high beams will stay on as long
as you hold the lever back.
When the light switch is in the
‘‘ ’’ or ‘‘ ’’ position, the
lights on indicator comes on as a
reminder. This indicator stays on if
you leave the light switch on and
turn the ignition switch to the
ACCESSORY (I) or LOCK (0)
position.
1.
2.
3.
4.
5.
6.
60
Headlights On Turn Signal
High Beams
Turn Signal and Headlights
Inst rument s and Cont rols
69
�����—�����—�����y�
�������������y���
�(���%�������y���������y
Page 176 of 319

Once the security system is set,
opening either door without using
the key or the remote transmitter,
the hood, or the trunk will cause the
system to alarm. It also alarms if the
radio is removed f rom the dashboard
or the wiring is cut.With the system set, you can still
open the trunk with the remote
transmitter without triggering the
alarm. The alarm will sound if the
trunk lock is f orced, or the trunk is
opened with the trunk release handle
or the emergency trunk opener.
The security system helps to protect
your vehicle and valuables f rom thef t.
The horn sounds and a combination
of headlights (low beam), parking
lights, side marker lights, and
taillights f lash if someone attempts
to break into your vehicle or remove
the radio. This alarm continues f or 2
minutes, then it stops. To reset an
alarming system before the 2
minutes have elapsed, unlock the
driver’s door with the key or the
remote transmitter.
The security system automatically
sets 15 seconds after you lock the
doors, hood, and trunk. For the
system to activate, you must lock the
doors f rom the outside with the key,
lock tab, door lock switch, or remote
transmitter. The security system
indicator on the instrument panel
starts blinking immediately to show
you the system is setting itself . The security system will not set if
the hood, trunk, or either door is not
f ully closed. Bef ore you leave the
vehicle, make sure the doors, trunk,
and hood are securely closed.
To see if the system is set
af ter you exit the vehicle, press the
LOCK button on the remote
transmitter within 5 seconds. If the
system is set, the horn will beep
once.
Do not attempt to alter this system
or add other devices to it.
Security System
174
NOTE:
SECURITY SYSTEM INDICATOR
�����—�����—�����y�
�������������y���
�(���%�������y���
�����y
Page 248 of 319

�µ�µTheheadlightswereproperlyaimed
when your vehicle was new. If you
regularly carry heavy items in the
trunk or pull a trailer, readjustment
may be required. Adjustments
should be done by your dealer or
other qualif ied mechanic.
Open the hood. To change a bulb
on the driver’s side, undo the two
f asteners and remove the air
intake cover.
Your vehicle has halogen headlight
bulbs. When replacing a bulb, handle
it by its base, and protect the glass
f rom contact with your skin or hard
objects. If you touch the glass, clean
it with denatured alcohol and a clean
cloth.
If you f requently tow a trailer.
Replace the belt at 60,000 miles (U.S.)
or 100,000 km (Canada) if you
regularly drive your vehicle in one or
more of these conditions: The timing belt should be replaced
at the intervals shown in the
maintenance minder schedule.
In very high temperatures
(over 110°F, 43°C).
In very low temperatures
(under 20°F, 29°C). 1.
6-cylinder models only
Timing Belt, Lights
Headlight A iming
Replacing a Headlight Bulb
Timing BeltHigh Beam Headlight
246
FASTENERS
AIR INTAKE
COVER
4-cylinder models
Halogen headlight bulbs get very hot
when lit. Oil, perspiration, or a scratch
on the glass can cause the bulb to
overheat and shatter.
�����—�����—�����y�
�������������y���
�(���%�������y���������y
Page 250 of 319
Remove the electrical connector
fromthebulbbysqueezingthe
connector to unlock the tab, then
slide the connector of f the bulb.
Remove the bulb by turning it
approximately one-quarter turn
counterclockwise.
To change the passenger’s side
bulb, start the engine, turn the
steering wheel all the way to the
lef t, and turn of f the engine. To
change the driver’s side bulb, turn
the steering wheel to the right.
Use a f lat-tipped screwdriver to
remove the two holding clips f rom
the inner f ender. Pull the inner f ender cover away
f rom the f ender and bumper.
To change the low beam headlight
bulb on the driver’s side, remove
the air intake duct. You can reach
the air intake duct f rom the back
side of the inner f ender.
6. 5.
4.
1.
2. 3.
On EX-V6 model with manual
transmission
L ow Beam Headlight
Lights
248
AIR INTAKE DUCT
EX-V6 with M/T
HOLDING CLIPS
�����—�����—�����y�
�������������y���
�(���%�������y�������
�y
Page 285 of 319
�µ�µ
�Î
�Î
�Î �Î
�Î �Î
�Î
�Î
�´
�Î
�Î
�Î
No. Amps.
CONT INUED
Amps.
Circuits ProtectedAmps.
No. Circuits Protected
No. Circuits Protected
1: All except U.S. 4-cylinder LX model
2: 4-cylinder models
3: 6-cylinder models
6
7
8
9
10 10 A
7.5 A 15 A
20 A
10 A
30 A
10 A
15 A
10 A Right Headlight Low Beam
Back Up
FI ECU (ECM/PCM)
Condenser Fan
Not Used20 A
30 A
7.5 A 20 A
40 A
40 A
15 A
30 A
30 A
20 A
40 A
40 A
40 A
40 A
100 A
50 A
50 A
11
12
13
14
15
16
17
18
19
20
21
22
23
Cooling Fan
Cooling Fan
MG. Clutch
Horn, Stop
Rear Defroster
Back Up, ACC
Hazard
ABS Motor
VSA Motor
ABS Unit
VSA Unit
Option
Option
Heater Motor
Battery
Not Used
BIG1Main
Power Window Main
1
2
3
4
5 Left Headlight Low Beam
Rear Defroster Coil
Left Headlight High Beam
Small Light
Right Headlight High Beam
2
3
2 3
2 3
1
1
Fuse Locations
T aking Care of t he Unexpect ed
283
UNDER-HOOD FUSE/RELAY BOX
�����—�����—�����y�
�������������y���
�(���%�������y���������y