2006 GREAT WALL HOVER check engine
[x] Cancel search: check enginePage 130 of 425

3. Oil filling of service after sales
Set the liquid level position correctly; the procedure is shown as follows:
a. Shut down the engine; place the gear-position in the P-Gear.
b . Lift the vehicle (or place it above the trench).
c. Clean the around of plug before remove it. Remove the oil plug and check the O-ring for damage, finally connect the oil filling
pump to the oil filling hole.
d. Lower the vehicle and oil filling pump to the ground; fill with the transmission fluid partially. The general oil filling amount
is shown as follows:
If in the status of transmission hydraulic torque converter is empty: 8.0 L
If in the status of transmission hydraulic torque converter is full: 3.8 L
e. When start the vehicle in P-Gear, rotate the engine in idle speed. Step down the foot brake, pull the shifting lever in each gear-
position in circulation and add the transmission fluid until the action of each gear-position can be sensed.
f. Then fill with 0.5L transmission fluid (ATF) additionally.
g. Shut off the engine, lift the vehicle; take off the pump and replace the plug. Ensure the plug is tightened according to the
specification.
h. Then pull the vehicle throttle position for slight opening to make the vehicle runs for 3.5
4.5km; the rotary speed of engine
is no more than 2500r/min; then the transmission fluid temperature will in the scope of 50
60.
i. The engine is in idle-speed; pull the hand brake to make the shifting lever circuits in each gear-position horizontal status.
k. Remove the filling plug 3 minutes after the engine is shut off, but must be no more than1 hour. At this time, the correct
level position should be in the bottom of oil filling hole. If does not reach the liquid level position, then fill with few
transmission fluid (ATF) to meet the requirement.
l. Reinsert the transmission fluid plug, remove the residual transmission fluid around the vehicle and transmission; tighten the
plug to the specified torque.
4. Replace the ATF
Please notice that the color of TQ95 automatic transmission oil will be faded in the normal operation of transmission; it will be
turn into the deep brown or even in black. It will not affect the performance of ATF. It means that the fading of transmission
fluid not always means to replace the transmission fluid.
If the transmission temperature is raised, the ATF will be burnt. In this condition, ATF will change into black and with special
sulfur smell. The smell of the ATF means the oil is burnt.
If the ATF is burnt, it will cause the damage of transmission (the clutch assembly is damaged at least).At this time, it should
disassembly the transmission and process the necessary detection.
Electronic calibration
1. Idle-speed calibration
The idle-speed calibration is introduced in detail in the vehicle factory manual.
2 Calibration of position of throttle position
If the throttle position information stored in TCU is lost or not in application scope. It can be reestablished according to the
following program as the diagnosis error information.
a. Check whether the engine idle speed is in required range.
b. In the status of shutting off of air-condition, make the engine is in “D” –Gear for 60s,then the reference point with opening
degree of 0
of throttle position is reset in TCU.
Shut off the engine; switch on the ignition device, step the accelerator pedal to bottom for 60s, then the reference point with opening
degree of 100
of throttle position is reset in TCU.
3. Clear of throttle position
The clear process set by learning throttle position is necessary for M88 transmission TCU.
4. Car code
For M88 transmission, the car code is unnecessary.
Page 146 of 425

o. Maintain the horizontal position of cylinder , install the sleeve and clutch disk assembly on the cylinder; ensure the top of
washer and external hole of cylinder are in order until the sleeve can contact the C2 wave plate.
Caution:
For the C2 wave spring is compressed and the clutch disk can endure the weight of 19.6N. The dimension form the lower
side of C2 pressure disc to the gear selection steel plate is 1.4
1.8mm. if the clutch need to start the accuracy from the
top of pressure plate, then the accurate value should be the actual size of pressure plate plus 1.4
1.8mm.
p. Use the special tools to check the C4 clutch assembly. Refer to Figure 8.25.
Caution:
It should take out the clutch clearance assembly before immerse the assembly into the automatic transmission fluid
(ATF).
q. Use the gear selection plate to reach the correct specification. If need to install the new friction disk, it should remove the
clutch assembly and immerse the friction disk in the automatic transmission fluid for 5 minutes at least before the installation.
Reinstall the sleeve and clutch assembly and place it in the cylinder. Ensure the wave washer is arranged consisting with the
cylinder hole.
Install the clutch C2 disk in the cylinder according to the following procedure:
friction disk
steel disc
friction disk
steel disc
The steel disc transmission use the G32 model engine; the 5th friction disk should replace the steel disc (reference table 9.3).
steel disc (optional)
friction disk
steel disc (optional)
friction disk
Caution:
For the clutch assembly can endure the weight of 19.6N, the dimension from the clutch C3 wheel axle to the friction disk
should be within 0.80-1.05mm.
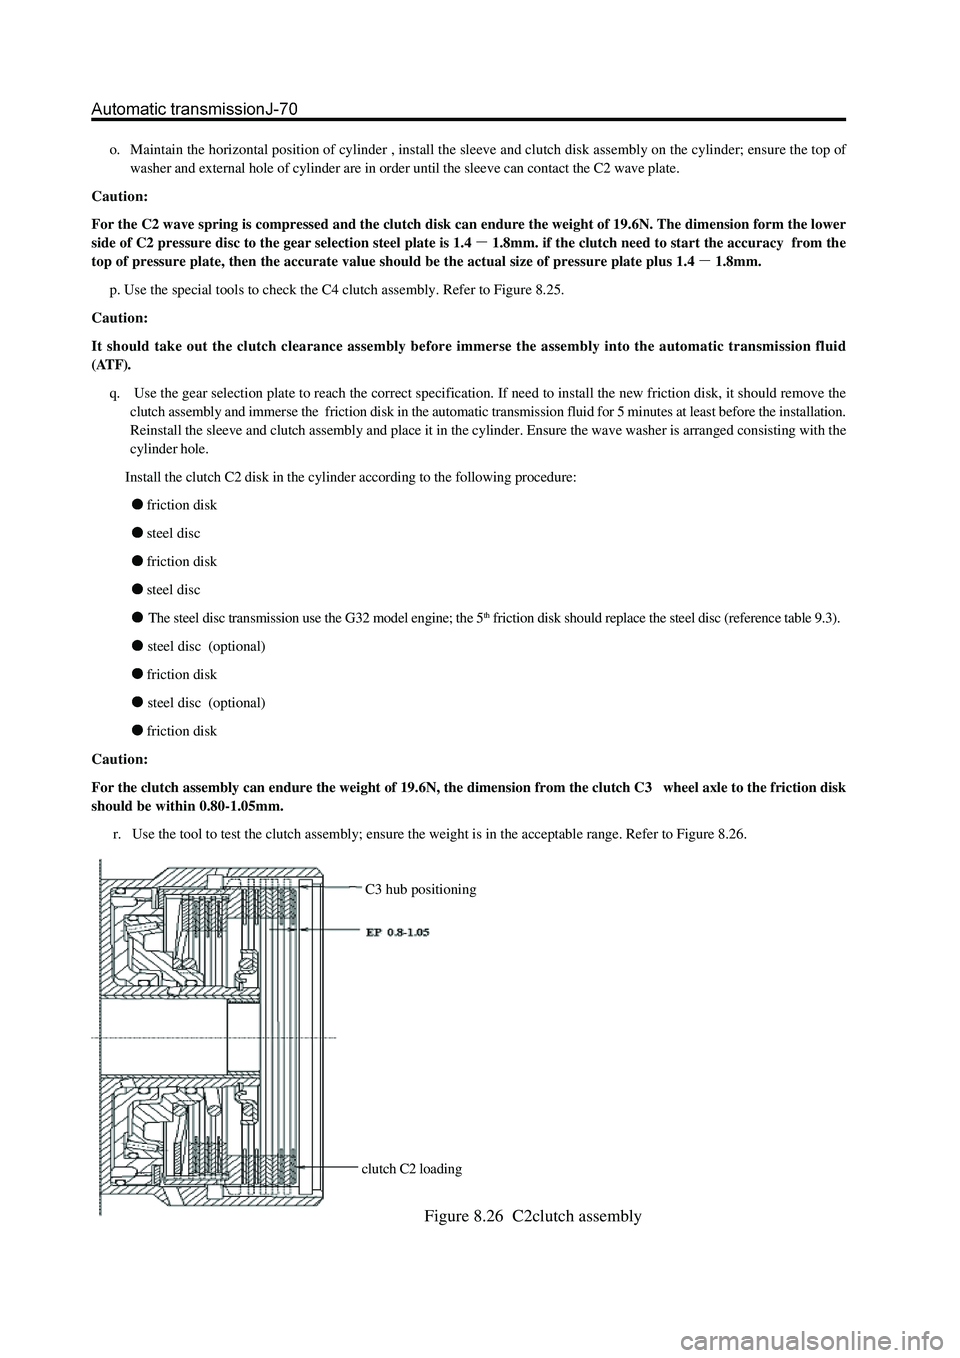
r. Use the tool to test the clutch assembly; ensure the weight is in the acceptable range. Refer to Figure 8.26.
C3 hub positioning
clutch C2 loading
Figure 8.26 C2clutch assembly
Page 162 of 425

Figure 8.59 Bushing of engine oil filter
Figure 8.60 Installation of engine oil filter
Figure 8.61 Tightening sequence of oil pan bolt
It should abide by follows when assemble the oil filter and oil sump tank (Refer to Figure 8.59and Figure 8.60):
a. Use the automatic transmission liquid to lubricate the spring ring of gasket of lubrication oil.
b. Install the oil filter on the valve carefully. During the installation, the socket must be inclined. Refer to Figure 8.59.
c. Fix the oil cleaner assembly.
d. Check whether the magnet is installed in the recess on the corner of oil bottom shell.
e. Assemble the groove on the oil bottom shell. The groove must be bent during the installation.
Page 269 of 425

limitationlimitationCheck and repair of rear axle components
1. Check the rear axle and flange for wear, damage
and run-out.
Max. Run-out of axle: 2mm
Max. Run-out of flange: 0.2mm
It should replace the rear axle if the rear axle or flange is worn or
damaged, or the measured run-out is beyond the specified value.
2. Check the external oil seal
a. Check for the wear or damage; especially for the lip of oil seal.
b. Replace it if necessary.
3. Check the bearing and oil seal holder
Check for wear and damage, replace it if necessary.
4. Remove the bearing and oil seal holder
a. Move the brake and oil seal pressing block to the limit position
along flange direction; move the external oil seal to the limit
position of oil seal.
b. Place the hook of the special tools in sequence, the position is
shown as figure; make the hook holds the bearing tightly; then
use the bolt to connect the hook to the hammer fixedly; at last,
place it on the pad with halfaxle spline end facing ground.
c. Hold the hammer to beat downwardly with force for several
times to remove the bearing and oil seal holder.
Caution: Do not damage the oil seal .
5. Install the new external oil seal
a. Clean the semiaxle.
b. Coat the lip of external oil seal with proper HP-R grease.
Caution: When install the oil seal, the lip of oil seal must not
contact the semishaft to avoid scratching the oil seal .
6. Replace the bearing and oil seal holder
a. Heat the oil seal pressing block in 22# engine oil to 100.
Caution: The end of oil seal pressing block with larger chamfer
faces the halfaxle spline. Install it immediately after taken out.
b. Use the hydraulic press to install the new bearing and new oil
seal pressing block by press.
7. Install the circlip
Use the circlip pliers to install the new circlip in the slot of semiaxle.
Page 291 of 425

Brake-5
Check and adjustment
Check and adjustment of brake pedal
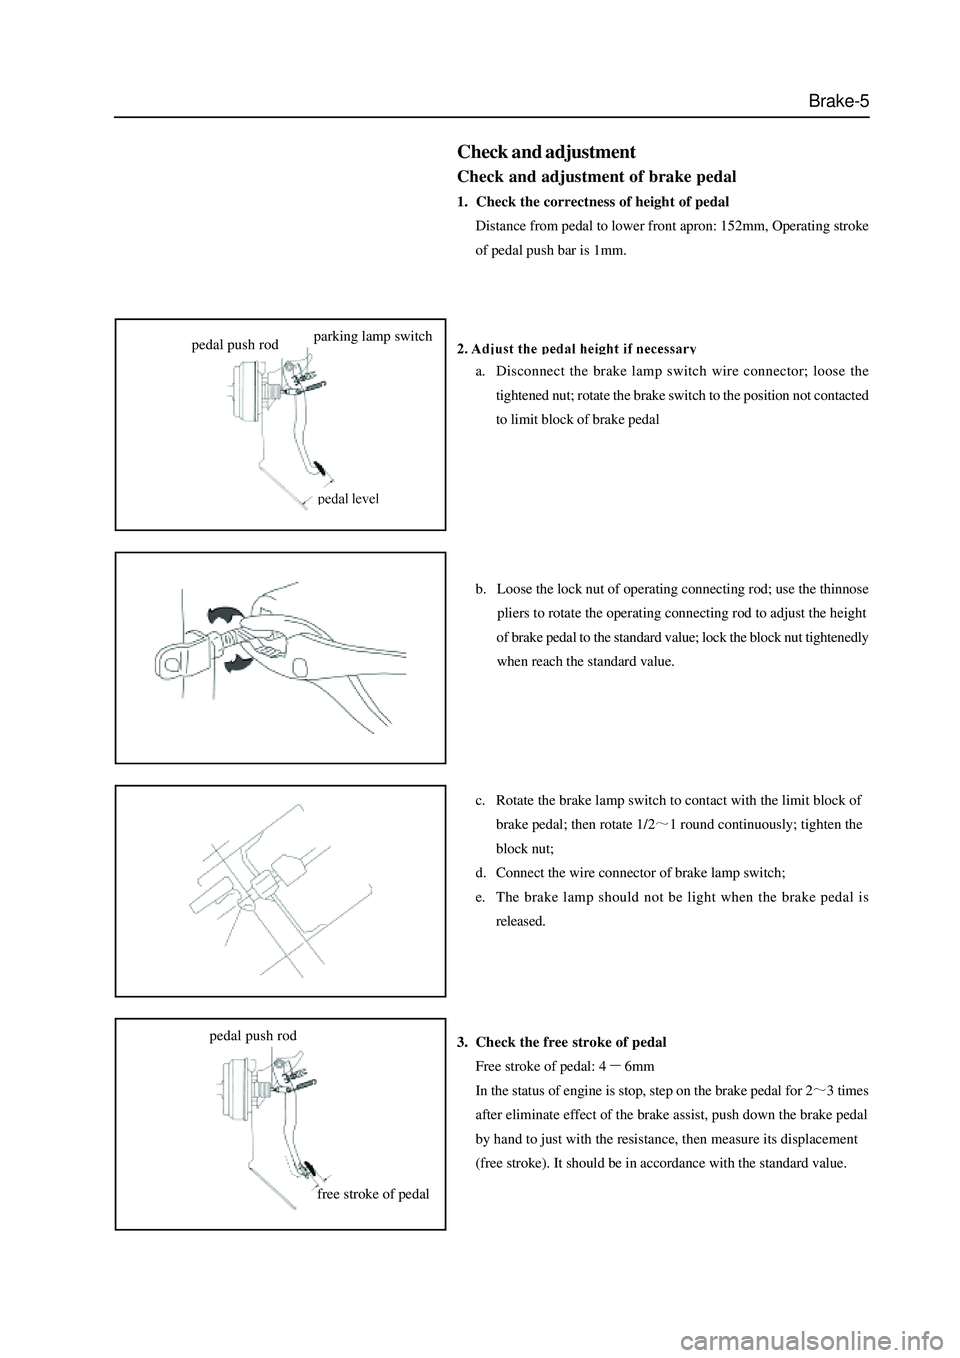
1. Check the correctness of height of pedal
Distance from pedal to lower front apron: 152mm, Operating stroke
of pedal push bar is 1mm.
a. Disconnect the brake lamp switch wire connector; loose the
tightened nut; rotate the brake switch to the position not contacted
to limit block of brake pedal
b. Loose the lock nut of operating connecting rod; use the thinnose
pliers to rotate the operating connecting rod to adjust the height
of brake pedal to the standard value; lock the block nut tightenedly
when reach the standard value.
c. Rotate the brake lamp switch to contact with the limit block of
brake pedal; then rotate 1/2
1 round continuously; tighten the
block nut;
d. Connect the wire connector of brake lamp switch;
e. The brake lamp should not be light when the brake pedal is
released.
3. Check the free stroke of pedal
Free stroke of pedal: 4
6mm
In the status of engine is stop, step on the brake pedal for 2
3 times
after eliminate effect of the brake assist, push down the brake pedal
by hand to just with the resistance, then measure its displacement
(free stroke). It should be in accordance with the standard value.
pedal push rodparking lamp switch
free stroke of pedal pedal push rod
Page 292 of 425

Brake-6
4. Adjust the stroke of pedal if necessary
a. Rotate the pedal push bar to adjust the free stroke if the stroke
length is improper.
b. Start the engine to confirm the free stroke of pedal.
c. Check the height of pedal after adjusts the free stroke of pedal.
d. The height difference of brake pedal and clutch pedal to front
apron is 0
8mm.
e. The height difference of brake pedal and accelerator pedal to the
front apron is 45
5mm.
Vacuum assist
Remarks:
Use the vacuum assist tester to check the operation of vacuum
assist if possible.
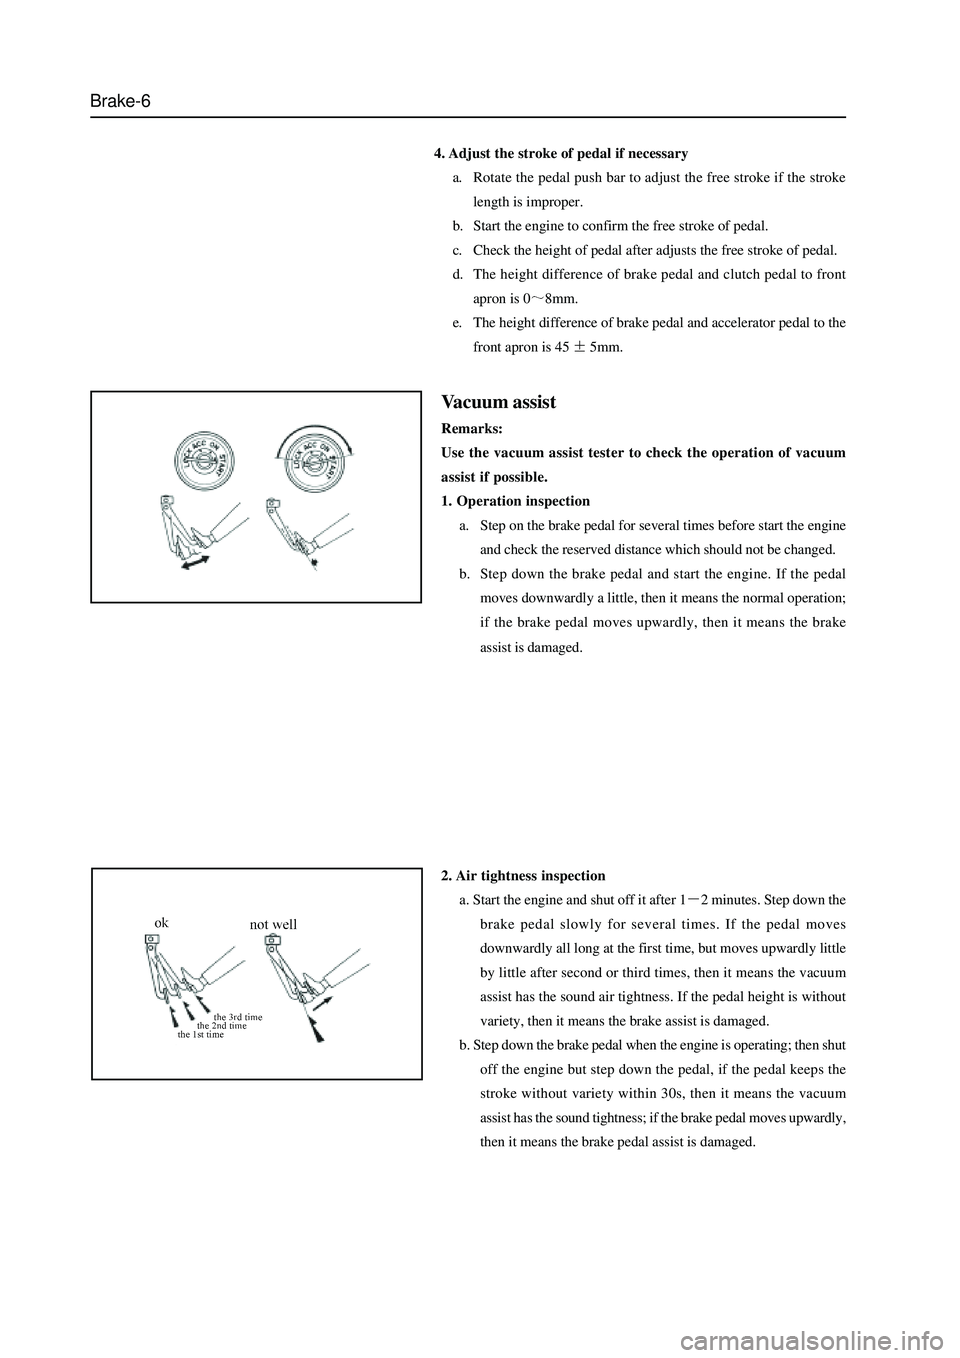
1. Operation inspection
a. Step on the brake pedal for several times before start the engine
and check the reserved distance which should not be changed.
b. Step down the brake pedal and start the engine. If the pedal
moves downwardly a little, then it means the normal operation;
if the brake pedal moves upwardly, then it means the brake
assist is damaged.
2. Air tightness inspection
a. Start the engine and shut off it after 1
2 minutes. Step down the
brake pedal slowly for several times. If the pedal moves
downwardly all long at the first time, but moves upwardly little
by little after second or third times, then it means the vacuum
assist has the sound air tightness. If the pedal height is without
variety, then it means the brake assist is damaged.
b. Step down the brake pedal when the engine is operating; then shut
off the engine but step down the pedal, if the pedal keeps the
stroke without variety within 30s, then it means the vacuum
assist has the sound tightness; if the brake pedal moves upwardly,
then it means the brake pedal assist is damaged.
Page 368 of 425

CD Player and Air Conditioning System-15
Turn on the high-pressure valve on the manifold pressure gauge and inject the refrigerant to the system from high-pressure pipeline.
At this time, the attention shall be given to the readings of high-pressure meter and low-pressure meter, and make sure that these two
pressure all go up. If the refrigerant is being injected while the pressure does not go up, then the joints of the pipeline may be loosened
or the seals damaged, inject the refrigerant once more after finding out the cause and the fixing. When the increase of pressure stops,
turn off the high-pressure valve of the manifold pressure gauge and then start the engine
.
Operate the switch in a way as follows:
Turn the switch of air conditioner to “ON”
Regulate the temperature controller to the coolest position,
Enable the air conveying to the maximum,
Select the internal air circulation between the internal/external air circulation,
During this process, the door and windows will be all opened.
Adjust the engine’s speed to the specified free running speed.
Erect the refrigerant reservoir or gas bottle (have the refrigerant injected into the refrigerating system in a gas state), turn on the
low-pressure valve of the manifold pressure gauge.
When the compressor is at work, please do not turn on the high-pressure valve.
Before checking the refrigeration level, please confirm the injection volume of the refrigerant specified for air conditioning system.
When injecting the refrigerant, carefully observe the high-pressure side of the manifold pressure gauge and the flow condition of
the refrigerant (clear, foaming or turbid), all these could be viewed through the inspection window, by which the moment of stop
injecting the refrigerant can be reasonably judged(turning off the low-pressure valve).
air washingoff
off
tip screw driverred
yellow blue
refrigerant reservoirhigh-pressure low-pressure
off
low-pressure pipe
high-pressure pipe
refrigerant reservoiryellowred blueon
Page 370 of 425

CD Player and Air Conditioning System-17
Daily Maintenance of Air Conditioning System
In order to ensure normal operation of air conditioning system, maintenance and care services shall be frequently performed for the
air conditioning system. The daily maintenance of air conditioning system is illustrated as follows:
1. Inspect, wash and clean the condenser of air conditioning system, requiring that radiator pins are clean and there is no dirt
between the pins. After the car runs in the rain or on the muddy road, the fan of the condenser should be inspected to find
whether it bears the earth, sand, stone and etc, and remove them if any.
2. Check the quantity of the working media of the refrigerating system; when the compressor set works normally, observe the
liquid viewing glass, under the normal circumstance, there shall be not air bubbles in the glass.
3. Inspect the drive belt. The belt between the compressor and the engine should be tensioned.
4. Check if there is any abnormal noise or odor in the air conditioning system.
5. Check if the temperature difference between the air inlet and outlet of the compressor is normal.
6. Check if the hose of the refrigerating system is in an apparent good condition and connections of all joints are secure.
7. Check if the pipeline of the refrigerating system collides with other parts and components, and if there is any oil leakage trace
left at each joint.
8. Check if the circuit connection of the refrigerating system is secure and if there is an occurrence of short circuit and falling off
9. Check if fastening bolts of the compressor are firmly secured or broken. d. When connecting the pipe, apply little compressor oil to the O-ring and fasten the nut with two wrenches. Attention: never
spatter the compressor oil to the painted parts or the plastic components to avoid the corrosion. If these components are
spattered with the oil, please clean it immediately.
e. When connecting the pipe, please follow the torque listed in the following table to fasten the screws or the nuts:
Diameter of Pipe Fastening Torque (N·m)
¢8mm 12-15
¢16mm 30-35 30-35
At ends of each pipe the protective caps should be installed till the pipe is connected to the refrigerating system.
compressor oil fasten it by using two wrenches at the same time