2006 GMC SIERRA parking brake
[x] Cancel search: parking brakePage 376 of 600
Dolly Towing
Front Towing (Front Wheels
Off the Ground)
Two-Wheel-Drive Vehicles
Notice:If you tow a two-wheel-drive vehicle with the
rear wheels on the ground, the transmission could be
damaged. The repairs would not be covered by your
warranty. Never tow your vehicle with the rear wheels
on the ground.
Two-wheel-drive vehicles should not be towed
with the rear wheels on the ground. Two-wheel-drive
transmissions have no provisions for internal lubrication
while being towed.
To dolly tow a two-wheel-drive vehicle, you must tow
the vehicle with the rear wheels on the dolly. See “Rear
Towing (Rear Wheels Off the Ground)” later in this
section for more information.
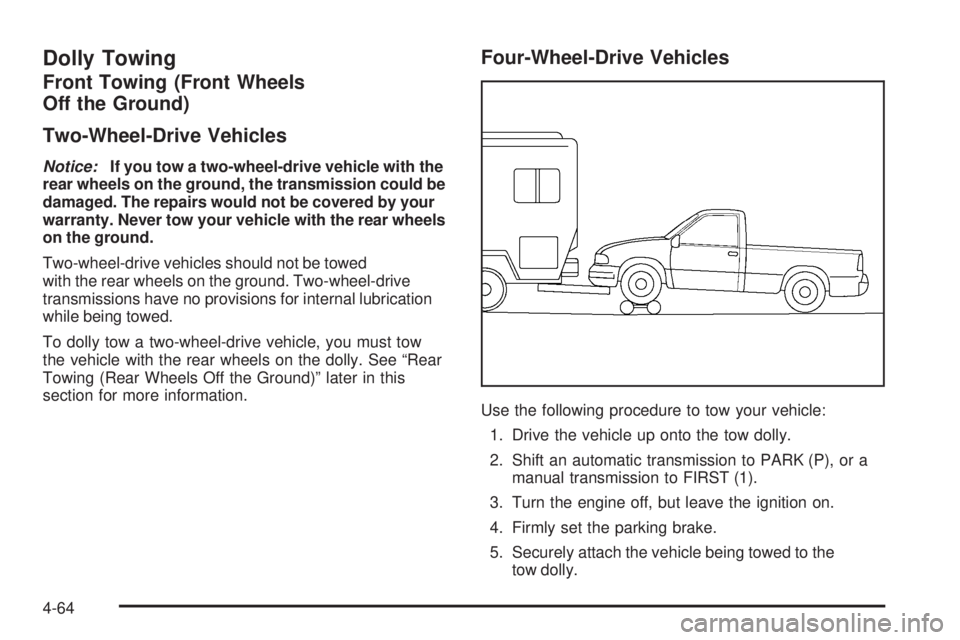
Four-Wheel-Drive Vehicles
Use the following procedure to tow your vehicle:
1. Drive the vehicle up onto the tow dolly.
2. Shift an automatic transmission to PARK (P), or a
manual transmission to FIRST (1).
3. Turn the engine off, but leave the ignition on.
4. Firmly set the parking brake.
5. Securely attach the vehicle being towed to the
tow dolly.
4-64
Page 377 of 600
{CAUTION:
Shifting a four-wheel-drive vehicle’s transfer
case into NEUTRAL can cause your vehicle to
roll even if the transmission is in PARK (P) for
an automatic transmission, or if your vehicle
is in gear, for a manual transmission. You or
others could be injured. Make sure the parking
brake is �rmly set before you shift the transfer
case to NEUTRAL.
6. Shift the transfer case to NEUTRAL. See
Four-Wheel Drive on page 2-38for the proper
procedure to select the neutral position for
your vehicle.
7. Release the parking brake only after the vehicle
being towed is �rmly attached to the towing vehicle.
8. Turn the ignition off and lock the steering column.
Rear Towing (Rear Wheels
Off the Ground)
Two-Wheel-Drive Vehicles
Use the following procedure to tow your vehicle from
the rear:
1. Drive the vehicle onto the dolly.
2. Firmly set the parking brake. SeeParking Brake on
page 2-52
3. Put an automatic transmission in PARK (P) or a
manual transmission in FIRST (1).
4. Follow the dolly manufacturer’s instructions to
attach and secure the vehicle being towed to
the dolly and then the loaded dolly to the tow
vehicle. Make sure the wheels are straight before
towing.
For manual transmission vehicles, make sure the
wheels are straight before proceeding to the next
steps. On automatic transmission vehicles, use an
adequate clamping device to ensure that the front
wheels are locked into the straight position.
5. Release the parking brake only after the vehicle
being towed is �rmly attached to the tow vehicle.
6. Turn the ignition to LOCK.
4-65
Page 378 of 600
Four-Wheel-Drive Vehicles
Use the following procedure to tow your vehicle from
the rear:
1. Drive the vehicle onto the dolly.
2. Firmly set the parking brake. SeeParking Brake on
page 2-52
3. Put an automatic transmission in PARK (P) or a
manual transmission in FIRST (1).
4. Follow the dolly manufacturer’s instructions to
attach and secure the vehicle being towed to
the dolly and then the loaded dolly to the tow
vehicle.
For manual transmission vehicles, make sure the
wheels are straight before proceeding to the next
steps. On automatic transmission vehicles, use an
adequate clamping device to ensure that the front
wheels are locked into the straight position.{CAUTION:
Shifting a four-wheel-drive vehicle’s transfer
case into NEUTRAL can cause your vehicle to
roll even if the transmission is in PARK (P) for
an automatic transmission, or if your vehicle
is in gear, for a manual transmission. You or
others could be injured. Make sure the parking
brake is �rmly set before you shift the transfer
case to NEUTRAL.
5. Shift the transfer case to NEUTRAL.
SeeFour-Wheel Drive on page 2-38
6. Release the parking brake only after the vehicle
being towed is �rmly attached to the tow vehicle.
7. Turn the ignition to LOCK.
4-66
Page 402 of 600

Making Turns
Notice:Making very sharp turns while trailering
could cause the trailer to come in contact with the
vehicle. Your vehicle could be damaged. Avoid
making very sharp turns while trailering.
When you’re turning with a trailer, make wider turns than
normal. Do this so your trailer won’t strike soft shoulders,
curbs, road signs, trees or other objects. Avoid jerky or
sudden maneuvers. Signal well in advance.
Turn Signals When Towing a Trailer
The arrows on your instrument panel will �ash whenever
you signal a turn or lane change. Properly hooked up, the
trailer lamps will also �ash, telling other drivers you’re
about to turn, change lanes or stop.
When towing a trailer, the arrows on your instrument
panel will �ash for turns even if the bulbs on the trailer are
burned out. Thus, you may think drivers behind you are
seeing your signal when they are not. It’s important to
check occasionally to be sure the trailer bulbs are still
working.
Driving On Grades
Reduce speed and shift to a lower gearbeforeyou start
down a long or steep downgrade. If you don’t shift down,
you might have to use your brakes so much that they
would get hot and no longer work well.If you have an automatic transmission, you can tow
in DRIVE (D). You may want to shift the transmission to
a lower gear selection if the transmission shifts too
often (e.g., under heavy loads and/or hilly conditions).
You may also want to activate the tow/haul mode if
the transmission shifts too often. SeeTow/Haul Mode
Light on page 3-50.
If you have a 5-speed manual transmission and you are
towing a trailer, it’s better not to use FIFTH (5) gear.
Just drive in FOURTH (4) gear (or, as you need to, a
lower gear).
If you have a 6-speed manual transmission and you are
towing a trailer, it’s better not to use SIXTH (6) gear.
Drive in FIFTH (5) gear (or, as you need to, a lower gear).
When towing at high altitude on steep uphill grades,
consider the following: Engine coolant at or near sea level
will boil at a lower temperature than at higher altitudes.
If you turn your engine off immediately after towing at
high altitude on steep uphill grades, your vehicle may
show signs similar to engine overheating. To avoid this,
let the engine run while parked, preferably on level
ground, with the automatic transmission in PARK (P) for
at least �ve minutes before turning the engine off. For
manual transmissions, let the engine run while parked,
preferably on level ground, with the transmission out
of gear and the parking brake applied, for at least �ve
minutes before turning the engine off. If you do get the
overheat warning, seeEngine Overheating on page 5-37.
4-90
Page 403 of 600
Parking on Hills
{CAUTION:
You really should not park your vehicle, with
a trailer attached, on a hill. If something goes
wrong, your rig could start to move. People
can be injured, and both your vehicle and the
trailer can be damaged.
But if you ever have to park your rig on a hill, here’s
how to do it:
1. Apply your regular brakes, but don’t shift into
PARK (P) yet for an automatic transmission,
or into gear for a manual transmission.
2. Have someone place chocks under the trailer
wheels.
3. When the wheel chocks are in place, release the
regular brakes until the chocks absorb the load.
4. Reapply the regular brakes. Then apply your
parking brake and shift into PARK (P) for an
automatic transmission, or REVERSE (R) for
a manual transmission.
5. If you have a four-wheel-drive vehicle, be sure the
transfer case is in a drive gear and not in NEUTRAL.
6. Release the regular brakes.
{CAUTION:
It can be dangerous to get out of your vehicle if
the shift lever is not fully in PARK (P) with the
parking brake �rmly set. Your vehicle can roll.
If you have left the engine running, the vehicle
can move suddenly. You or others could be
injured. To be sure your vehicle will not move,
even when you are on fairly level ground, use
the steps that follow.
Always put the shift lever fully in PARK (P) with
the parking brake �rmly set.
If the transfer case on four-wheel-drive vehicles
is in NEUTRAL, your vehicle will be free to roll,
even if your shift lever is in PARK (P). So, be
sure the transfer case is in a drive gear — not
in NEUTRAL.
4-91
Page 404 of 600

When You Are Ready to Leave After
Parking on a Hill
1. Apply your regular brakes and hold the pedal down
while you:
Start your engine
Shift into a gear
Release the parking brake
2. Let up on the brake pedal.
3. Drive slowly until the trailer is clear of the chocks.
4. Stop and have someone pick up and store the
chocks.
Maintenance When Trailer Towing
Your vehicle will need service more often when you’re
pulling a trailer. SeeScheduled Maintenance (Gasoline
Engine) on page 6-4for more information. Things that
are especially important in trailer operation are automatic
transmission �uid (don’t over�ll), engine oil, axle
lubricant, belt, cooling system and brake system. Each of
these is covered in this manual, and the Index will help
you �nd them quickly. If you’re trailering, it’s a good idea
to review these sections before you start your trip.
Check periodically to see that all hitch nuts and bolts
are tight.
Trailer Wiring Harness
Your vehicle is equipped with one of the following wiring
harnesses for towing a trailer or hauling a slide-in
camper.
Basic Trailer Wiring
All regular, extended cab and crew cab pickups have an
eight-wire trailer towing harness.
For vehicles not equipped with heavy duty trailering, the
harness is clipped to the vehicle’s frame behind the spare
tire mount. The harness requires the installation of a
trailer connector, which is available through your dealer.
4-92
Page 409 of 600
Power Take-Off (PTO)
Before using a Power Take-Off (PTO), if equipped,
refer to the manufacturer’s or installer’s instructions.
To engage a PTO on a vehicle with a manual
transmission do the following:
1. Hold the clutch pedal down.
2. Set the parking brake.
3. Shift the transmission into NEUTRAL.
4. Engage the PTO. Refer to the manufacturer’s or
installer’s for instructions on electrically engaged
PTOs.
5. For mobile operations, shift the transmission into
the gear you want, apply the regular brakes and
release the parking brake. For stationary operations,
leave the parking brake applied.
6. Release the clutch and regular brakes as you
normally would. When the clutch is released,
the PTO will start.
7. Turn the PTO rotary switch to ON.To engage a PTO on a vehicle with an automatic
transmission do the following:
1. For stationary use shift the transmission into
PARK (P).
2. Turn the PTO rotary switch ON.
3. If the engine speed is below the PTO engage speed
limit, the PTO will start. The blinking LED on the PTO
control switch indicates PTO engage is requested.
When PTO engages the LED will switch from blinking
to a steady light.
To use PTO speed control in Preset Mode (Factory
Setting) do the following:
1. Engage the PTO.
2. Select PARK (P) or NEUTRAL (N) range. Apply
the parking brake if NEUTRAL (N) is selected.
Torque Converter Clutch (TCC) is not available in
NEUTRAL (N) and is available only in PARK (P)
when engine speed is above 1,100 rpm.
3. Make sure your foot is off the brake pedal (and
off the clutch on vehicles equipped with a manual
transmission).
4. Select the desired engine speed for PTO operation.
Read the following preset mode information
regarding operation.
4-97
Page 441 of 600
Checking the Fluid Level
Prepare your vehicle as follows:
1. Park your vehicle on a level place. Keep the engine
running.
2. With the parking brake applied, place the shift lever
in PARK (P).
3. With your foot on the brake pedal, move the shift
lever through each gear range, pausing for about
three seconds in each range. Then, position
the shift lever in PARK (P).
4. Let the engine run at idle for three minutes or more.
Then, without shutting off the engine, follow these steps:
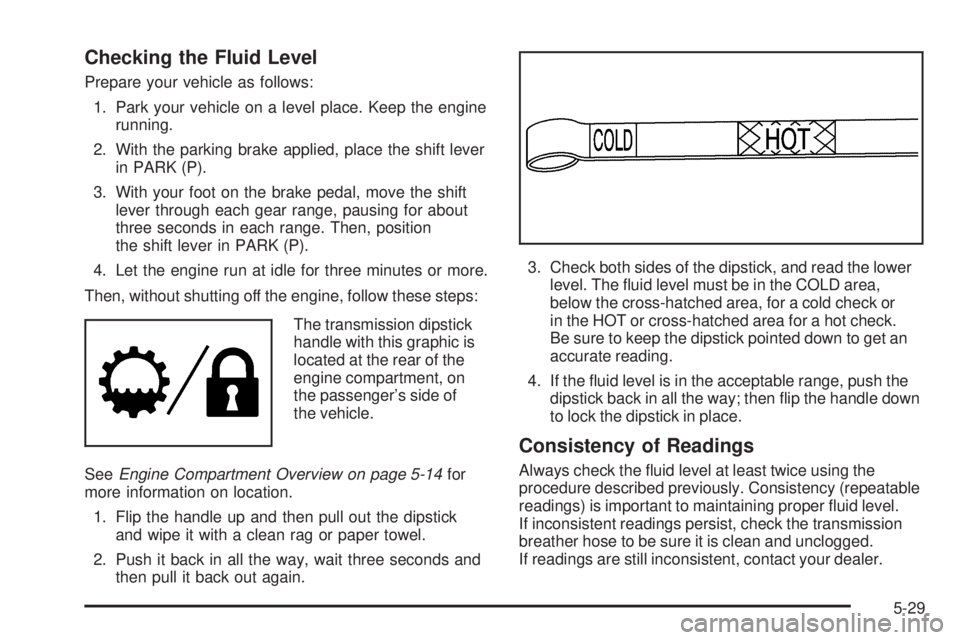
The transmission dipstick
handle with this graphic is
located at the rear of the
engine compartment, on
the passenger’s side of
the vehicle.
SeeEngine Compartment Overview on page 5-14for
more information on location.
1. Flip the handle up and then pull out the dipstick
and wipe it with a clean rag or paper towel.
2. Push it back in all the way, wait three seconds and
then pull it back out again.3. Check both sides of the dipstick, and read the lower
level. The �uid level must be in the COLD area,
below the cross-hatched area, for a cold check or
in the HOT or cross-hatched area for a hot check.
Be sure to keep the dipstick pointed down to get an
accurate reading.
4. If the �uid level is in the acceptable range, push the
dipstick back in all the way; then �ip the handle down
to lock the dipstick in place.
Consistency of Readings
Always check the �uid level at least twice using the
procedure described previously. Consistency (repeatable
readings) is important to maintaining proper �uid level.
If inconsistent readings persist, check the transmission
breather hose to be sure it is clean and unclogged.
If readings are still inconsistent, contact your dealer.
5-29