2006 GMC SIERRA seats
[x] Cancel search: seatsPage 93 of 600
Q:What if I added a snow plow? Will it keep the
airbags from working properly?
A:We have designed our airbag systems to work
properly under a wide range of conditions,
including snow plowing with vehicles equipped with
the optional Snow Plow Prep Package (RPO
VYU). But do not change or defeat the snow plow’s
“tripping mechanism.” If you do, it can damage
your snow plow and your vehicle, and it may cause
an airbag ination.
Q:Because I have a disability, I have to get my
vehicle modied. How can I nd out whether
this will affect my advanced airbag system?
A:Changing or moving any parts of the front seats,
safety belts, the airbag sensing and diagnostic
module (located under the driver’s seat), or
the inside rearview mirror can affect the operation
of the advanced airbag system. If you have
questions, call Customer Assistance. The phone
numbers and addresses for Customer Assistance
are in Step Two of the Customer Satisfaction
Procedure in this manual. SeeCustomer
Satisfaction Procedure on page 7-2.
Restraint System Check
Checking the Restraint Systems
Now and then, make sure the safety belt reminder light
and all your belts, buckles, latch plates, retractors
and anchorages are working properly. Look for any other
loose or damaged safety belt system parts. If you see
anything that might keep a safety belt system from doing
its job, have it repaired.
Torn or frayed safety belts may not protect you in a
crash. They can rip apart under impact forces. If a belt
is torn or frayed, get a new one right away.
Also look for any opened or broken airbag covers, and
have them repaired or replaced. (The airbag system
does not need regular maintenance.)
Notice:If you damage the covering for the driver’s
or the right front passenger’s airbag, the airbag
may not work properly. You may have to replace the
airbag module in the steering wheel or both the
airbag module and the instrument panel for the right
front passenger’s airbag. Do not open or break
the airbag coverings.
1-87
Page 165 of 600

Outside Power Foldaway Mirrors
If your vehicle is equipped
with this feature, the
controls are located on the
driver’s door armrest.
Move the upper selector switch to the left or right to
choose the mirror you want to adjust; then press the dots
located on the four-way control pad to adjust the mirror.
The mirrors may also include a memory function which
works together with the memory seats. SeeMemory
Seat on page 2-83for more information.
To fold or unfold the mirrors, move the selector switch,
located above the mirror control, to the middle position.
The mirror control will illuminate. Press the right or left
side of the mirror control to fold or unfold the mirrors. You
may notice the mirror glass adjust as the mirrors fold in;
this is normal. The mirror glass will reposition itself once
the mirrors are unfolded.If the mirrors are accidentally folded/unfolded manually,
they may shake or utter at normal driving speeds and
may not stay in the unfolded position. If this happens, you
will need to reset the mirrors. See “Resetting the Power
Foldaway Mirrors” next.
Resetting the Power Foldaway Mirrors
You will need to reset the power foldaway mirrors if the
following occurs:
They are accidentally manually folded/unfolded.
The mirrors will not stay in the unfolded position.
The mirrors shake and utter at normal driving
speeds.
To reset the power foldaway mirrors, fold and unfold
them at least three times using the mirror controls.
This will reset them to their normal position.
Outside Automatic Dimming Mirror
If your vehicle is equipped with this feature, the driver’s
outside mirror will adjust for the glare of headlamps
behind you. This feature is controlled by the on and off
settings found on the electrochromic mirror.
2-71
Page 173 of 600
Reprogramming a Single Universal
Home Remote Button
To program a device to Universal Home Remote using
a Universal Home Remote button previously trained,
follow these steps:
1. Press and hold the desired Universal Home
Remote button. Do not release the button.
2. The indicator light will begin to ash after
20 seconds. While still holding the Universal
Home Remote button, proceed with Step 2 under
“Programming Universal Home Remote” shown
earlier in this section.
For additional information on Universal Home Remote,
seeCustomer Assistance Offices on page 7-4.
Storage Areas
Glove Box
Open the glove box by pulling the bottom of the handle
upward.
Cupholder(s)
Your vehicle may have cupholders located in the front
console, or in the fold-down armrest.
Coinholder(s)
Your vehicle may have a coin holder inside the center
console storage area.
Front Storage Area
Your vehicle may have a center armrest storage
compartment in the front bench seat.
To open it, fold down the armrest and press the latch
handle located at the front of the armrest. Then, let the
lid pop up and swing open.
The storage compartment may have a cassette/compact
disc holder.
Center Console Storage Area
Your vehicle may be equipped with a console
compartment between the bucket seats.
To open it, press the button located on the right side of
the front of the lid and swing the lid open.
Your vehicle may have a compact disc holder in the
console.
Your console may have a cupholder that swings down
for the rear seat passengers to use. The front cupholder
pulls out and swivels 180° to provide clearance between
tall beverage containers and the manual transmission
shift lever (if equipped).
2-79
Page 208 of 600
Rear Window Defogger
If your vehicle has this feature, the lines you see on the
rear window warm the glass. The rear window defogger
uses a warming grid to remove fog from the rear window.
If your vehicle has a sliding rear window, you will not
have a rear window defogger; however, your vehicle will
still have a mirror button to activate the heated outside
rearview mirrors, if equipped.
<(Rear):Press this button to turn the rear window
defogger on or off. An indicator light in the button will
come on to let you know that the rear window defogger
is activated. This button will also activate the heated
mirrors, if equipped.
The rear window defogger will automatically turn off
several minutes after the button is pressed. Pressing the
button while the defogger is running can also turn off the
defogger.
W(Mirror):If your vehicle does not have a rear
defogger and is equipped with heated mirrors, your
vehicle will have this button to activate them.
Notice:Do not use a razor blade or sharp object to
clear the inside rear window. Do not adhere anything
to the defogger grid lines in the rear glass. These
actions may damage the rear defogger. Repairs
would not be covered by your warranty.
Outlet Adjustment
Use the air outlets located in the center and on the side
of your instrument panel to direct the airow.
Operation Tips
Keep the hood and front air inlets free of ice, snow,
or any other obstruction (such as leaves). The
heater and defroster will work far better, reducing
the chance of fogging the inside of your windows.
When you enter a vehicle in cold weather, turn the
fan knob all the way to the right for a few moments
before driving. This helps clear the intake ducts of
snow and moisture, and reduces the chance of
fogging the inside of your window.
Keep the air path under the front seats clear of
objects. This helps air to circulate throughout your
vehicle.
Adding outside equipment to the front of your
vehicle, such as hood-air deectors, may affect the
performance of the heating and air conditioning
system. Check with your dealer before adding
equipment to the outside of your vehicle.
3-30
Page 365 of 600

{CAUTION:
Things you put inside your vehicle can strike
and injure people in a sudden stop or turn, or
in a crash.
Put things in the cargo area of your
vehicle. Try to spread the weight evenly.
Never stack heavier things, like suitcases,
inside the vehicle so that some of them
are above the tops of the seats.
Do not leave an unsecured child restraint
in your vehicle.
When you carry something inside the
vehicle, secure it whenever you can.
Do not leave a seat folded down unless
you need to.
There is also important loading information for off-road
driving in this manual. See “Loading Your Vehicle
for Off-Road Driving“ underOff-Road Driving on
page 4-16.
Two-Tiered Loading
By positioning four 2 inches (5 cm) by 6 inches (15 cm)
wooden planks across the width of the pickup box,
you can create an upper load platform. The planks
must be inserted in the pickup box depressions.
The length of the planks must allow for at least a
3/4 inch (2 cm) bearing surface on each end of
the plank.
When using this upper load platform, be sure the load is
securely tied down to prevent it from shifting. The load’s
center of gravity should be positioned in a zone over the
rear axle. The zone is located in the area between the
front of each wheel well and the rear of each wheel well.
The center of gravity height must not extend above the
top of the pickup box areboard.
Any load that extends beyond the vehicle’s taillamp
area must be properly marked according to local laws
and regulations.
Remember not to exceed the Gross Axle Weight
Rating (GAWR) of the front or rear axle.
4-53
Page 488 of 600

Tire Terminology and Denitions
Air Pressure:The amount of air inside the tire pressing
outward on each square inch of the tire. Air pressure
is expressed in pounds per square inch (psi) or
kilopascal (kPa).
Accessory Weight:This means the combined weight
of optional accessories. Some examples of optional
accessories are, automatic transmission, power steering,
power brakes, power windows, power seats, and air
conditioning.
Aspect Ratio:The relationship of a tire’s height to
its width.
Belt:A rubber coated layer of cords that is located
between the plies and the tread. Cords may be made
from steel or other reinforcing materials.
Bead:The tire bead contains steel wires wrapped by
steel cords that hold the tire onto the rim.
Bias Ply Tire:A pneumatic tire in which the plies are
laid at alternate angles less than 90 degrees to the
centerline of the tread.Cold Ination Pressure:The amount of air pressure in
a tire, measured in pounds per square inch (psi) or
kilopascals (kPa) before a tire has built up heat
from driving. SeeInation - Tire Pressure on page 5-79.
Curb Weight:This means the weight of a motor
vehicle with standard and optional equipment including
the maximum capacity of fuel, oil and coolant, but
without passengers and cargo.
DOT Markings:A code molded into the sidewall of a
tire signifying that the tire is in compliance with the
U.S. Department of Transportation (DOT) motor
vehicle safety standards. The DOT code includes the
Tire Identication Number (TIN), an alphanumeric
designator which can also identify the tire manufacturer,
production plant, brand and date of production.
GVWR:Gross Vehicle Weight Rating, seeLoading
Your Vehicle on page 4-48.
GAWR FRT:Gross Axle Weight Rating for the front
axle, seeLoading Your Vehicle on page 4-48.
GAWR RR:Gross Axle Weight Rating for the rear axle,
seeLoading Your Vehicle on page 4-48.
5-76
Page 506 of 600
For regular cab models, the equipment you will need is
behind the passenger’s seat. For extended and crew
cab models, the equipment is on the shelf behind
the passenger’s side second row seat.
1. If there is a cover, move the seats forward and turn
the wing nut on the cover counterclockwise to
remove it. For crew cab models, pull up the second
row seat with the loop at the base of the seat
cushion to access the tools.
2. Turn the knob on the jack counterclockwise to lower
the jack head to release the jack from its holder.
3. Remove the wheel blocks and the wheel block
retainer by turning the wing nut counterclockwise.
4. Remove the wing nut used to retain the storage
bag and tools by turning it counterclockwise.You will use the jack handle extensions and the wheel
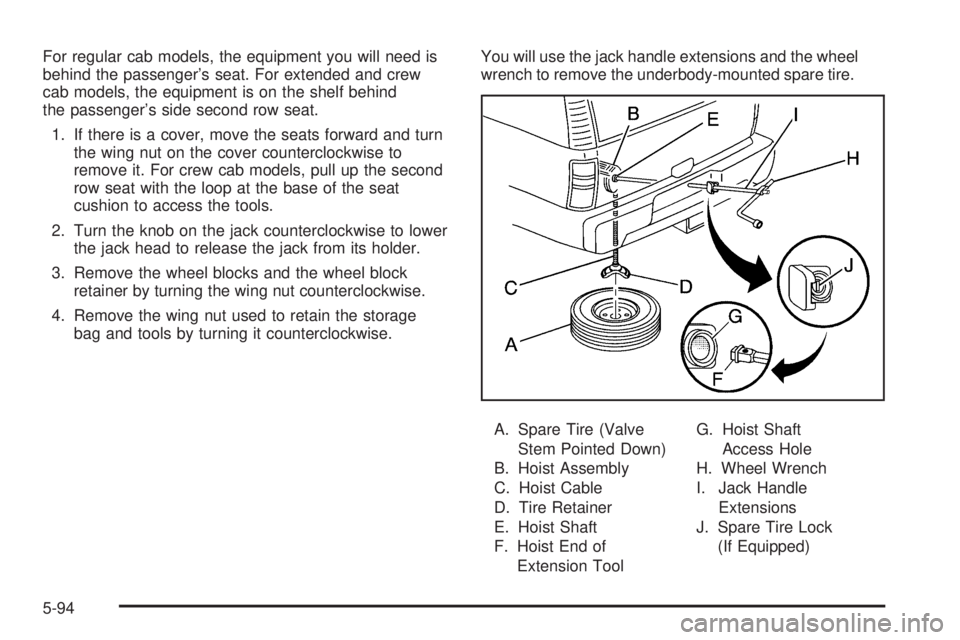
wrench to remove the underbody-mounted spare tire.
A. Spare Tire (Valve
Stem Pointed Down)
B. Hoist Assembly
C. Hoist Cable
D. Tire Retainer
E. Hoist Shaft
F. Hoist End of
Extension ToolG. Hoist Shaft
Access Hole
H. Wheel Wrench
I. Jack Handle
Extensions
J. Spare Tire Lock
(If Equipped)
5-94
Page 516 of 600
{CAUTION:
Incorrect wheel nuts or improperly tightened
wheel nuts can cause the wheel to come loose
and even come off. This could lead to an
accident. Be sure to use the correct wheel
nuts. If you have to replace them, be sure to
get new GM original equipment wheel nuts.
Stop somewhere as soon as you can and have
the nuts tightened with a torque wrench to the
proper torque specication. SeeCapacities
and Specifications on page 5-133for wheel nut
torque specication.
Notice:Improperly tightened wheel nuts can lead
to brake pulsation and rotor damage. To avoid
expensive brake repairs, evenly tighten the wheel
nuts in the proper sequence and to the proper
torque specication. SeeCapacities and
Specifications on page 5-133for the wheel nut
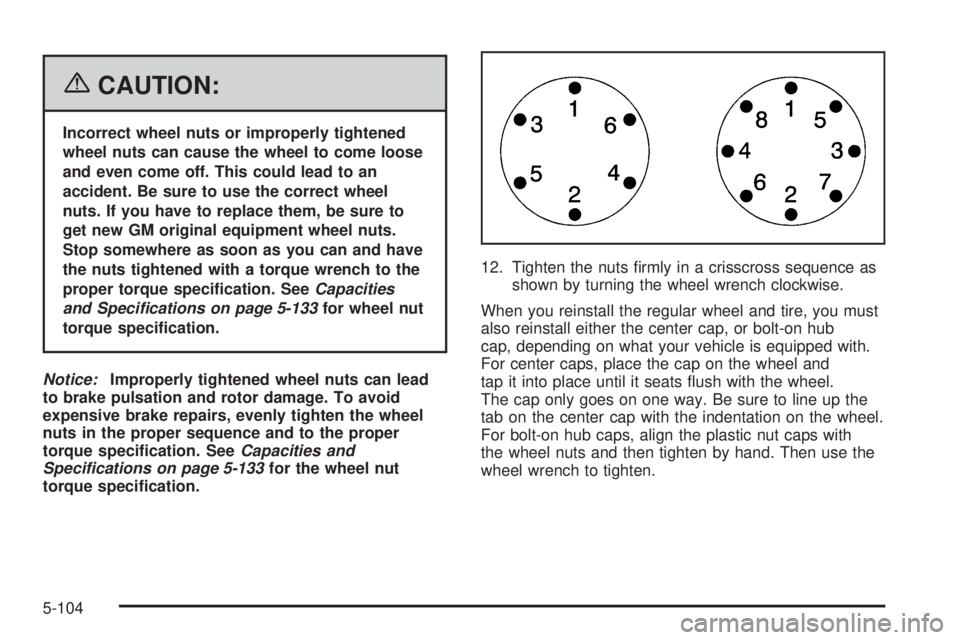
torque specication.12. Tighten the nuts rmly in a crisscross sequence as
shown by turning the wheel wrench clockwise.
When you reinstall the regular wheel and tire, you must
also reinstall either the center cap, or bolt-on hub
cap, depending on what your vehicle is equipped with.
For center caps, place the cap on the wheel and
tap it into place until it seats ush with the wheel.
The cap only goes on one way. Be sure to line up the
tab on the center cap with the indentation on the wheel.
For bolt-on hub caps, align the plastic nut caps with
the wheel nuts and then tighten by hand. Then use the
wheel wrench to tighten.
5-104