2006 GMC SIERRA manual transmission
[x] Cancel search: manual transmissionPage 177 of 600

Memory Seat
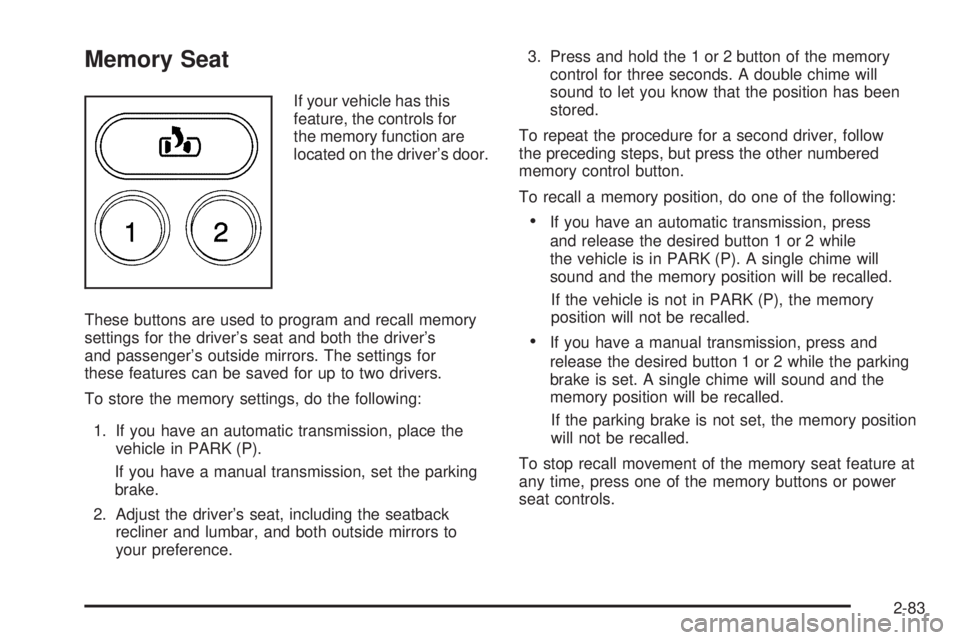
If your vehicle has this
feature, the controls for
the memory function are
located on the driver’s door.
These buttons are used to program and recall memory
settings for the driver’s seat and both the driver’s
and passenger’s outside mirrors. The settings for
these features can be saved for up to two drivers.
To store the memory settings, do the following:
1. If you have an automatic transmission, place the
vehicle in PARK (P).
If you have a manual transmission, set the parking
brake.
2. Adjust the driver’s seat, including the seatback
recliner and lumbar, and both outside mirrors to
your preference.3. Press and hold the 1 or 2 button of the memory
control for three seconds. A double chime will
sound to let you know that the position has been
stored.
To repeat the procedure for a second driver, follow
the preceding steps, but press the other numbered
memory control button.
To recall a memory position, do one of the following:
If you have an automatic transmission, press
and release the desired button 1 or 2 while
the vehicle is in PARK (P). A single chime will
sound and the memory position will be recalled.
If the vehicle is not in PARK (P), the memory
position will not be recalled.
If you have a manual transmission, press and
release the desired button 1 or 2 while the parking
brake is set. A single chime will sound and the
memory position will be recalled.
If the parking brake is not set, the memory position
will not be recalled.
To stop recall movement of the memory seat feature at
any time, press one of the memory buttons or power
seat controls.
2-83
Page 178 of 600

Easy Exit Seat
The controls for this memory function are located on the
driver’s door.
B(Easy Exit Seat):This button is used to program
and recall the desired driver’s seat position when exiting
or entering the vehicle. The seat position can be saved
for up to two drivers.
To store the seat exit position, do the following:
1. If you have an automatic transmission, place the
vehicle in PARK (P).
If you have a manual transmission, set the
parking brake.
2. Press and release the 1 or 2 button. The seat will
move to the stored memory position.
3. Adjust the seat to the desired exit position.
4. Press and hold the exit button of the memory control
for three seconds. A double chime will sound to let
you know that the position has been stored for the
selected button 1 or 2.
To repeat the procedure for a second driver, follow the
preceding steps, but press the other numbered memory
control button.To use the seat exit position, do one of the following:
If you have an automatic transmission, press and
release the exit button on the memory control while
the vehicle is in PARK (P).
If you have a manual transmission, press and
release the exit button on the memory control while
the parking brake is set.
If this feature is activated in the Driver Information
Center (DIC), removing the key from the ignition will
move the seat to the exit position.
See “Easy Exit Seat” underDIC Vehicle Customization
on page 3-64for more information on activating this
feature in the DIC.
2-84
Page 179 of 600

Instrument Panel Overview...............................3-4
Hazard Warning Flashers................................3-6
Other Warning Devices...................................3-6
Horn.............................................................3-6
Tilt Wheel.....................................................3-6
Turn Signal/Multifunction Lever.........................3-7
Turn and Lane-Change Signals........................3-7
Headlamp High/Low-Beam Changer..................3-8
Flash-to-Pass.................................................3-9
Windshield Wipers..........................................3-9
Windshield Washer.......................................3-10
Cruise Control..............................................3-10
Headlamps..................................................3-14
Headlamps on Reminder................................3-14
Daytime Running Lamps (DRL).......................3-15
Automatic Headlamp System..........................3-15
Fog Lamps..................................................3-17
Auxiliary Roof Mounted Lamp.........................3-18
Instrument Panel Brightness...........................3-18
Dome Lamps...............................................3-18
Dome Lamp Override....................................3-19
Entry Lighting...............................................3-19
Exit Lighting.................................................3-19
Front Reading Lamps....................................3-19
Cargo Lamp.................................................3-19
Accessory Power Outlet(s).............................3-20
Ashtray(s) and Cigarette Lighter......................3-20Climate Controls............................................3-21
Climate Control System.................................3-21
Dual Climate Control System..........................3-22
Dual Automatic Climate Control System...........3-25
Outlet Adjustment.........................................3-30
Warning Lights, Gages, and Indicators............3-31
Instrument Panel Cluster................................3-32
Speedometer and Odometer...........................3-33
Trip Odometer..............................................3-33
Tachometer.................................................3-34
Safety Belt Reminder Light.............................3-34
Airbag Readiness Light..................................3-35
Airbag Off Light............................................3-35
Passenger Airbag Status Indicator...................3-37
Battery Warning Light....................................3-40
Voltmeter Gage............................................3-40
Up-Shift Light (Manual Transmission)...............3-41
Brake System Warning Light..........................3-41
Anti-Lock Brake System Warning Light...............3-42
Traction Off Light..........................................3-43
Engine Coolant Temperature Gage..................3-43
Transmission Temperature Gage.....................3-44
Malfunction Indicator Lamp.............................3-46
Oil Pressure Gage........................................3-48
Security Light...............................................3-49
Cruise Control Light......................................3-49
Section 3 Instrument Panel
3-1
Page 182 of 600

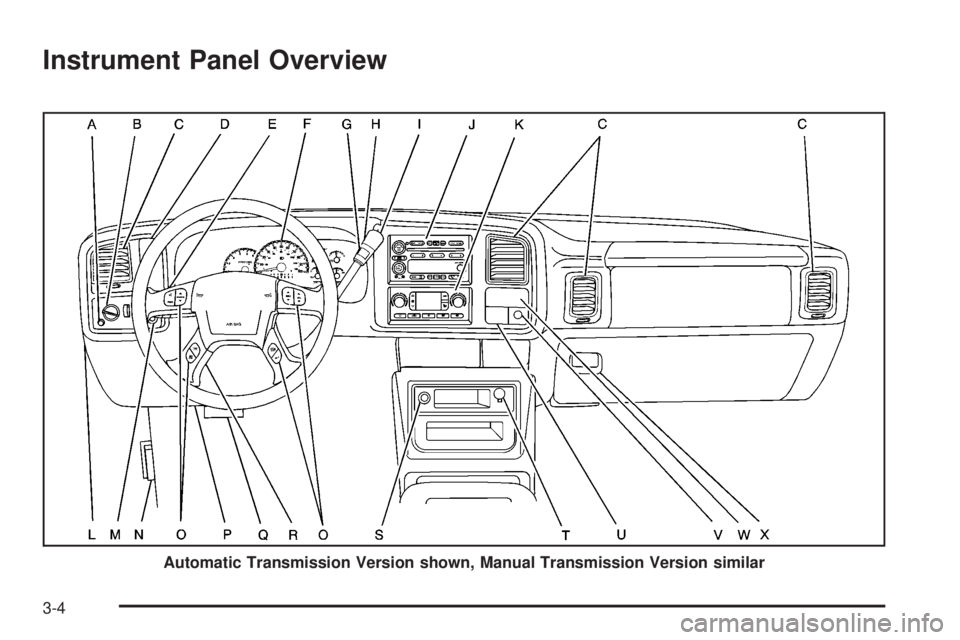
Instrument Panel Overview
Automatic Transmission Version shown, Manual Transmission Version similar
3-4
Page 183 of 600

The main components of your instrument panel are the
following:
A. Dome Lamp Override Button. SeeDome Lamp
Override on page 3-19.
B. Headlamp Controls. SeeHeadlamps on page 3-14.
C. Air Outlets. SeeOutlet Adjustment on page 3-30.
D. Automatic Transfer Case/Electronic Transfer
Case/Traction Assist System (TAS). SeeFour-Wheel
Drive on page 2-38andTraction Assist System (TAS)
on page 4-8.
E. Multifunction Lever. SeeTurn Signal/Multifunction
Lever on page 3-7.
F. Instrument Panel Cluster. SeeInstrument Panel
Cluster on page 3-32.
G. Range Selection Mode (Allison Transmission
®only)
Button (If Equipped). SeeAutomatic Transmission
Operation on page 2-26.
H. Gearshift Lever. SeeAutomatic Transmission
Operation on page 2-26orManual Transmission
Operation on page 2-34for manual transmissions.
I. Tow/Haul Selector Button (If Equipped).
SeeTow/Haul Mode on page 2-31.
J. Audio System. SeeAudio System(s) on page 3-70.
K. Climate Control System. SeeClimate Control System
on page 3-21,Dual Climate Control System on
page 3-22andDual Automatic Climate Control
System on page 3-25.L. Instrument Panel Fuse Block.Instrument Panel Fuse
Block on page 5-124.
M. Cargo Lamp Button. SeeCargo Lamp on page 3-19.
N. Hood Release. SeeHood Release on page 5-13.
O. Steering Wheel Control Buttons (If Equipped).
SeeDriver Information Center (DIC) on page 3-52
orAudio Steering Wheel Controls on page 3-129.
P. Center Instrument Panel Fuse Block. SeeCenter
Instrument Panel Fuse Block on page 5-126.
Q. Parking Brake Release. SeeParking Brake on
page 2-52.
R. Tilt Wheel Lever. SeeTilt Wheel on page 3-6.
S. Cigarette Lighter. SeeAshtray(s) and Cigarette
Lighter on page 3-20.
T. Accessory Power Outlet. SeeAccessory Power
Outlet(s) on page 3-20.
U. Manual Selectable Ride Control (If Equipped).
SeeManual Selectable Ride on page 4-10.
V. Auxiliary Roof Mounted Lamp Button (If Equipped).
SeeAuxiliary Roof Mounted Lamp on page 3-18.
W. Passenger Airbag Off Switch (If Equipped).
SeeAirbag Off Switch on page 1-78.
X. Glove Box. SeeGlove Box on page 2-79.
3-5
Page 210 of 600

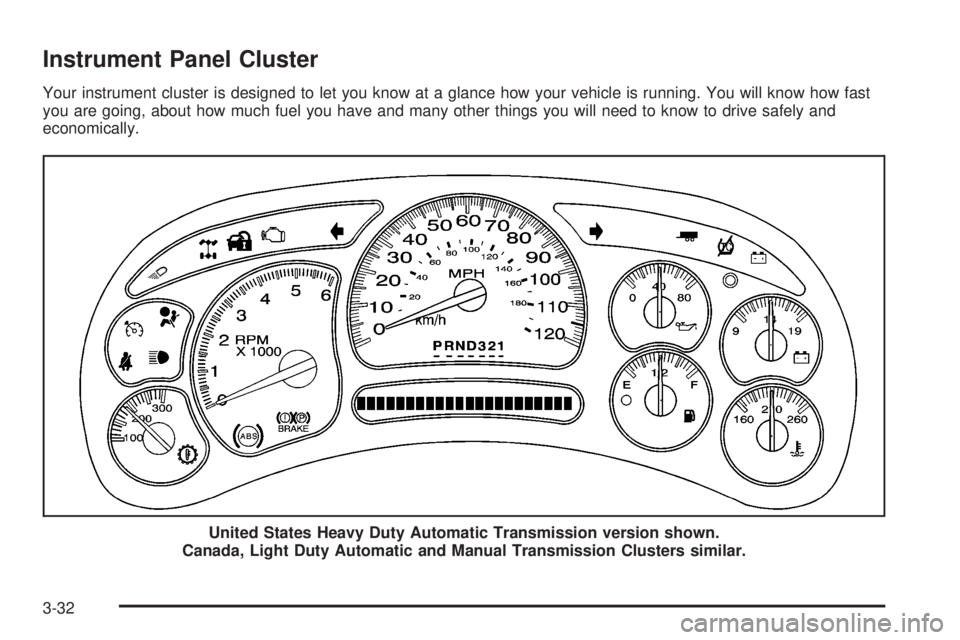
Instrument Panel Cluster
Your instrument cluster is designed to let you know at a glance how your vehicle is running. You will know how fast
you are going, about how much fuel you have and many other things you will need to know to drive safely and
economically.
United States Heavy Duty Automatic Transmission version shown.
Canada, Light Duty Automatic and Manual Transmission Clusters similar.
3-32
Page 219 of 600

Readings in the low warning zone may occur when a
large number of electrical accessories are operating
in the vehicle and the engine is left at an idle for an
extended period. This condition is normal since the
charging system is not able to provide full power at
engine idle. As engine speeds are increased, this
condition should correct itself as higher engine speeds
allow the charging system to create maximum power.
You can only drive for a short time with the reading
in either warning zone. If you must drive, turn off
all unnecessary accessories.
Readings in either warning zone indicate a possible
problem in the electrical system. Have the vehicle
serviced as soon as possible.
Up-Shift Light
(Manual Transmission)
This light is used on
some models with
manual transmissions.
The shift indicator light will show you when to shift to
the next highest gear, and will help you get the best fuel
economy.
Brake System Warning Light
With the ignition on, the brake system warning light will
�ash when you set the parking brake. The light will �ash if
the parking brake doesn’t release fully. If you try to drive
with the parking brake engaged, a chime will sound when
the vehicle speed is greater than 3 mph (5 km/h).
Your vehicle’s hydraulic brake system is divided into
two parts. If one part isn’t working, the other part can
still work and stop you. For good braking, though,
you need both parts working well.
If the warning light comes on and a chime sounds there
could be a brake problem. Have your brake system
inspected right away.
This light should come on brie�y when you turn the
ignition key to RUN. If it doesn’t come on then, have it
�xed so it will be ready to warn you if there’s a problem.
United StatesCanada
3-41
Page 230 of 600

Driver Information Center (DIC)
The Driver Information Center (DIC) display is located on
the instrument panel cluster, below the speedometer. If
your vehicle has DIC buttons, they are located on the
steering wheel. The DIC can display information such as
the trip odometer, fuel economy, customization features,
and warning/status messages.
If your vehicle does not have DIC steering wheel buttons,
you will not have all of the features listed. Scroll through
the odometer, trip odometer, engine hours, and selected
range if your vehicle has an Allison Transmission
®by
pressing the trip odometer reset stem located on the
instrument panel cluster. Turn off, or acknowledge, DIC
messages by pressing the trip odometer reset stem. See
Speedometer and Odometer on page 3-33for information
on features for vehicles without DIC buttons.
If your vehicle has an Allison Transmission
®and the shift
lever is in the MANUAL MODE (M) position, the DIC will
display the current gear range. The DIC will also display
the gear range as it is shifted up or down. For example,
if the gear range is currently set to 6, the DIC will display
(6)54321.When the gear range is shifted down one
time, the DIC will display 6 (5)4321.SeeAutomatic
Transmission Operation on page 2-26for more
information.
3(Trip Information):Press this button to display
the odometer, trip odometers, timer, engine hours,
and selected range if your vehicle has an Allison
Transmission
®.
t(Fuel Information):Press this button to display the
current range, fuel used, average fuel economy, and
engine oil life.
4(Customization):Press this button to access the
vehicle settings menu and customize the personal
settings on your vehicle.
r(Select):Press this button to reset certain DIC
functions and set your customization settings.
Pressing any of the four DIC buttons will acknowledge
DIC messages and clear them from the DIC display.
3-52