Page 416 of 600
Service
Your dealer knows your vehicle best and wants you to be
happy with it. We hope you will go to your dealer for all
your service needs. You will get genuine GM parts and
GM-trained and supported service people.
We hope you will want to keep your GM vehicle all GM.
Genuine GM parts have one of these marks:
Accessories and Modi�cations
When you add non-GM accessories to your vehicle
they can affect your vehicle’s performance and safety,
including such things as, braking, stability, ride and
handling, emissions systems, aerodynamics, durability,
and electronic systems like antilock brakes, traction
control and stability control. Some of these accessories
may even cause malfunction or damage not covered by
warranty.
GM Accessories are designed to complement and
function with other systems on your vehicle. Your
GM dealer can accessorize your vehicle using genuine
GM Accessories. When you go to your GM dealer
and ask for GM Accessories, you will know that
GM-trained and supported service technicians will
perform the work using genuine GM Accessories.
California Proposition 65 Warning
Most motor vehicles, including this one, contain and/or
emit chemicals known to the State of California to cause
cancer and birth defects or other reproductive harm.
Engine exhaust, many parts and systems (including
some inside the vehicle), many �uids, and some
component wear by-products contain and/or emit
these chemicals.
5-4
Page 424 of 600
Checking Things Under
the Hood
{CAUTION:
An electric fan under the hood can start up
and injure you even when the engine is not
running. Keep hands, clothing and tools away
from any underhood electric fan.
{CAUTION:
Things that burn can get on hot engine parts
and start a �re. These include liquids like fuel,
oil, coolant, brake �uid, windshield washer and
other �uids, and plastic or rubber. You or others
could be burned. Be careful not to drop or spill
things that will burn onto a hot engine.
5-12
Page 427 of 600
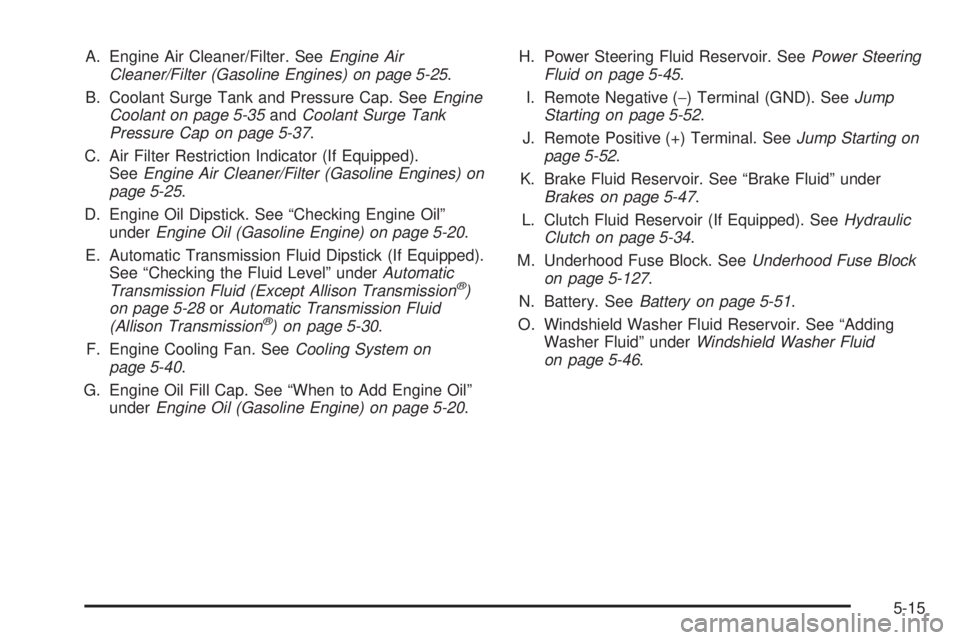
A. Engine Air Cleaner/Filter. SeeEngine Air
Cleaner/Filter (Gasoline Engines) on page 5-25.
B. Coolant Surge Tank and Pressure Cap. SeeEngine
Coolant on page 5-35andCoolant Surge Tank
Pressure Cap on page 5-37.
C. Air Filter Restriction Indicator (If Equipped).
SeeEngine Air Cleaner/Filter (Gasoline Engines) on
page 5-25.
D. Engine Oil Dipstick. See “Checking Engine Oil”
underEngine Oil (Gasoline Engine) on page 5-20.
E. Automatic Transmission Fluid Dipstick (If Equipped).
See “Checking the Fluid Level” underAutomatic
Transmission Fluid (Except Allison Transmission
®)
on page 5-28orAutomatic Transmission Fluid
(Allison Transmission
®) on page 5-30.
F. Engine Cooling Fan. SeeCooling System on
page 5-40.
G. Engine Oil Fill Cap. See “When to Add Engine Oil”
underEngine Oil (Gasoline Engine) on page 5-20.H. Power Steering Fluid Reservoir. SeePower Steering
Fluid on page 5-45.
I. Remote Negative (−) Terminal (GND). SeeJump
Starting on page 5-52.
J. Remote Positive (+) Terminal. SeeJump Starting on
page 5-52.
K. Brake Fluid Reservoir. See “Brake Fluid” under
Brakes on page 5-47.
L. Clutch Fluid Reservoir (If Equipped). SeeHydraulic
Clutch on page 5-34.
M. Underhood Fuse Block. SeeUnderhood Fuse Block
on page 5-127.
N. Battery. SeeBattery on page 5-51.
O. Windshield Washer Fluid Reservoir. See “Adding
Washer Fluid” underWindshield Washer Fluid
on page 5-46.
5-15
Page 429 of 600
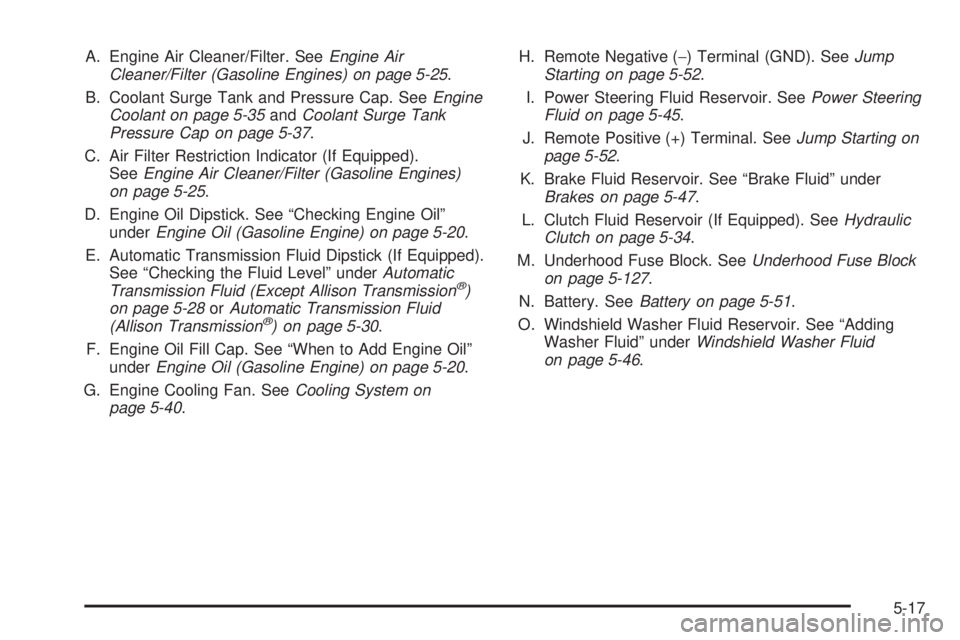
A. Engine Air Cleaner/Filter. SeeEngine Air
Cleaner/Filter (Gasoline Engines) on page 5-25.
B. Coolant Surge Tank and Pressure Cap. SeeEngine
Coolant on page 5-35andCoolant Surge Tank
Pressure Cap on page 5-37.
C. Air Filter Restriction Indicator (If Equipped).
SeeEngine Air Cleaner/Filter (Gasoline Engines)
on page 5-25.
D. Engine Oil Dipstick. See “Checking Engine Oil”
underEngine Oil (Gasoline Engine) on page 5-20.
E. Automatic Transmission Fluid Dipstick (If Equipped).
See “Checking the Fluid Level” underAutomatic
Transmission Fluid (Except Allison Transmission
®)
on page 5-28orAutomatic Transmission Fluid
(Allison Transmission
®) on page 5-30.
F. Engine Oil Fill Cap. See “When to Add Engine Oil”
underEngine Oil (Gasoline Engine) on page 5-20.
G. Engine Cooling Fan. SeeCooling System on
page 5-40.H. Remote Negative (−) Terminal (GND). SeeJump
Starting on page 5-52.
I. Power Steering Fluid Reservoir. SeePower Steering
Fluid on page 5-45.
J. Remote Positive (+) Terminal. SeeJump Starting on
page 5-52.
K. Brake Fluid Reservoir. See “Brake Fluid” under
Brakes on page 5-47.
L. Clutch Fluid Reservoir (If Equipped). SeeHydraulic
Clutch on page 5-34.
M. Underhood Fuse Block. SeeUnderhood Fuse Block
on page 5-127.
N. Battery. SeeBattery on page 5-51.
O. Windshield Washer Fluid Reservoir. See “Adding
Washer Fluid” underWindshield Washer Fluid
on page 5-46.
5-17
Page 431 of 600
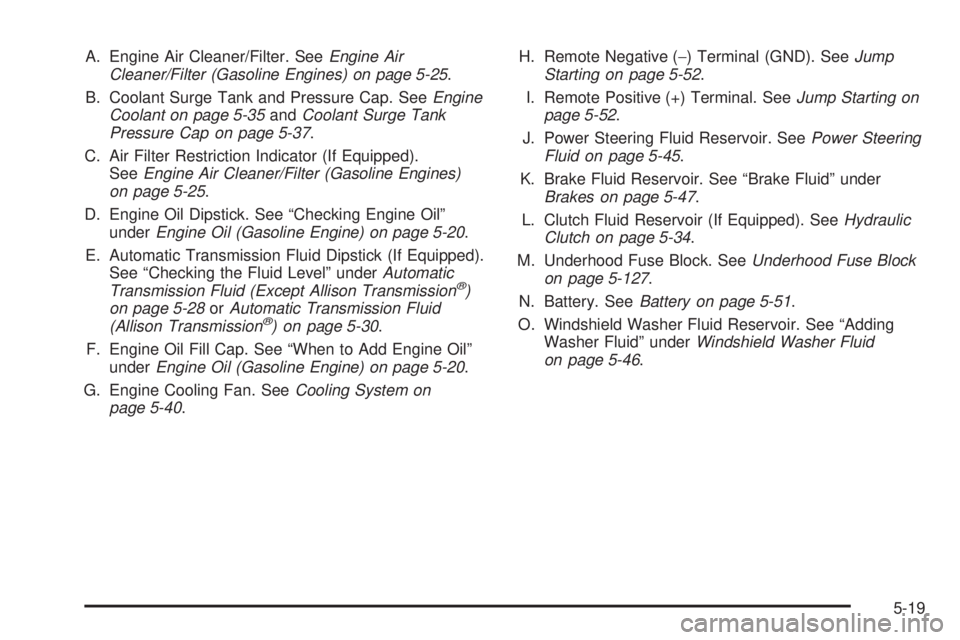
A. Engine Air Cleaner/Filter. SeeEngine Air
Cleaner/Filter (Gasoline Engines) on page 5-25.
B. Coolant Surge Tank and Pressure Cap. SeeEngine
Coolant on page 5-35andCoolant Surge Tank
Pressure Cap on page 5-37.
C. Air Filter Restriction Indicator (If Equipped).
SeeEngine Air Cleaner/Filter (Gasoline Engines)
on page 5-25.
D. Engine Oil Dipstick. See “Checking Engine Oil”
underEngine Oil (Gasoline Engine) on page 5-20.
E. Automatic Transmission Fluid Dipstick (If Equipped).
See “Checking the Fluid Level” underAutomatic
Transmission Fluid (Except Allison Transmission
®)
on page 5-28orAutomatic Transmission Fluid
(Allison Transmission
®) on page 5-30.
F. Engine Oil Fill Cap. See “When to Add Engine Oil”
underEngine Oil (Gasoline Engine) on page 5-20.
G. Engine Cooling Fan. SeeCooling System on
page 5-40.H. Remote Negative (−) Terminal (GND). SeeJump
Starting on page 5-52.
I. Remote Positive (+) Terminal. SeeJump Starting on
page 5-52.
J. Power Steering Fluid Reservoir. SeePower Steering
Fluid on page 5-45.
K. Brake Fluid Reservoir. See “Brake Fluid” under
Brakes on page 5-47.
L. Clutch Fluid Reservoir (If Equipped). SeeHydraulic
Clutch on page 5-34.
M. Underhood Fuse Block. SeeUnderhood Fuse Block
on page 5-127.
N. Battery. SeeBattery on page 5-51.
O. Windshield Washer Fluid Reservoir. See “Adding
Washer Fluid” underWindshield Washer Fluid
on page 5-46.
5-19
Page 441 of 600
Checking the Fluid Level
Prepare your vehicle as follows:
1. Park your vehicle on a level place. Keep the engine
running.
2. With the parking brake applied, place the shift lever
in PARK (P).
3. With your foot on the brake pedal, move the shift
lever through each gear range, pausing for about
three seconds in each range. Then, position
the shift lever in PARK (P).
4. Let the engine run at idle for three minutes or more.
Then, without shutting off the engine, follow these steps:
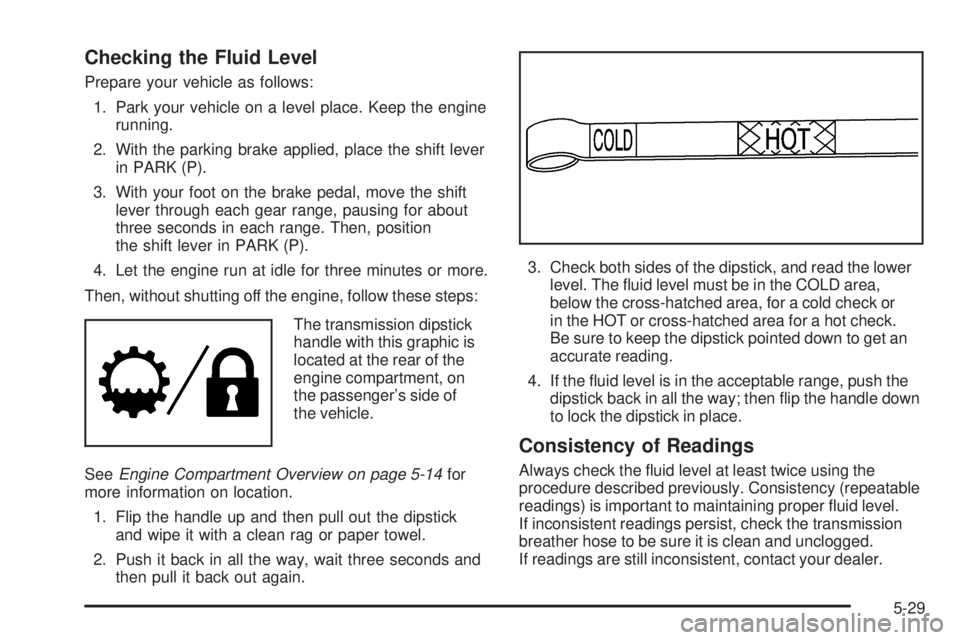
The transmission dipstick
handle with this graphic is
located at the rear of the
engine compartment, on
the passenger’s side of
the vehicle.
SeeEngine Compartment Overview on page 5-14for
more information on location.
1. Flip the handle up and then pull out the dipstick
and wipe it with a clean rag or paper towel.
2. Push it back in all the way, wait three seconds and
then pull it back out again.3. Check both sides of the dipstick, and read the lower
level. The �uid level must be in the COLD area,
below the cross-hatched area, for a cold check or
in the HOT or cross-hatched area for a hot check.
Be sure to keep the dipstick pointed down to get an
accurate reading.
4. If the �uid level is in the acceptable range, push the
dipstick back in all the way; then �ip the handle down
to lock the dipstick in place.
Consistency of Readings
Always check the �uid level at least twice using the
procedure described previously. Consistency (repeatable
readings) is important to maintaining proper �uid level.
If inconsistent readings persist, check the transmission
breather hose to be sure it is clean and unclogged.
If readings are still inconsistent, contact your dealer.
5-29
Page 443 of 600
Notice:Too much or too little �uid can damage your
transmission. Too much can mean that some of the
�uid could come out and fall on hot engine part or
exhaust system parts, starting a �re. Too little �uid
could cause the transmission to overheat. Be sure to
get an accurate reading if you check your
transmission �uid.
Wait at least 30 minutes before checking the
transmission �uid level if you have been driving:
When outside temperatures are above 90°F (32°C).
At high speed for quite a while.
In heavy traffic — especially in hot weather.
While pulling a trailer.
Checking the Fluid Level
Prepare your vehicle as follows:
1. Park your vehicle on a level place. Keep the engine
running.
2. With the parking brake applied, place the shift lever
in PARK (P).3. With your foot on the brake pedal, run the engine for
at least once minute and shift to DRIVE (D). Then
shift to NEUTRAL (N) and then REVERSE (R) to �ll
the hydraulic system. Then, position the shift lever in
PARK (P).
4. Allow the engine to run at idle (500–800 rpm).
Slowly release the brake pedal.
Then, without shutting off the engine, follow these steps:
Cold Check Procedure
The purpose of the cold check is to determine if the
transmission has enough �uid to be operated safely until
a hot check can be made. The �uid level rises as �uid
temperature increases. Do not �ll above the COLD
CHECK band if the transmission �uid is below normal
operating temperatures.
1. Pull out the dipstick and wipe it with a clean rag or
paper towel.
2. Push it back in all the way, wait three seconds and
then pull it back out again.
3. Check the �uid level reading. Repeat the check
procedure to verify the reading.
5-31
Page 459 of 600
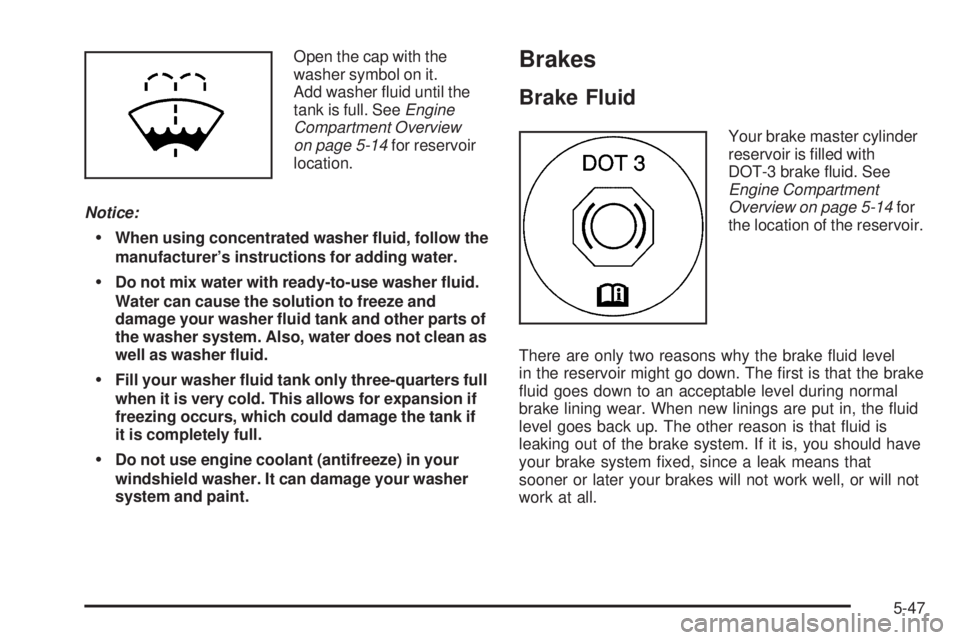
Open the cap with the
washer symbol on it.
Add washer �uid until the
tank is full. SeeEngine
Compartment Overview
on page 5-14for reservoir
location.
Notice:
When using concentrated washer �uid, follow the
manufacturer’s instructions for adding water.
Do not mix water with ready-to-use washer �uid.
Water can cause the solution to freeze and
damage your washer �uid tank and other parts of
the washer system. Also, water does not clean as
well as washer �uid.
Fill your washer �uid tank only three-quarters full
when it is very cold. This allows for expansion if
freezing occurs, which could damage the tank if
it is completely full.
Do not use engine coolant (antifreeze) in your
windshield washer. It can damage your washer
system and paint.
Brakes
Brake Fluid
Your brake master cylinder
reservoir is �lled with
DOT-3 brake �uid. See
Engine Compartment
Overview on page 5-14for
the location of the reservoir.
There are only two reasons why the brake �uid level
in the reservoir might go down. The �rst is that the brake
�uid goes down to an acceptable level during normal
brake lining wear. When new linings are put in, the �uid
level goes back up. The other reason is that �uid is
leaking out of the brake system. If it is, you should have
your brake system �xed, since a leak means that
sooner or later your brakes will not work well, or will not
work at all.
5-47