2006 GMC SAVANA instrument panel
[x] Cancel search: instrument panelPage 119 of 394

Instrument Panel Overview...............................3-4
Hazard Warning Flashers................................3-5
Other Warning Devices...................................3-6
Horn.............................................................3-6
Tilt Wheel.....................................................3-6
Turn Signal/Multifunction Lever.........................3-7
Turn and Lane-Change Signals........................3-7
Headlamp High/Low-Beam Changer..................3-8
Flash-to-Pass.................................................3-8
Windshield Wipers..........................................3-9
Windshield Washer.........................................3-9
Cruise Control..............................................3-10
Exterior Lamps.............................................3-13
Headlamps on Reminder................................3-14
Daytime Running Lamps (DRL).......................3-14
Instrument Panel Brightness...........................3-14
Dome Lamps...............................................3-15
Dome Lamp Override....................................3-15
Entry Lighting...............................................3-15
Exit Lighting.................................................3-15
Reading Lamps............................................3-15
Battery Run-Down Protection..........................3-16
Accessory Power Outlet(s).............................3-16
Ashtray(s) and Cigarette Lighter......................3-17Climate Controls............................................3-17
Climate Control System.................................3-17
Outlet Adjustment.........................................3-20
Rear Heating System....................................3-21
Rear Air Conditioning and Heating System.......3-21
Warning Lights, Gages, and Indicators............3-23
Instrument Panel Cluster................................3-24
Speedometer and Odometer...........................3-25
Trip Odometer..............................................3-25
Engine Speed Limiter....................................3-25
Safety Belt Reminder Light.............................3-26
Passenger Safety Belt Reminder Light.............3-26
Airbag Readiness Light..................................3-27
Airbag Off Light............................................3-28
Passenger Airbag Status Indicator...................3-29
Charging System Light..................................3-32
Voltmeter Gage............................................3-32
Brake System Warning Light..........................3-33
Anti-Lock Brake System Warning Light.............3-34
StabiliTrak
®Not Ready Light..........................3-34
StabiliTrak®Indicator Light..............................3-35
Engine Coolant Temperature Gage..................3-35
Malfunction Indicator Lamp.............................3-36
Oil Pressure Gage........................................3-38
Section 3 Instrument Panel
3-1
Page 120 of 394

Change Engine Oil Light................................3-39
Security Light...............................................3-40
Cruise Control Light......................................3-40
Reduced Engine Power Light.........................3-41
Highbeam On Light.......................................3-41
Daytime Running Lamps (DRL) Indicator Light.....3-41
Tow/Haul Mode Light....................................3-42
Check Gages Warning Light...........................3-42
Fuel Gage...................................................3-42
Audio System(s).............................................3-43
Setting the Time for Radios without Radio
Data Systems (RDS)..................................3-44
Setting the Time for Radios with Radio
Data Systems (RDS)..................................3-44AM-FM Radio...............................................3-45
Radio with CD..............................................3-47
Radio with Cassette and CD..........................3-52
Radio with Six-Disc CD.................................3-63
Theft-Deterrent Feature (Non-RDS Radios).......3-74
Theft-Deterrent Feature (RDS Radios).............3-74
Radio Reception...........................................3-75
Care of the Cassette Tape Player...................3-75
Care of Your CDs.........................................3-76
Care of the CD Player...................................3-77
Fixed Mast Antenna......................................3-77
Chime Level Adjustment................................3-77
Section 3 Instrument Panel
3-2
Page 122 of 394

Instrument Panel Overview
3-4
Page 123 of 394

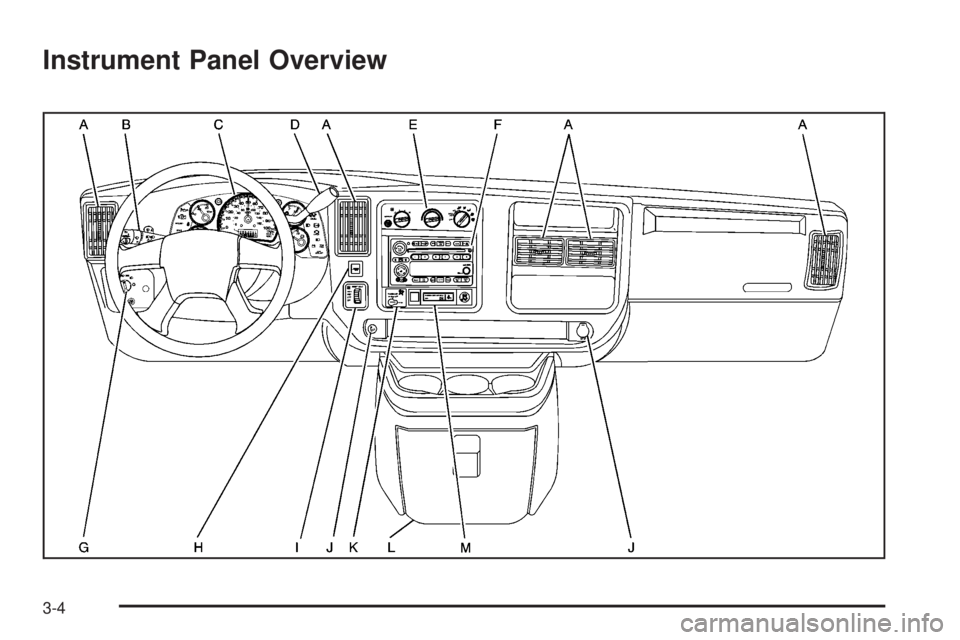
The main components of your instrument panel are the following:
A. Air Outlets. SeeOutlet Adjustment on page 3-20.
B. Turn Signal/Multifunction Lever. SeeTurn
Signal/Multifunction Lever on page 3-7.
C. Instrument Panel Cluster. SeeInstrument Panel
Cluster on page 3-24.
D. Shift Lever. SeeStarting the Engine on page 2-19.
E. Climate Control System. SeeClimate Control System
on page 3-17.
F. Audio System(s). SeeAudio System(s) on
page 3-43.
G. Exterior Lamp Controls. SeeExterior Lamps on
page 3-13.
H. Tow/Haul Mode Button. See “Tow/Haul Mode” under
Towing a Trailer on page 4-37.
I. Rear Heating System (If Equipped). SeeRear
Heating System on page 3-21.
J. Accessory Power Outlets/Cigarette Lighter. See
Accessory Power Outlet(s) on page 3-16and
Ashtray(s) and Cigarette Lighter on page 3-17.
K. Airbag Off Switch. SeeAirbag Off Switch on
page 1-71.
L. Storage Compartment. SeeStorage Areas on
page 2-30.M. StabiliTrak
®Button (If Equipped), Passenger Airbag
Status Indicator, and High-Idle System (If Equipped).
SeeStabiliTrak
®System on page 4-9orPassenger
Airbag Status Indicator on page 3-29.
Hazard Warning Flashers
Your hazard warning flashers let you warn others. They
also let police know you have a problem. Your front
and rear turn signal lamps will flash on and off.
The hazard warning
flasher button is
located on top of the
steering column.
Your hazard warning flashers work no matter what
position your key is in, and even if the key is not in
the ignition.
Press the button to make the front and rear turn signal
lamps flash on and off. Press the button again to
turn the flashers off.
When the hazard warning flashers are on, your turn
signals will not work.
3-5
Page 126 of 394

An arrow on the instrument
panel cluster will flash in
the direction of the
turn or lane change.
To signal a lane change, just raise or lower the lever
until the arrow starts to flash. Hold it there until you
complete your lane change. The lever will return by
itself when you release it.
If you move the lever all the way up or down, and the
arrow flashes at twice the normal rate, a signal bulb may
be burned out and other drivers may not see your
turn signal.
If a bulb is burned out, replace it to help avoid an
accident. If the arrows don’t go on at all when you signal
a turn, check for burned-out bulbs or a blown fuse.
SeeFuses and Circuit Breakers on page 5-93.
Turn Signal On Chime
If your turn signal is left on for more than 3/4 of a mile
(1.2 km), a chime will sound at each flash of the
turn signal. To turn off the chime, move the turn signal
lever to the off position.
Headlamp High/Low-Beam Changer
23(Headlamp High/Low-Beam Changer):To
change the headlamps from low to high beam, pull the
multifunction lever all the way toward you. Then
release it.
When the high beams are
on, this light on the
instrument panel cluster
also will be on.
Flash-to-Pass
This feature allows you to use your high-beam
headlamps to signal a driver in front of you that you
want to pass. It works even if your headlamps are off.
To use it, pull the turn signal lever toward you, but not so
far that you hear it click.
If your headlamps are off or on low-beam, your
high-beam headlamps will turn on and stay on as long
as you hold the lever toward you and the high-beam
indicator on the instrument panel will come on. Release
the lever to turn the high-beam headlamps off.
3-8
Page 129 of 394

Setting Cruise Control
{CAUTION:
If you leave your cruise control on when you
are not using cruise, you might hit a button
and go into cruise when you do not want to.
You could be startled and even lose control.
Keep the cruise control switch off until you
want to use cruise control.
1. Move the cruise control switch to on.
2. Get up to the speed you want.
3. Press in the set button at the end of the lever and
release it.
4. Take your foot off the accelerator pedal.
The CRUISE light on the instrument panel will illuminate
when the cruise control is engaged.
Resuming a Set Speed
Suppose you set your cruise control at a desired speed
and then you apply the brake. This, of course,
disengages the cruise control. But you don’t need to
reset it.Once you’re going about 25 mph (40 km/h) or more, you
can move the cruise control switch from on to
resume/accelerate briefly.
You’ll go right back up to your chosen speed and
stay there.
If you hold the switch at resume/accelerate briefly, the
vehicle will keep going faster until you release the switch
or apply the brake. So unless you want to go faster,
don’t hold the switch at resume/accelerate.
Increasing Speed While Using Cruise
Control
There are two ways to go to a higher speed:
•Use the accelerator pedal to get to the higher
speed. Press the set button at the end of the lever,
then release the button and the accelerator
pedal. You’ll now cruise at the higher speed.
•Move the cruise switch from on to
resume/accelerate. Hold it there until you get up to
the speed you want, and then release the switch.
To increase your speed in very small amounts,
move the switch to resume/accelerate briefly. Each
time you do this, your vehicle will go about
1 mph (1.6 km/h) faster.
3-11
Page 131 of 394

Exterior Lamps
The control on the driver’s
side of your instrument
panel operates the exterior
lamps.
The exterior lamp control has four positions:
Ø (Defeat):Turn the control to this position to turn off
the DRL. Vehicles first sold in Canada cannot turn
off the DRL.
i(Daytime Running Lamps (DRL)):Turning the
control to this position selects the DRL. When the
vehicle is shifted out of PARK (P), the DRL will turn on,
unless defeated. When the DRL are active, the DRL
indicator will illuminate.
;(Parking Lamps):Turn the control to this position
to turn on the parking lamps, together with the
following:
•Instrument Panel Lights
•Daytime Running Lamps (DRL) (Canada)
•Sidemarker Lamps
•Taillamps
•License Plate Lamps
If the DRL are active when the control is turned to this
position, the DRL will turn off.
For vehicles first sold in Canada, the DRL will remain
active along with the lamps mentioned above.
5(Headlamps):Turn the control to this position to
turn on the headlamps together with the parking
lamps and turn off the daytime running lamps.
You can switch your headlamps from high to
low-beam by pulling the turn signal/high-beam
lever toward you.
A circuit breaker protects your headlamps. If you have
an electrical overload, your headlamps will flicker on and
off. Have your headlamp wiring checked right away if
this happens.
3-13
Page 132 of 394

Headlamps on Reminder
A reminder chime will sound when your control is turned
to the headlamps or parking lamps position, your key
is out of the ignition, and your driver’s door is open.
To disable the chime, turn the control to the Daytime
Running Lamp (DRL) position and then back to the
parking lamps or headlamps position.
Daytime Running Lamps (DRL)
Daytime Running Lamps (DRL) can make it easier for
others to see the front of your vehicle during the
day. DRL can be helpful in many different driving
conditions, but they can be especially helpful in the short
periods after dawn and before sunset. Fully functional
daytime running lamps are required on all vehicles
first sold in Canada.
The DRL system will come on when the following
conditions are met:
•the ignition is on,
•the exterior lamps control is in DRL mode and not
in the defeat position.
When the DRL are on, only your parking lamps will
be on. The other lamps will not be on. The instrument
panel will be lit.When you turn the headlamp switch off, the headlamps
will go off, and your DRL lamps (parking lamps) will
illuminate.
To turn off the DRL, turn the exterior lamp control to the
off position or shift into PARK (P). The DRL will stay
off until the control is toggled again or the vehicle
is shifted out of PARK (P).
This procedure applies only to vehicles first sold in the
United States.
Instrument Panel Brightness
Press this knob located
next to the exterior lamps
knob to extend it, and
then turn it to adjust the
instrument panel
brightness.
Turn the knob all the way clockwise to turn on the
interior lamps. Press the knob back into its stored
position when not in use.
3-14