2006 FORD FREESTYLE fog light
[x] Cancel search: fog lightPage 8 of 288
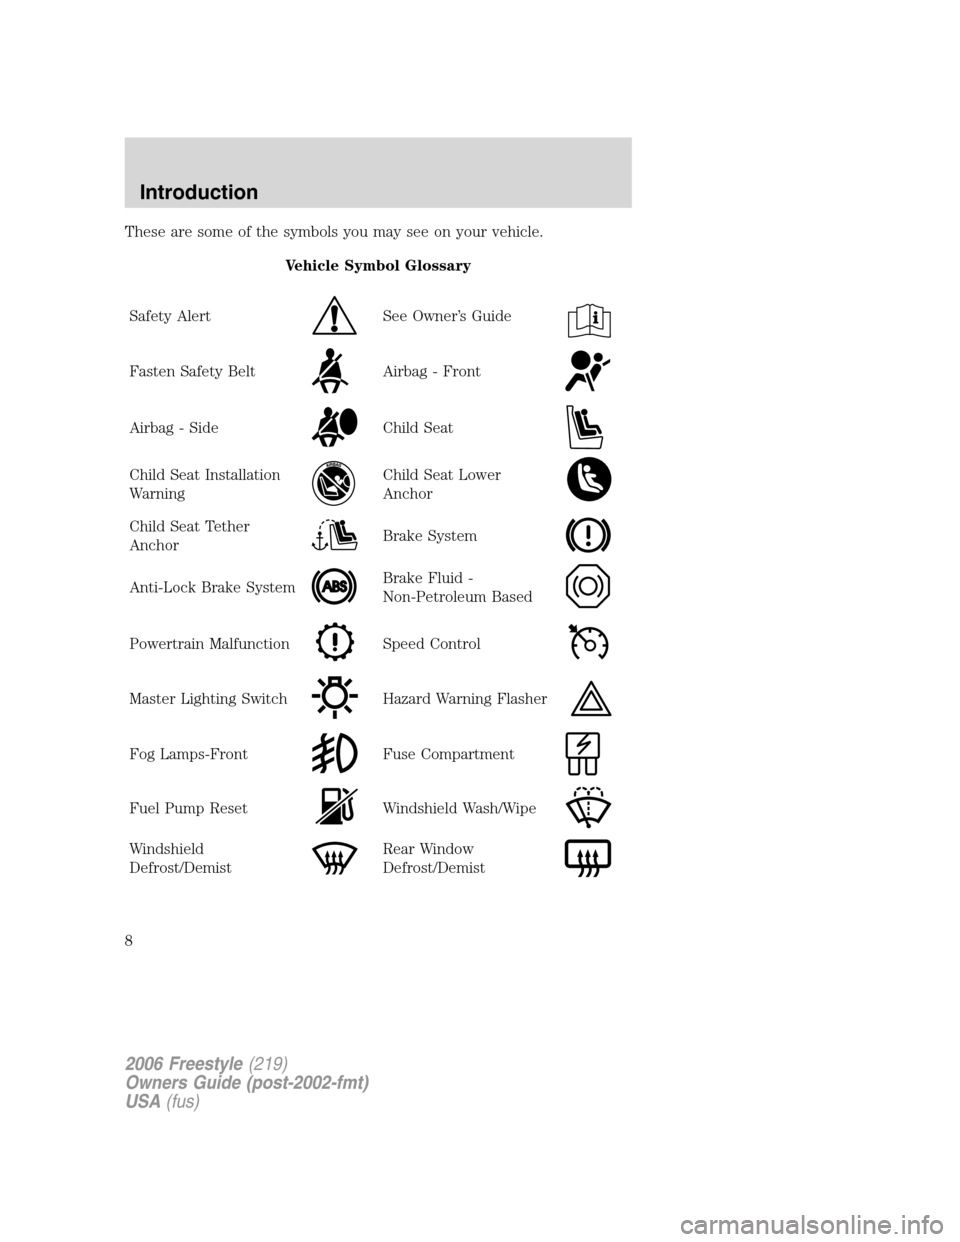
These are some of the symbols you may see on your vehicle.
Vehicle Symbol Glossary
Safety Alert
See Owner’s Guide
Fasten Safety BeltAirbag - Front
Airbag - SideChild Seat
Child Seat Installation
WarningChild Seat Lower
Anchor
Child Seat Tether
AnchorBrake System
Anti-Lock Brake SystemBrake Fluid -
Non-Petroleum Based
Powertrain MalfunctionSpeed Control
Master Lighting SwitchHazard Warning Flasher
Fog Lamps-FrontFuse Compartment
Fuel Pump ResetWindshield Wash/Wipe
Windshield
Defrost/DemistRear Window
Defrost/Demist
2006 Freestyle(219)
Owners Guide (post-2002-fmt)
USA(fus)
Introduction
8
Page 44 of 288
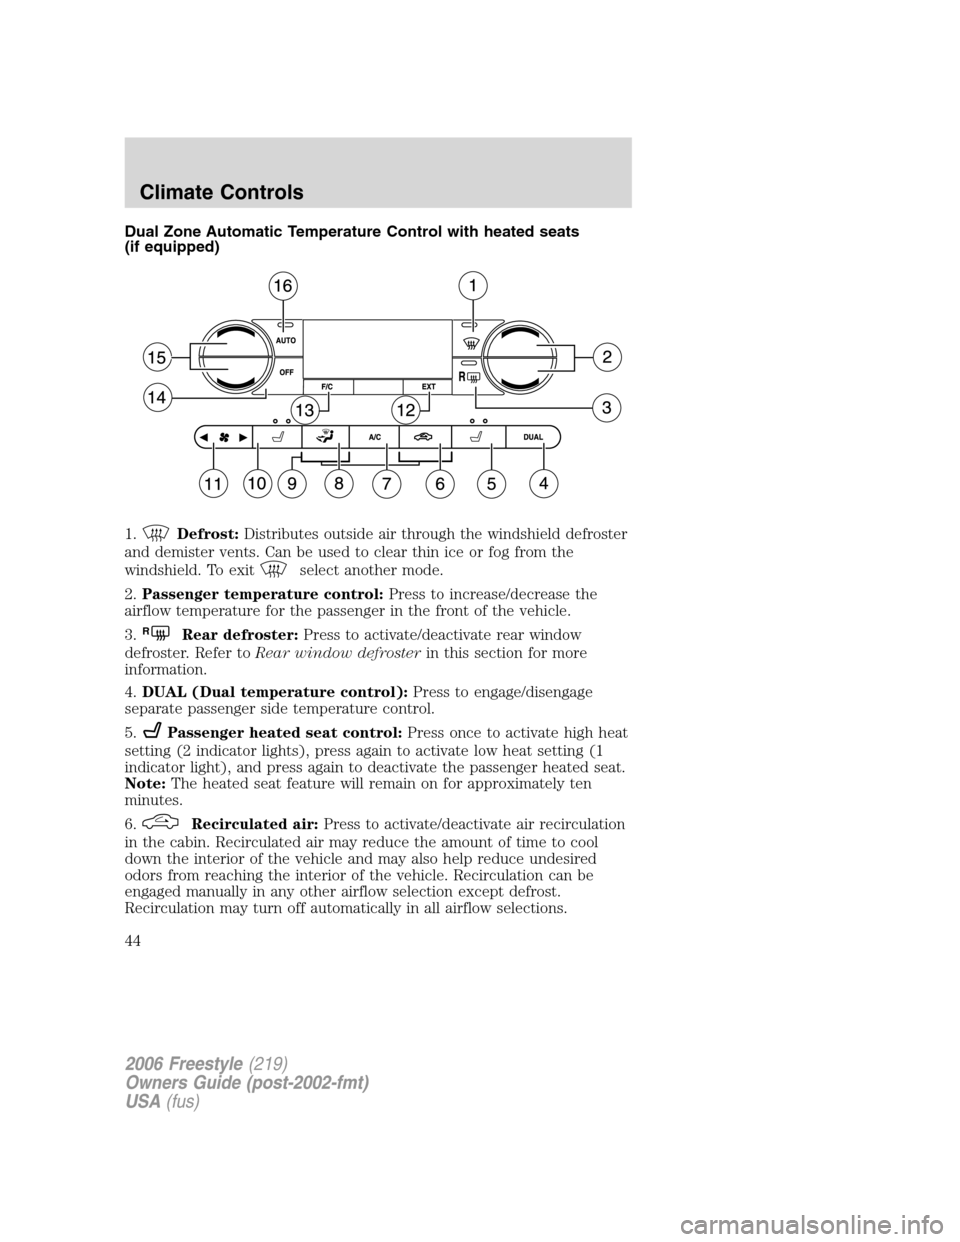
Dual Zone Automatic Temperature Control with heated seats
(if equipped)
1.
Defrost:Distributes outside air through the windshield defroster
and demister vents. Can be used to clear thin ice or fog from the
windshield. To exit
select another mode.
2.Passenger temperature control:Press to increase/decrease the
airflow temperature for the passenger in the front of the vehicle.
3.
RRear defroster:Press to activate/deactivate rear window
defroster. Refer toRear window defrosterin this section for more
information.
4.DUAL (Dual temperature control):Press to engage/disengage
separate passenger side temperature control.
5.
Passenger heated seat control:Press once to activate high heat
setting (2 indicator lights), press again to activate low heat setting (1
indicator light), and press again to deactivate the passenger heated seat.
Note:The heated seat feature will remain on for approximately ten
minutes.
6.
Recirculated air:Press to activate/deactivate air recirculation
in the cabin. Recirculated air may reduce the amount of time to cool
down the interior of the vehicle and may also help reduce undesired
odors from reaching the interior of the vehicle. Recirculation can be
engaged manually in any other airflow selection except defrost.
Recirculation may turn off automatically in all airflow selections.
2006 Freestyle(219)
Owners Guide (post-2002-fmt)
USA(fus)
Climate Controls
44
Page 48 of 288
Operating tips
•To reduce fog build up on the windshield during humid weather, place
the air flow selector in the
position.
•To reduce humidity build up inside the vehicle: do not drive with the
airflow selector in the OFF or with recirculated air engaged.
•Do not put objects under the front seats that will interfere with the
airflow to the back seats.
•Remove any snow, ice or leaves from the air intake area at the base of
the windshield.
•For maximum cooling performance (MAX A/C):
In AUTO mode, press AUTO control and set to desired temperature.
In manual override control, select
or, A/C and recirculated
air
and set the temperature to 60°F (16°C). Set the fan to the
highest speed initially, then adjust to maintain passenger comfort.
•To improve the A/C cool down, drive with the windows slightly open
for 2–3 minutes after starting the vehicle or until the vehicle has
“aired out.”
In extremely cold temperatures, to maximize overall heater performance
it is suggested to not operate the auxiliary system (if so equipped) until
the engine temperature gauge crosses into the normal operating range.
To aid in side window defogging/demisting in cold weather:
1. Select
.
2. Select A/C.
3. Adjust the temperature control to maintain comfort.
4. Set the fan to the highest speed.
5. Direct the outer instrument panel vents towards the side windows.
Do not place objects on top of the instrument panel as these
objects may become projectiles in a collision or sudden stop.
2006 Freestyle(219)
Owners Guide (post-2002-fmt)
USA(fus)
Climate Controls
48
Page 49 of 288
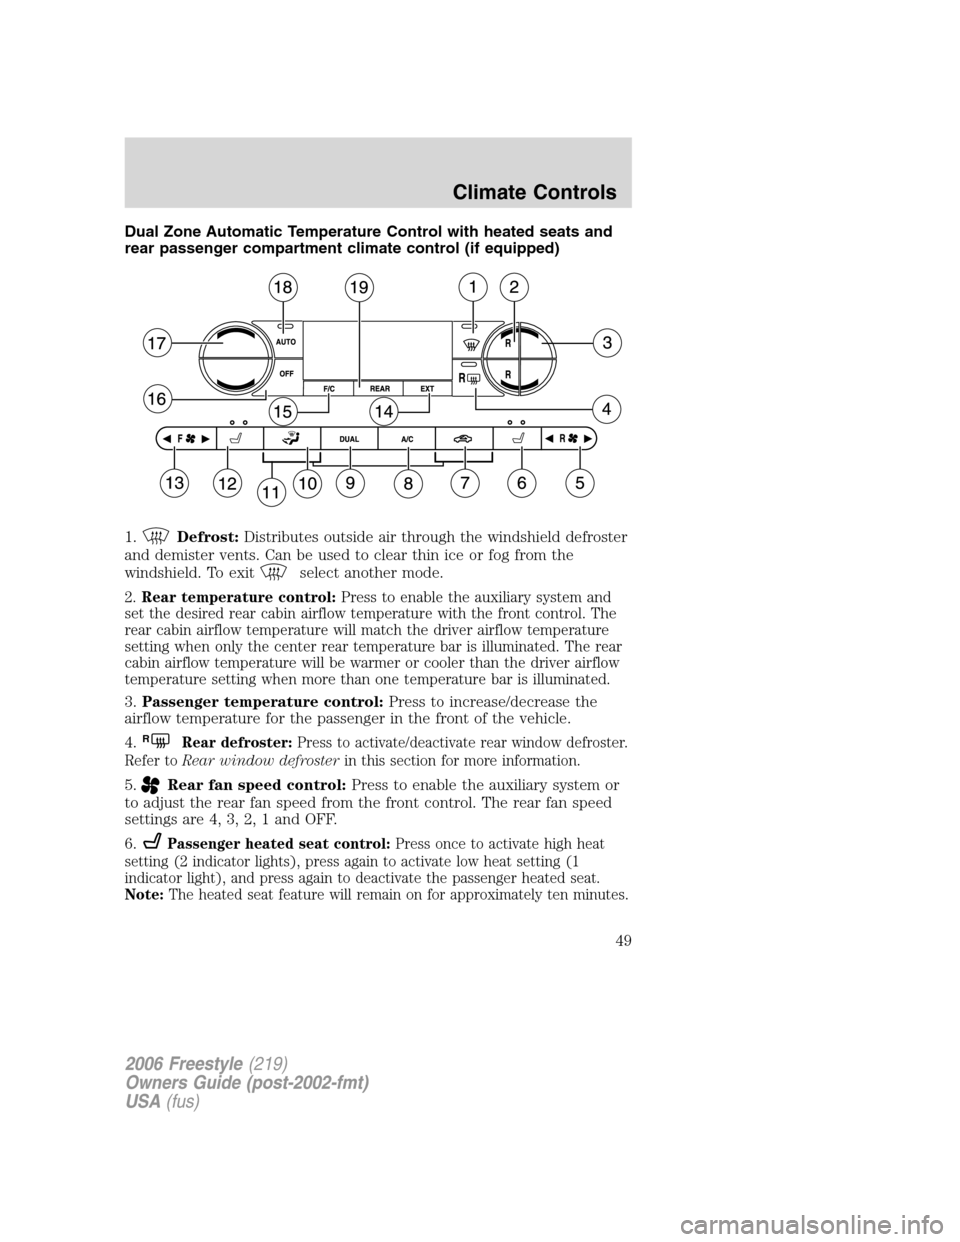
Dual Zone Automatic Temperature Control with heated seats and
rear passenger compartment climate control (if equipped)
1.
Defrost:Distributes outside air through the windshield defroster
and demister vents. Can be used to clear thin ice or fog from the
windshield. To exit
select another mode.
2.Rear temperature control:Press to enable the auxiliary system and
set the desired rear cabin airflow temperature with the front control. The
rear cabin airflow temperature will match the driver airflow temperature
setting when only the center rear temperature bar is illuminated. The rear
cabin airflow temperature will be warmer or cooler than the driver airflow
temperature setting when more than one temperature bar is illuminated.
3.Passenger temperature control:Press to increase/decrease the
airflow temperature for the passenger in the front of the vehicle.
4.
RRear defroster:Press to activate/deactivate rear window defroster.
Refer toRear window defrosterin this section for more information.
5.Rear fan speed control:Press to enable the auxiliary system or
to adjust the rear fan speed from the front control. The rear fan speed
settings are 4, 3, 2, 1 and OFF.
6.
Passenger heated seat control:Press once to activate high heat
setting (2 indicator lights), press again to activate low heat setting (1
indicator light), and press again to deactivate the passenger heated seat.
Note:The heated seat feature will remain on for approximately ten minutes.
2006 Freestyle(219)
Owners Guide (post-2002-fmt)
USA(fus)
Climate Controls
49
Page 54 of 288
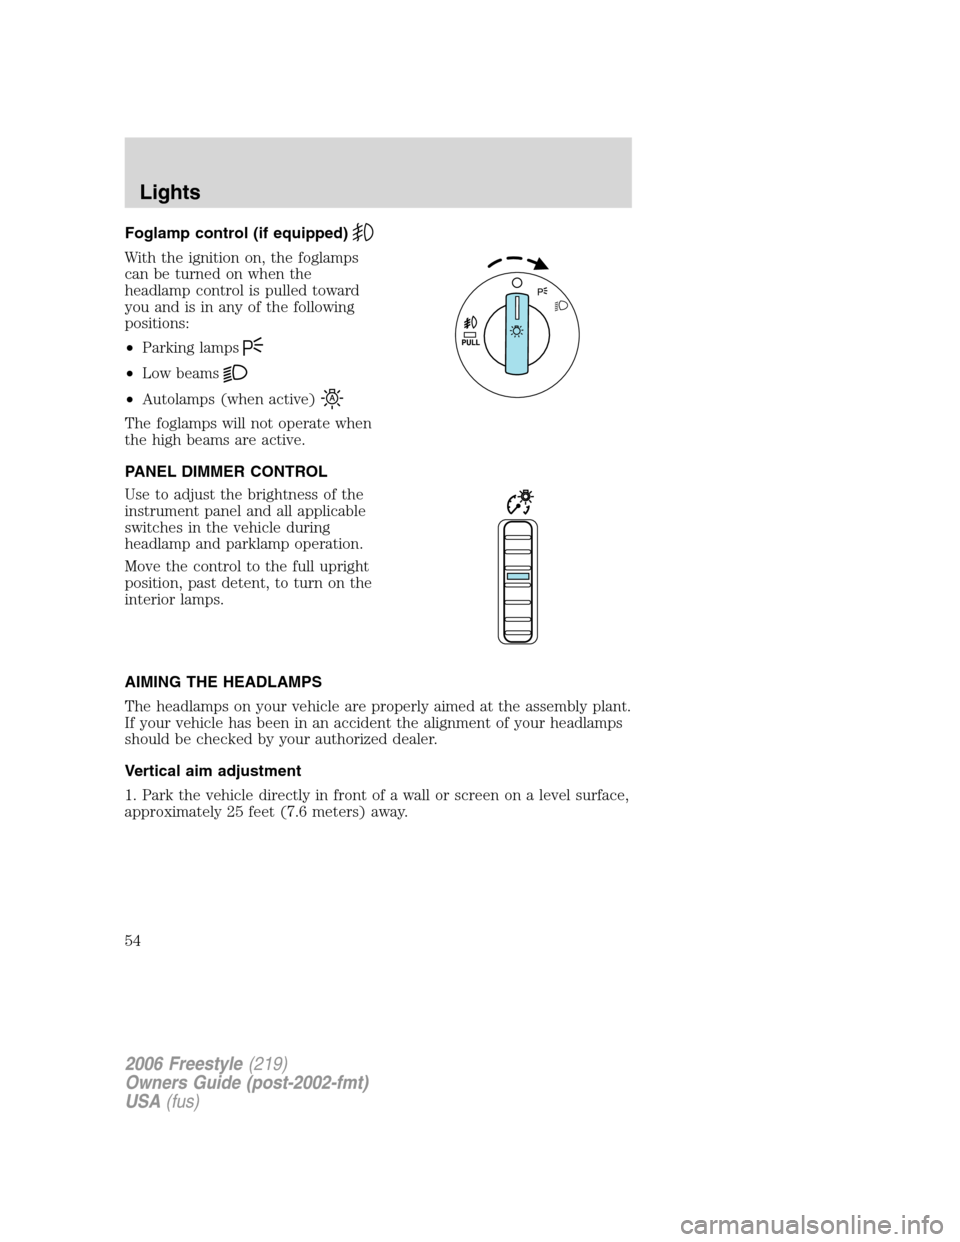
Foglamp control (if equipped)
With the ignition on, the foglamps
can be turned on when the
headlamp control is pulled toward
you and is in any of the following
positions:
•Parking lamps
•Low beams
•Autolamps (when active)
The foglamps will not operate when
the high beams are active.
PANEL DIMMER CONTROL
Use to adjust the brightness of the
instrument panel and all applicable
switches in the vehicle during
headlamp and parklamp operation.
Move the control to the full upright
position, past detent, to turn on the
interior lamps.
AIMING THE HEADLAMPS
The headlamps on your vehicle are properly aimed at the assembly plant.
If your vehicle has been in an accident the alignment of your headlamps
should be checked by your authorized dealer.
Vertical aim adjustment
1. Park the vehicle directly in front of a wall or screen on a level surface,
approximately 25 feet (7.6 meters) away.
2006 Freestyle(219)
Owners Guide (post-2002-fmt)
USA(fus)
Lights
54
Page 57 of 288
Using the right bulbs
Replacement bulbs are specified in the chart below. Headlamp bulbs must
be marked with an authorized “D.O.T.” for North America and an “E” for
Europe to assure lamp performance, light brightness and pattern and safe
visibility. The correct bulbs will not damage the lamp assembly or void the
lamp assembly warranty and will provide quality bulb burn time.
Function Number of bulbs Trade number
Front park/turn lamp 23157AK or
3157A (amber)
Front sidemarker lamp 2 168
Headlamp 2 9008 H13
Tail/brake/turn signal lamp 2 4057K
Backup lamp 2 3156
License plate lamp 2 168
High-mount brake lamp 5 W5W
Foglamp (if equipped) 2 H11 LL
Map lamp 2 12V6W
Dome/reading lamps 6 578
All replacement bulbs are clear in color except where noted.
To replace all instrument panel lights - see your authorized dealer.
Replacing headlamp (high/low beam) bulbs
1. Make sure headlamp switch is in the OFF position, then open the
hood.
2. Reach behind the headlamp assembly to access the bulb sockets and
connectors.
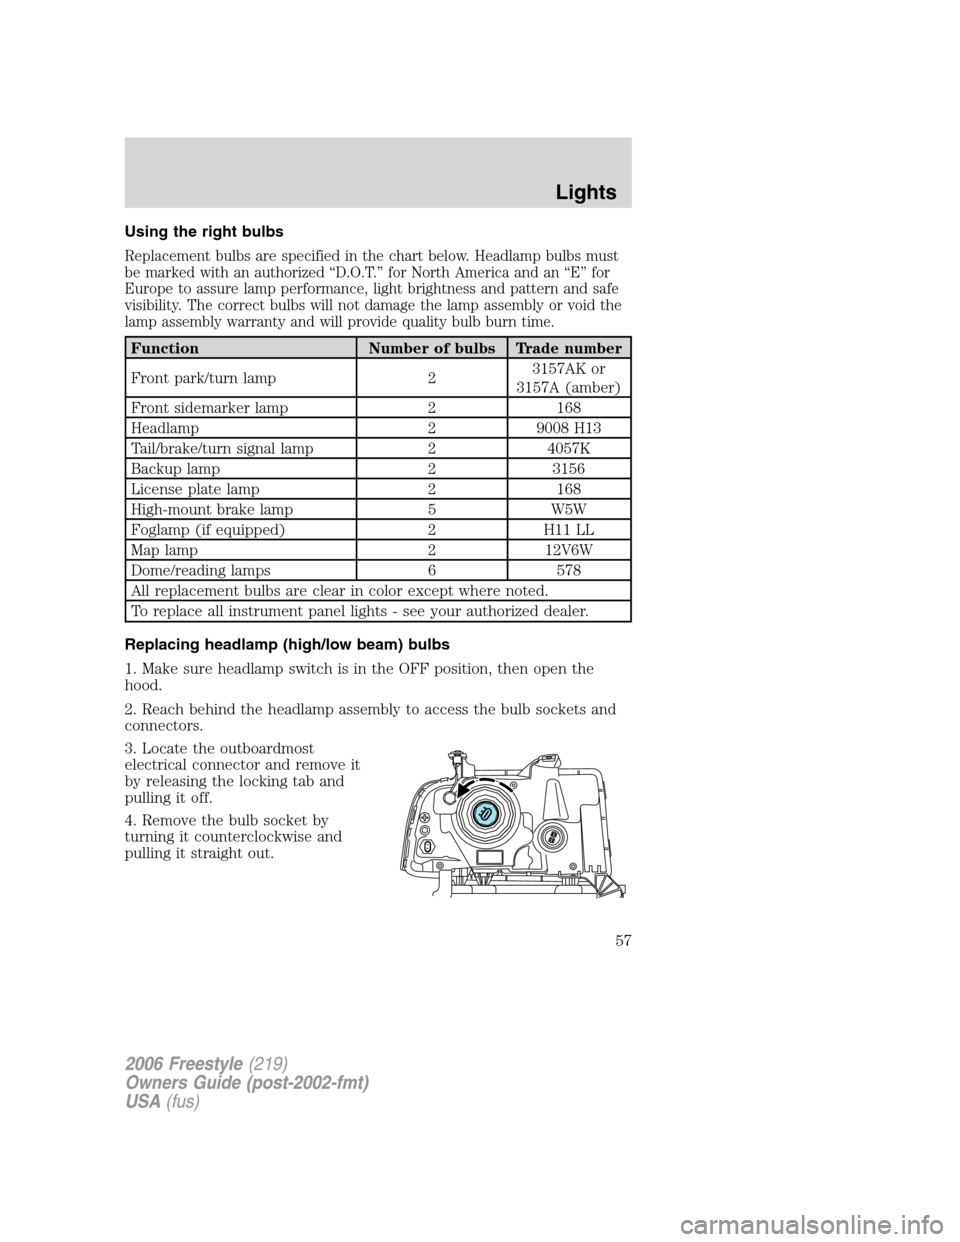
3. Locate the outboardmost
electrical connector and remove it
by releasing the locking tab and
pulling it off.
4. Remove the bulb socket by
turning it counterclockwise and
pulling it straight out.
2006 Freestyle(219)
Owners Guide (post-2002-fmt)
USA(fus)
Lights
57
Page 60 of 288
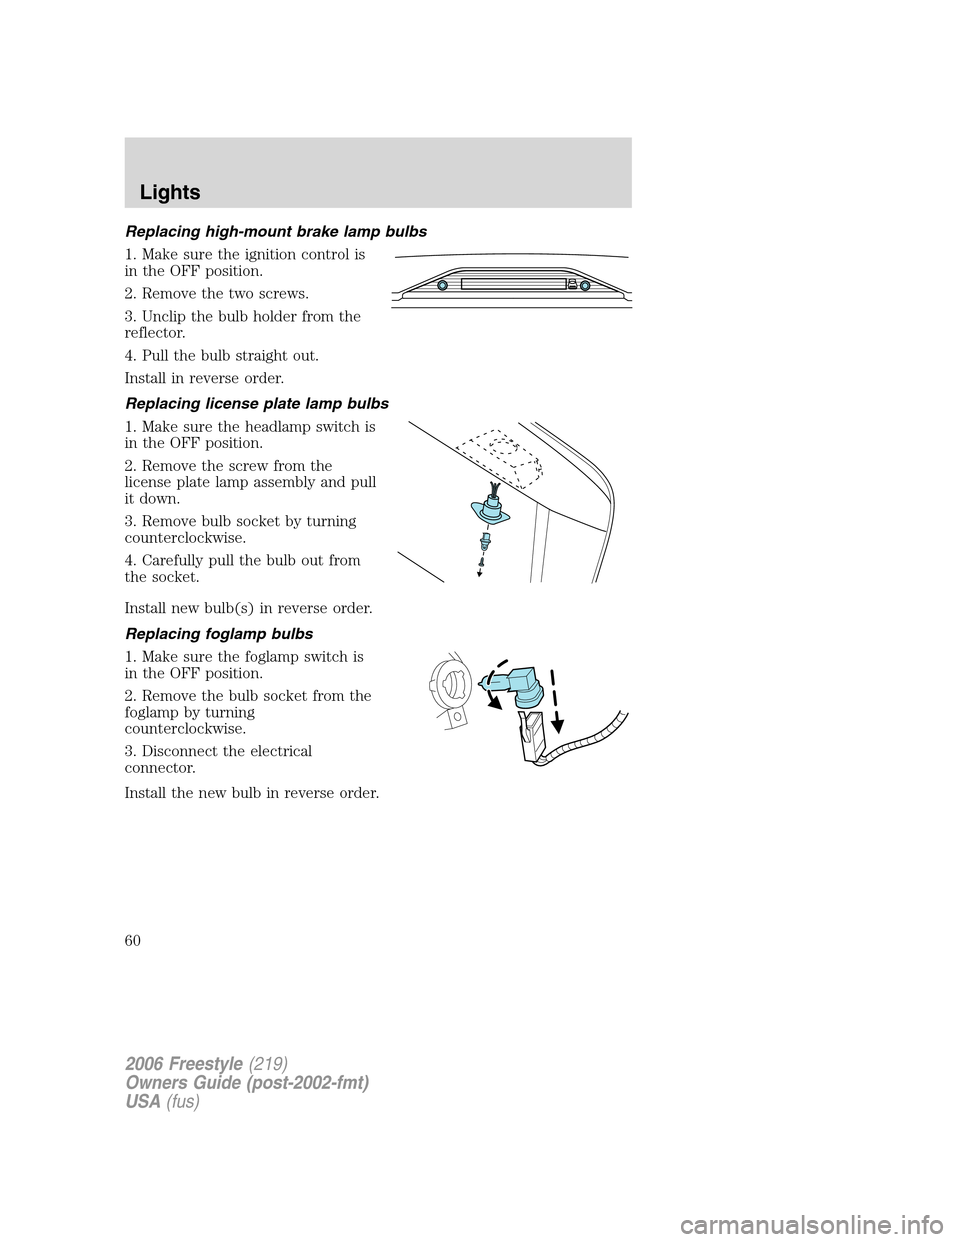
Replacing high-mount brake lamp bulbs
1. Make sure the ignition control is
in the OFF position.
2. Remove the two screws.
3. Unclip the bulb holder from the
reflector.
4. Pull the bulb straight out.
Install in reverse order.
Replacing license plate lamp bulbs
1. Make sure the headlamp switch is
in the OFF position.
2. Remove the screw from the
license plate lamp assembly and pull
it down.
3. Remove bulb socket by turning
counterclockwise.
4. Carefully pull the bulb out from
the socket.
Install new bulb(s) in reverse order.
Replacing foglamp bulbs
1. Make sure the foglamp switch is
in the OFF position.
2. Remove the bulb socket from the
foglamp by turning
counterclockwise.
3. Disconnect the electrical
connector.
Install the new bulb in reverse order.
2006 Freestyle(219)
Owners Guide (post-2002-fmt)
USA(fus)
Lights
60
Page 96 of 288

4. The doors will lock, then unlock, to confirm that the programming
mode has been activated.
5. Within 20 seconds press any button on the remote entry transmitter to
be programmed.Note:If more than 20 seconds have passed you will
need to start the procedure over again.
6. The doors will lock, then unlock, to confirm that each remote entry
transmitter has been programmed.
7. Repeat Step 5 to program each additional remote entry transmitter.
Note:The first remote transmitter programmed corresponds to Driver 1;
the second, Driver 2.
8. Turn the ignition to the 1 (LOCK) position after you have finished
programming all of the remote entry transmitters.Note:If any one of
the transmitters is not reprogrammed, it will be erased.
9. The doors will lock, then unlock, to confirm that the programming
mode has been exited.
Illuminated entry
The interior lamps illuminate when the remote entry system or the
keyless entry system keypad (if equipped) is used to unlock the door(s).
The illuminated entry system will turn off the interior lights if:
•the ignition is turned to the 3 (RUN) position, or
•the remote transmitter lock control is pressed, or
•after 25 seconds of illumination.
The inside lights will not turn off if:
•they have been turned on with the dimmer control, or
•any door is open.
Battery saver
The battery saver will shut off the interior lamps 30 minutes after the
ignition has been turned to the 1 (LOCK) position.
•If the dome lamps were turned on using the panel dimmer control, the
battery saver will shut off them off 30 minutes after the ignition has
been turned to the 1 (LOCK) position.
•If the courtesy lamps were turned on because one of the vehicle doors
was opened, the battery saver will shut them off 10 minutes after the
ignition has been turned to the 1 (LOCK) position.
•The battery saver will shut off the headlamps and foglamps 10
minutes after the ignition has been turned to the 1 (LOCK) position.
2006 Freestyle(219)
Owners Guide (post-2002-fmt)
USA(fus)
Locks and Security
96