Page 1 of 288
Introduction 4
Instrument Cluster 10
Warning and control lights 10
Gauges 14
Entertainment Systems 17
AM/FM stereo with CD 17
AM/FM stereo with in-dash six CD 20
Family entertainment system 25
Climate Controls 40
Manual heating and air conditioning 40
Automatic temperature control 42
Rear window defroster 51
Lights 52
Headlamps 52
Turn signal control 56
Bulb replacement 56
Driver Controls 61
Windshield wiper/washer control 61
Steering wheel adjustment 62
Power windows 66
Mirrors 68
Speed control 70
Message center 78
Locks and Security 90
Keys 90
Locks 90
Anti-theft system 100
Table of Contents
1
2006 Freestyle(219)
Owners Guide (post-2002-fmt)
USA(fus)
Page 10 of 288

WARNING LIGHTS AND CHIMES
Warning lights and gauges can alert you to a vehicle condition that may
become serious enough to cause extensive repairs. A warning light may
illuminate when a problem exists with one of your vehicle’s functions.
Many lights will illuminate when you start your vehicle to make sure the
bulbs work. If any light remains on after starting the vehicle, refer to the
respective system warning light for additional information.
Check engine:TheCheck Engine
indicator light illuminates when the
ignition is first turned to the ON
position to check the bulb. Solid
illumination after the engine is started indicates the On Board
Diagnostics System (OBD-II) has detected a malfunction. Refer toOn
board diagnostics (OBD-II)in theMaintenance and Specifications
chapter. If the light is blinking, engine misfire is occurring which could
damage your catalytic converter. Drive in a moderate fashion (avoid
heavy acceleration and deceleration) and have your vehicle serviced
immediately by your authorized dealer.
Under engine misfire conditions, excessive exhaust temperatures
could damage the catalytic converter, the fuel system, interior
floor coverings or other vehicle components, possibly causing a fire.
2006 Freestyle(219)
Owners Guide (post-2002-fmt)
USA(fus)
Instrument Cluster
10
Page 13 of 288

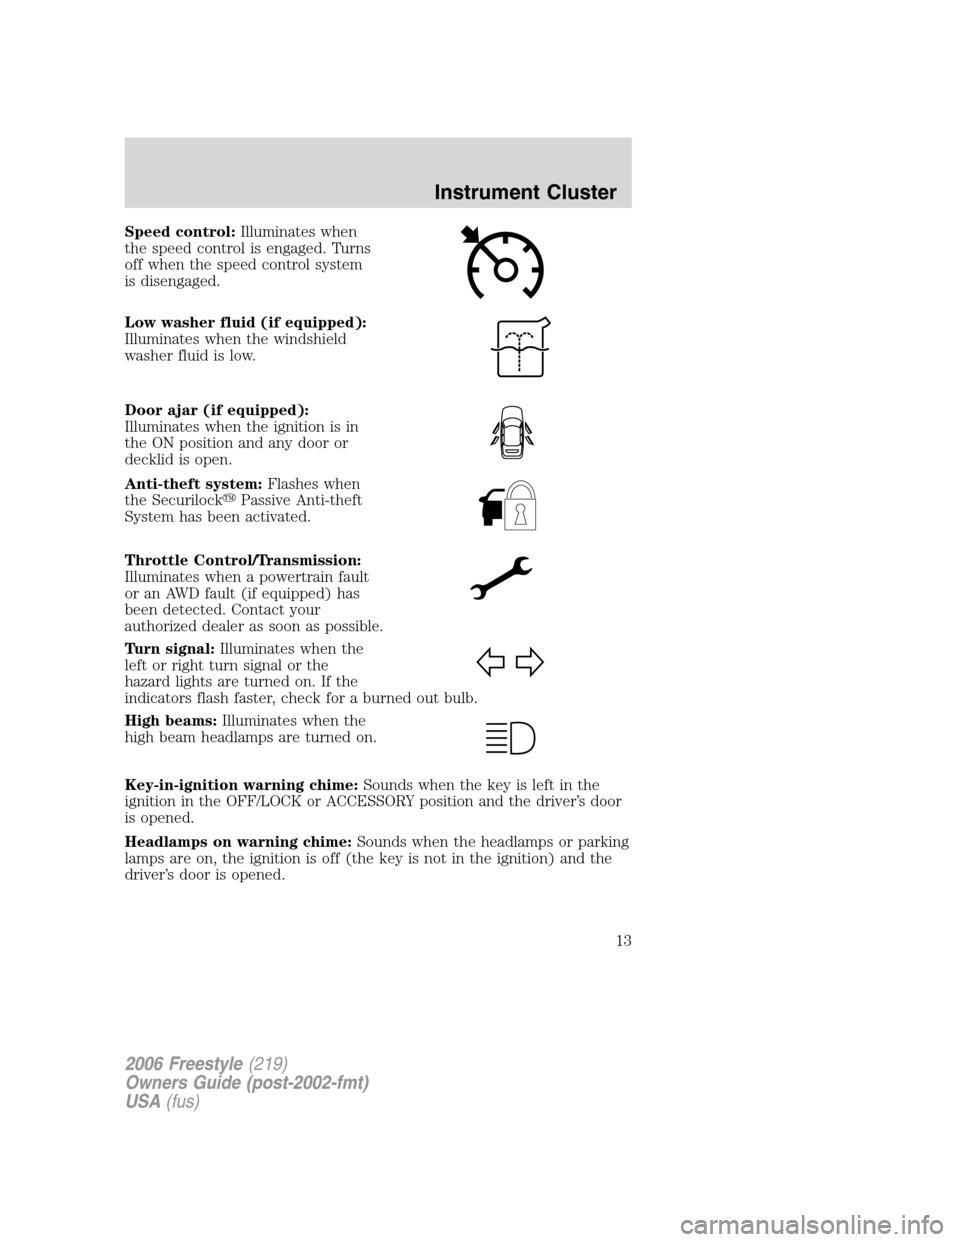
Speed control:Illuminates when
the speed control is engaged. Turns
off when the speed control system
is disengaged.
Low washer fluid (if equipped):
Illuminates when the windshield
washer fluid is low.
Door ajar (if equipped):
Illuminates when the ignition is in
the ON position and any door or
decklid is open.
Anti-theft system:Flashes when
the Securilock�Passive Anti-theft
System has been activated.
Throttle Control/Transmission:
Illuminates when a powertrain fault
or an AWD fault (if equipped) has
been detected. Contact your
authorized dealer as soon as possible.
Turn signal:Illuminates when the
left or right turn signal or the
hazard lights are turned on. If the
indicators flash faster, check for a burned out bulb.
High beams:Illuminates when the
high beam headlamps are turned on.
Key-in-ignition warning chime:Sounds when the key is left in the
ignition in the OFF/LOCK or ACCESSORY position and the driver’s door
is opened.
Headlamps on warning chime:Sounds when the headlamps or parking
lamps are on, the ignition is off (the key is not in the ignition) and the
driver’s door is opened.
2006 Freestyle(219)
Owners Guide (post-2002-fmt)
USA(fus)
Instrument Cluster
13
Page 55 of 288

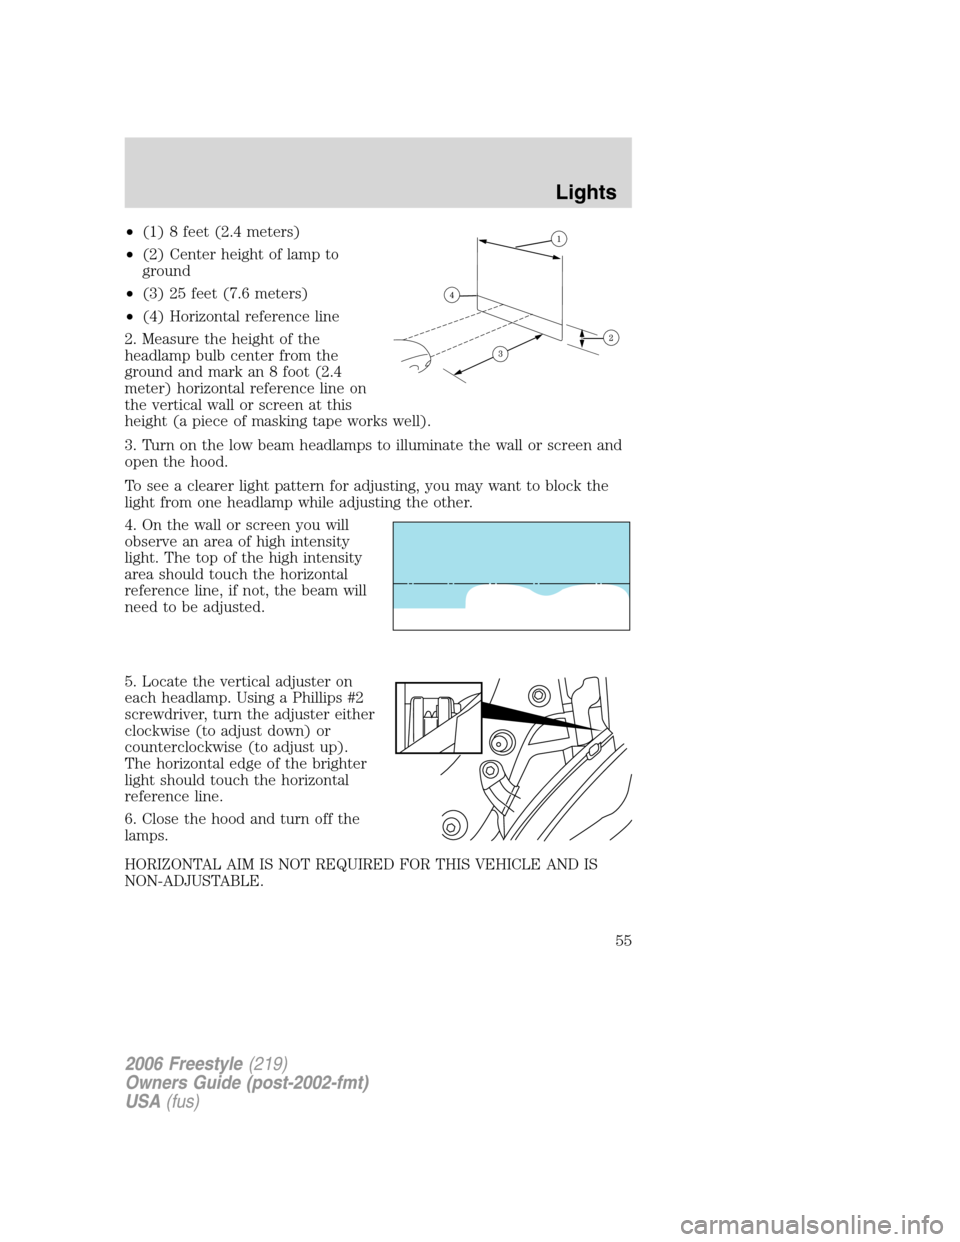
•(1) 8 feet (2.4 meters)
•(2) Center height of lamp to
ground
•(3) 25 feet (7.6 meters)
•(4) Horizontal reference line
2. Measure the height of the
headlamp bulb center from the
ground and mark an 8 foot (2.4
meter) horizontal reference line on
the vertical wall or screen at this
height (a piece of masking tape works well).
3. Turn on the low beam headlamps to illuminate the wall or screen and
open the hood.
To see a clearer light pattern for adjusting, you may want to block the
light from one headlamp while adjusting the other.
4. On the wall or screen you will
observe an area of high intensity
light. The top of the high intensity
area should touch the horizontal
reference line, if not, the beam will
need to be adjusted.
5. Locate the vertical adjuster on
each headlamp. Using a Phillips #2
screwdriver, turn the adjuster either
clockwise (to adjust down) or
counterclockwise (to adjust up).
The horizontal edge of the brighter
light should touch the horizontal
reference line.
6. Close the hood and turn off the
lamps.
HORIZONTAL AIM IS NOT REQUIRED FOR THIS VEHICLE AND IS
NON-ADJUSTABLE.
2006 Freestyle(219)
Owners Guide (post-2002-fmt)
USA(fus)
Lights
55
Page 56 of 288
TURN SIGNAL CONTROL
•Push down to activate the left
turn signal.
•Push up to activate the right turn
signal.
INTERIOR LAMPS
Dome lamps and map lamps
The map lamps are located on the
overhead console. Press the controls
on either side of each map lamp to
turn on the lamps.
Your vehicle may also have reading
lamps within the rear dome lamp(s).
Press the switches on either side of
the dome lamp to turn on the
lamps.
BULB REPLACEMENT
Headlamp Condensation
The headlamps are vented to equalize pressure. When moist air enters
the headlamp(s) through the vents, there is a possibility that
condensation can occur. This condensation is normal and will clear
within 45 minutes of headlamp operation.
2006 Freestyle(219)
Owners Guide (post-2002-fmt)
USA(fus)
Lights
56
Page 57 of 288

Using the right bulbs
Replacement bulbs are specified in the chart below. Headlamp bulbs must
be marked with an authorized “D.O.T.” for North America and an “E” for
Europe to assure lamp performance, light brightness and pattern and safe
visibility. The correct bulbs will not damage the lamp assembly or void the
lamp assembly warranty and will provide quality bulb burn time.
Function Number of bulbs Trade number
Front park/turn lamp 23157AK or
3157A (amber)
Front sidemarker lamp 2 168
Headlamp 2 9008 H13
Tail/brake/turn signal lamp 2 4057K
Backup lamp 2 3156
License plate lamp 2 168
High-mount brake lamp 5 W5W
Foglamp (if equipped) 2 H11 LL
Map lamp 2 12V6W
Dome/reading lamps 6 578
All replacement bulbs are clear in color except where noted.
To replace all instrument panel lights - see your authorized dealer.
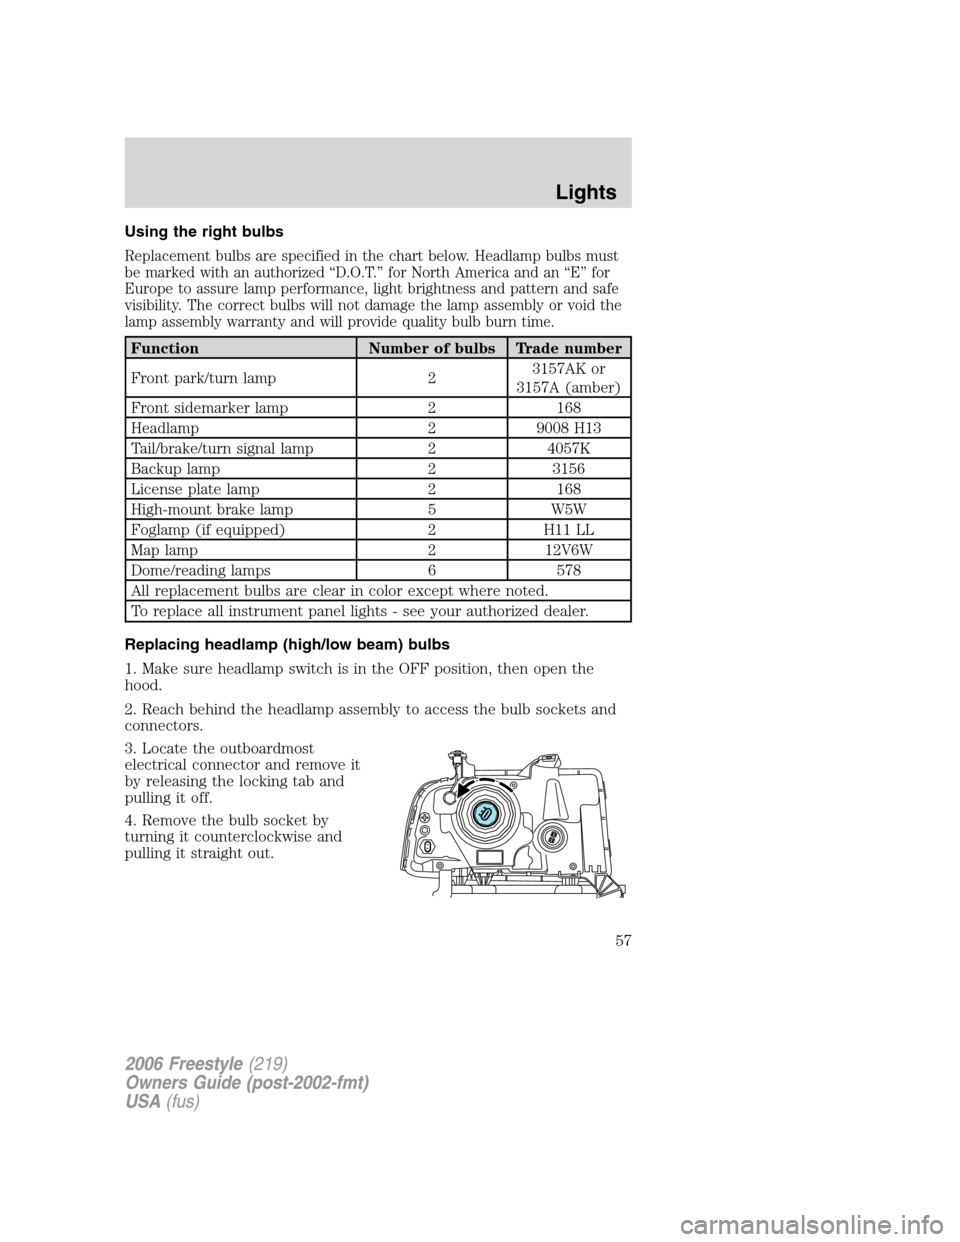
Replacing headlamp (high/low beam) bulbs
1. Make sure headlamp switch is in the OFF position, then open the
hood.
2. Reach behind the headlamp assembly to access the bulb sockets and
connectors.
3. Locate the outboardmost
electrical connector and remove it
by releasing the locking tab and
pulling it off.
4. Remove the bulb socket by
turning it counterclockwise and
pulling it straight out.
2006 Freestyle(219)
Owners Guide (post-2002-fmt)
USA(fus)
Lights
57
Page 58 of 288
Handle a halogen headlamp bulb carefully and keep out of
children’s reach. Grasp the bulb only by its plastic base and do
not touch the glass. The oil from your hand could cause the bulb to
break the next time the headlamps are operated.
Install the new bulb(s) in reverse order.
Replacing front parking lamp/turn signal bulbs
1. Make sure headlamp switch is in the OFF position, then open the
hood.
2. Reach behind the headlamp assembly to access the bulb sockets and
connectors.
3. Remove the bulb socket by
turning it counterclockwise and
pulling it straight out.
4. To remove the bulb, pull it
straight out of the bulb socket.
Install the new bulb(s) in reverse order.
Replacing front sidemarker bulbs
1. Make sure headlamp switch is in the OFF position, then open the
hood.
2. Reach behind the headlamp assembly to access the bulb sockets and
connectors.
2006 Freestyle(219)
Owners Guide (post-2002-fmt)
USA(fus)
Lights
58
Page 59 of 288
3. Locate the front sidemarker lamp
electrical connector and remove it
by pulling it off.
4. Remove the bulb socket by
turning it counterclockwise and
pulling it straight out.
5. To remove the bulb, pull it
straight out of the bulb socket.
Install the new bulb(s) in reverse order.
Replacing stop/tail/turn/backup bulbs
The stop, tail, turn and backup lamp bulbs are located in the tail lamp
assembly. Follow the same steps to replace either bulb.
1. Make sure the headlamp switch is
in the OFF position and open the
liftgate.
2. Remove the two screws in the
liftgate opening, then pull the lamp
assembly away from the vehicle.
3. Remove the bulb socket by
rotating it counterclockwise, then
pulling it out of the lamp assembly.
4. Pull the bulb straight from the
socket.
Install new bulb(s) in reverse order.
2006 Freestyle(219)
Owners Guide (post-2002-fmt)
USA(fus)
Lights
59