Page 1 of 312
Introduction 4
Instrument Cluster 12Warning and control lights 12
Gauges 15
Entertainment Systems 20AM/FM stereo 20
AM/FM stereo with CD 22
AM/FM stereo cassette with CD 25
AM/FM stereo with in-dash six CD 28
Climate Controls 33Heater only 33
Manual heating and air conditioning 34
Automatic temperature control 36
Lights 39Headlamps 39
Turn signal control 44
Bulb replacement 45
Driver Controls 54Windshield wiper/washer control 54
Steering wheel adjustment 54
Power windows 57
Mirrors 58
Speed control 61
Upfitter controls 64
Moon roof 66
Message center 68
Locks and Security 80Keys 80
Locks 80Table of Contents
1
2006 F-250/350/450/550 (f23)
Owners Guide (post-2002-fmt)
USA (fus)
Page 13 of 312

Many lights will illuminate when you start your vehicle to make sure the
bulbs work. If any light remains on after starting the vehicle, have the
respective system inspected immediately.
If your vehicle is equipped with a diesel engine, it has a unique cluster,
refer to Starting the engine in your 6.0 Liter Power Stroke Direct
Injection Turbo Diesel Owner’s Guide Supplement.
Service engine soon: The Service
engine soon indicator light
illuminates when the ignition is first
turned to the ON position to check
the bulb. Solid illumination after the engine is started indicates the On
Board Diagnostics System (OBD-II) has detected a malfunction. Refer to
On board diagnostics (OBD-II) in the Maintenance and Specifications
chapter. If the light is blinking, engine misfire is occurring which could
damage your catalytic converter. Drive in a moderate fashion (avoid heavy
acceleration and deceleration) and have your vehicle serviced immediately.
Under engine misfire conditions, excessive exhaust temperatures
could damage the catalytic converter, the fuel system, interior
floor coverings or other vehicle components, possibly causing a fire.
Electronic throttle control:
Illuminates when the engine has
defaulted to a ’limp-home’ operation.
Report the fault to an authorized
dealer at the earliest opportunity.
On vehicles equipped with a message center, “ENGINE FAILSAFE MODE”
will be displayed, refer to Message Center in the Driver Controls chapter.
Brake system warning light: To
confirm the brake system warning
light is functional, it will momentarily
illuminate when the ignition is turned
to the ON position when the engine
is not running, or in a position between ON and START, or by applying the
parking brake when the ignition is turned to the ON position. If the brake
system warning light does not illuminate at this time, seek service
immediately from your authorized dealer. Illumination after releasing the
parking brake indicates low brake fluid level and the brake system should
be inspected immediately by your servicing authorized dealer.
P!
BRAKE
2006 F-250/350/450/550 (f23)
Owners Guide (post-2002-fmt)
USA (fus) Instrument Cluster
13
Page 15 of 312
Speed control: Illuminates when
the speed control is activated. Turns
off when the speed control system
is deactivated.
Turn signal: Illuminates when the
left or right turn signal or the
hazard lights are turned on. If the
indicators stay on or flash faster, check for a burned out bulb.
High beams: Illuminates when the
high beam headlamps are turned on.
Key-in-ignition warning chime: Sounds when the key is left in the
ignition in the OFF, LOCK or ACCESSORY position and the driver’s door
is opened.
Headlamps on warning chime: Sounds when the headlamps or parking
lamps are on, the ignition is off (the key is not in the ignition) and the
driver’s door is opened.
Parking brake ON warning chime: Sounds when the parking brake is
set, the engine is running and the vehicle is driven more than 3 mph
(5 km).
GAUGES
2006 F-250/350/450/550 (f23)
Owners Guide (post-2002-fmt)
USA (fus) Instrument Cluster
15
Page 42 of 312

Vertical and horizontal aim adjustment (sealed beam headlamps)
The headlamps on your vehicle are intended to be aimed using
mechanical aimers. If mechanical aimers are used and the cross-car sight
line is in any way blocked, set the legs of the universal adaptor all to the
same setting, such that the cross-car sight line is no longer blocked, per
the instructions for the brand of mechanical aimer used. You can also
aim the headlamps visually using the procedure below.
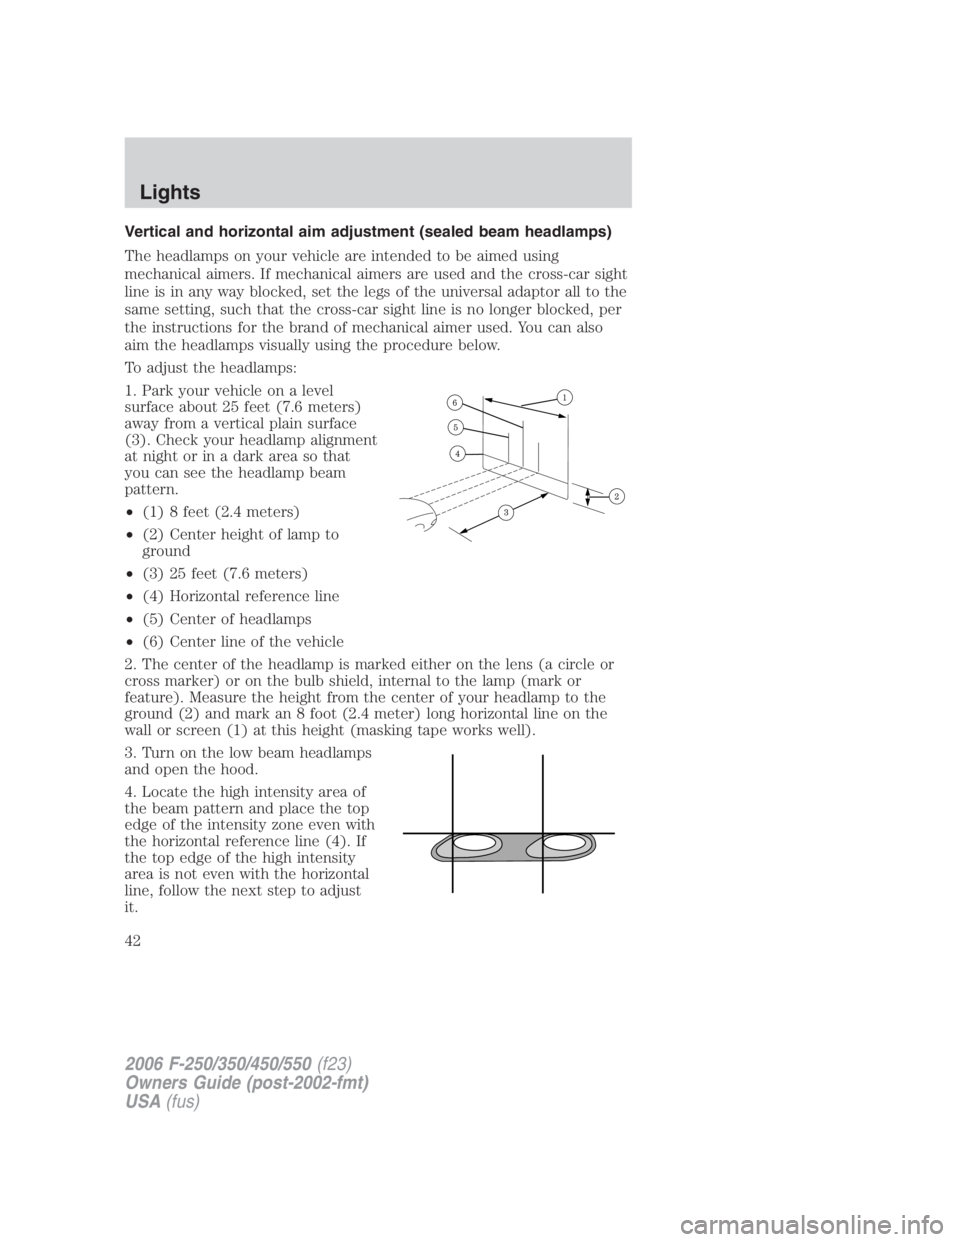
To adjust the headlamps:
1. Park your vehicle on a level
surface about 25 feet (7.6 meters)
away from a vertical plain surface
(3). Check your headlamp alignment
at night or in a dark area so that
you can see the headlamp beam
pattern.
• (1) 8 feet (2.4 meters)
• (2) Center height of lamp to
ground
• (3) 25 feet (7.6 meters)
• (4) Horizontal reference line
• (5) Center of headlamps
• (6) Center line of the vehicle
2. The center of the headlamp is marked either on the lens (a circle or
cross marker) or on the bulb shield, internal to the lamp (mark or
feature). Measure the height from the center of your headlamp to the
ground (2) and mark an 8 foot (2.4 meter) long horizontal line on the
wall or screen (1) at this height (masking tape works well).
3. Turn on the low beam headlamps
and open the hood.
4. Locate the high intensity area of
the beam pattern and place the top
edge of the intensity zone even with
the horizontal reference line (4). If
the top edge of the high intensity
area is not even with the horizontal
line, follow the next step to adjust
it.
2006 F-250/350/450/550 (f23)
Owners Guide (post-2002-fmt)
USA (fus)Lights
42
Page 45 of 312
COURTESY/READING LAMPS (IF EQUIPPED)
The dome lamp illuminates when
any door is not completely closed,
the instrument panel switch is
pushed past the detent and when
any of the remote entry controls are
pressed while the ignition is off.
The reading lamps can be turned on
by pressing the rocker controls next
to each lamp.
MAP LAMPS (IF EQUIPPED)
To turn on the map lamps, press the
control next to each lamp.
BULBS
Headlamp condensation
The headlamps are vented to equalize pressure. When moist air enters
the headlamp(s) through the vents, there is a possibility that
condensation can occur. This condensation is normal and will clear
within 45 minutes of headlamp operation.
2006 F-250/350/450/550 (f23)
Owners Guide (post-2002-fmt)
USA (fus) Lights
45
Page 46 of 312
Replacing exterior bulbs
Check the operation of all the bulbs frequently.
Function Number of
bulbs Trade number
Headlamps
(aerodynamic) 2 H13/9008
Headlamps (sealed beam) 2 H6054
Park lamp with
aerodynamic headlamp 2 3157AK or 3157A
Park lamp with sealed
beam headlamp 2 4157K/3157
Sidemarker 2 194
Tail/stop/turn/sidemarker 2 4157K/3157
Backup 2 3156K or 3156
High-mount stoplamp 1 922
Foglamp 2 9145
License plate lamp 2 194
Cargo lamp 2 906
Front clearance lamps
(2) and Front
identification lamps (3) 5 194
Rear fender clearance* 4 W5W
Interior visor lamp (if
equipped) 4 194
Rear identification 3 194
All replacement bulbs are clear in color except where noted.
To replace all instrument panel lights - see your authorized dealer
* Dual rear wheels, or if equipped.
2006 F-250/350/450/550 (f23)
Owners Guide (post-2002-fmt)
USA (fus)Lights
46
Page 47 of 312

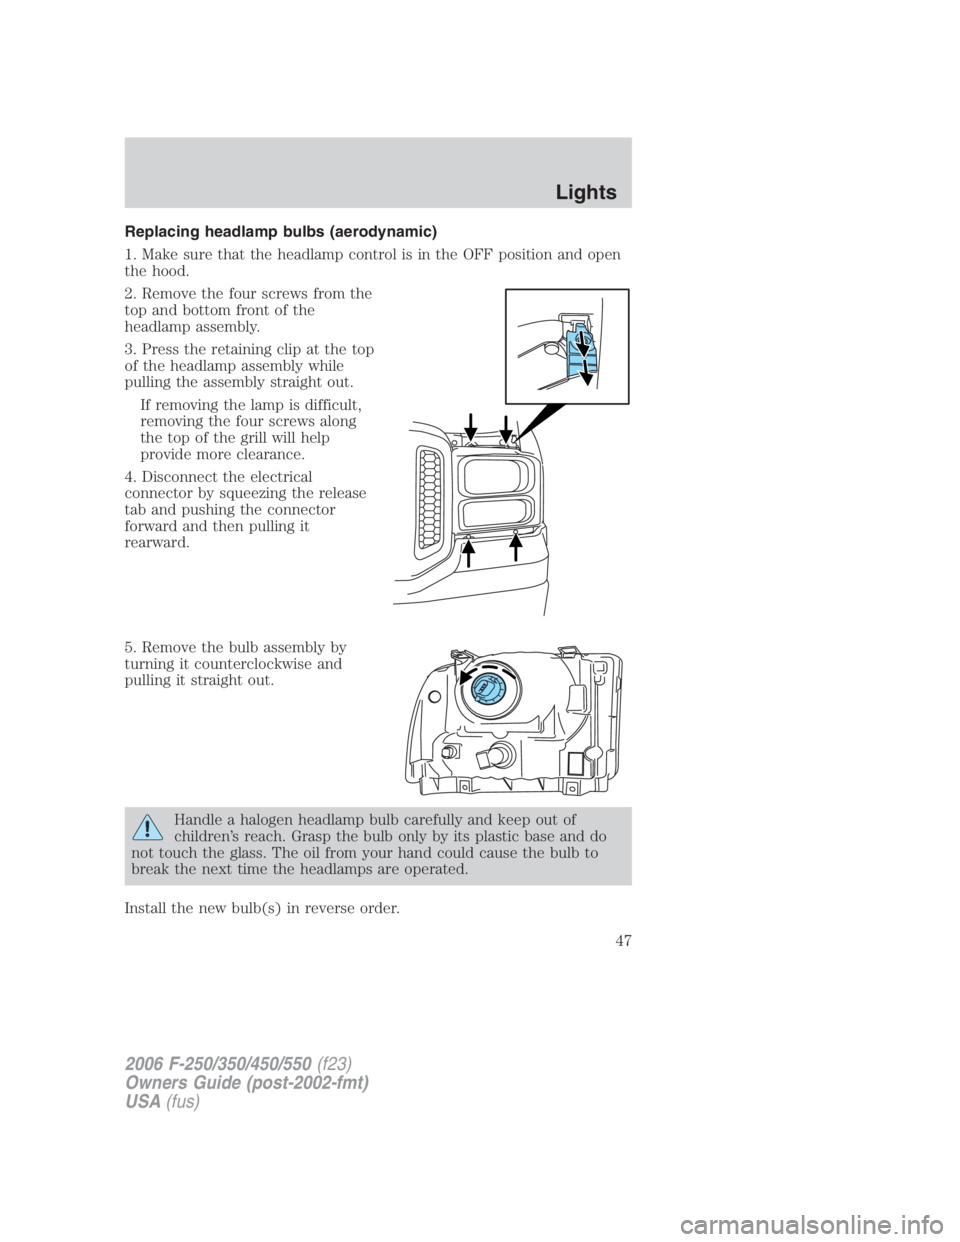
Replacing headlamp bulbs (aerodynamic)
1. Make sure that the headlamp control is in the OFF position and open
the hood.
2. Remove the four screws from the
top and bottom front of the
headlamp assembly.
3. Press the retaining clip at the top
of the headlamp assembly while
pulling the assembly straight out.
If removing the lamp is difficult,
removing the four screws along
the top of the grill will help
provide more clearance.
4. Disconnect the electrical
connector by squeezing the release
tab and pushing the connector
forward and then pulling it
rearward.
5. Remove the bulb assembly by
turning it counterclockwise and
pulling it straight out.
Handle a halogen headlamp bulb carefully and keep out of
children’s reach. Grasp the bulb only by its plastic base and do
not touch the glass. The oil from your hand could cause the bulb to
break the next time the headlamps are operated.
Install the new bulb(s) in reverse order.
2006 F-250/350/450/550 (f23)
Owners Guide (post-2002-fmt)
USA (fus) Lights
47
Page 48 of 312
Replacing park/turn and sidemarker lamp bulbs (aerodynamic)
1. Make sure that the headlamp control is in the OFF position and open
the hood.
2. Remove the four screws from the
top and bottom front of the
headlamp assembly.
3. Press the retaining clip at the top
of the headlamp assembly while
pulling the assembly straight out.
If removing the lamp is difficult,
removing the four screws along
the top of the grill will help
provide more clearance.
4. Remove the bulb assembly, (1)
sidemarker or (2) park/turn by
turning it counterclockwise and
pulling it straight out.
5. Pull the old bulb out from the
socket.
Install the new bulb(s) in reverse order.
2006 F-250/350/450/550 (f23)
Owners Guide (post-2002-fmt)
USA (fus)Lights
48