2006 FORD F250 SUPER DUTY ECO mode
[x] Cancel search: ECO modePage 17 of 312
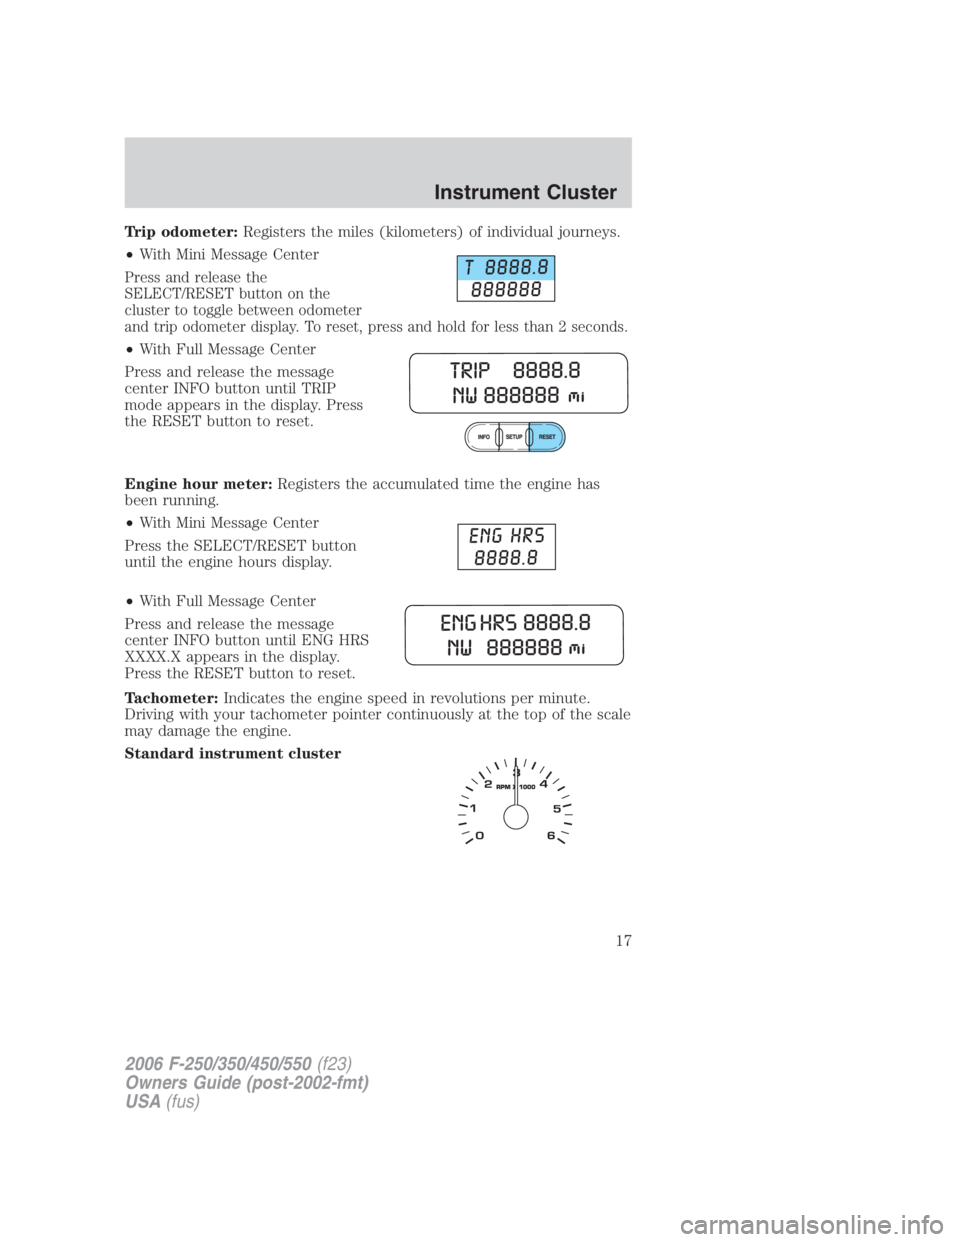
Trip odometer: Registers the miles (kilometers) of individual journeys.
• With Mini Message Center
Press and release the
SELECT/RESET button on the
cluster to toggle between odometer
and trip odometer display. To reset, press and hold for less than 2 seconds.
• With Full Message Center
Press and release the message
center INFO button until TRIP
mode appears in the display. Press
the RESET button to reset.
Engine hour meter: Registers the accumulated time the engine has
been running.
• With Mini Message Center
Press the SELECT/RESET button
until the engine hours display.
• With Full Message Center
Press and release the message
center INFO button until ENG HRS
XXXX.X appears in the display.
Press the RESET button to reset.
Tachometer: Indicates the engine speed in revolutions per minute.
Driving with your tachometer pointer continuously at the top of the scale
may damage the engine.
Standard instrument cluster
2006 F-250/350/450/550 (f23)
Owners Guide (post-2002-fmt)
USA (fus) Instrument Cluster
17
Page 32 of 312
• Remove loose labels before inserting tapes.
• Allow tapes which have been subjected to extreme heat, humidity or
cold to reach a moderate temperature before playing.
• Clean the cassette player head with a cassette cleaning cartridge after
10–12 hours of play to maintain good sound/operation.
Don’t:
• Expose tapes to direct sunlight, extreme humidity, heat or cold.
• Leave tapes in the cassette player for a long time when not being
played.
CD/CD player care
Do:
• Handle discs by their edges only. Never touch the playing surface.
• Inspect discs before playing. Clean only with an approved CD cleaner
and wipe from the center out.
Don’t:
• Expose discs to direct sunlight or heat sources for extended periods
of time.
• Insert more than one disc into each slot of the CD changer magazine.
• Clean using a circular motion.
CD units are designed to play commercially pressed 4.75 in (12
cm) audio compact discs only. Due to technical incompatibility,
certain recordable and re-recordable compact discs may not
function correctly when used in Ford CD players. Irregular
shaped CDs, CDs with a scratch protection film attached, and CDs
with homemade paper (adhesive) labels should not be inserted
into the CD player. The label may peel and cause the CD to
become jammed. It is recommended that homemade CDs be
identified with permanent felt tip marker rather than adhesive
labels. Ballpoint pens may damage CDs. Please contact your
authorized dealer for further information.
Audio system warranty and service
Refer to the Warranty Guide for audio system warranty information. If
service is necessary, see your authorized dealer.
2006 F-250/350/450/550 (f23)
Owners Guide (post-2002-fmt)
USA (fus)Entertainment Systems
32
Page 34 of 312
To aid in side window defogging/demisting in cold weather:
1. Select .
2. Modulate the temperature control to maintain comfort.
3. Set the fan speed to the highest setting.
4. Direct the outer instrument panel vents toward the side windows.
To increase airflow to the outer instrument panel vents, close the vents
located in the middle of the instrument panel.
Do not place objects on top of the instrument panel as these
objects may become projectiles in a collision or sudden stop.
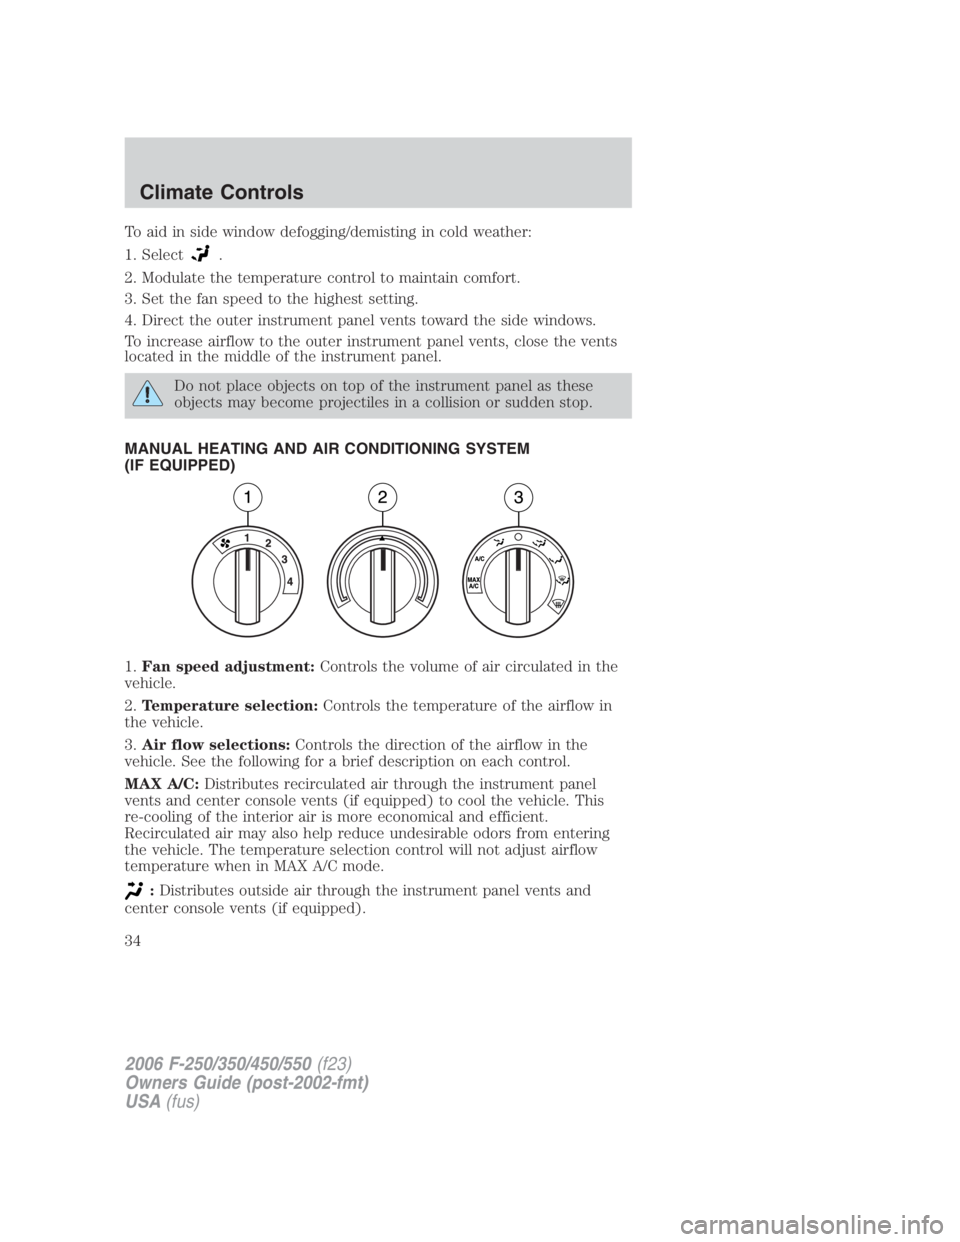
MANUAL HEATING AND AIR CONDITIONING SYSTEM
(IF EQUIPPED)
1. Fan speed adjustment: Controls the volume of air circulated in the
vehicle.
2. Temperature selection: Controls the temperature of the airflow in
the vehicle.
3. Air flow selections: Controls the direction of the airflow in the
vehicle. See the following for a brief description on each control.
MAX A/C: Distributes recirculated air through the instrument panel
vents and center console vents (if equipped) to cool the vehicle. This
re-cooling of the interior air is more economical and efficient.
Recirculated air may also help reduce undesirable odors from entering
the vehicle. The temperature selection control will not adjust airflow
temperature when in MAX A/C mode.
: Distributes outside air through the instrument panel vents and
center console vents (if equipped).
2006 F-250/350/450/550 (f23)
Owners Guide (post-2002-fmt)
USA (fus)Climate Controls
34
Page 35 of 312

: Distributes outside air through the instrument panel vents, floor
vents and center console vents (if equipped).
O (OFF): Outside air is shut out and the climate system is turned off.
: Distributes outside air through the floor vents.
: Distributes outside air through the windshield defroster vents,
floor vents and demister vents.
: Distributes outside air through the windshield defroster vents and
demister vents.
Operating tips
• To reduce fog build up on the windshield during humid weather, place
the air flow selector in the position.
• To reduce humidity build up inside the vehicle, do not drive with the
air flow selector in the O (OFF) position.
• Do not put objects under the front seats that will interfere with the
airflow to the rear seats.
• Remove any snow, ice or leaves from the air intake area at the base of
the windshield.
• To improve the A/C cool down, drive with the windows slightly open
for 2–3 minutes after start up or until the vehicle has been “aired out.”
For maximum cooling performance (MAX A/C) in MAX A/C mode:
• Move the temperature control to the coolest setting.
• Set the fan to the highest speed initially, then adjust in order to
maintain comfort.
To aid in side window defogging and demisting in cold weather:
1. Select .
2. Select A/C.
3. Set the temperature control to maintain comfort.
4. Set the fan speed to highest setting.
5. Direct the outer instrument panel vents towards the side windows.
Do not place objects on top of the instrument panel as these
objects may become projectiles in a collision or sudden stop.
2006 F-250/350/450/550 (f23)
Owners Guide (post-2002-fmt)
USA (fus) Climate Controls
35
Page 37 of 312
5. (Floor/defrost): Distributes air through the instrument panel
vents, floor vents and demister vents.
6. (Floor): Distributes air through the floor vents.
7. (Panel/floor): Distributes air through the instrument panel vents,
floor vents and center console vents (if equipped).
8. (Panel): Distributes air through the instrument panel vents and
center console vents (if equipped).
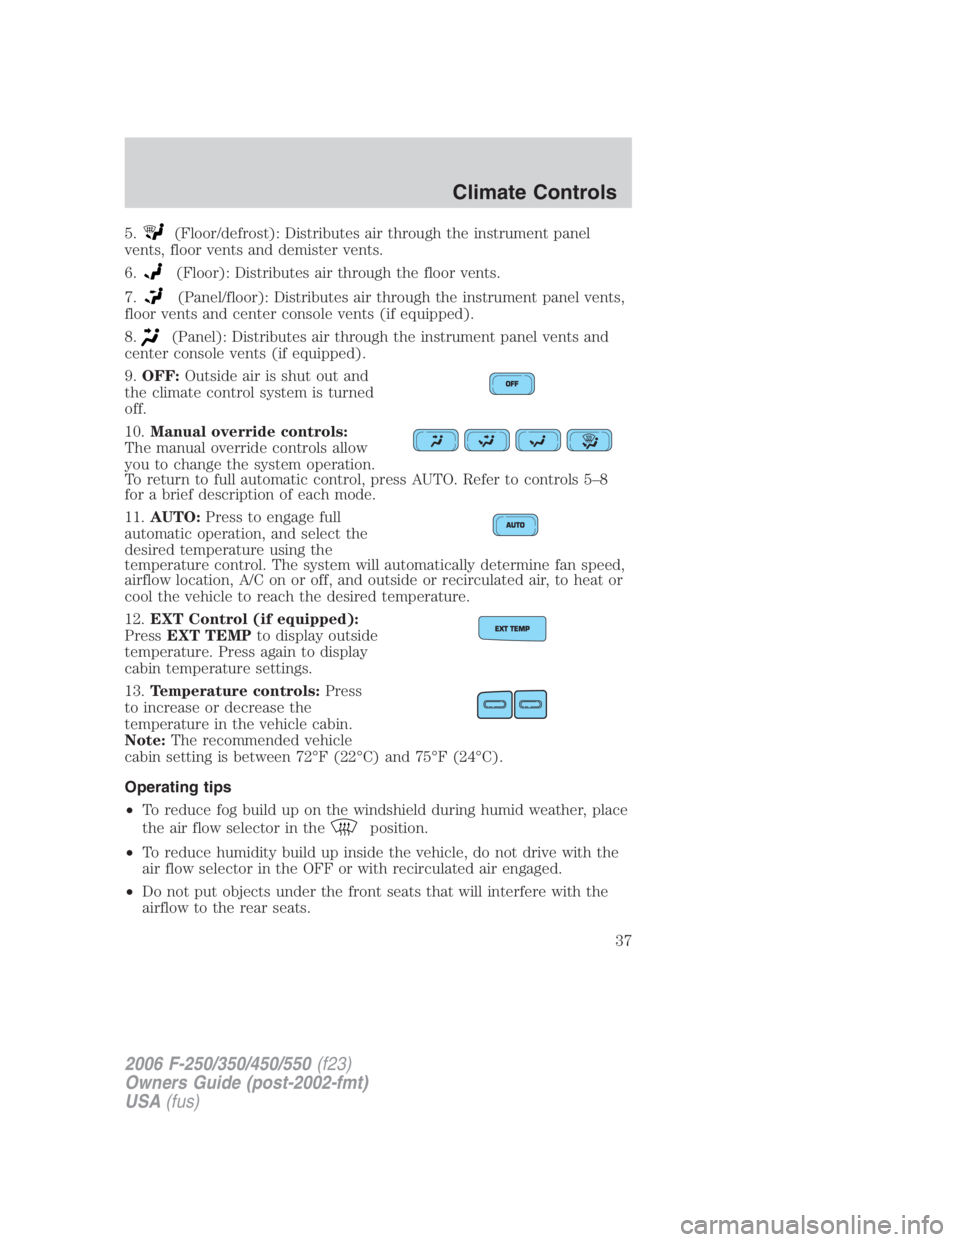
9. OFF: Outside air is shut out and
the climate control system is turned
off.
10. Manual override controls:
The manual override controls allow
you to change the system operation.
To return to full automatic control, press AUTO. Refer to controls 5–8
for a brief description of each mode.
11. AUTO: Press to engage full
automatic operation, and select the
desired temperature using the
temperature control. The system will automatically determine fan speed,
airflow location, A/C on or off, and outside or recirculated air, to heat or
cool the vehicle to reach the desired temperature.
12. EXT Control (if equipped):
Press EXT TEMP to display outside
temperature. Press again to display
cabin temperature settings.
13. Temperature controls: Press
to increase or decrease the
temperature in the vehicle cabin.
Note: The recommended vehicle
cabin setting is between 72°F (22°C) and 75°F (24°C).
Operating tips
• To reduce fog build up on the windshield during humid weather, place
the air flow selector in the position.
• To reduce humidity build up inside the vehicle, do not drive with the
air flow selector in the OFF or with recirculated air engaged.
• Do not put objects under the front seats that will interfere with the
airflow to the rear seats.
2006 F-250/350/450/550 (f23)
Owners Guide (post-2002-fmt)
USA (fus) Climate Controls
37
Page 38 of 312

• Remove any snow, ice or leaves from the air intake area at the base of
the windshield.
• To improve the A/C cool down, drive with the windows slightly open
for 2–3 minutes after start up or until the vehicle has been “aired out.”
For maximum cooling performance in AUTO mode:
• Press AUTO control and set to desired temperature.
For maximum cooling performance using manual override modes:
• Press (panel), A/C, with recirculated air. Set the temperature to
60°F (16°C) and the fan to the highest setting.
To aid in side window defogging and demisting in cold weather:
1. Select .
2. Select A/C.
3. Set the temperature control to maintain comfort.
4. Set the fan speed to highest setting.
5. Direct the outer instrument panel vents towards the side windows. To
increase airflow to the outer instrument panel vents, close the vents
located in the middle of the instrument panel.
To increase airflow to the outer instrument panel vents, close the vents
located in the middle of the instrument panel.
Do not place objects on top of the instrument panel as these
objects may become projectiles in a collision or sudden stop.
2006 F-250/350/450/550 (f23)
Owners Guide (post-2002-fmt)
USA (fus)Climate Controls
38
Page 77 of 312
LOW BRAKE FLUID LEVEL. Indicates the brake fluid level is low and
the brake system should be inspected immediately. Refer to Checking
and adding brake fluid in the Maintenance and Specifications
chapter.
LOW OIL PRESSURE. Displayed when the engine oil pressure is low. If
this warning message is displayed, check the level of the engine oil.
Refer to Engine oil in the Maintenance and Specifications chapter for
information about adding engine oil. If the oil level is OK and this
warning persists, shut down the engine immediately and contact your
authorized dealer for service.
CHECK FUEL CAP. Displayed when the fuel filler cap is not properly
installed. Check the fuel filler cap for proper installation. Refer to Fuel
filler cap under the Fuel Information section in the Maintenance and
Specifications chapter.
ENGINE FAILSAFE MODE. Displayed when the engine has defaulted
to a ’limp-home’ operation. If the warning stays on or continues to come
on, contact your authorized dealer as soon as possible.
CHECK COMPASS MODULE. Displayed when the compass is not
operating properly. If the warning stays on or continues to come on,
contact your authorized dealer as soon as possible.
TRAILER DISCONNECTED (if equipped): Displayed when a trailer
connection becomes disconnected, either intentionally or unintentionally,
and has been sensed during a given ignition cycle. Refer to Integrated
trailer brake controller in the Tires, Wheels and Loading chapter for
more information.
TRAILER FAULT (if equipped): Displayed if there is a short circuit on
the electric brake output wire or the trailer brakes are drawing too much
current. Refer to Integrated trailer brake controller in the Tires,
Wheels and Loading chapter for more information.
TBC FAULT (if equipped): Displayed in response to faults sensed by
the TBC. In the event this message is seen, please take your vehicle to
an authorized dealer for diagnosis and repair. Refer to Integrated trailer
brake controller in the Tires, Wheels and Loading chapter for more
information.
WATER IN FUEL (diesel only): Refer to Instrumentation in your 6.0
Liter Power Stroke Direct Injection Turbo Diesel Owner’s Guide
Supplement.
CHECK AIR FILTER (diesel only): Refer to Instrumentation in your
6.0 Liter Power Stroke Direct Injection Turbo Diesel Owner’s Guide
Supplement.
2006 F-250/350/450/550 (f23)
Owners Guide (post-2002-fmt)
USA (fus) Driver Controls
77
Page 85 of 312
To program the keyless entry
keypads remote entry transmitters
yourself:
1. Ensure the vehicle is
electronically unlocked.
2. Put the key in the ignition.
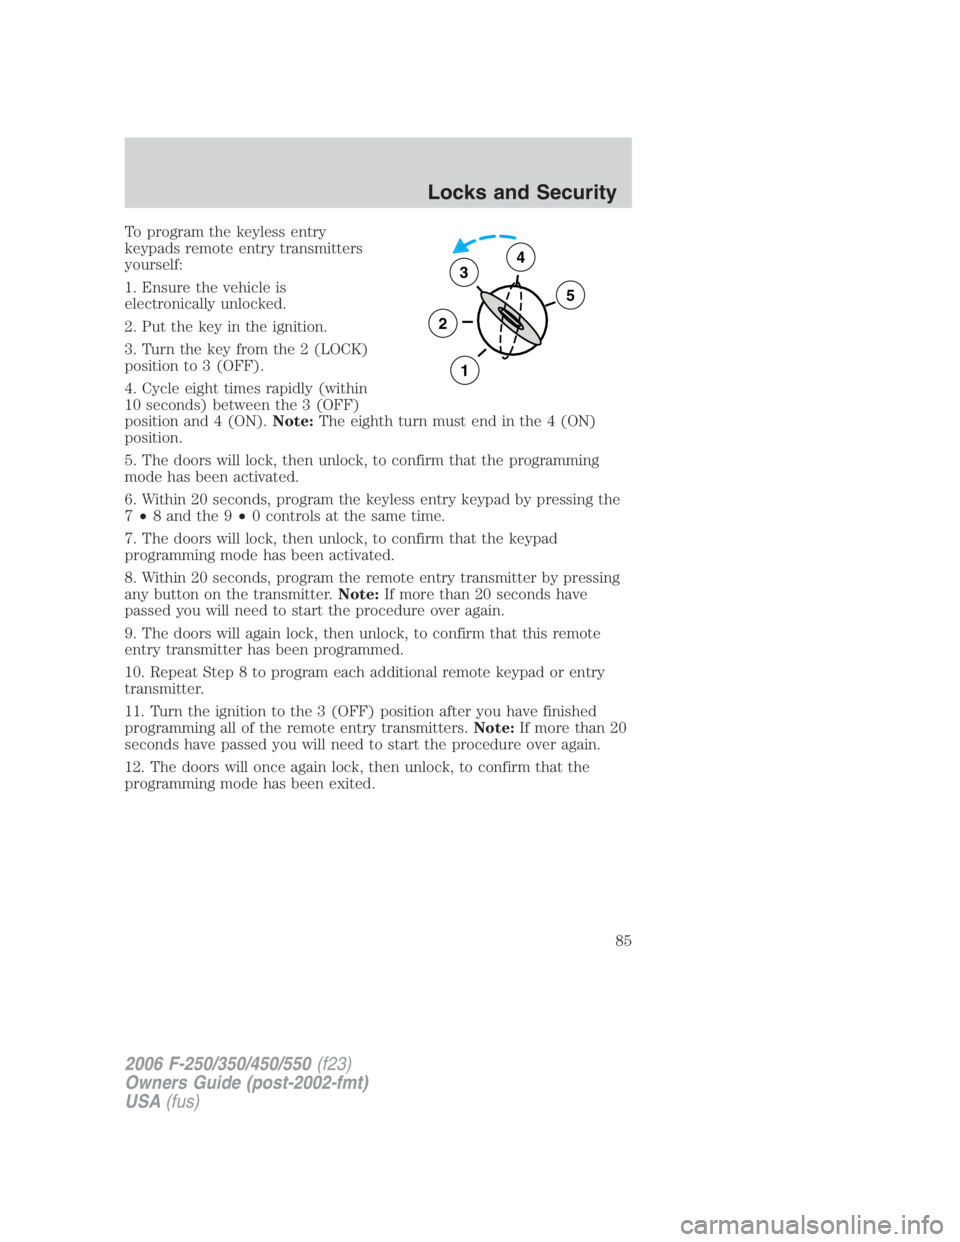
3. Turn the key from the 2 (LOCK)
position to 3 (OFF).
4. Cycle eight times rapidly (within
10 seconds) between the 3 (OFF)
position and 4 (ON). Note: The eighth turn must end in the 4 (ON)
position.
5. The doors will lock, then unlock, to confirm that the programming
mode has been activated.
6. Within 20 seconds, program the keyless entry keypad by pressing the
7 • 8 and the 9 • 0 controls at the same time.
7. The doors will lock, then unlock, to confirm that the keypad
programming mode has been activated.
8. Within 20 seconds, program the remote entry transmitter by pressing
any button on the transmitter. Note: If more than 20 seconds have
passed you will need to start the procedure over again.
9. The doors will again lock, then unlock, to confirm that this remote
entry transmitter has been programmed.
10. Repeat Step 8 to program each additional remote keypad or entry
transmitter.
11. Turn the ignition to the 3 (OFF) position after you have finished
programming all of the remote entry transmitters. Note: If more than 20
seconds have passed you will need to start the procedure over again.
12. The doors will once again lock, then unlock, to confirm that the
programming mode has been exited. 3
2
1 54
2006 F-250/350/450/550 (f23)
Owners Guide (post-2002-fmt)
USA (fus) Locks and Security
85