2006 FORD EXPEDITION change time
[x] Cancel search: change timePage 29 of 360

Rear seat radio controls (if equipped)
If your vehicle is equipped with a
front row console, then it is also
equipped with rear seat radio
controls.
If your vehicle is equipped with the
Vehicle Navigation Radio, then it
may also be equipped with rear seat
radio controls.
This feature allows front and middle seat passengers to listen to different
media sources (radio, cassette, CD or DVD) simultaneously. (However,
the front and middle-seat passengers cannot listen to two different radio
stations at the same time.)
When the rear seat controls are activated, rear seat passengers can use
the controls to change the playing media for all passengers (Single Play
mode). In this mode, all speakers will play audio from the same media
source for all passengers to hear. To activate the rear seat radio controls:
•Press the memory preset controls
3 and 5 at the same time. A
headphone icon
will illuminate
in the radio display, indicating the rear seat radio controls are active.
•Press memory preset controls 3 and 5 a second time to deactivate the
rear seat controls. The headphone icon
will turn off in the radio
display.
If there is a discrepancy between the rear seat controls and the front
audio controls (such as both trying to listen to the same playing media),
the front audio system will receive the desired selection.
- VOLUME +
MODE
SEEK MEMORY
2006 Expedition(exd)
Owners Guide (post-2002-fmt)
USA(fus)
Entertainment Systems
29
Page 34 of 360
Don’t:
•Expose discs to direct sunlight or heat sources for extended periods
of time.
•Insert more than one disc into each slot of the CD changer magazine.
•Clean using a circular motion.
CD units are designed to play commercially pressed 4.75 in (12 cm)
audio compact discs only. Due to technical incompatibility, certain
recordable and re-recordable compact discs may not function
correctly when used in Ford CD players. Irregular shaped CDs,
CDs with a scratch protection film attached, and CDs with
homemade paper (adhesive) labels should not be inserted into
the CD player. The label may peel and cause the CD to become
jammed. It is recommended that homemade CDs be identified
with permanent felt tip marker rather than adhesive labels.
Ballpoint pens may damage CDs. Please contact your authorized
dealer for further information.
Audio system warranty and service:Refer to theWarranty Guide
for audio system warranty information. If service is necessary, see your
dealer or qualified technician.
Whenever a warning is received, the radio volume will be lowered
to a volume that will allow the tones to be heard. The radio
volume will return to the previous level after the warning goes
away.
REAR SEAT ENTERTAINMENT DVD SYSTEM (IF EQUIPPED)
Your vehicle may be equipped with a Rear Seat Entertainment DVD
System which allows you to watch DVDs, DVDR/RW, play music CDs,
CDR/RW, MP3s and to plug in and play video game systems. Please
review this material to become familiar with the system features and
safety information.
2006 Expedition(exd)
Owners Guide (post-2002-fmt)
USA(fus)
Entertainment Systems
34
Page 45 of 360
7. AUDIO OUTPUT (not changeable)
8. AUDIO VERSION — (01 ENG., etc.)
9. DISPLAY SETTING (4x3, Zoom, 16x9)
10. STATUS ICON (FWD, x4, x8, x32, REV, x4, x8, x32, etc.)
Safety information
Read all of the safety and operating instructions before operating the
system and retain for future reference.
Do not attempt to service, repair or modify the Rear Seat Entertainment
DVD System. See your Ford or Lincoln Mercury dealer.
Do not insert foreign objects into the DVD compartment.
The front glass on the liquid crystal display (LCD) flip-down
screen may break when hit with a hard surface. If the glass
breaks, do not touch the liquid crystalline material. In case of contact
with skin, wash immediately with soap and water.
Do not expose the liquid crystal display (LCD) flip-down screen
to direct sunlight or intensive ultraviolet rays for extensive
periods of time. Ultraviolet rays deteriorate the liquid crystal.
Be sure to review user manuals for video games and video game
equipment when used as auxiliary inputs for your Rear Seat
Entertainment DVD System.
Do not operate video games or video equipment if the power cords
and/or cables are broken, split or damaged. Carefully place cords and/or
cables where they will not be stepped on or interfere with the operation
of seats and/or compartments.
Disconnect video games and video equipment power cords and/or cables
when not in use.
Avoid touching auxiliary input jacks with your fingers. Do not blow on
them or allow them to get wet or dirty.
Do not clean any part of the DVD player with benzene, paint thinner or
any other solvent.
Whenever a warning is received, the radio volume will be lowered
to a volume that will allow the tones to be heard. The radio
volume will return to the previous level after the warning goes
away.
2006 Expedition(exd)
Owners Guide (post-2002-fmt)
USA(fus)
Entertainment Systems
45
Page 46 of 360
Federal Communication Commission (FCC) Compliance
Changes or modifications not approved by Ford Motor Company could
void user’s authority to operate the equipment. This equipment has been
tested and found to comply with the limits for a Class B digital device,
pursuant to Part 15 of the FCC Rules. These limits are designed to
provide reasonable protection against harmful interference in a
residential installation. This equipment generates, uses and can radiate
radio frequency energy and, if not installed and used in accordance with
the instructions, may cause harmful interference with radio
communications.
However, there is no guarantee that interference will not occur in a
particular installation. If this equipment does cause harmful interference
to radio or television reception, which can be determined by turning the
equipment off and on, the user is encouraged to consult the dealer or an
experienced radio/TV technician for help.
Care and service of the DVD player
Environmental extremes
DVD players that are subjected to harsh environmental conditions may
be damaged or perform at less than maximum capability. To avoid these
outcomes, whenever possible avoid exposing your DVD player to:
•extremely hot or cold temperatures.
•direct sunlight.
•high humidity.
•a dusty environment.
•locations where strong magnetic fields are generated.
Temperature extremes
When the vehicle is parked under direct sunlight or in an extremely cold
place for a long period of time, wait until the cabin temperature of the
vehicle is at normal temperature before operating the system.
Humidity and moisture condensation
Moisture in the air will condense in the DVD player under extremely
humid conditions or when moving from a cold place to a warm one. If
moisture condensation occurs, do not insert a CD or DVD into the
player. If one is already in the player, remove it. Turn the DVD player ON
to dry the moisture before inserting a DVD. This could take an hour or
more.
2006 Expedition(exd)
Owners Guide (post-2002-fmt)
USA(fus)
Entertainment Systems
46
Page 75 of 360
On the Guide display screen, there are two display functions which are
available if needed:
•VOICE — Press to repeat the current voice prompt.
•DETOUR — Press to select a detour. For more information on
detours, refer toDetours, interruptions and route changesin this
chapter.
•CANCEL — Press to cancel the guide display.
While in the Guide display screen, the cursor input can be used to
preview future/up coming maneuvers. This can be done by pressing
down on the cursor input to go to the ’next’ maneuver instruction, and
pressing up to go to the ’previous’ maneuver. Pressing the NAV control at
any time will set you back to the current maneuver/turn instruction.
True view
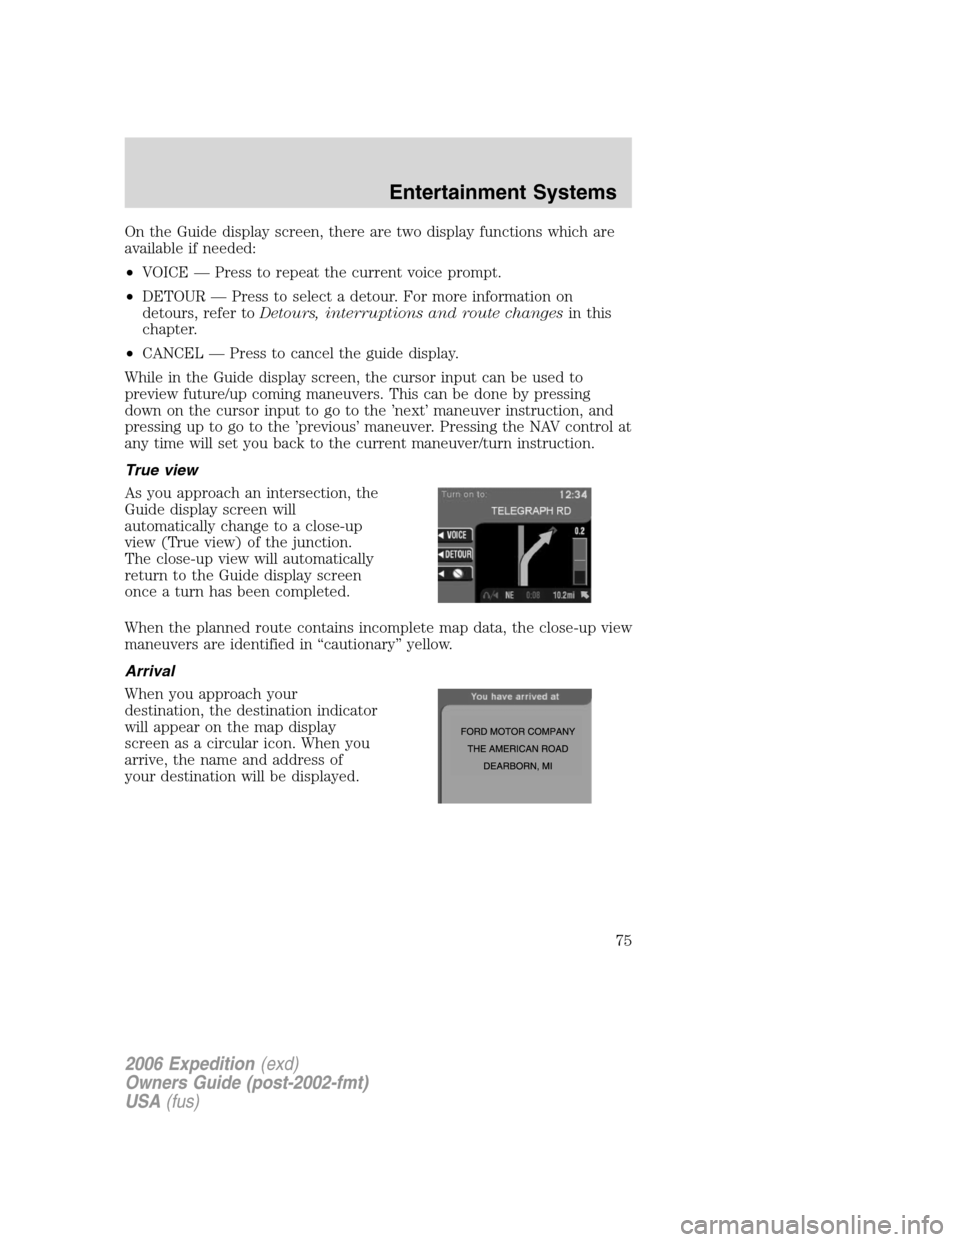
As you approach an intersection, the
Guide display screen will
automatically change to a close-up
view (True view) of the junction.
The close-up view will automatically
return to the Guide display screen
once a turn has been completed.
When the planned route contains incomplete map data, the close-up view
maneuvers are identified in “cautionary” yellow.
Arrival
When you approach your
destination, the destination indicator
will appear on the map display
screen as a circular icon. When you
arrive, the name and address of
your destination will be displayed.
2006 Expedition(exd)
Owners Guide (post-2002-fmt)
USA(fus)
Entertainment Systems
75
Page 80 of 360

Display options
Use this feature to change the
display setting. This feature can be
accessed by selecting “Display
Options” within the Main Menu.
Use the cursor control to select one
of the following options:
•MODE — auto (automatic), day
or night display settings.
•BRIGHTNESS— provides manual adjustment for screen brightness.
•Turn Display Off— Turns the display off. Press any button to turn the
display back on again.
System options
•Language Selection: Use the
cursor control to select and enter
the desired voice and text
language.
•Clock Setting: Your vehicle is equipped
with a clock in the VNR system. To set the clock:
1. Access the CLOCK screen.
2. Press the ADJUST control to
select the hours or minutes to set.
3. Use the cursor control to increase
or decrease the hours or minutes.
4. Press DONE to set the time.
5. Select the SET soft key to
synchronize/set the minutes and
seconds to GPS time. The hours will remain at the user set value.
You may choose to set the clock to a 12 or 24 hour display.
2006 Expedition(exd)
Owners Guide (post-2002-fmt)
USA(fus)
Entertainment Systems
80
Page 102 of 360
4. Rotate the bulb socket counterclockwise and remove from lamp
assembly.
5. Pull bulb straight out of socket and snap in the new bulb.
6. Install the bulb socket into the lamp assembly and rotate clockwise.
7. Carefully install the tail lamp assembly on the vehicle by securing the
lamp assembly with two screws.
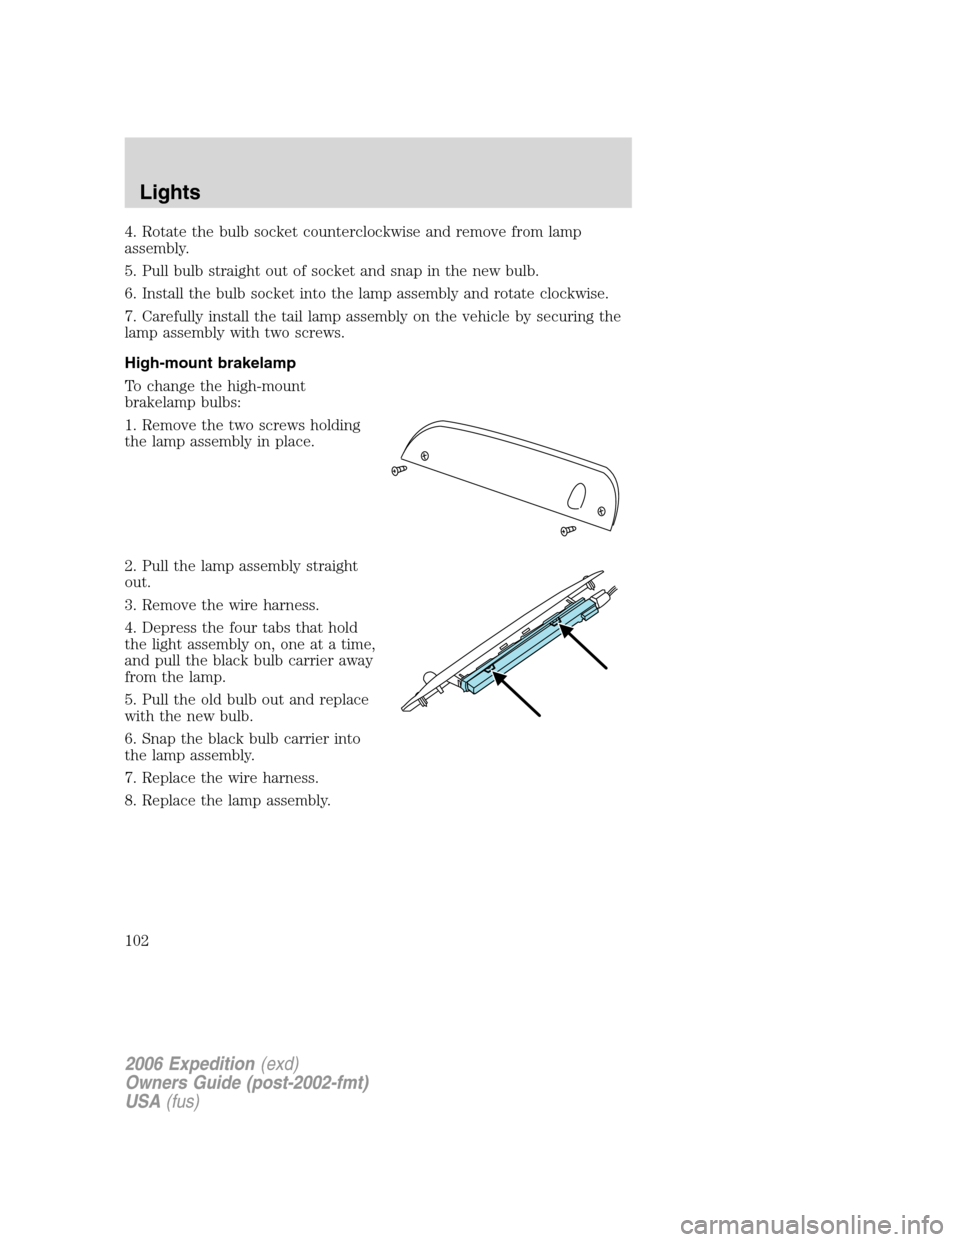
High-mount brakelamp
To change the high-mount
brakelamp bulbs:
1. Remove the two screws holding
the lamp assembly in place.
2. Pull the lamp assembly straight
out.
3. Remove the wire harness.
4. Depress the four tabs that hold
the light assembly on, one at a time,
and pull the black bulb carrier away
from the lamp.
5. Pull the old bulb out and replace
with the new bulb.
6. Snap the black bulb carrier into
the lamp assembly.
7. Replace the wire harness.
8. Replace the lamp assembly.
2006 Expedition(exd)
Owners Guide (post-2002-fmt)
USA(fus)
Lights
102
Page 103 of 360
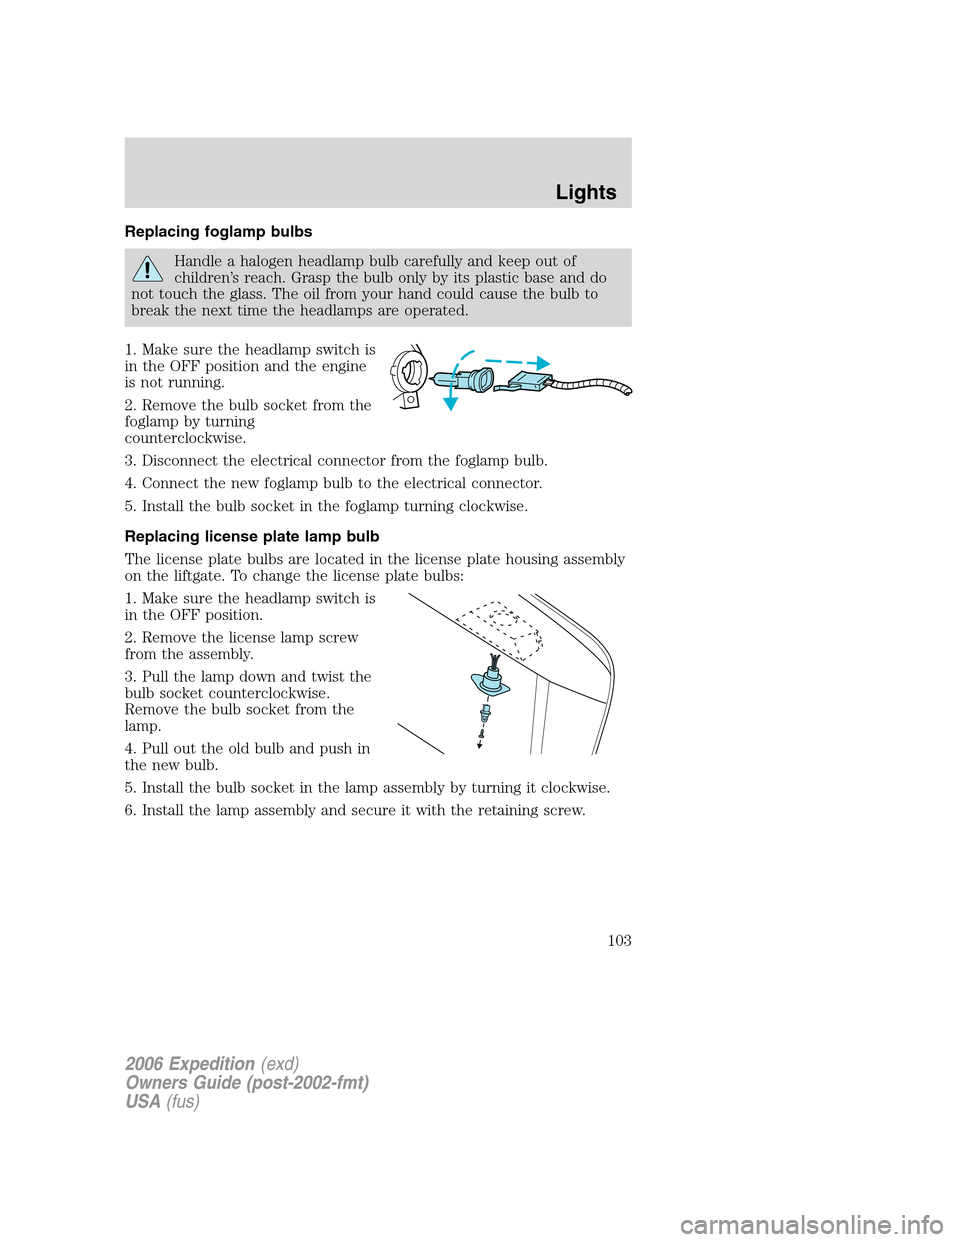
Replacing foglamp bulbs
Handle a halogen headlamp bulb carefully and keep out of
children’s reach. Grasp the bulb only by its plastic base and do
not touch the glass. The oil from your hand could cause the bulb to
break the next time the headlamps are operated.
1. Make sure the headlamp switch is
in the OFF position and the engine
is not running.
2. Remove the bulb socket from the
foglamp by turning
counterclockwise.
3. Disconnect the electrical connector from the foglamp bulb.
4. Connect the new foglamp bulb to the electrical connector.
5. Install the bulb socket in the foglamp turning clockwise.
Replacing license plate lamp bulb
The license plate bulbs are located in the license plate housing assembly
on the liftgate. To change the license plate bulbs:
1. Make sure the headlamp switch is
in the OFF position.
2. Remove the license lamp screw
from the assembly.
3. Pull the lamp down and twist the
bulb socket counterclockwise.
Remove the bulb socket from the
lamp.
4. Pull out the old bulb and push in
the new bulb.
5. Install the bulb socket in the lamp assembly by turning it clockwise.
6. Install the lamp assembly and secure it with the retaining screw.
2006 Expedition(exd)
Owners Guide (post-2002-fmt)
USA(fus)
Lights
103