Page 44 of 360

CD/DVD will not eject from the system, press and hold the EJECT
control for approximately 2 seconds. The disc should eject whether the
vehicle ignition is ON or OFF.
Playing a video game/auxiliary device
1. Connect the video line from your video game device to the YELLOW
auxiliary input jack.
2. Connect the left and right audio lines to the WHITE and RED auxiliary
input jacks respectively.
3. Press the MODE control until DVD/CD AUX (no disc in player) or
DVD/CD play (disc in player) illuminates in the radio display. If a disc is
in the system, playback should begin. To enable the aux inputs, press the
STOP control or press the AUX control on the DVD player.
On-screen indicators
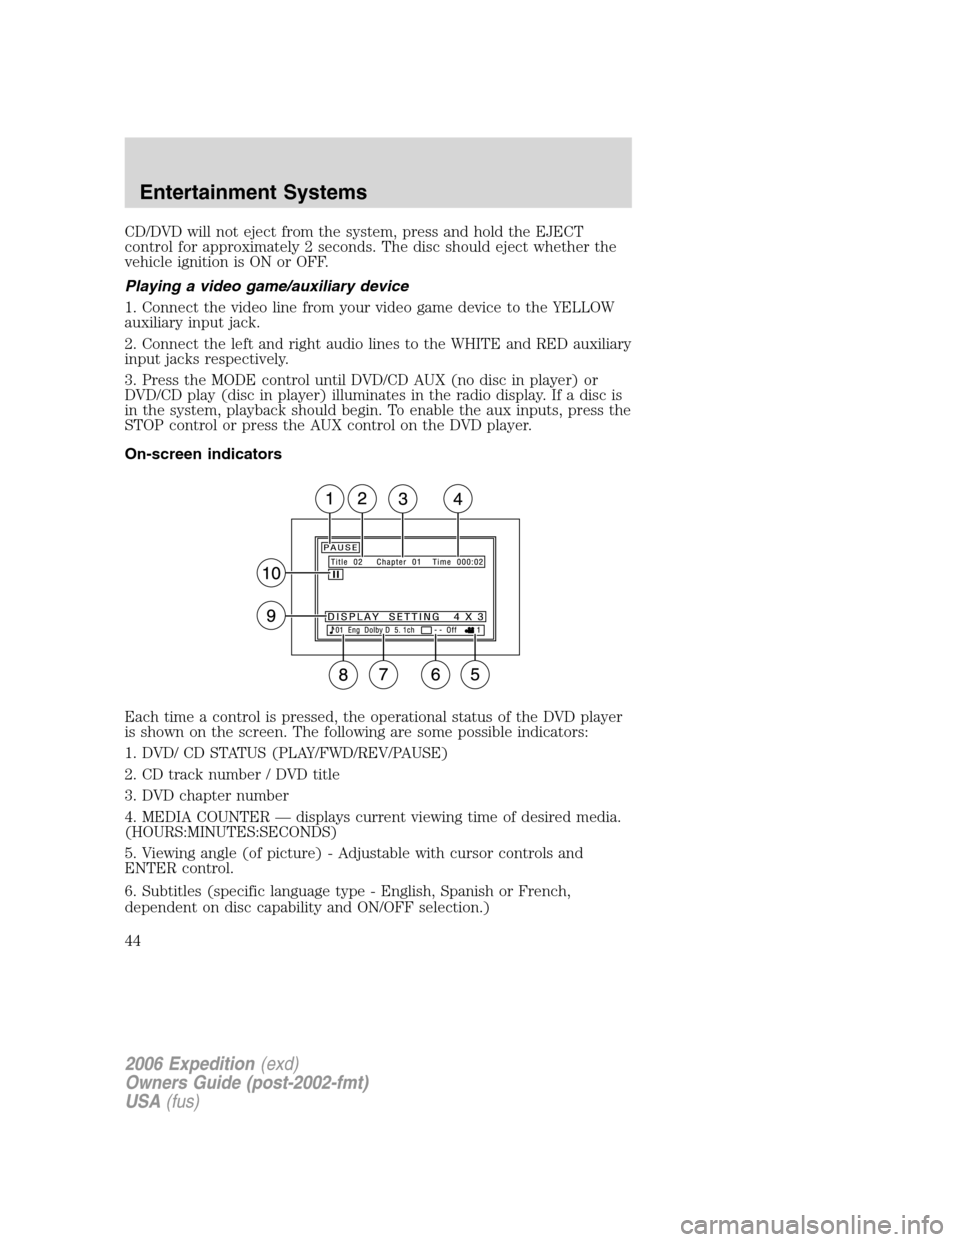
Each time a control is pressed, the operational status of the DVD player
is shown on the screen. The following are some possible indicators:
1. DVD/ CD STATUS (PLAY/FWD/REV/PAUSE)
2. CD track number / DVD title
3. DVD chapter number
4. MEDIA COUNTER — displays current viewing time of desired media.
(HOURS:MINUTES:SECONDS)
5. Viewing angle (of picture) - Adjustable with cursor controls and
ENTER control.
6. Subtitles (specific language type - English, Spanish or French,
dependent on disc capability and ON/OFF selection.)
2006 Expedition(exd)
Owners Guide (post-2002-fmt)
USA(fus)
Entertainment Systems
44
Page 48 of 360

Ford Motor Company shall not be liable for any damages of any
type arising from failure to follow these guidelines.
Do not attempt to service, repair or modify the system. See your Ford or
Lincoln Mercury dealer.
The driver must not attempt to operate any detailed operation of
the navigation system while the vehicle is in motion. Give full
attention to driving and to the road. Pull off the road and park in a
safe place before performing detailed operations.
A safety screen will be displayed
each time the navigation system is
turned on as a reminder. Ensure
that you are familiar with the
system’s features and functionality,
including the following:
•Do not turn the ignition key or start the engine while the software is
updating.
•Do not apply pressure to the display screen.
•The navigation system is not a substitute for your personal judgement.
•Route suggestions should not supersede local traffic regulations or
safe driving practices.
•Do not follow route suggestions if they direct you to perform an
unsafe or illegal maneuver, would place you in an unsafe situation, or
would route you into an area that you consider unsafe.
•Drivers should not rely on screen displays while their vehicle is in
motion. Let the voice guide you. If viewing is necessary, pull off the
road to a safe location.
•Do not use the navigation system to locate emergency services.
•For road safety reasons, the driver should program the system only
when the vehicle is stationary. Certain functions will therefore not
operate while the vehicle is in motion.
•The navigation CD does not reflect road detours, closures or
construction, road characteristics such as rough road surface, slope or
grade, weight or height restrictions, traffic congestion, weather or
similar conditions.
2006 Expedition(exd)
Owners Guide (post-2002-fmt)
USA(fus)
Entertainment Systems
48
Page 52 of 360

Quick start – how to get going
To play a radio station:
1. Ensure that the ignition and the Vehicle Navigation Radio (VNR)
system are ON.
2. Press the AM/FM control to select
the desired frequency band.
3. Press the SEEK control to locate
a station.
To play a CD in the VNR:
1. Ensure that the ignition and the
VNR system are ON.
2. Insert a CD into the single slot of
the VNR and the CD will automatically begin play. If a CD is already
loaded into the system, press the CD control.
To play a CD in the CD DJ:
1. Ensure that the ignition and the
VNR system are ON.
2. Insert CD(s) into the CD DJ
magazine. Insert magazine into CD DJ. If the CD DJ magazine is already
loaded, press the CD control to toggle through CD, CD DJ and DVD (if
equipped).
3. Press the memory presets to
choose the desired disc in the CD
DJ.
Note:Navigation CD’s are not operational in the CD DJ.
To use the Navigation system:
1. Ensure that the ignition and the VNR system are ON, and a map data
disc is inserted into the VNR CD slot.
AM/FM
SEEK
12
3456
2006 Expedition(exd)
Owners Guide (post-2002-fmt)
USA(fus)
Entertainment Systems
52
Page 78 of 360

Detour options
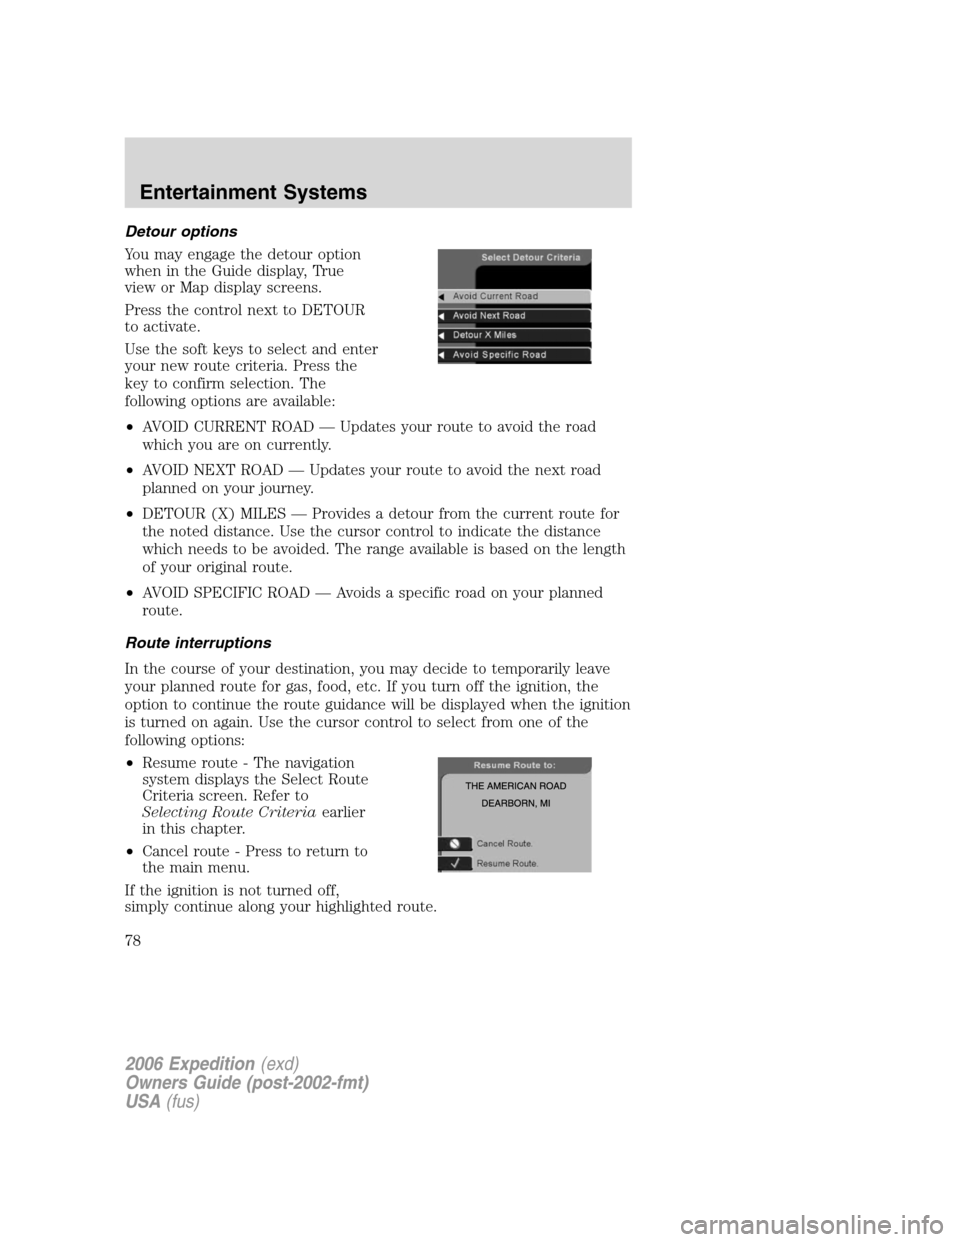
You may engage the detour option
when in the Guide display, True
view or Map display screens.
Press the control next to DETOUR
to activate.
Use the soft keys to select and enter
your new route criteria. Press the
key to confirm selection. The
following options are available:
•AVOID CURRENT ROAD — Updates your route to avoid the road
which you are on currently.
•AVOID NEXT ROAD — Updates your route to avoid the next road
planned on your journey.
•DETOUR (X) MILES — Provides a detour from the current route for
the noted distance. Use the cursor control to indicate the distance
which needs to be avoided. The range available is based on the length
of your original route.
•AVOID SPECIFIC ROAD — Avoids a specific road on your planned
route.
Route interruptions
In the course of your destination, you may decide to temporarily leave
your planned route for gas, food, etc. If you turn off the ignition, the
option to continue the route guidance will be displayed when the ignition
is turned on again. Use the cursor control to select from one of the
following options:
•Resume route - The navigation
system displays the Select Route
Criteria screen. Refer to
Selecting Route Criteriaearlier
in this chapter.
•Cancel route - Press to return to
the main menu.
If the ignition is not turned off,
simply continue along your highlighted route.
2006 Expedition(exd)
Owners Guide (post-2002-fmt)
USA(fus)
Entertainment Systems
78
Page 93 of 360
HEADLAMP CONTROL
Rotate the headlamp control to the
first position
to turn on the
parking lamps. Rotate to the second
position
to turn on the
headlamps.
Autolamp control
The autolamp system provides light
sensitive automatic on-off control of
the exterior lights normally
controlled by the headlamp control.
The autolamp system also keeps the
lights on for approximately 20
seconds or on vehicles equipped
with a message center, you can
select a delay from 0–180 seconds, after the ignition switch is turned to
OFF.
•To turn autolamps on, rotate the control counterclockwise.
•To turn autolamps off, rotate the control clockwise to OFF.
High beams
Push the lever toward the
instrument panel to activate. Pull
the lever towards you to deactivate.
A
INT2OFFOFFINT1
2006 Expedition(exd)
Owners Guide (post-2002-fmt)
USA(fus)
Lights
93
Page 94 of 360
Flash to pass
Pull toward you slightly to activate
and release to deactivate.
Daytime running lamps (DRL) (if equipped)
Turns the foglamps on at full intensity output. To activate:
•the ignition must be in the ON position and
•the headlamp control must be in the OFF or Parking lamps position.
Always remember to turn on your headlamps at dusk or during
inclement weather. The Daytime Running Lamp (DRL) system
does not activate the tail lamps and generally may not provide
adequate lighting during these conditions. Failure to activate your
headlamps under these conditions may result in a collision.
Foglamp control (if equipped)
The headlamp control also operates
the foglamps. The foglamps can be
turned on when the headlamp
control is in the
,or
positions and the high beams are
not turned on.
Pull headlamp control towards you
to turn foglamps on. The foglamp
indicator light
will illuminate.
INT2OFFOFFINT1
A
2006 Expedition(exd)
Owners Guide (post-2002-fmt)
USA(fus)
Lights
94
Page 97 of 360
Front row map/dome lamp (if equipped)
The dome lamp lights when:
•any door is opened,
•the instrument panel dimmer
switch is rotated up until the
courtesy lamps come on, and
•any of the remote entry controls
are pressed and the ignition is
OFF.
The map lamps are activated by pressing the controls on either side of
the lens.
Second row map lamps (if equipped)
The second row map lamps are
located in the headliner above the
second row seats.
•Press the controls to activate the
lamps.
Rear cargo lamp
The dome lamp lights when:
•any door is opened, and the
switch is in the middle position.
•the instrument panel dimmer
switch is rotated up until the
courtesy lamps come on.
•any of the remote entry controls
are pressed and ignition is OFF
(and switch is in the middle
position).
With the ignition key in the ACC or ON position, the rear dome lamp can
be turned ON or OFF by sliding the control.
2006 Expedition(exd)
Owners Guide (post-2002-fmt)
USA(fus)
Lights
97
Page 111 of 360

POWER WINDOWS (IF EQUIPPED)
Do not leave children unattended in the vehicle and do not let
children play with the power windows. They may seriously injure
themselves.
When closing the power windows, you should verify they are free
of obstructions and ensure that children and/or pets are not in
the proximity of the window openings.
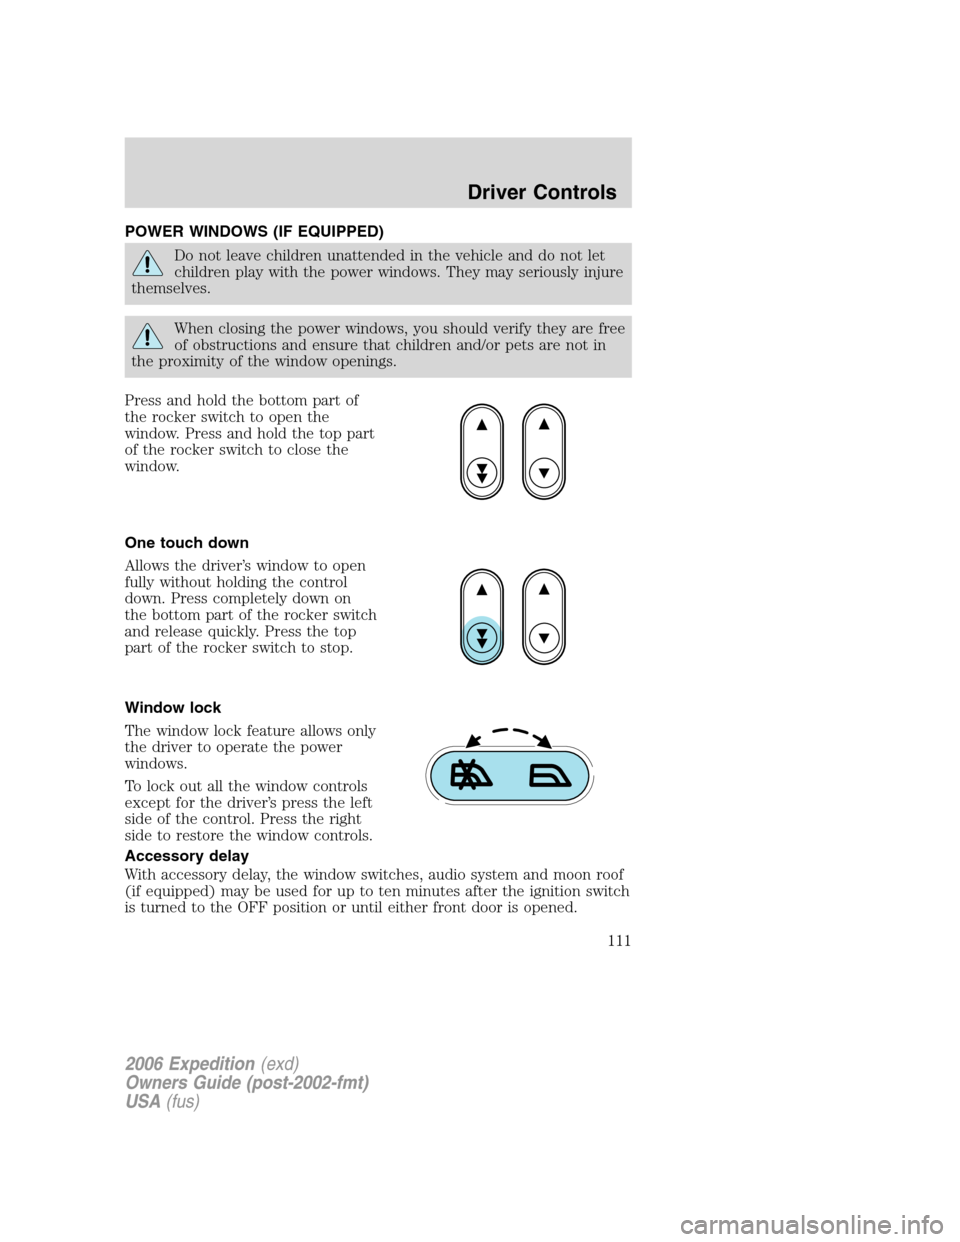
Press and hold the bottom part of
the rocker switch to open the
window. Press and hold the top part
of the rocker switch to close the
window.
One touch down
Allows the driver’s window to open
fully without holding the control
down. Press completely down on
the bottom part of the rocker switch
and release quickly. Press the top
part of the rocker switch to stop.
Window lock
The window lock feature allows only
the driver to operate the power
windows.
To lock out all the window controls
except for the driver’s press the left
side of the control. Press the right
side to restore the window controls.
Accessory delay
With accessory delay, the window switches, audio system and moon roof
(if equipped) may be used for up to ten minutes after the ignition switch
is turned to the OFF position or until either front door is opened.
2006 Expedition(exd)
Owners Guide (post-2002-fmt)
USA(fus)
Driver Controls
111