Page 166 of 256

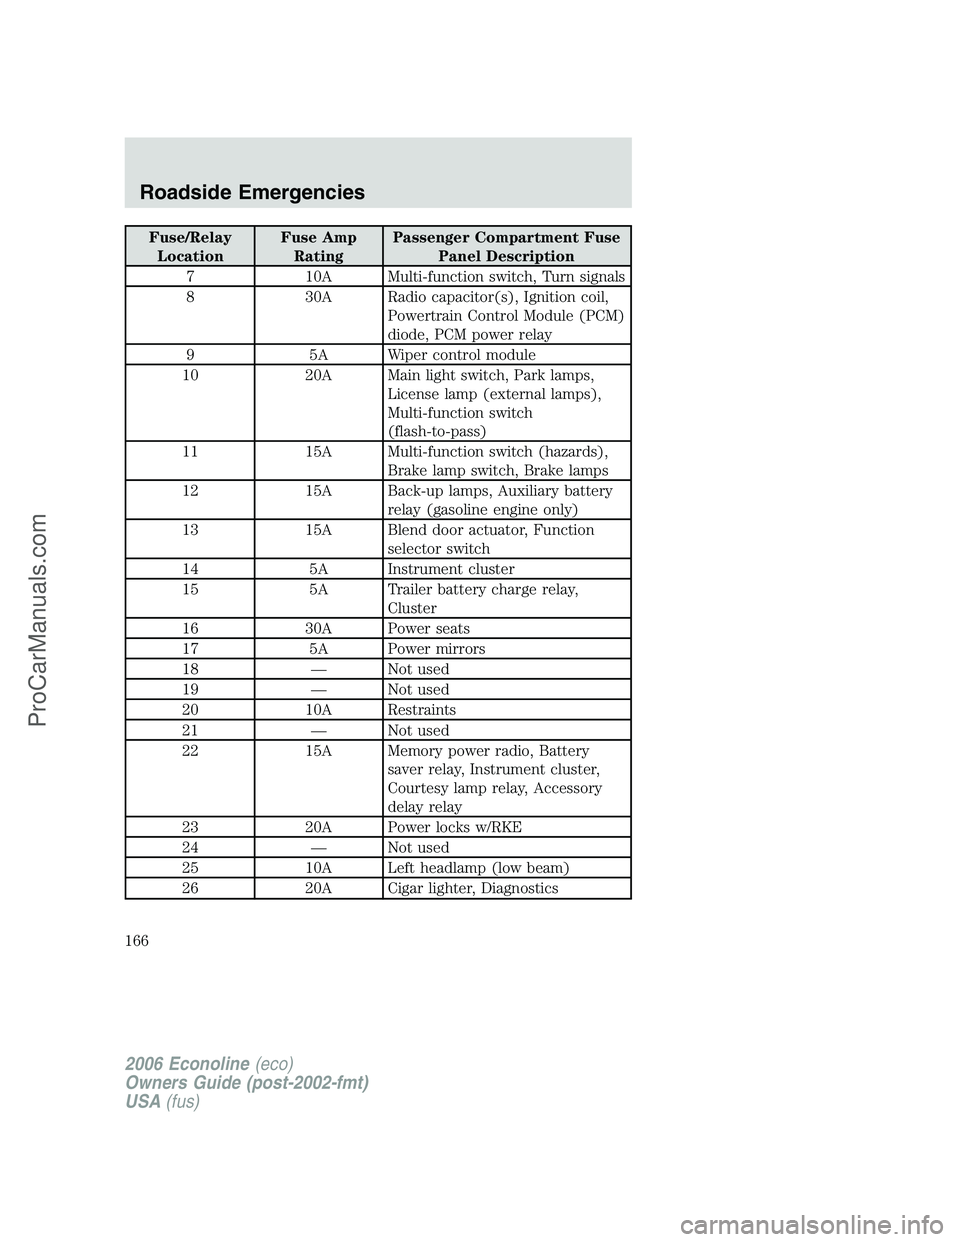
Fuse/Relay
LocationFuse Amp
RatingPassenger Compartment Fuse
Panel Description
7 10A Multi-function switch, Turn signals
8 30A Radio capacitor(s), Ignition coil,
Powertrain Control Module (PCM)
diode, PCM power relay
9 5A Wiper control module
10 20A Main light switch, Park lamps,
License lamp (external lamps),
Multi-function switch
(flash-to-pass)
11 15A Multi-function switch (hazards),
Brake lamp switch, Brake lamps
12 15A Back-up lamps, Auxiliary battery
relay (gasoline engine only)
13 15A Blend door actuator, Function
selector switch
14 5A Instrument cluster
15 5A Trailer battery charge relay,
Cluster
16 30A Power seats
17 5A Power mirrors
18 — Not used
19 — Not used
20 10A Restraints
21 — Not used
22 15A Memory power radio, Battery
saver relay, Instrument cluster,
Courtesy lamp relay, Accessory
delay relay
23 20A Power locks w/RKE
24 — Not used
25 10A Left headlamp (low beam)
26 20A Cigar lighter, Diagnostics
2006 Econoline(eco)
Owners Guide (post-2002-fmt)
USA(fus)
Roadside Emergencies
166
ProCarManuals.com
Page 167 of 256

Fuse/Relay
LocationFuse Amp
RatingPassenger Compartment Fuse
Panel Description
27 5A Radio
28 — Not used
29 — Not used
30 15A Headlamps (high beam indicator)
31 10A Right headlamp (low beam)
32 20A Power point #1 (instrument
panel)
33 10A Start relay
34 30A IP Body builder connector #3
35 — Not used
36 5A Instrument illumination
37 5A Airbag deactivation switch
38 — Not used
39 10A Trailer tow electric brake, Center
High-Mounted Stop Lamp
(CHMSL), Brake lamps
40 20A Power point #2 (2nd row seating
position - driver side)
41 30A Modified vehicle
42 20A circuit
breakerPower windows
43 — Not used
44 20A circuit
breakerWiper/washer
Power distribution box
The power distribution box is located in the engine compartment. The
power distribution box contains high-current fuses that protect your
vehicle’s main electrical systems from overloads.
Always disconnect the battery before servicing high current
fuses.
2006 Econoline(eco)
Owners Guide (post-2002-fmt)
USA(fus)
Roadside Emergencies
167
ProCarManuals.com
Page 168 of 256
To reduce risk of electrical shock, always replace the cover to
the Power Distribution Box before reconnecting the battery or
refilling fluid reservoirs.
If the battery has been disconnected and reconnected, refer to the
Batterysection of theMaintenance and Specificationschapter.
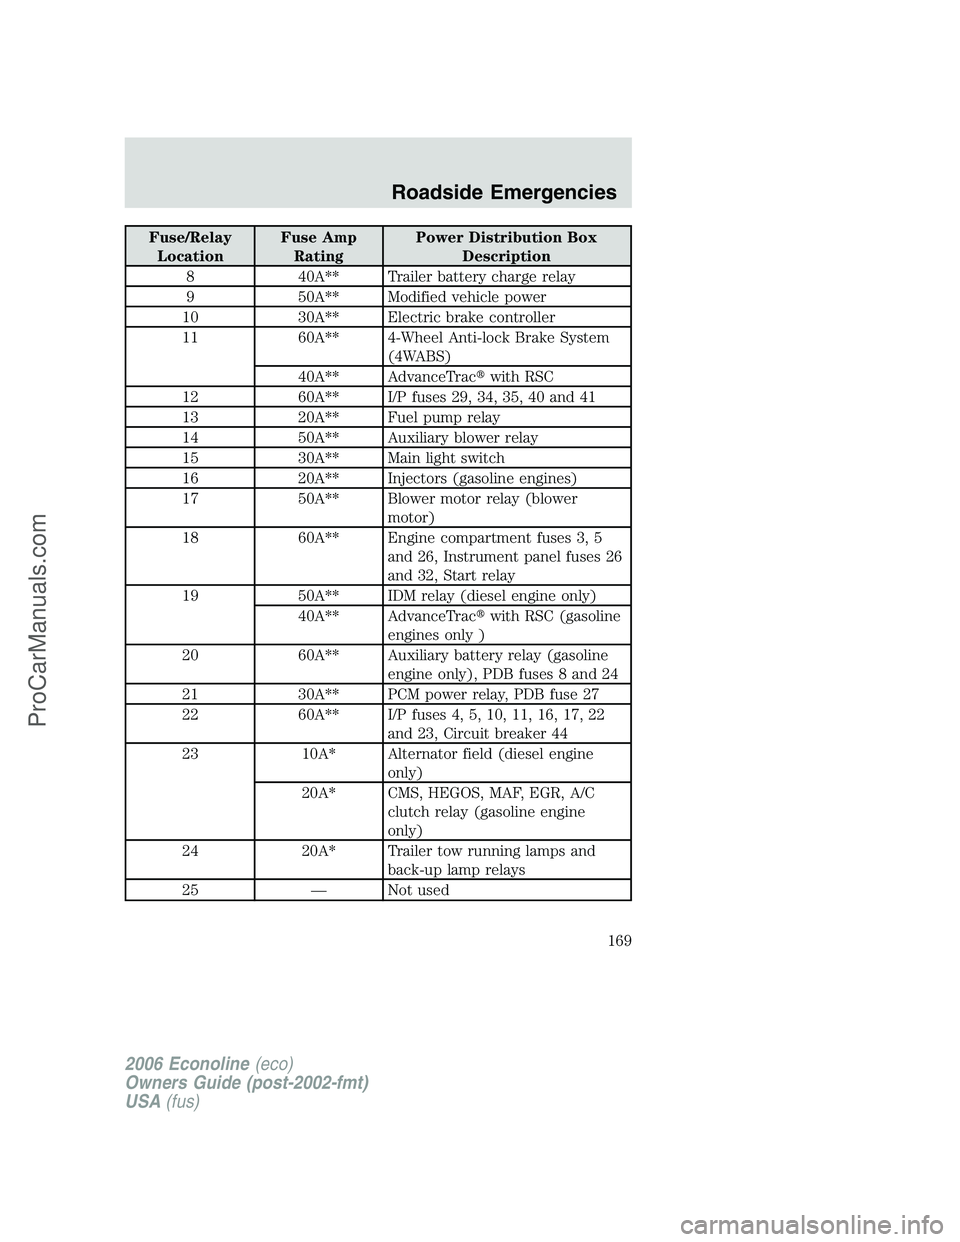
The high-current fuses are coded as follows.
Fuse/Relay
LocationFuse Amp
RatingPower Distribution Box
Description
1 — Powertrain Control Module (PCM)
diode
2 — Auxiliary battery diode
3 15A* Daytime Running Lamps (DRL)
module, A/C clutch
4 5A* Heated PCV (4.6L and 6.8L
gasoline engines)
5 15A* Horn relay
6 2A* Brake pressure switch
7 60A** Ignition switch, Accessory delay
2006 Econoline(eco)
Owners Guide (post-2002-fmt)
USA(fus)
Roadside Emergencies
168
ProCarManuals.com
Page 169 of 256

Fuse/Relay
LocationFuse Amp
RatingPower Distribution Box
Description
8 40A** Trailer battery charge relay
9 50A** Modified vehicle power
10 30A** Electric brake controller
11 60A** 4-Wheel Anti-lock Brake System
(4WABS)
40A** AdvanceTrac�with RSC
12 60A** I/P fuses 29, 34, 35, 40 and 41
13 20A** Fuel pump relay
14 50A** Auxiliary blower relay
15 30A** Main light switch
16 20A** Injectors (gasoline engines)
17 50A** Blower motor relay (blower
motor)
18 60A** Engine compartment fuses 3, 5
and 26, Instrument panel fuses 26
and 32, Start relay
19 50A** IDM relay (diesel engine only)
40A** AdvanceTrac�with RSC (gasoline
engines only )
20 60A** Auxiliary battery relay (gasoline
engine only), PDB fuses 8 and 24
21 30A** PCM power relay, PDB fuse 27
22 60A** I/P fuses 4, 5, 10, 11, 16, 17, 22
and 23, Circuit breaker 44
23 10A* Alternator field (diesel engine
only)
20A* CMS, HEGOS, MAF, EGR, A/C
clutch relay (gasoline engine
only)
24 20A* Trailer tow running lamps and
back-up lamp relays
25 — Not used
2006 Econoline(eco)
Owners Guide (post-2002-fmt)
USA(fus)
Roadside Emergencies
169
ProCarManuals.com
Page 171 of 256
Relay location Description
1 Interior lamps
2 Open
3 Open
4 Battery saver
Engine compartment relay module
The engine compartment relay module is located in one of two places
depending on which type of engine your vehicle is equipped with:
•Gasoline engine: driver side of the engine compartment above the
brake master cylinder.
•Diesel engine: passenger side of the engine compartment behind the
power distribution box.
Have your authorized dealer service this module, if required.
The relays are coded as follows:
Relay location Description
1 PCM back-up lamp
2 A/C control
3 Trailer tow right turn
4 Trailer tow left turn
CHANGING A FLAT TIRE
If you get a flat tire while driving:
•do not brake heavily.
•gradually decrease the vehicle’s speed.
•hold the steering wheel firmly.
2006 Econoline(eco)
Owners Guide (post-2002-fmt)
USA(fus)
Roadside Emergencies
171
ProCarManuals.com
Page 175 of 256

Tire change procedure
Preparing to change the tire
To help prevent the vehicle from moving when you change a tire,
be sure the parking brake is set, then block (in both directions)
the wheel that is diagonally opposite (other side and end of the
vehicle) to the tire being changed.
1. Park on a level surface.
2. Activate the warning flashers.
3. Place the gearshift in P (Park).
4. Apply the parking brake and turn
the engine off.
5. Block the wheel that is diagonally
opposite the tire you are changing.
On E-450 vehicles, the parking
brake is on the transmission.
Therefore, the vehicle will not be
prevented from moving when a rear
wheel is lifted, even if the parking brake is applied. Be sure to block both
directions of the wheel that is diagonally opposite to the wheel that is
being lifted.
If the vehicle slips off the jack, you or someone else could be
seriously injured.
6. Remove the spare tire and jack from the storage location.
2006 Econoline(eco)
Owners Guide (post-2002-fmt)
USA(fus)
Roadside Emergencies
175
ProCarManuals.com
Page 181 of 256

When a wheel is installed, always remove any corrosion, dirt or
foreign materials present on the mounting surfaces of the wheel
or the surface of the wheel hub, brake drum or brake disc that
contacts the wheel. Ensure that any fasteners that attach the rotor to
the hub are secured so they do not interfere with the mounting
surfaces of the wheel. Installing wheels without correct metal-to-metal
contact at the wheel mounting surfaces can cause the wheel nuts to
loosen and the wheel to come off while the vehicle is in motion,
resulting in loss of control.
JUMP STARTING YOUR VEHICLE
The following procedure is for vehicles equipped with a gasoline engine;
if your vehicle is equipped with a diesel engine, refer to the6.0L Power
Stroke Direct Injection Turbo Diesel Owner’s Guide Supplementfor
the proper jump starting procedure.
The gases around the battery can explode if exposed to flames,
sparks, or lit cigarettes. An explosion could result in injury or
vehicle damage.
Batteries contain sulfuric acid which can burn skin, eyes and
clothing, if contacted.
Do not attempt to push-start your vehicle. Automatic
transmissions do not have push-start capability; doing so may
damage the catalytic converter.
Preparing your vehicle
When the battery is disconnected or a new battery is installed, the
transmission must relearn its shift strategy. As a result, the transmission
may have firm and/or soft shifts. This operation is considered normal and
will not affect function or durability of the transmission. Over time, the
adaptive learning process will fully update transmission operation.
1.Use only a 12–volt supply to start your vehicle.
2. Do not disconnect the battery of the disabled vehicle as this could
damage the vehicle’s electrical system.
3. Park the booster vehicle close to the hood of the disabled vehicle
making sure the two vehiclesdo nottouch. Set the parking brake on
both vehicles and stay clear of the engine cooling fan and other moving
parts.
2006 Econoline(eco)
Owners Guide (post-2002-fmt)
USA(fus)
Roadside Emergencies
181
ProCarManuals.com
Page 195 of 256

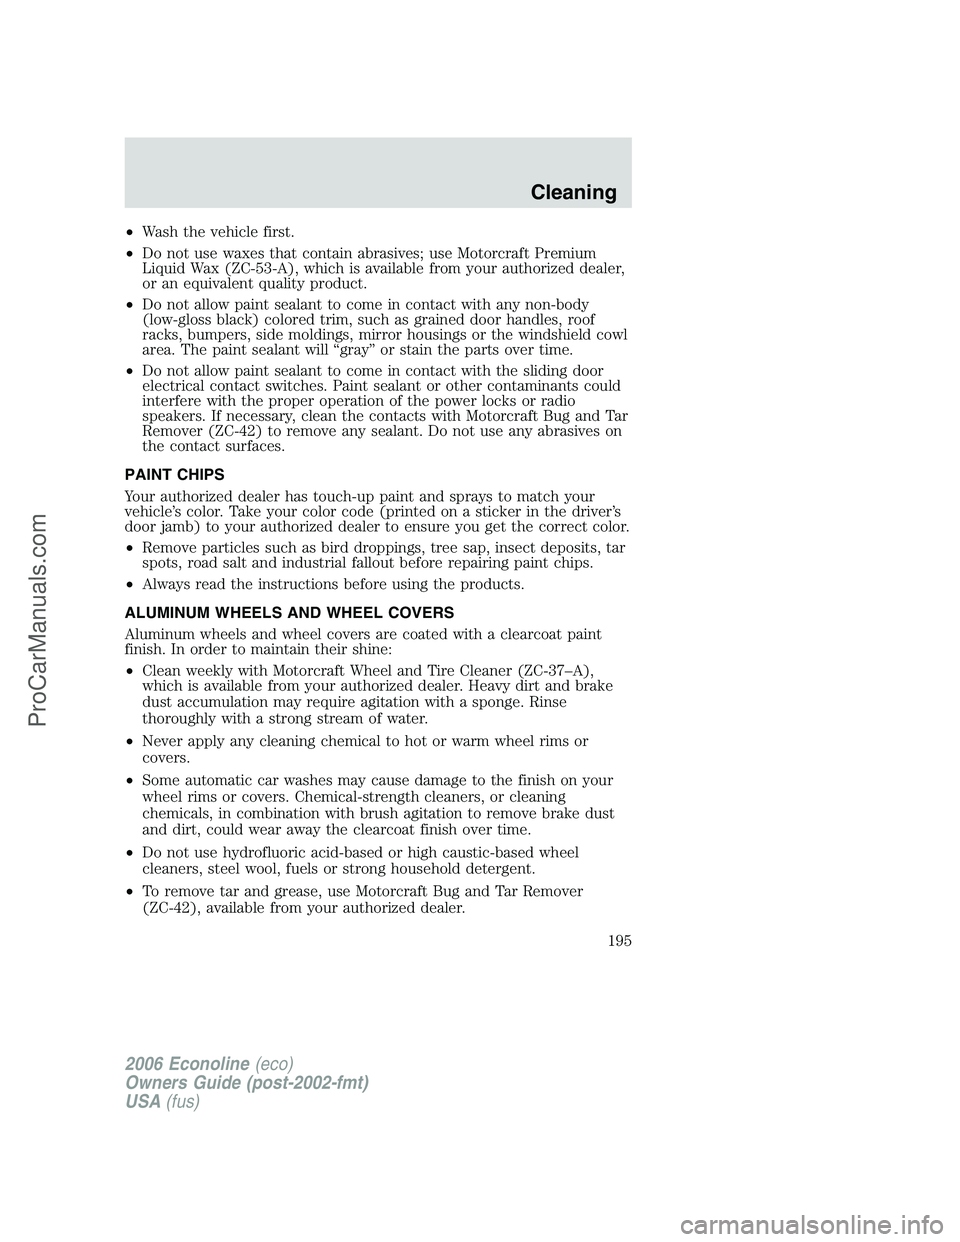
•Wash the vehicle first.
•Do not use waxes that contain abrasives; use Motorcraft Premium
Liquid Wax (ZC-53-A), which is available from your authorized dealer,
or an equivalent quality product.
•Do not allow paint sealant to come in contact with any non-body
(low-gloss black) colored trim, such as grained door handles, roof
racks, bumpers, side moldings, mirror housings or the windshield cowl
area. The paint sealant will “gray” or stain the parts over time.
•Do not allow paint sealant to come in contact with the sliding door
electrical contact switches. Paint sealant or other contaminants could
interfere with the proper operation of the power locks or radio
speakers. If necessary, clean the contacts with Motorcraft Bug and Tar
Remover (ZC-42) to remove any sealant. Do not use any abrasives on
the contact surfaces.
PAINT CHIPS
Your authorized dealer has touch-up paint and sprays to match your
vehicle’s color. Take your color code (printed on a sticker in the driver’s
door jamb) to your authorized dealer to ensure you get the correct color.
•Remove particles such as bird droppings, tree sap, insect deposits, tar
spots, road salt and industrial fallout before repairing paint chips.
•Always read the instructions before using the products.
ALUMINUM WHEELS AND WHEEL COVERS
Aluminum wheels and wheel covers are coated with a clearcoat paint
finish. In order to maintain their shine:
•Clean weekly with Motorcraft Wheel and Tire Cleaner (ZC-37–A),
which is available from your authorized dealer. Heavy dirt and brake
dust accumulation may require agitation with a sponge. Rinse
thoroughly with a strong stream of water.
•Never apply any cleaning chemical to hot or warm wheel rims or
covers.
•Some automatic car washes may cause damage to the finish on your
wheel rims or covers. Chemical-strength cleaners, or cleaning
chemicals, in combination with brush agitation to remove brake dust
and dirt, could wear away the clearcoat finish over time.
•Do not use hydrofluoric acid-based or high caustic-based wheel
cleaners, steel wool, fuels or strong household detergent.
•To remove tar and grease, use Motorcraft Bug and Tar Remover
(ZC-42), available from your authorized dealer.
2006 Econoline(eco)
Owners Guide (post-2002-fmt)
USA(fus)
Cleaning
195
ProCarManuals.com