Page 100 of 536

restraint installation, instead of tucking the seat belt
behind the child restraint, route the seat belt through the
child restraint belt path and then buckle it. This should
stow the seat belt out of the reach of an inquisitive child.
Remind all children in the vehicle that the seat belts are
not toys and should not be played with, and never leave
your child unattended in the vehicle.
NOTE: If your child restraint seat is not LATCH com-
patible, install the restraint using the vehicle seat belting.Installing the Child Restraint System
WARNING!
Do not install child restraint systems equipped with
LATCH attachments in the center position of a Quad
Cab model rear seat. The LATCH anchorages in this
seat are designed for the two outboard seating posi-
tions only. A child may be placed in the rear center
seating position of a Quad Cab model using the seat
belt and child tether anchorage. Failure to follow this
may result in serious or fatal injury.
100 THINGS TO KNOW BEFORE STARTING YOUR VEHICLE
Page 101 of 536

We urge that you carefully follow the directions of the
manufacturer when installing your child restraint. Many,
but not all, restraint systems will be equipped with
separate straps on each side, with each having a hook or
connector and a means for adjusting the tension in the
strap. Forward-facing toddler restraints and some
rearward-facing infant restraints will also be equipped
with a tether strap, a hook and means for adjusting the
tension in the strap.
In general, you will first loosen the adjusters on the lower
straps and tether straps so that you can more easily attach
the hook or connector to the lower anchorages and tether
anchorages. Then tighten all three straps as you push the
child restraint rearward and downward into the seat.
Not all child restraint systems will be installed as we
have described here. Again, carefully follow the instruc-
tions that come with the child restraint system.WARNING!
Improper installation of a child restraint to the
LATCH anchorages can lead to failure of an infant or
child restraint. The child could be badly injured or
killed. Follow the manufacturer’s directions exactly
when installing an infant or child restraint.
Child Restraint Tether Anchor
Child restraints having tether straps and hooks for con-
nection to tether anchors have been available for some
time. In fact, many child restraint manufacturers will
provide add-on tether strap kits for their older products.
Regular Cab models of Ram Pickups have two tether
anchorages, one each behind the front center and right
seats. Quad Cab and Mega Cab models have three
anchorages, one behind each of the rear seats.
THINGS TO KNOW BEFORE STARTING YOUR VEHICLE 101
2
Page 102 of 536

WARNING!
An incorrectly anchored tether strap could lead to
seat failure and injury to the child. In a collision, the
seat could come loose and allow the child to crash
into the inside of the vehicle or other passengers, or
even be thrown from the vehicle. Use only the
anchor positions directly behind the child seat to
secure a child restraint top tether strap. Follow the
instructions below. See your dealer for help if nec-
essary.
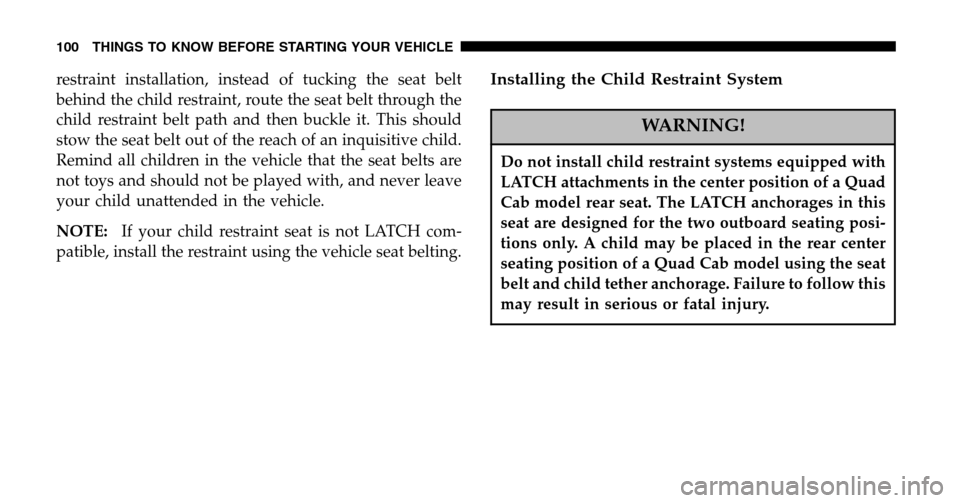
Tether Anchorage Points at the Right and Center
Front Seat (Regular Cab - All Seats)
1. Place the child restraint on the seat and adjust the
tether strap so that it will reach over the seat back under
the head restraint to the tether anchor directly behind the
seat. 2. Lift the cover (if so equipped), and attach the hook to
the square opening in the sheet metal.
3. Install the child restraint and remove the slack in the
tether strap according to the manufacturer’s instructions.
Regular Cab Tether Strap Mounting
102 THINGS TO KNOW BEFORE STARTING YOUR VEHICLE
Page 103 of 536

Multiple Child Restraint Installation Sequence -
(Quad Cab Rear Seats)
1. Obtain tether straps by raising the head restraints and
reaching between the rear glass and rear seat. The tether
strap may be retained with an elastic band. Accessibility
to the tether strap is greatly improved by raising the seat
cushion to the “up” position. Remove the elastic before
use.
2. Place a child restraint on each outboard rear seat and
adjust the tether strap so that it will reach under the head
restraint to the tether anchor directly behind the seat and
then to the anchor directly behind the center rear seat.
3. Pass each tether strap hook under the head restraint
and through the loop of webbing behind the child seat. 4. Route each tether strap to the anchor behind the center
seat, and attach the hooks to the metal ring.
5. Place a child restraint on the center rear seat and
adjust the tether strap so that it will reach under the head
restraint to the tether anchor directly behind the seat and
to the anchor directly behind the right seat.
6. Install each child restraint and remove the slack in the
tether strap according to the child restraint manufactur-
er’s instructions.
THINGS TO KNOW BEFORE STARTING YOUR VEHICLE 103
2
Page 105 of 536
Tether Anchorage Points at All Three Seating
Positions (Mega Cab)
1. Place the child restraint on the seat and adjust the
tether strap so that it will reach over the seat back under
the head restraint to the tether anchor directly behind the
seat.
2. Lift the cover, and attach the hook to the square
opening in the sheet metal.
3. Install the child restraint and remove the slack in the
tether strap according to the manufacturer’s instructions.
Children Too Large for Booster Seats
Children who are large enough to wear the shoulder belt
comfortably, and whose legs are long enough to bend
over the front of the seat when their back is against the
seat back should use the lap/shoulder belt in a rear seat.
•Make sure that the child is upright in the seat.
Mega Cab Tether Strap Mounting
THINGS TO KNOW BEFORE STARTING YOUR VEHICLE 105
2
Page 158 of 536
WARNING!
Be certain that the seatback is securely locked into
position. If the seatback in not securely locked into
position the seat will not provide the proper stability
for child seats and/or passengers. An improperly
latched seat could cause serious injury.
Heated Seats — If Equipped
The heated seat switches are located in the instrument
panel under the climate controls.
Heated Seat Switches
158 UNDERSTANDING THE FEATURES OF YOUR VEHICLE
Page 190 of 536

WARNING!
•Never leave children in a vehicle, with the keys in
the ignition switch. Occupants, particularly unat-
tended children, can become entrapped by the
power sunroof while operating the power sunroof
switch. Such entrapment may result in serious
injury or death.
•In an accident, there is a greater risk of being
thrown from a vehicle with an open sunroof. You
could also be seriously injured or killed. Always
fasten your seat belt properly and make sure all
passengers are properly secured too.
•Do not allow small children to operate the sun-
roof. Never allow fingers or other body parts, or
any object to project through the sunroof opening.
Injury may result.
Open Sunroof - Express Mode
Momentarily pressing the switch rearward will activate
the Express Open Feature, causing the sunroof to open
automatically. During the Express Open operation, any
movement of the switch will stop the sunroof and it will
remain in a partial open position. Again, momentarily
pressing the switch rearward will activate the Express
Open Feature.
Comfort Stop
The sunroof is equipped with an intermediate “Comfort
Stop” position. This is the first stop that express open
reaches. This is designed to reduce wind buffeting at
vehicle speeds between 20 - 40 mph (32 - 64 km/h).
Pressing the switch momentarily rearward again will
open the sunroof to its full open position however wind
buffeting can occur at full open.
190 UNDERSTANDING THE FEATURES OF YOUR VEHICLE
Page 519 of 536

Belts, Drive............................ 435
Belts, Seat ............................ 31,68
Body Mechanism Lubrication ............... 443
B-Pillar Location ........................ 339
Brake Fluid ............................ 486
Brake System ........................ 330,450
Anti-Lock (ABS) ....................... 331
Disc Brakes .......................... 450
Hoses .............................. 451
Master Cylinder ....................... 450
Parking ............................. 328
Warning Light ........................ 224
Break-In Recommendations, New Vehicle ....... 106
Bulb Replacement ....................... 470
Bulbs, Light ............................ 470
Cab Top Clearance Lights .................. 477
Calibration, Compass ..................... 180
Camper ............................... 209 Capacities, Fluid
........................ 483
Caps, Filler Oil (Engine) .......................... 434
Power Steering ........................ 441
Car Washes ............................ 462
Carbon Monoxide Warning ...........108,211,360
Cargo Light ............................ 165
Cassette Tape and Player Maintenance ......... 272
Catalytic Converter .................... 365,437
CD (Compact Disc) Player ............228,236,250
Cellular Phone .......................... 121
Center High Mounted Stop Light ............ 476
Center Lap Belts ....................... 40,77
Center Seat Storage Compartment .........199,200
Certification Label ....................... 367
Chart, Tire Sizing ........................ 336
Check Engine Light
(Malfunction Indicator Light) ............... 223
Child Restraint ...................... 56,93,94
INDEX 519
10