Page 194 of 302

Towing Tips
Before setting out on a trip, practice turning, stopping
and backing the trailer in an area away from heavy
traffic.
If using a manual transmission vehicle for trailer towing,
all starts must be in FIRST gear to avoid excessive clutch
slippage.
Towing Tips — Automatic Transmission
The “D” range can be selected when towing. However, if
frequent shifting occurs while in this range, the “3” range
should be selected.
NOTE:Using the “3” range while operating the vehicle
under heavy operating conditions will improve perfor-
mance and extend transmission life by reducing exces-
sive shifting and heat build up. This action will also
provide better engine braking.
The automatic transmission fluid and filter should be
changed if you REGULARLY tow a trailer for more than
45 minutes of continuous operation. See Schedule “B” in
section 8 of this manual for transmission fluid change
intervals.
NOTE:Check the automatic transmission fluid level
before towing.
7- Pin Connector
194 STARTING AND OPERATING
Page 200 of 302
Preparations for Jacking
Park the vehicle on a firm level surface, avoid ice or
slippery areas, and set the parking brake. Place the gear
selector in PARK.
•Turn on the Hazard Warning Flasher, park vehicle on
firm, level surface.
•Put gear shift in park (automatic transmission) or
reverse (manual transmission).
•Set parking brake and turn off engine.
•Passengers should not remain in the vehicle while the
vehicle is being jacked.
Changing a Tire
The spare wheel, scissors jack, and lug wrench are
stowed under the spare tire cover in the rear cargo area.
Do not attempt to raise this vehicle using a bumper jack.
200 WHAT TO DO IN EMERGENCIES
Page 211 of 302

MAINTAINING YOUR VEHICLE
CONTENTS
�2.4L Engine..........................213
�2.7L Engine..........................214
�Onboard Diagnostic System — OBD II......215
�Emissions Inspection And Maintenance
Programs
............................216
�Replacement Parts.....................217
�Dealer Service........................217
�Maintenance Procedures.................218
▫Engine Oil..........................218
▫Crankcase Emission Control System........224
▫Maintenance-Free Battery................225
▫Air Conditioner......................226▫Power Steering — Fluid Check............227
▫Suspension Ball Joints..................228
▫Body Mechanism Lubrication.............228
▫Windshield Wiper Blades................229
▫Windshield Washers...................230
▫Exhaust System......................231
▫Cooling System.......................232
▫Hoses And Vacuum/Vapor Harnesses.......236
▫Brakes.............................236
▫Fuel System Hoses....................239
▫Automatic Transmission................239
7
Page 215 of 302

ONBOARD DIAGNOSTIC SYSTEM — OBD II
Your vehicle is equipped with a sophisticated onboard
diagnostic system called OBD II. This system monitors
the performance of the emissions, engine, and automatic
transmission control systems. When these systems are
operating properly, your vehicle will provide excellent
performance and fuel economy, as well as engine emis-
sions well within current government regulations.
If any of these systems require service, the OBD II system
will turn on the “Malfunction Indicator Light.” It will
also store diagnostic codes and other information to
assist your service technician in making repairs. Al-
though your vehicle will usually be drivable and not
need towing, see your dealer for service as soon as
possible.CAUTION!
•Prolonged driving with the “Malfunction Indica-
tor Light” on could cause further damage to the
emission control system. It could also affect fuel
economy and driveability. The vehicle must be
serviced before any emissions tests can be per-
formed.
•If the “Malfunction Indicator Light” is flashing
while the engine is running, severe catalytic con-
verter damage and power loss will soon occur.
Immediate service is required.
MAINTAINING YOUR VEHICLE 215
7
Page 239 of 302

Do not allow petroleum base fluid to contaminate the
brake fluid as seal damage will result!
Fuel System Hoses
Electronic Fuel Injection high pressure fuel systems are
designed with hoses and clamps which have unique
material characteristics to provide adequate sealing and
resist attack by deteriorated gasoline.
You are urged to use only manufacturer specified hoses
and clamps, or their equivalent in material and specifi-
cation, in any fuel system servicing. It is mandatory to
replace all clamps that have been loosened or removed
during service. Care should be taken in installing new
clamps to insure they are properly torqued.
Automatic Transmission
Your front wheel drive vehicle has a transmission and
differential assembly contained within a single housing.
This is referred to as a “Transaxle.”
Selection of Lubricant
It is important that the proper lubricant is used in the
transmission to assure optimum transmission perfor-
mance. Use only manufacturers recommended transmis-
sion fluid, refer to Fluids, Lubricants and Genuine Parts
for correct fluid type. It is important that the transmission
fluid be maintained at the prescribed level using the
recommended fluid.
CAUTION!
Using a transmission fluid other than the manufac-
turers recommended fluid may cause deterioration
in transmission shift quality and/or torque converter
shudder. Using a transmission fluid other than the
manufacturers recommended fluid will result in
more frequent fluid and filter changes. Refer to
Fluids, Lubricants and Genuine Parts for correct
fluid type.
MAINTAINING YOUR VEHICLE 239
7
Page 240 of 302

Procedure For Checking Fluid Level
The fluid level in the automatic transaxle should be
checked whenever the vehicle is serviced. Operation with
an improper fluid level will greatly reduce the life of the
transaxle and of the fluid.
To properly check the automatic transaxle fluid level, the
following procedure must be used:
•The vehicle must be on level ground.
•The engine should be running at curb idle speed for a
minimum of 60 seconds.
•Fully apply parking brake.
•Place the gear selector momentarily in each gear
position ending with the lever in P (PARK).
•Wipe the dipstick clean and reinsert until seated.
Remove dipstick and note reading.
•If the fluid is cold (80°F / 27°C), the reading should be
in the cross hatched area marked “COLD” (between
the lower two holes in the dipstick).
•If the fluid is hot (180°F / 82°C), the reading should be
in the cross hatched area marked ”HOT” (between the
upper two holes in the dipstick).
•If the fluid level shows low, add sufficient transmis-
sion fluid to bring to the proper level.
CAUTION!
Do not overfill. Dirt and water in the transaxle can
cause serious damage. To prevent dirt and water
from entering the transaxle after checking or replen-
ishing fluid, make certain that the dipstick cap is
seated properly.
Fluid and Filter Changes
Automatic transmission fluid and filter should be
changed as follows:
Maintenance schedule “A”— No change necessary.
Maintenance schedule “B”— Every 60,000 miles (96 000
km) change fluid and filter under the following condi-
tions:
240 MAINTAINING YOUR VEHICLE
Page 259 of 302
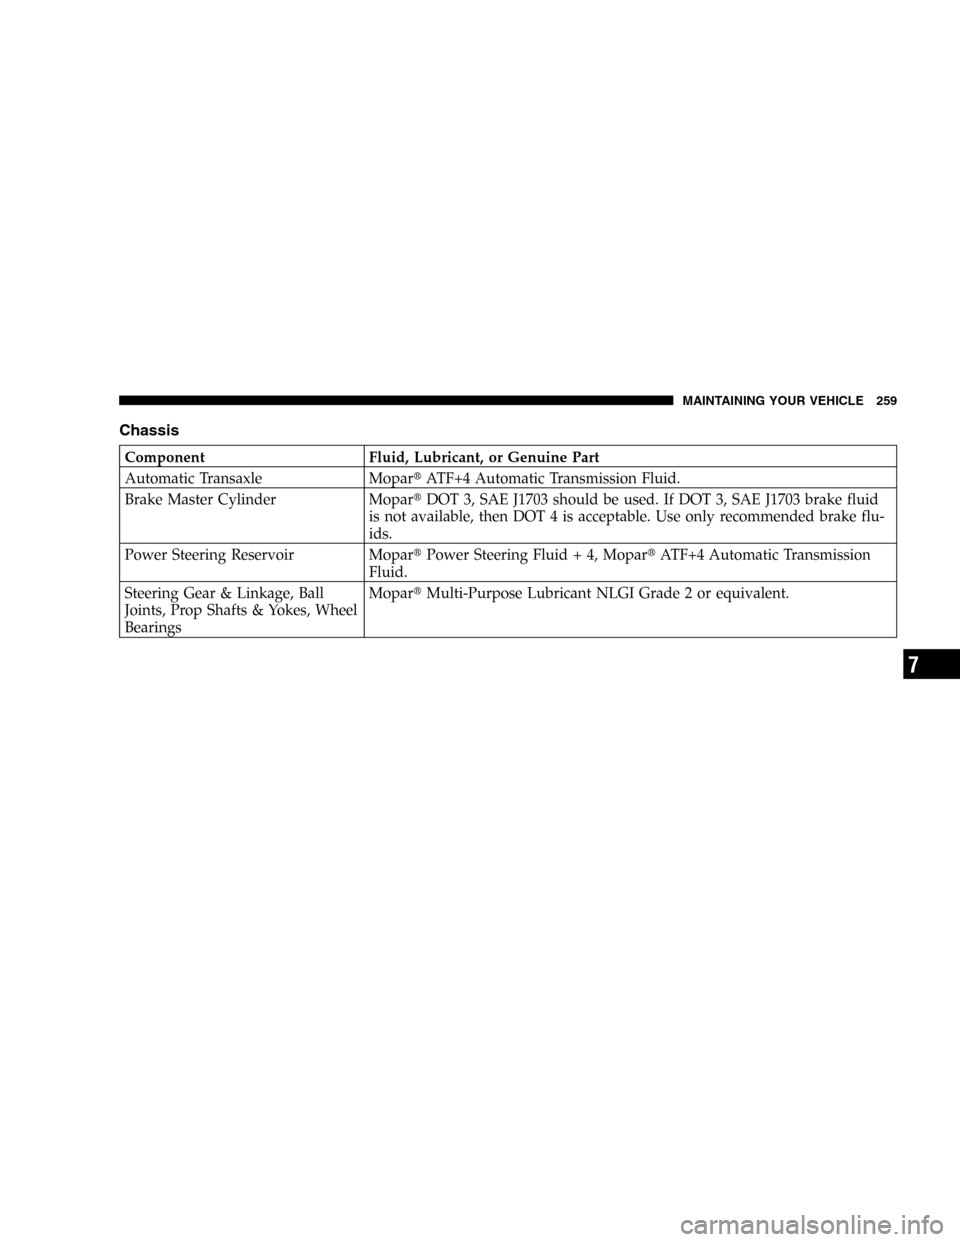
Chassis
Component Fluid, Lubricant, or Genuine Part
Automatic Transaxle Mopar�ATF+4 Automatic Transmission Fluid.
Brake Master Cylinder Mopar�DOT 3, SAE J1703 should be used. If DOT 3, SAE J1703 brake fluid
is not available, then DOT 4 is acceptable. Use only recommended brake flu-
ids.
Power Steering Reservoir Mopar�Power Steering Fluid + 4, Mopar�ATF+4 Automatic Transmission
Fluid.
Steering Gear & Linkage, Ball
Joints, Prop Shafts & Yokes, Wheel
BearingsMopar�Multi-Purpose Lubricant NLGI Grade 2 or equivalent.
MAINTAINING YOUR VEHICLE 259
7
Page 264 of 302
•Check all lights and all other electrical items for correct
operation.
•Check rubber seals on each side of the radiator for
proper fit.
At Each Oil Change
•
Change the engine oil filter.
•Inspect the exhaust system.
•Inspect the brake linings, hoses and calipers.
•Inspect the CV joints and front and rear suspension
components.
•Check the automatic transmission fluid level.
•Check the brake master cylinder fluid level.
•Check the coolant level, hoses, and clamps.
NOTE:In 2.7L Engines equipped with Flex Fuel Engine
(FFV), change engine oil every 5 months or 5,000 miles,
whichever comes first. This applies to both Maintenance
Schedule A and B.
264 MAINTENANCE SCHEDULES
8
M
A
I
N
T
E
N
A
N
C
E
S
C
H
E
D
U
L
E
S