2006 CHEVROLET UPLANDER turn signal bulb
[x] Cancel search: turn signal bulbPage 158 of 458

Turn and Lane-Change Signals
The turn signal has two upward (for right) and
two downward (for left) positions. These positions
allow you to signal a turn or a lane change.
To signal a turn, move the lever all the way up or down.
When the turn is �nished, the lever will return
automatically.
An arrow on the instrument
panel cluster will �ash in
the direction of the
turn or lane change.
To signal a lane change, just raise or lower the lever
until the arrow starts to �ash. Hold it there until you
complete your lane change. The lever will return by itself
when you release it.
As you signal a turn or a lane change, if the arrow
�ashes faster than normal, a signal bulb may be burned
out and other drivers will not see your turn signal.
If a bulb is burned out, replace it to help avoid an
accident. If the arrows do not go on at all when you
signal a turn, check for burned-out bulbs and check the
fuse. SeeBulb Replacement on page 5-45andFuses
and Circuit Breakers on page 5-94.If you have a trailer towing option with added wiring for
the trailer lamps, the signal indicator will �ash at a
normal rate even if a turn signal bulb is burned
out. Check the front and rear turn signal lamps regularly
to make sure they are working.
Turn Signal On Chime
If either turn signal is left on for more than 3/4 mile
(1.2 km), a chime will sound to let the driver know to
turn it off. If you need to leave the signal on for more
than 3/4 mile (1.2 km), turn off the signal and then
turn it back on.
Headlamp High/Low-Beam Changer
To change the headlamps from low beam to high
beam, push the turn signal/multifunction lever away
from you.
When the high beams are
on, this light will appear on
the instrument panel
cluster.
To change the headlamps from high beam to low beam,
pull the turn signal/multifunction lever toward you.
3-8
ProCarManuals.com
Page 208 of 458
KEY FOB BATTERY LOW
This message will display when the battery in the
remote keyless entry transmitter needs to be replaced.
To replace the battery, see “Battery Replacement”
underRemote Keyless Entry System Operation
on page 2-5.
This message will display while the ignition is in RUN.
Press any of the DIC buttons to acknowledge this
message and to clear it from the screen.
This message will continue to display for two seconds if
it has not been acknowledged when the engine is
turned off. It will also re-display for two seconds if the
message has been acknowledged, but the condition still
exists when the engine is turned off.
If the condition still exists, the message will re-appear
when the engine is turned on.
KEY IN IGNITION
This message will display and a chime will sound
continuously when the driver’s door is open and the key
is in the ignition and in the accessory or off position.
This message cannot be acknowledged.
This message will disappear and the chiming will stop
when the key is removed from the ignition.
LEFT FRONT TURN LAMP OUT
This message will display when the left front turn signal
bulb needs to be replaced. SeeHeadlamps and
Sidemarker Lamps on page 5-45.
This message will display while the ignition is in RUN.
Press any of the DIC buttons to acknowledge this
message and to clear it from the screen.
This message will continue to display for two seconds if
it has not been acknowledged when the engine is
turned off. It will also re-display for two seconds if the
message has been acknowledged, but the condition still
exists when the engine is turned off.
If the condition still exists, the message will re-appear
when the engine is turned on.
LEFT REAR TURN LAMP OUT
This message will display when the left rear turn signal
bulb needs to be replaced. SeeTaillamps, Turn
Signal, Stoplamps and Back-up Lamps on page 5-47.
This message will display while the ignition is in
RUN. Press any of the DIC buttons to acknowledge this
message and to clear it from the screen.
3-58
ProCarManuals.com
Page 213 of 458

REMOTE START DISABLED
This warning message will come on if a remote start
attempt is unsuccessful. This may be caused if any of
the following conditions are true when a remote
start attempt is made:
The remote start system is disabled through
the DIC.
The key is in the ignition.
The hood or the doors are not closed.
There is an emission control system malfunction.
The engine coolant temperature is too high.
The oil pressure is low.
The hazard warning �ashers are turned on.
The maximum number of remote starts or remote
start attempts between ignition cycles has been
reached.
The content theft-deterrent alarm is on while
attempting to remote start the vehicle.
See “REMOTE START” underDIC Vehicle
Personalization (Uplevel Only) on page 3-69and
“Remote Vehicle Start” underRemote Keyless Entry
System Operation on page 2-5for more information.
REMOTE START ON
If your vehicle has the remote start feature, this
message will display when a remote start is initiated.
See “Remote Vehicle Start” underRemote Keyless Entry
System Operation on page 2-5for more information.
RIGHT FRONT TURN LAMP OUT
This message will display when the right front turn
signal bulb needs to be replaced. SeeHeadlamps and
Sidemarker Lamps on page 5-45.
This message will display while the ignition is in RUN.
Press any of the DIC buttons to acknowledge this
message and to clear it from the screen.
This message will continue to display for two seconds if
it has not been acknowledged when the engine is
turned off. It will also re-display for two seconds if the
message has been acknowledged, but the condition still
exists when the engine is turned off.
If the condition still exists, the message will re-appear
when the engine is turned on.
3-63
ProCarManuals.com
Page 214 of 458
RIGHT REAR TURN LAMP OUT
This message will display when the right rear turn signal
bulb needs to be replaced. SeeTaillamps, Turn
Signal, Stoplamps and Back-up Lamps on page 5-47.
This message will display while the ignition is in
RUN. Press any of the DIC buttons to acknowledge this
message and to clear it from the screen.
This message will continue to display for two seconds if
it has not been acknowledged when the engine is
turned off. It will also re-display for two seconds if the
message has been acknowledged, but the condition still
exists when the engine is turned off.
If the condition still exists, the message will re-appear
when the engine is turned on.
SERVICE ABS SYSTEM
This message will display when the vehicle’s brakes are
not functioning properly. Have the brake system
serviced by your GM dealer as soon as possible.
The anti-lock brake system warning light will also appear
on the instrument panel cluster when this message
appears on the DIC. SeeAnti-Lock Brake System
Warning Light on page 3-39.
This message will only display while the ignition is in
RUN. Press any of the DIC buttons to acknowledge this
message and to clear it from the screen.This message will continue to display for two seconds if
it has not been acknowledged when the engine is
turned off. It will also re-display for two seconds if the
message has been acknowledged, but the condition still
exists when the engine is turned off.
If the condition still exists, the message will re-appear
when the engine is turned on.
SERVICE AIR BAG
This message will display along with the airbag
readiness light if there is a problem with the airbag
system. Have your GM dealer inspect the system for
problems. SeeAirbag Readiness Light on page 3-34and
Airbag System on page 1-74for more information.
This message will only display while the ignition is in
RUN. Press any of the DIC buttons to acknowledge this
message and to clear it from the screen.
This message will continue to display for two seconds if
it has not been acknowledged when the engine is
turned off. It will also re-display for two seconds if the
message has been acknowledged, but the condition still
exists when the engine is turned off.
If the condition still exists, the message will re-appear
when the engine is turned on.
3-64
ProCarManuals.com
Page 310 of 458
Following Distance
Stay at least twice as far behind the vehicle ahead as
you would when driving your vehicle without a trailer.
This can help you avoid situations that require
heavy braking and sudden turns.
Passing
You will need more passing distance up ahead when
you are towing a trailer. And, because you are a
good deal longer, you will need to go much farther
beyond the passed vehicle before you can return to
your lane.
Backing Up
Hold the bottom of the steering wheel with one hand.
Then, to move the trailer to the left, just move that hand
to the left. To move the trailer to the right, move your
hand to the right. Always back up slowly and, if possible,
have someone guide you.
Making Turns
Notice:Making very sharp turns while trailering
could cause the trailer to come in contact with the
vehicle. Your vehicle could be damaged. Avoid
making very sharp turns while trailering.
When you are turning with a trailer, make wider turns
than normal. Do this so your trailer will not strike soft
shoulders, curbs, road signs, trees, or other objects.
Avoid jerky or sudden maneuvers. Signal well in advance.
Turn Signals When Towing a Trailer
When you tow a trailer, your vehicle has to have
extra wiring.
The arrows on your instrument panel will �ash whenever
you signal a turn or lane change. Properly hooked up,
the trailer lamps will also �ash, telling other drivers
you are about to turn, change lanes, or stop.
When towing a trailer, the arrows on your instrument
panel will �ash for turns even if the bulbs on the trailer
are burned out. Thus, you may think drivers behind
you are seeing your signal when they are not. It
is important to check occasionally to be sure the trailer
bulbs are still working.
4-44
ProCarManuals.com
Page 313 of 458

Service............................................................5-3
Accessories and Modi�cations..........................5-3
California Proposition 65 Warning.....................5-3
Doing Your Own Service Work.........................5-4
Adding Equipment to the Outside of
Your Vehicle..............................................5-5
Fuel................................................................5-5
Gasoline Octane............................................5-5
Gasoline Speci�cations....................................5-5
California Fuel...............................................5-6
Additives.......................................................5-6
Fuels in Foreign Countries...............................5-7
Filling the Tank..............................................5-8
Filling a Portable Fuel Container.....................5-10
Checking Things Under the Hood....................5-10
Hood Release..............................................5-11
Engine Compartment Overview.......................5-12
Engine Oil...................................................5-15
Engine Oil Life System..................................5-18
Engine Air Cleaner/Filter................................5-20
Automatic Transaxle Fluid..............................5-21
Engine Coolant.............................................5-23
Radiator Pressure Cap..................................5-26
Engine Overheating.......................................5-26
Overheated Engine Protection Operating Mode . . .5-27
Cooling System............................................5-28Power Steering Fluid.....................................5-34
Windshield Washer Fluid................................5-34
Brakes........................................................5-35
Battery........................................................5-38
Jump Starting...............................................5-38
All-Wheel Drive..............................................5-43
Bulb Replacement..........................................5-45
Halogen Bulbs..............................................5-45
Headlamps and Sidemarker Lamps.................5-45
Front Turn Signal, Parking and Daytime
Running Lamps (DRL)................................5-47
Taillamps, Turn Signal, Stoplamps and
Back-up Lamps.........................................5-47
Replacement Bulbs.......................................5-48
Windshield Wiper Blade Replacement..............5-49
Tires..............................................................5-50
Tire Sidewall Labeling...................................5-51
Tire Terminology and De�nitions.....................5-53
In�ation - Tire Pressure.................................5-56
Tire Inspection and Rotation...........................5-57
When It Is Time for New Tires.......................5-58
Buying New Tires.........................................5-59
Different Size Tires and Wheels......................5-60
Uniform Tire Quality Grading..........................5-61
Section 5 Service and Appearance Care
5-1
ProCarManuals.com
Page 359 of 458
Front Turn Signal, Parking and
Daytime Running Lamps (DRL)
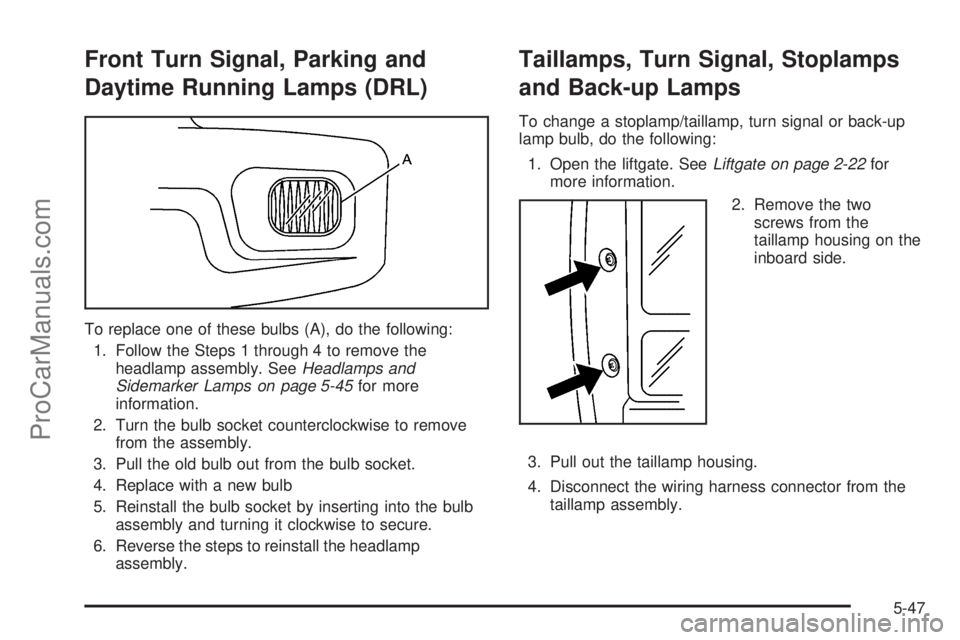
To replace one of these bulbs (A), do the following:
1. Follow the Steps 1 through 4 to remove the
headlamp assembly. SeeHeadlamps and
Sidemarker Lamps on page 5-45for more
information.
2. Turn the bulb socket counterclockwise to remove
from the assembly.
3. Pull the old bulb out from the bulb socket.
4. Replace with a new bulb
5. Reinstall the bulb socket by inserting into the bulb
assembly and turning it clockwise to secure.
6. Reverse the steps to reinstall the headlamp
assembly.
Taillamps, Turn Signal, Stoplamps
and Back-up Lamps
To change a stoplamp/taillamp, turn signal or back-up
lamp bulb, do the following:
1. Open the liftgate. SeeLiftgate on page 2-22for
more information.
2. Remove the two
screws from the
taillamp housing on the
inboard side.
3. Pull out the taillamp housing.
4. Disconnect the wiring harness connector from the
taillamp assembly.
5-47
ProCarManuals.com
Page 360 of 458
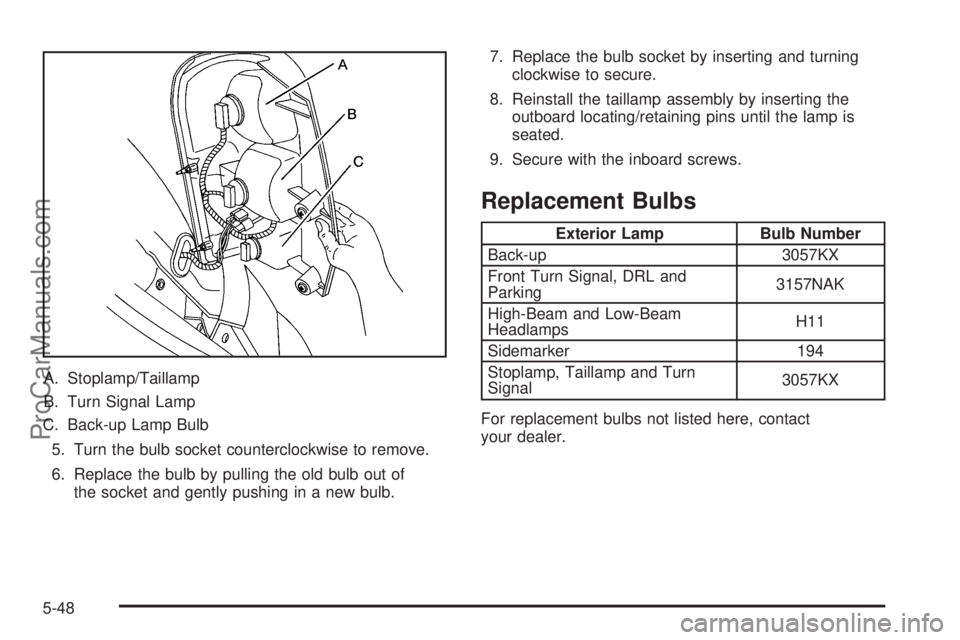
A. Stoplamp/Taillamp
B. Turn Signal Lamp
C. Back-up Lamp Bulb
5. Turn the bulb socket counterclockwise to remove.
6. Replace the bulb by pulling the old bulb out of
the socket and gently pushing in a new bulb.7. Replace the bulb socket by inserting and turning
clockwise to secure.
8. Reinstall the taillamp assembly by inserting the
outboard locating/retaining pins until the lamp is
seated.
9. Secure with the inboard screws.
Replacement Bulbs
Exterior Lamp Bulb Number
Back-up 3057KX
Front Turn Signal, DRL and
Parking3157NAK
High-Beam and Low-Beam
HeadlampsH11
Sidemarker 194
Stoplamp, Taillamp and Turn
Signal3057KX
For replacement bulbs not listed here, contact
your dealer.
5-48
ProCarManuals.com