2006 CHEVROLET UPLANDER maintenance
[x] Cancel search: maintenancePage 350 of 458
Replacing Brake System Parts
The braking system on a vehicle is complex. Its many
parts have to be of top quality and work well together
if the vehicle is to have really good braking. Your vehicle
was designed and tested with top-quality GM brake
parts. When you replace parts of your braking
system — for example, when your brake linings wear
down and you need new ones put in — be sure you get
new approved GM replacement parts. If you do not,
your brakes may no longer work properly. For example,
if someone puts in brake linings that are wrong for
your vehicle, the balance between your front and rear
brakes can change — for the worse. The braking
performance you have come to expect can change in
many other ways if someone puts in the wrong
replacement brake parts.
Battery
Your vehicle has a maintenance free battery. When it is
time for a new battery, get one that has the replacement
number shown on the original battery’s label. We
recommend an ACDelco
®replacement battery.
Warning:Battery posts, terminals, and related
accessories contain lead and lead compounds,
chemicals known to the State of California to cause
cancer and reproductive harm. Wash hands after
handling.
Vehicle Storage
If you are not going to drive your vehicle for 25 days
or more, remove the black, negative (−) cable from
the battery. This will help keep your battery from
running down.
{CAUTION:
Batteries have acid that can burn you and gas
that can explode. You can be badly hurt if you
are not careful. SeeJump Starting on
page 5-38for tips on working around a battery
without getting hurt.
Jump Starting
If your vehicle’s battery has run down, you may want to
use another vehicle and some jumper cables to start your
vehicle. Be sure to use the following steps to do it safely.
On vehicles equipped with the optional power sliding
door, a low-voltage battery or replacing a battery
may cause the system to become inoperative. See
Power Sliding Door (PSD) on page 2-16for more
information.
5-38
ProCarManuals.com
Page 355 of 458
To disconnect the jumper cables from both vehicles, do
the following:
1. Disconnect the black negative (−) cable from the
vehicle that had the dead battery.
2. Disconnect the black negative (−) cable from the
vehicle with the good battery.
3. Disconnect the red positive (+) cable from the
vehicle with the good battery.
4. Disconnect the red positive (+) cable from the
other vehicle.
5. Return the remote positive (+) terminal cover or
underhood fuse block cover to its original position.
All-Wheel Drive
If you have an all-wheel-drive vehicle, be sure to
perform the lubricant checks described in this section.
All-wheel-drive vehicles have two additional systems that
need lubrication.
Transfer Case (Power Transfer Unit)
When to Check Lubricant
Refer to the Maintenance Schedule to determine how
often to check the lubricant. SeeScheduled
Maintenance on page 6-4.
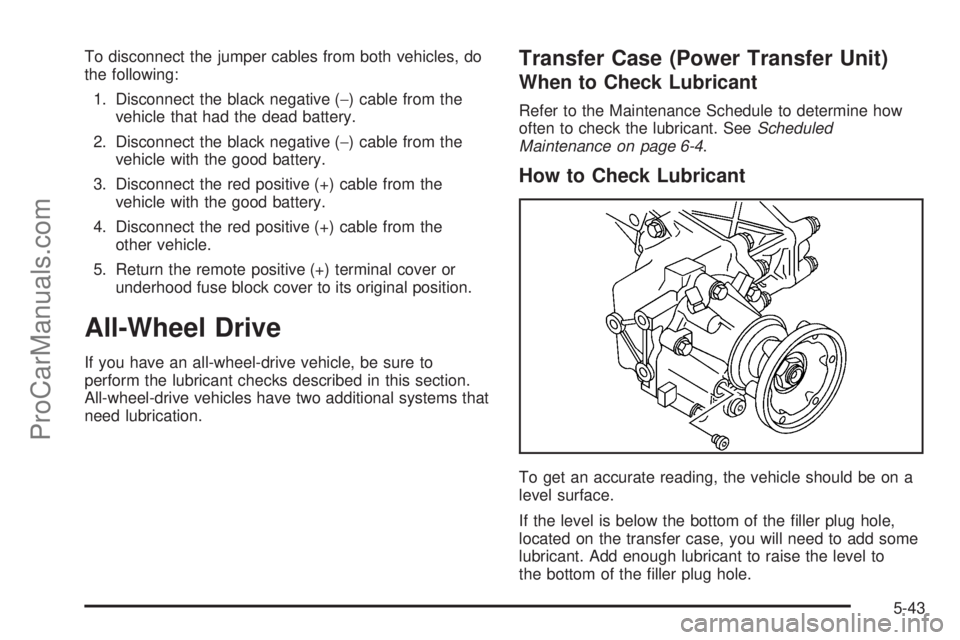
How to Check Lubricant
To get an accurate reading, the vehicle should be on a
level surface.
If the level is below the bottom of the �ller plug hole,
located on the transfer case, you will need to add some
lubricant. Add enough lubricant to raise the level to
the bottom of the �ller plug hole.
5-43
ProCarManuals.com
Page 356 of 458
What to Use
Refer to the Maintenance Schedule to determine what
kind of lubricant to use. SeeRecommended Fluids
and Lubricants on page 6-12.
Carrier Assembly-Differential (Rear
Drive Module)
When to Check and Change Lubricant
Refer to the Maintenance Schedule to determine how
often to check the lubricant and when to change it. See
Scheduled Maintenance on page 6-4.
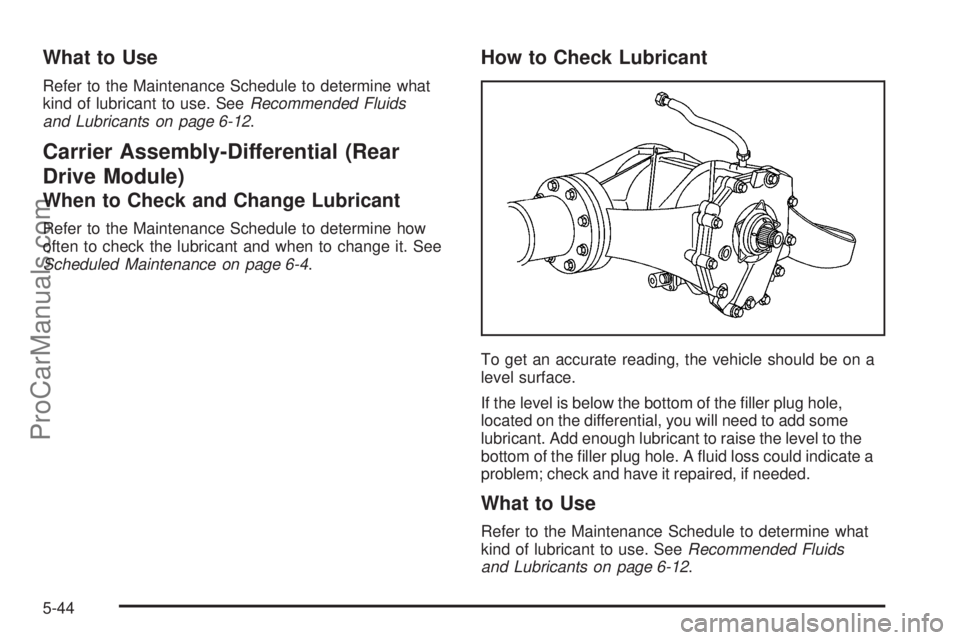
How to Check Lubricant
To get an accurate reading, the vehicle should be on a
level surface.
If the level is below the bottom of the �ller plug hole,
located on the differential, you will need to add some
lubricant. Add enough lubricant to raise the level to the
bottom of the �ller plug hole. A �uid loss could indicate a
problem; check and have it repaired, if needed.
What to Use
Refer to the Maintenance Schedule to determine what
kind of lubricant to use. SeeRecommended Fluids
and Lubricants on page 6-12.
5-44
ProCarManuals.com
Page 361 of 458
Windshield Wiper Blade
Replacement
Windshield wiper blades should be inspected for wear
and cracking. SeeScheduled Maintenance on page 6-4
for more information.
Replacement blades come in different types and are
removed in different ways. For proper type and length,
seeNormal Maintenance Replacement Parts on
page 6-14.
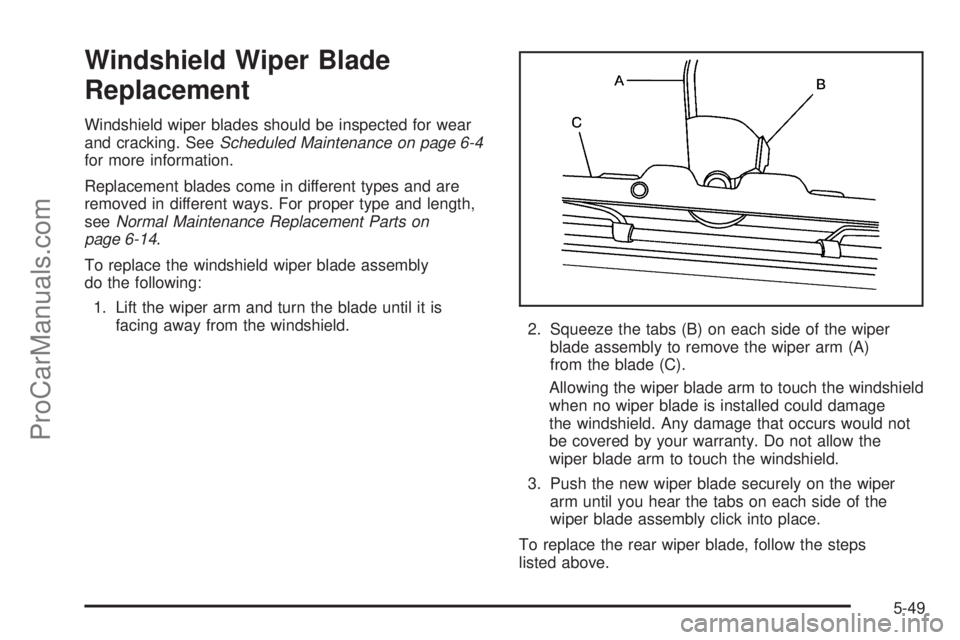
To replace the windshield wiper blade assembly
do the following:
1. Lift the wiper arm and turn the blade until it is
facing away from the windshield.
2. Squeeze the tabs (B) on each side of the wiper
blade assembly to remove the wiper arm (A)
from the blade (C).
Allowing the wiper blade arm to touch the windshield
when no wiper blade is installed could damage
the windshield. Any damage that occurs would not
be covered by your warranty. Do not allow the
wiper blade arm to touch the windshield.
3. Push the new wiper blade securely on the wiper
arm until you hear the tabs on each side of the
wiper blade assembly click into place.
To replace the rear wiper blade, follow the steps
listed above.
5-49
ProCarManuals.com
Page 369 of 458

How to Check
Use a good quality pocket-type gage to check tire
pressure. You cannot tell if your tires are properly in�ated
simply by looking at them. Radial tires may look properly
in�ated even when they are under-in�ated. Check the
tire’s in�ation pressure when the tires are cold. Cold
means your vehicle has been sitting for at least three
hours or driven no more than 1 mile (1.6 km).
Remove the valve cap from the tire valve stem. Press
the tire gage �rmly onto the valve to get a pressure
measurement. If the cold tire in�ation pressure matches
the recommended pressure on the Tire and Loading
Information label, no further adjustment is necessary. If
the in�ation pressure is low, add air until you reach
the recommended amount.
If you over�ll the tire, release air by pushing on the
metal stem in the center of the tire valve. Re-check the
tire pressure with the tire gage.
Be sure to put the valve caps back on the valve stems.
They help prevent leaks by keeping out dirt and
moisture.
Tire Inspection and Rotation
Tires should be rotated every 5,000 to 8,000 miles
(8 000 to 13 000 km).
Any time you notice unusual wear, rotate your tires as
soon as possible and check wheel alignment. Also
check for damaged tires or wheels. SeeWhen It Is Time
for New Tires on page 5-58andWheel Replacement
on page 5-62for more information.
The purpose of regular rotation is to achieve more
uniform wear for all tires on the vehicle. The �rst rotation
is the most important. SeeScheduled Maintenance
on page 6-4.
When rotating your tires, always use the correct rotation
pattern shown here.
5-57
ProCarManuals.com
Page 378 of 458
If a Tire Goes Flat
It is unusual for a tire to blowout while you are driving,
especially if you maintain your vehicle’s tires properly.
If air goes out of a tire, it is much more likely to leak out
slowly. But if you should ever have a blowout, here
are a few tips about what to expect and what to do:
If a front tire fails, the �at tire will create a drag that pulls
the vehicle toward that side. Take your foot off the
accelerator pedal and grip the steering wheel �rmly.
Steer to maintain lane position, and then gently brake to
a stop well out of the traffic lane.
A rear blowout, particularly on a curve, acts much like a
skid and may require the same correction you would
use in a skid. In any rear blowout remove your foot from
the accelerator pedal. Get the vehicle under control
by steering the way you want the vehicle to go. It may
be very bumpy and noisy, but you can still steer. Gently
brake to a stop, well off the road if possible.{CAUTION:
Lifting a vehicle and getting under it to do
maintenance or repairs is dangerous without
the appropriate safety equipment and training.
The jack provided with your vehicle is
designed only for changing a �at tire. If it is
used for anything else, you or others could be
badly injured or killed if the vehicle slips off
the jack. Use the jack provided with your
vehicle only for changing a �at tire.
If a tire goes �at, the next part shows how to use the
jacking equipment to change a �at tire safely.
Changing a Flat Tire
If a tire goes �at, avoid further tire and wheel damage
by driving slowly to a level place. Turn on your vehicle’s
hazard warning �ashers. SeeHazard Warning Flashers
on page 3-6for more information.
5-66
ProCarManuals.com
Page 402 of 458
Sheet Metal Damage
If the vehicle is damaged and requires sheet metal
repair or replacement, make sure the body repair shop
applies anti-corrosion material to parts repaired or
replaced to restore corrosion protection.
Original manufacturer replacement parts will provide the
corrosion protection while maintaining the warranty.
Finish Damage
Any stone chips, fractures or deep scratches in the
�nish should be repaired right away. Bare metal
will corrode quickly and may develop into major repair
expense.
Minor chips and scratches can be repaired with touch-up
materials available from your GM dealer. Larger areas
of �nish damage can be corrected in your GM
dealer’s body and paint shop.
Underbody Maintenance
Chemicals used for ice and snow removal and dust
control can collect on the underbody. If these are not
removed, corrosion and rust can develop on the
underbody parts such as fuel lines, frame, �oor pan,
and exhaust system even though they have corrosion
protection.
At least every spring, �ush these materials from the
underbody with plain water. Clean any areas where mud
and debris can collect. Dirt packed in close areas of
the frame should be loosened before being �ushed.
Your dealer or an underbody car washing system can
do this for you.
Chemical Paint Spotting
Some weather and atmospheric conditions can create a
chemical fallout. Airborne pollutants can fall upon and
attack painted surfaces on the vehicle. This damage can
take two forms: blotchy, ring-shaped discolorations,
and small, irregular dark spots etched into the
paint surface.
Although no defect in the paint job causes this, GM will
repair, at no charge to the owner, the surfaces of
new vehicles damaged by this fallout condition within
12 months or 12,000 miles (20 000 km) of purchase,
whichever occurs �rst.
5-90
ProCarManuals.com
Page 413 of 458
Maintenance Schedule......................................6-2
Introduction...................................................6-2
Maintenance Requirements..............................6-2
Your Vehicle and the Environment....................6-2
Using the Maintenance Schedule......................6-3
Scheduled Maintenance...................................6-4
Additional Required Services............................6-6
Maintenance Footnotes...................................6-7Owner Checks and Services............................6-8
At Each Fuel Fill............................................6-8
At Least Once a Month...................................6-9
At Least Once a Year.....................................6-9
Recommended Fluids and Lubricants...............6-12
Normal Maintenance Replacement Parts..........6-14
Maintenance Record.....................................6-15
Section 6 Maintenance Schedule
6-1
ProCarManuals.com