2006 CHEVROLET TRAIL BLAZER flat tire
[x] Cancel search: flat tirePage 362 of 534
Wheel Replacement......................................5-76
Tire Chains..................................................5-78
Accessory In�ator.........................................5-78
If a Tire Goes Flat........................................5-79
Changing a Flat Tire.....................................5-80
Removing the Spare Tire and Tools................5-82
Removing the Flat Tire and Installing the
Spare Tire................................................5-85
Secondary Latch System...............................5-91
Storing a Flat or Spare Tire and Tools............5-94
Spare Tire...................................................5-97
Appearance Care............................................5-98
Cleaning the Inside of Your Vehicle.................5-98
Fabric/Carpet...............................................5-99
Leather......................................................5-100
Instrument Panel, Vinyl, and Other Plastic
Surfaces.................................................5-100
Care of Safety Belts....................................5-101
Weatherstrips.............................................5-101
Washing Your Vehicle..................................5-101
Cleaning Exterior Lamps/Lenses....................5-102
Finish Care................................................5-102Windshield, Backglass, and Wiper Blades.......5-103
Aluminum Wheels.......................................5-103
Tires.........................................................5-104
Sheet Metal Damage...................................5-104
Finish Damage...........................................5-105
Underbody Maintenance...............................5-105
Chemical Paint Spotting...............................5-105
Vehicle Care/Appearance Materials................5-106
Vehicle Identi�cation.....................................5-107
Vehicle Identi�cation Number (VIN)................5-107
Service Parts Identi�cation Label...................5-107
Electrical System..........................................5-108
Add-On Electrical Equipment.........................5-108
Headlamps.................................................5-108
Windshield Wiper Fuses...............................5-108
Power Windows and Other Power Options......5-108
Fuses and Circuit Breakers..........................5-109
Engine Compartment Fuse Block...................5-109
Rear Underseat Fuse Block..........................5-115
Capacities and Speci�cations........................5-122
Section 5 Service and Appearance Care
5-2
Page 430 of 534

Federal Communications Commission
(FCC) and Industry and Science
Canada
The Tire Pressure Monitor System (TPMS) operates
on a radio frequency and complies with Part 15 of
the FCC Rules. Operation is subject to the following
two conditions:
1. This device may not cause harmful interference.
2. This device must accept any interference received,
including interference that may cause undesired
operation.
The Tire Pressure Monitor System (TPMS) operates on
a radio frequency and complies with RSS-210 of
Industry and Science Canada. Operation is subject to
the following two conditions:
1. This device may not cause interference.
2. This device must accept any interference received,
including interference that may cause undesired
operation of the device.
Changes or modi�cations to this system by other than
an authorized service facility could void authorization to
use this equipment.
Tire Inspection and Rotation
Tires should be rotated every 5,000 to 8,000 miles
(8 000 to 13 000 km).
Any time you notice unusual wear, rotate your tires as
soon as possible and check wheel alignment. Also
check for damaged tires or wheels. SeeWhen It Is Time
for New Tires on page 5-72andWheel Replacement
on page 5-76for more information.
Make sure the spare tire is stored securely. Push, pull,
and then try to rotate or turn the tire. If it moves, use the
wheel wrench to tighten the cable. For information on
storing or removing the spare tire, seeChanging a Flat
Tire on page 5-80.
The purpose of regular rotation is to achieve more
uniform wear for all tires on the vehicle. The �rst rotation
is the most important. SeeScheduled Maintenance
on page 6-4.
5-70
Page 431 of 534

When rotating your tires, always use the correct rotation
pattern shown here.
After the tires have been rotated, adjust the front and
rear in�ation pressures as shown on the Tire and
Loading Information label. SeeLoading Your Vehicle on
page 4-48, for an example of the label and its location
on your vehicle.
The Tire Pressure Monitor System (TPMS) sensors will
need to be reset after a tire rotation. See “TPMS
Sensor Identi�cation Codes” underTire Pressure
Monitor System on page 5-67.
Make certain that all wheel nuts are properly tightened.
See “Wheel Nut Torque” underCapacities and
Speci�cations on page 5-122.
{CAUTION:
Rust or dirt on a wheel, or on the parts to
which it is fastened, can make wheel nuts
become loose after a time. The wheel could
come off and cause an accident. When you
change a wheel, remove any rust or dirt from
places where the wheel attaches to the vehicle.
In an emergency, you can use a cloth or a
paper towel to do this; but be sure to use a
scraper or wire brush later, if needed, to get all
the rust or dirt off. SeeChanging a Flat Tire on
page 5-80.
5-71
Page 437 of 534
{CAUTION:
Using the wrong replacement wheels, wheel
bolts, or wheel nuts on your vehicle can be
dangerous. It could affect the braking and
handling of your vehicle, make your tires lose
air and make you lose control. You could have
a collision in which you or others could be
injured. Always use the correct wheel, wheel
bolts, and wheel nuts for replacement.
Notice:The wrong wheel can also cause problems
with bearing life, brake cooling, speedometer or
odometer calibration, headlamp aim, bumper height,
vehicle ground clearance, and tire or tire chain
clearance to the body and chassis.
SeeChanging a Flat Tire on page 5-80for more
information.
Used Replacement Wheels
{CAUTION:
Putting a used wheel on your vehicle is
dangerous. You cannot know how it has been
used or how far it has been driven. It could fail
suddenly and cause a crash. If you have to
replace a wheel, use a new GM original
equipment wheel.
5-77
Page 439 of 534
To use the accessory in�ator, do the following:
1. Attach the appropriate nozzle adapter to the end of
the hose, if required.
{CAUTION:
In�ating something too much can make it
explode, and you or others could be injured. Be
sure to read the in�ator instructions, and in�ate
any object only to its recommended pressure.
2. Attach that end of the hose to the object you wish
to in�ate.
3. Attach the other end of the hose to the outlet.
4. Press and release the switch to turn the air in�ator
on. The indicator light will remain on when the
in�ator is running.
The system has an internal clock to prevent the
system from overheating. The system will allow
about �ve minutes of running time, then the
compressor will stop. The indicator light will then
begin to �ash. When the indicator is off, the in�ator
can be started again by pressing the switch. If the
compressor is still hot, it may only run for a short time
before shutting off again.
5. Press and release the switch to turn the in�ator off.Place the in�ator kit tools in the pouch and store it in its
proper location. Remove the in�ator hose from the
outlet during loading and unloading. Load leveling will
not function with the in�ator hose attached to the in�ator
outlet. SeeElectronically Controlled Air Suspension
System on page 4-58for more information.
To reinstall the cover, line up the tabs at the back of the
cover, put it in place and latch the tabs.
A continuous �ashing indicator light may also indicate a
malfunction in the air suspension system. See
Electronically Controlled Air Suspension System on
page 4-58for more information.
If a Tire Goes Flat
It is unusual for a tire to blowout while you are driving,
especially if you maintain your vehicle’s tires properly.
If air goes out of a tire, it is much more likely to leak out
slowly. But if you should ever have a blowout, here
are a few tips about what to expect and what to do:
If a front tire fails, the �at tire will create a drag that pulls
the vehicle toward that side. Take your foot off the
accelerator pedal and grip the steering wheel �rmly.
Steer to maintain lane position, and then gently brake to
a stop well out of the traffic lane.
5-79
Page 440 of 534
A rear blowout, particularly on a curve, acts much like a
skid and may require the same correction you would
use in a skid. In any rear blowout remove your foot from
the accelerator pedal. Get the vehicle under control
by steering the way you want the vehicle to go. It may
be very bumpy and noisy, but you can still steer. Gently
brake to a stop, well off the road if possible.
{CAUTION:
Lifting a vehicle and getting under it to do
maintenance or repairs is dangerous without
the appropriate safety equipment and training.
The jack provided with your vehicle is
designed only for changing a �at tire. If it is
used for anything else, you or others could be
badly injured or killed if the vehicle slips off
the jack. Use the jack provided with your
vehicle only for changing a �at tire.
If a tire goes �at, the next part shows how to use the
jacking equipment to change a �at tire safely.
Changing a Flat Tire
If a tire goes �at, avoid further tire and wheel damage
by driving slowly to a level place. Turn on your
hazard warning �ashers. SeeHazard Warning Flashers
on page 3-6for more information.
{CAUTION:
Changing a tire can be dangerous. The vehicle
can slip off the jack and roll over or fall on you
or other people. You and they could be badly
injured or even killed. Find a level place to
change your tire. To help prevent the vehicle
from moving:
1. Set the parking brake �rmly.
2. Put the shift lever in PARK (P).
3. If you have a four-wheel-drive vehicle,
be sure the transfer case is in a drive
gear — not in NEUTRAL.
CAUTION: (Continued)
5-80
Page 443 of 534
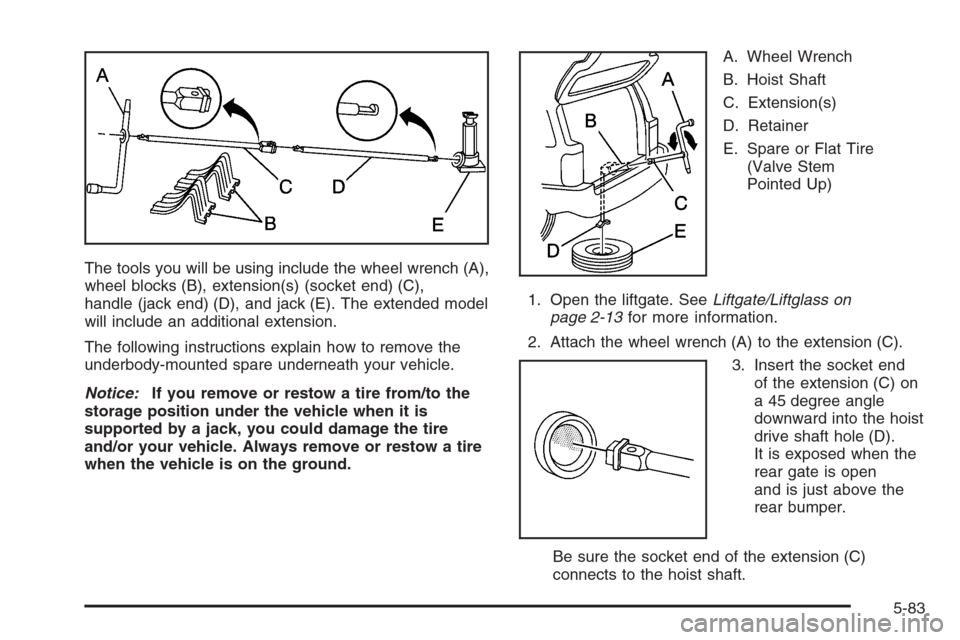
The tools you will be using include the wheel wrench (A),
wheel blocks (B), extension(s) (socket end) (C),
handle (jack end) (D), and jack (E). The extended model
will include an additional extension.
The following instructions explain how to remove the
underbody-mounted spare underneath your vehicle.
Notice:If you remove or restow a tire from/to the
storage position under the vehicle when it is
supported by a jack, you could damage the tire
and/or your vehicle. Always remove or restow a tire
when the vehicle is on the ground.A. Wheel Wrench
B. Hoist Shaft
C. Extension(s)
D. Retainer
E. Spare or Flat Tire
(Valve Stem
Pointed Up)
1. Open the liftgate. SeeLiftgate/Liftglass on
page 2-13for more information.
2. Attach the wheel wrench (A) to the extension (C).
3. Insert the socket end
of the extension (C) on
a 45 degree angle
downward into the hoist
drive shaft hole (D).
It is exposed when the
rear gate is open
and is just above the
rear bumper.
Be sure the socket end of the extension (C)
connects to the hoist shaft.
5-83
Page 445 of 534
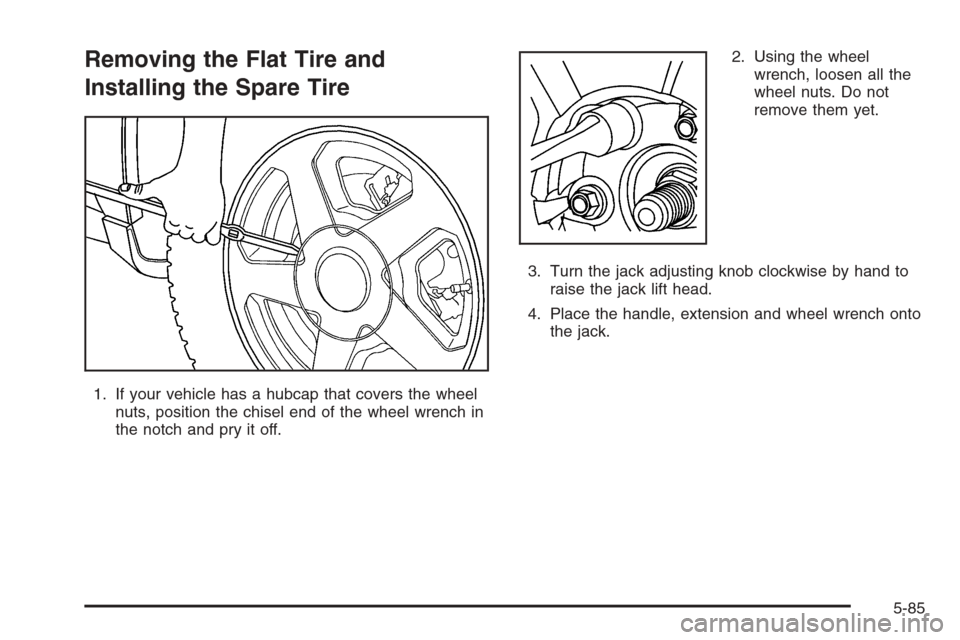
Removing the Flat Tire and
Installing the Spare Tire
1. If your vehicle has a hubcap that covers the wheel
nuts, position the chisel end of the wheel wrench in
the notch and pry it off.2. Using the wheel
wrench, loosen all the
wheel nuts. Do not
remove them yet.
3. Turn the jack adjusting knob clockwise by hand to
raise the jack lift head.
4. Place the handle, extension and wheel wrench onto
the jack.
5-85