2006 CHEVROLET TAHOE tow
[x] Cancel search: towPage 141 of 540

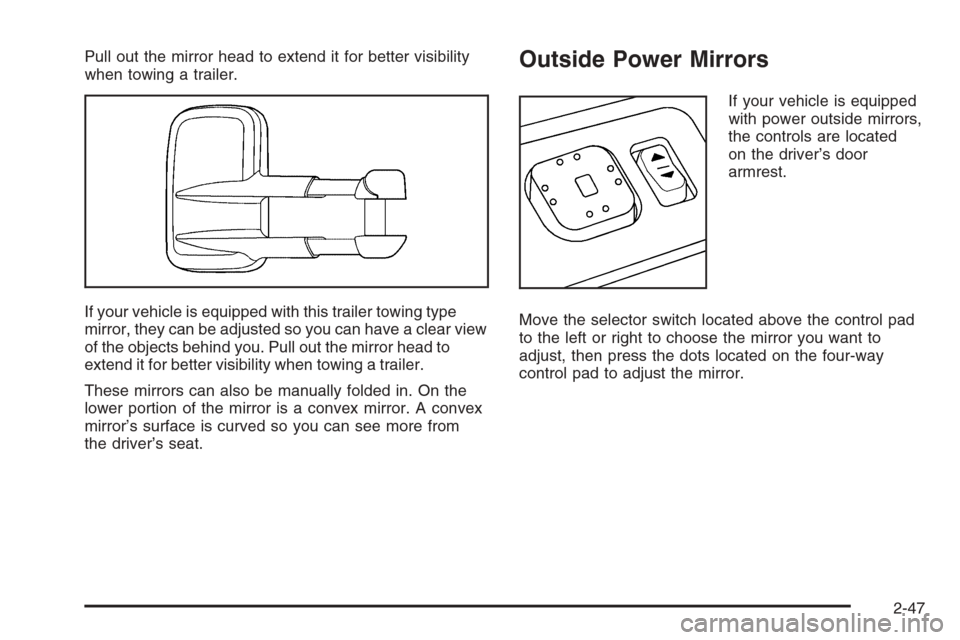
Pull out the mirror head to extend it for better visibility
when towing a trailer.
If your vehicle is equipped with this trailer towing type
mirror, they can be adjusted so you can have a clear view
of the objects behind you. Pull out the mirror head to
extend it for better visibility when towing a trailer.
These mirrors can also be manually folded in. On the
lower portion of the mirror is a convex mirror. A convex
mirror’s surface is curved so you can see more from
the driver’s seat.Outside Power Mirrors
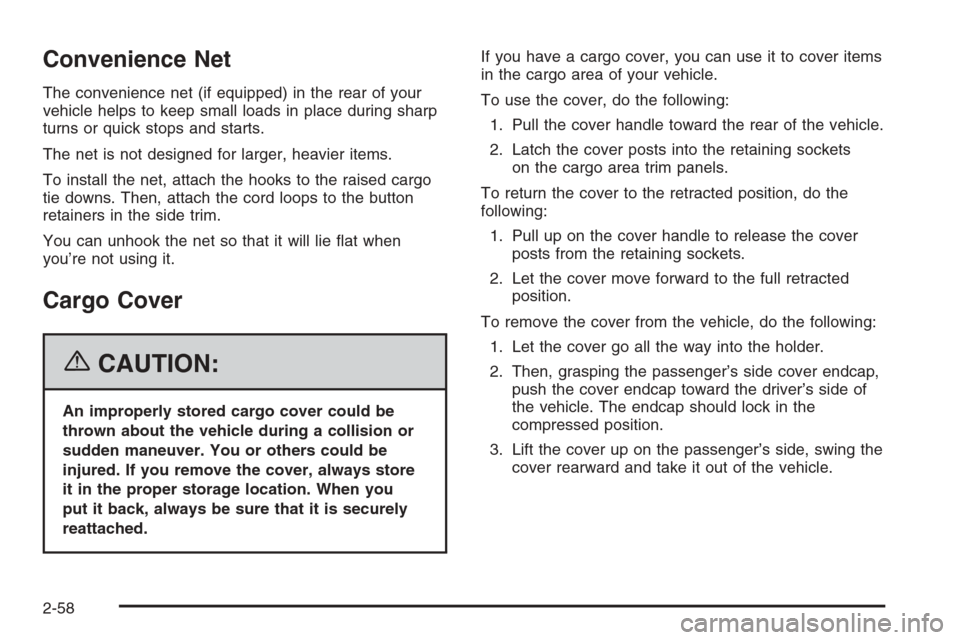
If your vehicle is equipped
with power outside mirrors,
the controls are located
on the driver’s door
armrest.
Move the selector switch located above the control pad
to the left or right to choose the mirror you want to
adjust, then press the dots located on the four-way
control pad to adjust the mirror.
2-47
Page 152 of 540

Convenience Net
The convenience net (if equipped) in the rear of your
vehicle helps to keep small loads in place during sharp
turns or quick stops and starts.
The net is not designed for larger, heavier items.
To install the net, attach the hooks to the raised cargo
tie downs. Then, attach the cord loops to the button
retainers in the side trim.
You can unhook the net so that it will lie �at when
you’re not using it.
Cargo Cover
{CAUTION:
An improperly stored cargo cover could be
thrown about the vehicle during a collision or
sudden maneuver. You or others could be
injured. If you remove the cover, always store
it in the proper storage location. When you
put it back, always be sure that it is securely
reattached.If you have a cargo cover, you can use it to cover items
in the cargo area of your vehicle.
To use the cover, do the following:
1. Pull the cover handle toward the rear of the vehicle.
2. Latch the cover posts into the retaining sockets
on the cargo area trim panels.
To return the cover to the retracted position, do the
following:
1. Pull up on the cover handle to release the cover
posts from the retaining sockets.
2. Let the cover move forward to the full retracted
position.
To remove the cover from the vehicle, do the following:
1. Let the cover go all the way into the holder.
2. Then, grasping the passenger’s side cover endcap,
push the cover endcap toward the driver’s side of
the vehicle. The endcap should lock in the
compressed position.
3. Lift the cover up on the passenger’s side, swing the
cover rearward and take it out of the vehicle.
2-58
Page 158 of 540

Transmission Temperature Gage.....................3-43
Tire Pressure Light.......................................3-44
Malfunction Indicator Lamp.............................3-45
Oil Pressure Gage........................................3-48
Security Light...............................................3-49
Cruise Control Light......................................3-49
Highbeam On Light.......................................3-49
Four-Wheel-Drive Light..................................3-49
Tow/Haul Mode Light....................................3-50
Fuel Gage...................................................3-50
Low Fuel Warning Light.................................3-50
Driver Information Center (DIC).......................3-51
DIC Operation and Displays...........................3-52
DIC Warnings and Messages.........................3-55
DIC Vehicle Customization.............................3-66
Audio System(s).............................................3-72
Setting the Time for Radios without
Radio Data Systems (RDS)........................3-73
Setting the Time for Radios with Radio
Data Systems (RDS)..................................3-74AM-FM Radio...............................................3-74
Radio with CD..............................................3-77
Radio with Cassette and CD..........................3-88
Radio with Six-Disc CD................................3-102
Navigation/Radio System..............................3-117
Rear Seat Entertainment System...................3-117
Rear Seat Audio (RSA)................................3-128
Theft-Deterrent Feature................................3-129
Audio Steering Wheel Controls......................3-130
Radio Reception.........................................3-131
Care of the Cassette Tape Player.................3-131
Care of Your CDs and DVDs........................3-132
Care of the CD and DVD Player...................3-133
Fixed Mast Antenna....................................3-133
XM™ Satellite Radio Antenna System............3-133
Chime Level Adjustment...............................3-133
Section 3 Instrument Panel
3-2
Page 161 of 540

A. Dome Lamp Override Button. SeeDome Lamp
Override on page 3-19.
B. Headlamp Controls. SeeHeadlamps on page 3-14.
C. Air Outlets. SeeOutlet Adjustment on page 3-30.
D. Automatic Transfer Case Buttons, Rear Window
Wiper/Washer Control, and Fog Lamps Button.
SeeFour-Wheel Drive on page 2-26,
Rear Window Wiper/Washer on page 3-10,
Fog Lamps on page 3-17.
E. Turn Signal/Multifunction Lever. SeeTurn
Signal/Multifunction Lever on page 3-7.
F. Instrument Panel Cluster. SeeInstrument Panel
Cluster on page 3-35.
G. Gearshift Lever. SeeAutomatic Transmission
Operation on page 2-23.
H. Tow/Haul Selector Button (If Equipped). See
Tow/Haul Mode on page 2-26.
I. Audio System. SeeAudio System(s) on page 3-72.
J. Climate Control System. SeeClimate Control
System on page 3-21,Dual Climate Control System
on page 3-22,orDual Automatic Climate Control
System on page 3-25.
K. Instrument Panel Fuse Block. SeeInstrument Panel
Fuse Block on page 5-110.L. Hood Release. SeeHood Release on page 5-11.
M. Steering Wheel Control Buttons (If Equipped).
SeeDriver Information Center (DIC) on page 3-51
andAudio Steering Wheel Controls on page 3-130.
N. Center Instrument Panel Fuse Block. SeeCenter
Instrument Panel Fuse Block on page 5-112.
O. Tilt Wheel Lever. SeeTilt Wheel on page 3-6.
P. Parking Brake Release. SeeParking Brake on
page 2-32.
Q. Cigarette Lighter (If Equipped). SeeAshtray(s) and
Cigarette Lighter on page 3-21.
R. Accessory Power Outlet. SeeAccessory Power
Outlet(s) on page 3-20.
S. StabiliTrak
®Button (If Equipped). SeeStabiliTrak®
System on page 4-9.
T. Glovebox. SeeGlove Box on page 2-56.
Hazard Warning Flashers
Your hazard warning �ashers let you warn others. They
also let police know you have a problem. Your front
and rear turn signal lamps will �ash on and off.
3-5
Page 164 of 540

To signal a lane change, raise or lower the lever until
the arrow starts to �ash. Hold it there until you complete
your lane change. The lever will return by itself when
you release it.
An arrow on the instrument
panel cluster will �ash in
the direction of the
turn or lane change.
As you signal a turn or a lane change, if the arrows �ash
more quickly than normal, a signal bulb may be burned
out and other drivers will not see your turn signal.
If a bulb is burned out, replace it to help avoid an
accident. If the arrows do not go on at all when you signal
a turn, check for burned-out bulbs and a blown fuse.
SeeFuses and Circuit Breakers on page 5-109.Turn Signal On Chime
If your turn signal is left on for more than 3/4 of a mile
(1.2 km), a chime will sound at each �ash of the
turn signal and the message TURN SIGNAL ON will
also appear in the DIC. To turn the chime and message
off, move the turn signal lever to the off position.
Headlamp High/Low-Beam Changer
53(Headlamp High/Low Beam Changer):
To change the headlamps from low to high beam,
push the lever toward the instrument panel. To return
to low-beam headlamps, pull the multifunction lever
toward you. Then release it.
When the high beams are
on, this indicator light on
the instrument panel
cluster will also be on.
3-8
Page 165 of 540

Flash-to-Pass
This feature lets you use your high-beam headlamps to
signal a driver in front of you that you want to pass.
It works even if your headlamps are in the automatic
position.
To use it, pull the turn signal lever toward you, then
release it.
If your headlamps are in the automatic position or on
low beam, your high-beam headlamps will turn on.
They’ll stay on as long as you hold the lever toward you.
The high-beam indicator on the instrument panel
cluster will come on. Release the lever to return to
normal operation.
Windshield Wipers
Be sure to clear ice and snow from the wiper blades
before using them. If they are frozen to the windshield,
gently loosen or thaw them. Damaged wiper blades
may not clear the windshield well, making it harder to
see and drive safely. If the blades do become damaged,
install new blades or blade inserts. For more information,
seeWindshield Wiper Blade Replacement on page 5-58
Heavy snow or ice can overload the wiper motor. A
circuit breaker will stop the motor until it cools down.
Clear away snow or ice to prevent an overload.You control the windshield wipers by turning the band
with the wiper symbol on it.
8(Mist):For a single wiping cycle, turn the band to
mist. Hold it there until the wipers start. Then let go. The
wipers will stop after one wipe. If you want more wipe
cycles, hold the band on mist longer.
N(Delay):You can set the wiper speed for a long or
short delay between wiping cycles. This can be very
useful in light rain or snow. Turn the band to choose the
delay time. The closer to the top of the lever, the
shorter the delay.
6(Low Speed):For steady wiping at low speed,
turn the band away from you to the �rst solid band past
the delay settings. For high-speed wiping, turn the
band further, to the second solid band past the delay
settings. To stop the wipers, move the band to off.
1(High Speed):For high-speed wiping, turn
the band further, to the second solid band past the
delay settings.
9(Off):To stop the wipers, move the band to off.
3-9
Page 171 of 540

;(Parking Lamps):Turning the control to this
position turns on the parking lamps, together with the
following:
Sidemarker Lamps
Taillamps
License Plate Lamps
Instrument Panel Lights
Roof Marker Lamps (If Equipped)
5(Headlamps):Turning the control to this position
turns on the headlamps, together with the previously
listed lamps and lights.
You can switch your headlamps from high to low-beam
by pushing the turn signal/high-beam lever towards
the instrument panel.
A circuit breaker protects your headlamps. If you have
an electrical overload, your headlamps will �icker on and
off. Have your headlamp wiring checked right away if
this happens.
Headlamps on Reminder
A reminder chime will sound when your headlamps or
parking lamps are manually turned on and your ignition is
off, in LOCK, ACCESSORY, or a door is open. To disable
the chime, turn the light off then back on.
Daytime Running Lamps (DRL)
Daytime Running Lamps (DRL) can make it easier
for others to see the front of your vehicle during the day.
DRL can be helpful in many different driving conditions,
but they can be especially helpful in the short periods
after dawn and before sunset. Fully functional daytime
running lamps are required on all vehicles �rst sold
in Canada.
The DRL system will come on when the following
conditions are met:
The ignition is on
The exterior lamps control is in AUTO
The automatic transmission is not in PARK (P)
The light sensor determines it is daytime
When the DRL are on, only your DRL lamps will be on.
The taillamps, sidemarker and other lamps will not
be on. The instrument panel will not be lit up either.
3-15
Page 178 of 540

Temperature Knob
The middle knob on the control panel lets you select
the temperature of the air �owing into the passenger
area. Turn the knob clockwise toward the red area for
warmer air. Turn the knob counterclockwise toward
the blue area for cooler air.
Mode Knob
The right knob on the control panel allows you to
choose the direction of air delivery.
H(Vent):This setting directs the air through the
instrument panel outlets.
)(Bi-Level):Air is delivered through the �oor outlets
as well as the instrument panel outlets. The �ow can
be divided between vent and �oor outlets depending
upon where the knob is placed between the settings.
6(Floor):This setting directs most of the air through
the �oor outlets, and the rest of the air is divided
between the windshield defroster outlets and the side
window defroster outlets.
W(Defog):Air�ow is delivered through the �oor
outlets, the windshield defroster outlets and the side
window defroster outlets. The air �ow can be divided
between �oor and defrost depending upon where
the knob is placed between the settings.
1(Defrost):This setting directs most air through the
windshield defroster outlets, side window defroster
outlets and some through the �oor outlets.
Dual Climate Control System
With this system you can control the heating, cooling
and ventilation for your vehicle.
9(Fan):Turn the left knob clockwise or
counterclockwise to increase or decrease the fan
speed. Turn the knob to the off position to turn off the
fan. If the knob is in off outside air will still enter
the vehicle, and will be directed based on the position
of the mode knob. The temperature can also be adjusted
using the temperature levers.
Turn the right knob clockwise or counterclockwise to
direct the air�ow inside of your vehicle.
3-22