2006 CHEVROLET TAHOE seat adjustment
[x] Cancel search: seat adjustmentPage 9 of 540

Power Seats
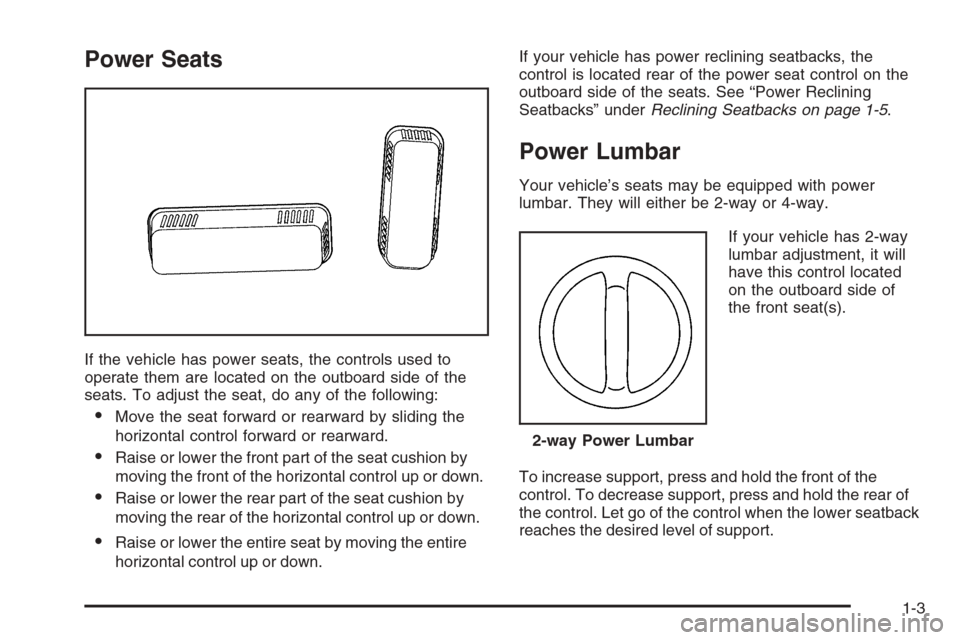
If the vehicle has power seats, the controls used to
operate them are located on the outboard side of the
seats. To adjust the seat, do any of the following:
Move the seat forward or rearward by sliding the
horizontal control forward or rearward.
Raise or lower the front part of the seat cushion by
moving the front of the horizontal control up or down.
Raise or lower the rear part of the seat cushion by
moving the rear of the horizontal control up or down.
Raise or lower the entire seat by moving the entire
horizontal control up or down.If your vehicle has power reclining seatbacks, the
control is located rear of the power seat control on the
outboard side of the seats. See “Power Reclining
Seatbacks” underReclining Seatbacks on page 1-5.
Power Lumbar
Your vehicle’s seats may be equipped with power
lumbar. They will either be 2-way or 4-way.
If your vehicle has 2-way
lumbar adjustment, it will
have this control located
on the outboard side of
the front seat(s).
To increase support, press and hold the front of the
control. To decrease support, press and hold the rear of
the control. Let go of the control when the lower seatback
reaches the desired level of support.
2-way Power Lumbar
1-3
Page 10 of 540

If your vehicle has 4-way
lumbar adjustment, it will
have this control located
on the outboard side of the
front seat(s).
To increase support, press and hold the front of the
control. To decrease support, press and hold the rear
of the control. Let go of the control when the lower
seatback reaches the desired level of support.
You can also reshape the side wing area of the lower
seatback for more lateral support.
To increase support, press and hold the top of the
control. To decrease support, press and hold the bottom
of the control. Let go of the control when the lower
seatback reaches the desired level of support.
Your vehicle may have a memory function which allows
seat settings to be saved and recalled. SeeMemory
Seat on page 2-61for more information.
Keep in mind that as your seating position changes,
as it may during long trips, so should the position of your
lumbar support. Adjust the seat as needed.Heated Seats
If your vehicle has this
feature, the buttons are
located on the front doors.
The engine must be
running for the heated
seats to work.
To heat the entire seat, press the horizontal button with
the heated seat and seatback symbol. Press the button to
cycle through the temperature settings of high, medium
and low and to turn the heated seat off. Indicator lights
will be lit to designate the level of heat selected: three for
high, two for medium, and one for low.
To heat only the seatback, press the vertical button with
the heated seatback symbol. An indicator light on the
seatback button will be lit to designate that only the
seatback is being heated. Additional presses of
the seatback button will cycle through the heat levels for
the seatback only. Press the horizontal button again
to heat the whole seat. 4-way Power Lumbar
1-4
Page 158 of 540

Transmission Temperature Gage.....................3-43
Tire Pressure Light.......................................3-44
Malfunction Indicator Lamp.............................3-45
Oil Pressure Gage........................................3-48
Security Light...............................................3-49
Cruise Control Light......................................3-49
Highbeam On Light.......................................3-49
Four-Wheel-Drive Light..................................3-49
Tow/Haul Mode Light....................................3-50
Fuel Gage...................................................3-50
Low Fuel Warning Light.................................3-50
Driver Information Center (DIC).......................3-51
DIC Operation and Displays...........................3-52
DIC Warnings and Messages.........................3-55
DIC Vehicle Customization.............................3-66
Audio System(s).............................................3-72
Setting the Time for Radios without
Radio Data Systems (RDS)........................3-73
Setting the Time for Radios with Radio
Data Systems (RDS)..................................3-74AM-FM Radio...............................................3-74
Radio with CD..............................................3-77
Radio with Cassette and CD..........................3-88
Radio with Six-Disc CD................................3-102
Navigation/Radio System..............................3-117
Rear Seat Entertainment System...................3-117
Rear Seat Audio (RSA)................................3-128
Theft-Deterrent Feature................................3-129
Audio Steering Wheel Controls......................3-130
Radio Reception.........................................3-131
Care of the Cassette Tape Player.................3-131
Care of Your CDs and DVDs........................3-132
Care of the CD and DVD Player...................3-133
Fixed Mast Antenna....................................3-133
XM™ Satellite Radio Antenna System............3-133
Chime Level Adjustment...............................3-133
Section 3 Instrument Panel
3-2
Page 186 of 540

Rear Window Defogger
If your vehicle has this feature, the lines you see on
the rear window warm the glass. The rear window
defogger uses a warming grid to remove fog from the
rear window.
<(Rear):Press this button to turn the rear window
defogger on or off. An indicator light in the button
will come on to let you know that the rear window
defogger is activated.
The rear window defogger will turn off about 10 minutes
after the button is pressed. If you need additional
warming time, press the button again.
If your vehicle is equipped with heated mirrors, this
button will activate them.
Notice:Do not use a razor blade or sharp object
to clear the inside rear window. Do not adhere
anything to the defogger grid lines in the rear glass.
These actions may damage the rear defogger.
Repairs would not be covered by your warranty.
Outlet Adjustment
Use the air outlets located in the center and on the side
of your instrument panel to direct the air�ow.
Operation Tips
Keep the hood and front air inlets free of ice, snow,
or any other obstruction (such as leaves). The
heater and defroster will work far better, reducing
the chance of fogging the inside of your windows.
When you enter a vehicle in cold weather, turn the
fan knob all the way to the right for a few moments
before driving. This helps clear the intake ducts
of snow and moisture, and reduces the chance of
fogging the inside of your window.
Keep the air path under the front seats clear of
objects. This helps air to circulate throughout
your vehicle.
Adding outside equipment to the front of your
vehicle, such as hood-air de�ectors, may affect the
performance of the heating and air conditioning
system. Check with your dealer before adding
equipment to the outside of your vehicle.
3-30
Page 466 of 540

6. Turn the wheel wrench clockwise to raise the tire.
After raising the tire halfway upward, check to
make sure the retainer is still seated properly across
the wheel opening and that the tire is level with
the underside of the vehicle.
7. Continue raising the tire until it is fully against the
underside of the vehicle and you hear two clicks
or feel it skip twice. You cannot overtighten
the cable.
8. For the Z71 model, to ensure that the tire is level
and positioned properly in the spare tire well, turn
the wheel wrench counterclockwise two turns
to slightly loosen the tire and wheel assembly.
Grasp the tire and make needed adjustments
to ensure that the tire is completely level and
properly positioned in the spare tire well.
Repeat Step 7.
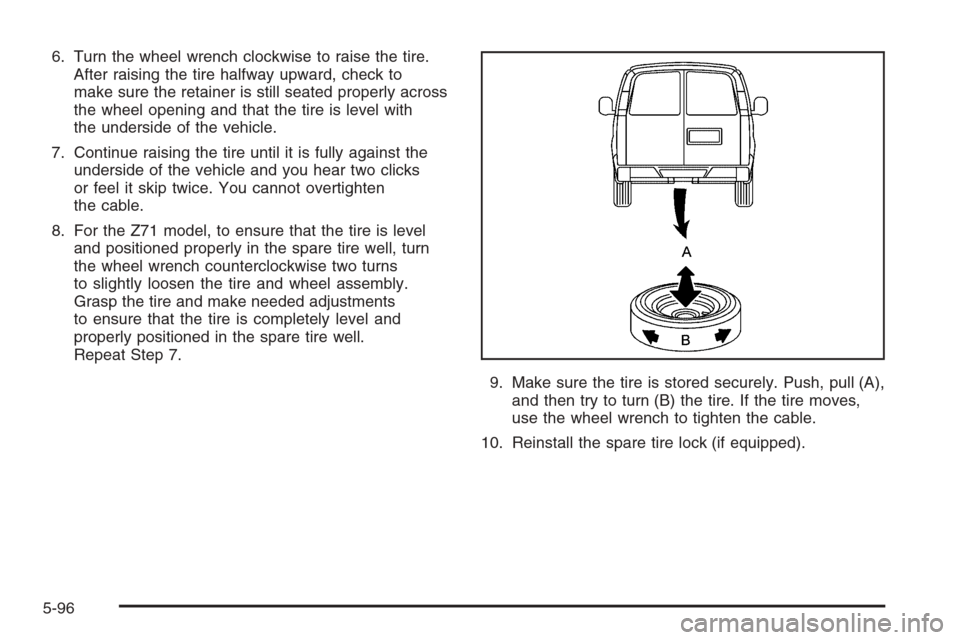
9. Make sure the tire is stored securely. Push, pull (A),
and then try to turn (B) the tire. If the tire moves,
use the wheel wrench to tighten the cable.
10. Reinstall the spare tire lock (if equipped).
5-96
Page 526 of 540

Audio System(s).............................................3-72
AM-FM Radio.............................................3-74
Audio Steering Wheel Controls....................3-130
Care of Your Cassette Tape Player...............3-131
Care of Your CD and DVD Player................3-133
Care of Your CDs and DVDs .......................3-132
Chime Level Adjustment.............................3-133
Fixed Mast Antenna...................................3-133
Navigation/Radio System, see Navigation
Manual.................................................3-117
Radio with Cassette and CD.........................3-88
Radio with CD............................................3-77
Radio with Six-Disc CD..............................3-102
Rear Seat Audio (RSA)...............................3-128
Setting the Time for Radios with Radio
Data Systems (RDS)................................3-74
Setting the Time for Radios without Radio
Data Systems (RDS)................................3-73
Theft-Deterrent Feature...............................3-129
Understanding Radio Reception...................3-131
XM™ Satellite Radio Antenna System...........3-133
Automatic Headlamp System............................3-16
Automatic Transmission
Fluid..........................................................5-22
Operation...................................................2-23
Autoride
®.......................................................4-62
Auxiliary Roof Mounted Lamp Switch.................3-18
B
Battery..........................................................5-41
Run-Down Protection...................................3-20
Battery Warning Light......................................3-39
Before Leaving on a Long Trip.........................4-38
Bench Seat....................................................1-19
Bench Seat Split (50/50)..................................1-14
Bench Seat, Split (60/40).................................1-11
Brake
Anti-Lock Brake System (ABS)........................ 4-7
Emergencies................................................ 4-8
Parking......................................................2-32
System Warning Light..................................3-41
Brake Pedal, Throttle.......................................2-21
Brakes..........................................................5-38
Braking........................................................... 4-6
Braking in Emergencies..................................... 4-8
Break-In, New Vehicle.....................................2-18
Bucket Seats, Rear.........................................1-25
Bulb Replacement...........................................5-51
Front Turn Signal, Sidemarker and Daytime
Running Lamps........................................5-52
Halogen Bulbs............................................5-51
Headlamps.................................................5-51
Replacement Bulbs......................................5-57
Roof Marker Lamps.....................................5-54
2
Page 527 of 540

Bulb Replacement (cont.)
Side Identi�cation Marker Lamps...................5-54
Taillamps, Turn Signal, Stoplamps and
Back-up Lamps........................................5-56
Buying New Tires...........................................5-72
C
California Fuel.................................................. 5-5
California Proposition 65 Warning....................... 5-3
Canadian Owners................................................ ii
Capacities and Speci�cations..........................5-118
Carbon Monoxide...................2-13, 2-36, 4-42, 4-62
Care of
Safety Belts..............................................5-102
Your Cassette Tape Player..........................3-131
Your CD and DVD Player...........................3-133
Your CDs and DVDs ..................................3-132
Cargo Cover..................................................2-58
Center Console Storage Area...........................2-56
Center Passenger Position, Safety Belts.............1-41
Chains, Tire...................................................5-77
Check
Engine Light...............................................3-45
Checking Things Under the Hood......................5-10
Chemical Paint Spotting.................................5-106Child Restraints
Child Restraint Systems...............................1-54
Infants and Young Children...........................1-51
Lower Anchors and Tethers for Children..........1-59
Older Children.............................................1-48
Securing a Child Restraint in a Rear
Outside Seat Position...............................1-66
Securing a Child Restraint in the Center
Front Seat Position...................................1-70
Securing a Child Restraint in the Center
Rear Seat Position...................................1-68
Securing a Child Restraint in the Right
Front Seat Position...................................1-70
Where to Put the Restraint...........................1-58
Chime Level Adjustment.................................3-133
Cigarette Lighter.............................................3-21
Cleaning
Aluminum or Chrome-Plated Wheels.............5-105
Exterior Lamps/Lenses................................5-103
Fabric/Carpet............................................5-101
Finish Care...............................................5-103
Inside of Your Vehicle..................................5-99
Instrument Panel, Vinyl, and Other Plastic
Surfaces...............................................5-102
Leather....................................................5-101
Tires........................................................5-106
3
Page 539 of 540

Tires (cont.)
Spare Tire..................................................5-99
Storing a Flat or Spare Tire and Tools............5-94
Tire Sidewall Labeling..................................5-60
Tire Terminology and De�nitions....................5-63
Uniform Tire Quality Grading.........................5-74
Wheel Alignment and Tire Balance.................5-75
Wheel Replacement.....................................5-75
When It Is Time for New Tires......................5-71
Tow/Haul Mode ...............................................2-26
Tow/Haul Mode Light.......................................3-50
Towing
Recreational Vehicle.....................................4-58
Towing a Trailer..........................................4-62
Your Vehicle...............................................4-58
Traction
StabiliTrak
®System....................................... 4-9
Trailer
Recommendations.......................................4-79
Transmission
Fluid, Automatic...........................................5-22
Temperature Gage.......................................3-43
Transmission Operation, Automatic....................2-23
Trip Odometer................................................3-36
Turn and Lane-Change Signals.......................... 3-7
Turn Signal/Multifunction Lever........................... 3-7
U
Understanding Radio Reception.......................3-131
Uniform Tire Quality Grading............................5-74
Universal Home Remote System.......................2-52
Operation...................................................2-52
V
Vehicle
Control........................................................ 4-5
Damage Warnings........................................... iv
Loading......................................................4-48
Symbols......................................................... iv
Vehicle Customization, DIC..............................3-66
Vehicle Data Collection and Event Data
Recorders..................................................7-10
Vehicle Identi�cation
Number (VIN)............................................5-108
Service Parts Identi�cation Label..................5-108
Vehicle Personalization....................................2-60
Memory Seat..............................................2-61
Ventilation Adjustment......................................3-30
Visors...........................................................2-16
Voltmeter Gage..............................................3-40
15