2006 CHEVROLET SILVERADO park assist
[x] Cancel search: park assistPage 118 of 594
Retained Accessory Power (RAP)
If the vehicle has Retained Accessory Power (RAP),
certain features will continue to operate for up to
10 minutes after the ignition key is turned to LOCK
unless a door is opened.
Starting the Engine
Your vehicle is equipped with Starter Motor Control.
This feature assists in starting the engine and protects
the electrical system. This feature may cause the
engine to crank even after the ignition key is
not in START
Automatic Transmission
Move your shift lever to PARK (P) or NEUTRAL (N).
Your engine will not start in any other position — that is
a safety feature. To restart when you are already
moving, use NEUTRAL (N) only. If you have a diesel
engine refer to the diesel supplement for the starting
procedure.
Notice:Do not try to shift to PARK (P) if your
vehicle is moving. If you do, you could damage the
transmission. Shift to PARK (P) only when your
vehicle is stopped.
Manual Transmission
The gear selector should be in neutral and the parking
brake engaged. Hold the clutch pedal to the �oor
and start the engine. Your vehicle will not start if the
clutch pedal is not all the way down — that is a safety
feature.
1. With your foot off the accelerator pedal, turn the
ignition key to START. When the engine starts,
let go of the key. The idle speed will go down as
your engine gets warm.
Notice:Holding your key in START for longer than
15 seconds at a time will disengage the starter
motor, cause your battery to be drained much
sooner, and add excessive heat that can damage
your starter motor. Try not to hold the key in START
for longer than 15 seconds and wait about
15 seconds between each try to help avoid draining
your battery or damaging your starter.
2. If it does not start within 10 seconds, push the
accelerator pedal all the way to the �oor, while
you hold the ignition key in START. When
the engine starts, let go of the key and let up on the
accelerator pedal. Wait about 15 seconds between
each try.
2-22
Page 164 of 594
Outside Automatic Dimming Mirror
If your vehicle is equipped with this feature, the driver’s
outside mirror will adjust for the glare of headlamps
behind you. This feature is controlled by the on and off
settings found on the electrochromic inside mirror.
Outside Curb View Assist Mirrors
If the vehicle has the memory package, the outside
mirrors are able to perform the curb view assist mirror
function. This feature will cause the passenger’s
and/or driver’s mirror to tilt to a preselected position
when the vehicle is in REVERSE (R). This feature may
be useful in allowing the driver to view the curb when
parallel parking. When the vehicle is shifted out of
REVERSE (R) and a short delay has occurred,
the passenger’s and/or driver’s mirror will return to its
original position.
To change the preselected tilt position, adjust the
mirrors to the desired position while the vehicle is in
REVERSE (R). When the vehicle is shifted out of
REVERSE (R), this new position is saved in memory as
the tilt position.
This feature can be turned on or off through the Driver
Information Center (DIC). SeeDriver Information
Center (DIC) on page 3-51for more information.
Outside Convex Mirror
Your passenger’s side mirror is convex. A convex
mirror’s surface is curved so you can see more from the
driver’s seat.
{CAUTION:
A convex mirror can make things (like other
vehicles) look farther away than they really are.
If you cut too sharply into the right lane, you
could hit a vehicle on your right. Check your
inside mirror or glance over your shoulder
before changing lanes.
Outside Heated Mirrors
The vehicle may have outside heated mirrors which
helps clear them of condensation, snow, and ice.
The mirror heat is controlled by pressing the outside
mirror button, if the vehicle has a sliding rear window, or
the rear window defogger button. See “Rear Window
Defogger” underDual Automatic Climate Control System
on page 3-24for further information.
The mirror heat will turn off about 10 minutes after the
button is pressed. Press the button again if additional
warming time is needed.
2-68
Page 168 of 594
Universal Home Remote System
Operation
Do not use the Universal Home Remote with any
garage door opener that does not have the stop and
reverse feature. This includes any garage door opener
model manufactured before April 1, 1982. If you
have a newer garage door opener with rolling codes,
please be sure to follow Steps 6 through 8 to complete
the programming of your Universal Home Remote
Transmitter.
Read the instructions completely before attempting to
program the Universal Home Remote. Because of
the steps involved, it may be helpful to have another
person available to assist you in the programming steps.
Keep the original hand-held transmitter for use in
other vehicles as well as for future Universal Home
Remote programming. It is also recommended that upon
the sale of the vehicle, the programmed Universal
Home Remote buttons should be erased for security
purposes. See “Erasing Universal Home Remote
Buttons” later in this section or, for assistance, see
Customer Assistance Offices on page 7-4.
Be sure that people and objects are clear of the garage
door or gate operator you are programming. When
programming a garage door, it is advised to park outside
of the garage.It is recommended that a new battery be installed in
your hand-held transmitter for quicker and more
accurate transmission of the radio-frequency signal.Programming Universal Home Remote
Follow these steps to program up to three channels:
1. Press and hold down the two outside Universal
Home Remote buttons, releasing only when the
Universal Home Remote indicator light begins to
�ash, after 20 seconds. Do not hold down the
buttons for longer than 30 seconds and do not repeat
this step to program a second and/or third hand-held
transmitter to the remaining two Universal Home
Remote buttons.
2. Position the end of your hand-held transmitter
about 1 to 3 inches (3 to 8 cm) away from the
Universal Home Remote buttons while keeping the
indicator light in view.
3. Simultaneously press and hold both the desired
Universal Home Remote button and the hand-held
transmitter button. Do not release the buttons
until Step 4 has been completed.
Some entry gates and garage door openers may
require you to substitute Step 3 with the procedure
noted in “Gate Operator and Canadian
Programming” later in this section.
2-72
Page 181 of 594

The main components of your instrument panel are the following:
A. Dome Lamp Override Button. SeeDome Lamp
Override on page 3-17.
B. Headlamp Controls. SeeHeadlamps on page 3-13.
C. Air Outlets. SeeOutlet Adjustment on page 3-29.
D. Automatic Transfer Case/Electronic Transfer
Case/Traction Assist System (TAS). SeeFour-Wheel
Drive on page 2-36andTraction Assist System
(TAS) on page 4-9.
E. Multifunction Lever. SeeTurn Signal/Multifunction
Lever on page 3-7.
F. Instrument Panel Cluster. SeeInstrument Panel
Cluster on page 3-31.
G. Range Selection Mode (Allison Transmission
®only)
Button (If Equipped). SeeAutomatic Transmission
Operation on page 2-24.
H. Gearshift Lever. SeeAutomatic Transmission
Operation on page 2-24orManual Transmission
Operation on page 2-32for manual transmissions.
I. Tow/Haul Selector Button (If Equipped). See
Tow/Haul Mode on page 2-30.
J. Audio System. SeeAudio System(s) on page 3-70.
K. Climate Control System. SeeClimate Control
System on page 3-20,Dual Climate Control System
on page 3-21andDual Automatic Climate Control
System on page 3-24.L. Instrument Panel Fuse Block.Instrument Panel Fuse
Block on page 5-126.
M. Cargo Lamp Button. SeeCargo Lamp on page 3-18.
N. Hood Release. SeeHood Release on page 5-13.
O. Steering Wheel Control Buttons (If Equipped).
SeeDriver Information Center (DIC) on page 3-51or
Audio Steering Wheel Controls on page 3-127.
P. Center Instrument Panel Fuse Block. SeeCenter
Instrument Panel Fuse Block on page 5-128.
Q. Parking Brake Release. SeeParking Brake on
page 2-49.
R. Tilt Wheel Lever. SeeTilt Wheel on page 3-6.
S. Cigarette Lighter. SeeAshtray(s) and Cigarette
Lighter on page 3-19.
T. Accessory Power Outlet. SeeAccessory Power
Outlet(s) on page 3-18.
U. Manual Selectable Ride Control (If Equipped). See
Manual Selectable Ride on page 4-11.
V. Auxiliary Roof Mounted Lamp Button (If Equipped).
SeeAuxiliary Roof Mounted Lamp on page 3-16.
W. Passenger Airbag Off Switch (If Equipped). See
Airbag Off Switch on page 1-78.
X. Glove Box. SeeGlove Box on page 2-75.
3-5
Page 220 of 594
SeeDriver Information Center (DIC) on page 3-51for
further information.
If your vehicle has an Allison transmission, and the �uid
reaches temperatures of approximately 275°F (135°C)
or greater, the driver information center will display
a TRANS HOT IDLE ENGINE warning message and a
chime will sound until the temperature falls below
265°F (130°C). Pull the vehicle off the roadway when
it is safe to do so. Set the parking brake, place the
transmission in PARK (P) and allow the engine to
idle until the transmission temperature falls below
265°F (130°C). If the transmission continues to operate
above 265°F (130°C), contact your nearest dealer or
the GM Roadside Assistance Center. SeeRoadside
Assistance Program on page 7-6.
Notice:If you drive your vehicle with the
transmission temperature gage above normal
operating range, you can damage the transmission.
This could lead to costly repairs that would not
be covered by your warranty. Do not drive your
vehicle while the transmission temperature gage
reading is above normal. See your dealer for service.The following situations can cause the transmission to
operate at higher temperatures:
Towing a trailer
Hot outside air temperatures
Vehicle overloading
Hauling a large or heavy load
Low transmission �uid level
High transmission �uid level
Restricted air �ow to the radiator and the auxiliary
transmission oil cooler (if equipped).
A temporary solution to hotter transmission operating
temperatures may be to let the transmission cool down.
If the transmission is operated at higher temperatures
on a frequent basis, seeScheduled Maintenance
(Gasoline Engine) on page 6-4for the proper
transmission maintenance intervals.
3-44
Page 319 of 594
Suppose you are steering through a sharp curve.
Then you suddenly accelerate. Both control
systems — steering and acceleration — have to do
their work where the tires meet the road. Adding
the sudden acceleration can demand too much of
those places. You can lose control. SeeTraction
Assist System (TAS) on page 4-9.
What should you do if this ever happens? Ease up on
the accelerator pedal, steer the vehicle the way you
want it to go, and slow down.
Speed limit signs near curves warn that you should
adjust your speed. Of course, the posted speeds
are based on good weather and road conditions. Under
less favorable conditions you will want to go slower.
If you need to reduce your speed as you approach
a curve, do it before you enter the curve, while your front
wheels are straight ahead.
Try to adjust your speed so you can “drive” through the
curve. Maintain a reasonable, steady speed. Wait to
accelerate until you are out of the curve, and then
accelerate gently into the straightaway.
Adding non-GM accessories can affect your vehicle’s
performance. SeeAccessories and Modi�cations
on page 5-4.Steering in Emergencies
There are times when steering can be more effective
than braking. For example, you come over a hill and �nd
a truck stopped in your lane, or a car suddenly pulls
out from nowhere, or a child darts out from between
parked cars and stops right in front of you. You
can avoid these problems by braking — if you can stop
in time. But sometimes you cannot; there is not room.
That is the time for evasive action — steering around the
problem.
Your vehicle can perform very well in emergencies like
these. First apply your brakes.
SeeBraking on page 4-6. It is better to remove as much
speed as you can from a possible collision. Then
steer around the problem, to the left or right depending
on the space available.
4-13
Page 375 of 594
Tow/Haul Mode
Tow/Haul is a feature on automatic transmission
equipped vehicles that assists when pulling a heavy
trailer or a large or heavy load. SeeTow/Haul Mode on
page 2-30for more information.
Tow/Haul is designed to be most effective when the
vehicle and trailer combined weight is at least 75% of
the vehicle’s Gross Combined Weight Rating (GCWR).
See “Weight of the Trailer” later in the section.
Tow/Haul is most useful under the following driving
conditions:
When pulling a heavy trailer or a large or heavy
load through rolling terrain.
When pulling a heavy trailer or a large or heavy
load in stop and go traffic.
When pulling a heavy trailer or a large or heavy
load in busy parking lots where improved low
speed control of the vehicle is desired.
Operating the vehicle in Tow/Haul when lightly loaded
or with no trailer at all will not cause damage. However,
there is no bene�t to the selection of Tow/Haul when
the vehicle is unloaded. Such a selection when unloaded
may result in unpleasant engine and transmission
driving characteristics and reduced fuel economy.
Tow/Haul is recommended only when pulling a heavy
trailer or a large or heavy load.
Weight of the Trailer
How heavy can a trailer safely be?
It depends on how you plan to use your rig. For
example, speed, altitude, road grades, outside
temperature and how much your vehicle is used to pull
a trailer are all important. It can also depend on any
special equipment that you have on your vehicle,
and the amount of tongue weight the vehicle can carry.
See “Weight of the Trailer Tongue” later in this
section for more information.
Maximum trailer weight is calculated assuming only the
driver is in the tow vehicle and it has all the required
trailering equipment. The weight of additional optional
equipment, passengers and cargo in the tow vehicle
must be subtracted from the maximum trailer weight.
Above the 5,000 lbs (2 268 kg) trailer rating, the
handling/trailering suspension is required on two-wheel
drive1500 series models and the handling/trailering
or off-road suspension is required on four-wheel drive
1500 series models.
4-69
Page 498 of 594
Changing a Flat Tire
If a tire goes �at, avoid further tire and wheel damage by
driving slowly to a level place. Turn on your hazard
warning �ashers. SeeHazard Warning Flashers on
page 3-6for more information.
{CAUTION:
Changing a tire can be dangerous. The vehicle
can slip off the jack and roll over or fall on you
or other people. You and they could be badly
injured or even killed. Find a level place to
change your tire. To help prevent the vehicle
from moving:
1. Set the parking brake �rmly.
2. Put an automatic transmission shift lever in
PARK (P), or shift a manual transmission to
FIRST (1) or REVERSE (R).
3. If you have a four-wheel-drive vehicle,
be sure the transfer case is in a drive
gear — not in NEUTRAL.
4. Turn off the engine and do not restart while
the vehicle is raised.
5. Do not allow passengers to remain in
the vehicle.
CAUTION: (Continued)
CAUTION: (Continued)
To be even more certain the vehicle will not
move, put blocks at the front and rear of the
tire farthest away from the one being changed.
That would be the tire on the other side, at the
opposite end of the vehicle.
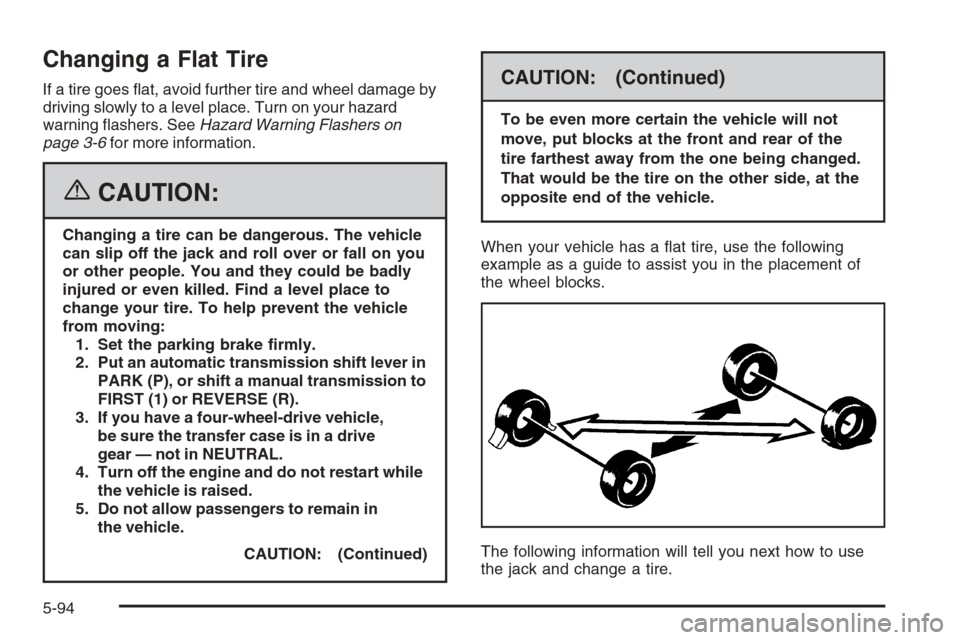
When your vehicle has a �at tire, use the following
example as a guide to assist you in the placement of
the wheel blocks.
The following information will tell you next how to use
the jack and change a tire.
5-94