Page 489 of 594

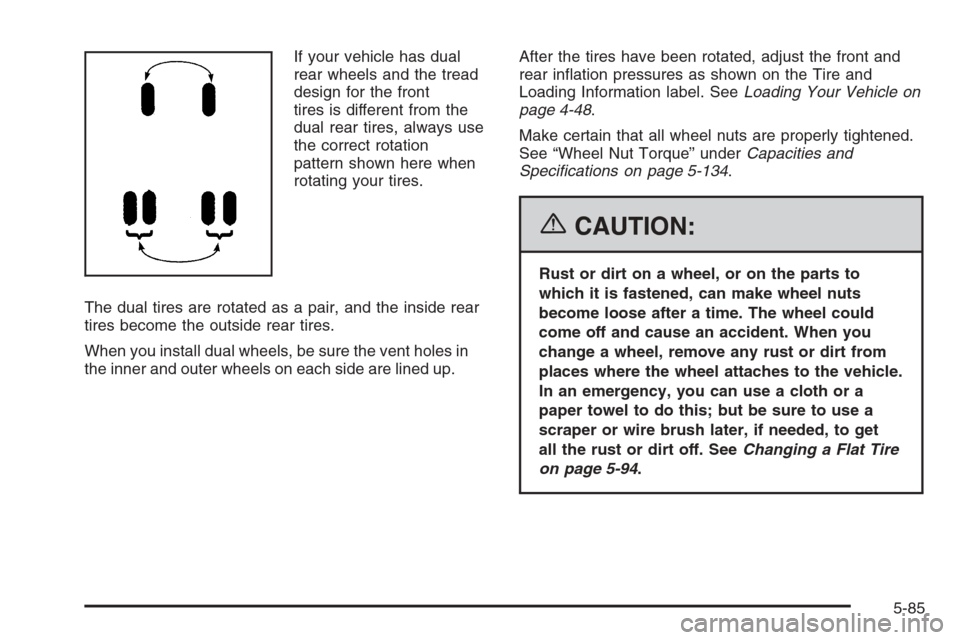
If your vehicle has dual
rear wheels and the tread
design for the front
tires is different from the
dual rear tires, always use
the correct rotation
pattern shown here when
rotating your tires.
The dual tires are rotated as a pair, and the inside rear
tires become the outside rear tires.
When you install dual wheels, be sure the vent holes in
the inner and outer wheels on each side are lined up.After the tires have been rotated, adjust the front and
rear in�ation pressures as shown on the Tire and
Loading Information label. SeeLoading Your Vehicle on
page 4-48.
Make certain that all wheel nuts are properly tightened.
See “Wheel Nut Torque” underCapacities and
Speci�cations on page 5-134.
{CAUTION:
Rust or dirt on a wheel, or on the parts to
which it is fastened, can make wheel nuts
become loose after a time. The wheel could
come off and cause an accident. When you
change a wheel, remove any rust or dirt from
places where the wheel attaches to the vehicle.
In an emergency, you can use a cloth or a
paper towel to do this; but be sure to use a
scraper or wire brush later, if needed, to get
all the rust or dirt off. SeeChanging a Flat Tire
on page 5-94.
5-85
Page 495 of 594

Each new wheel should have the same load-carrying
capacity, diameter, width, offset and be mounted
the same way as the one it replaces.
If you need to replace any of your wheels, wheel bolts
or wheel nuts, replace them only with new GM
original equipment parts. This way, you will be sure to
have the right wheel, wheel bolts and wheel nuts
for your vehicle.
{CAUTION:
Using the wrong replacement wheels, wheel
bolts, or wheel nuts on your vehicle can be
dangerous. It could affect the braking and
handling of your vehicle, make your tires lose
air and make you lose control. You could have
a collision in which you or others could be
injured. Always use the correct wheel, wheel
bolts, and wheel nuts for replacement.
Notice:The wrong wheel can also cause problems
with bearing life, brake cooling, speedometer or
odometer calibration, headlamp aim, bumper height,
vehicle ground clearance, and tire or tire chain
clearance to the body and chassis.Whenever a wheel, wheel bolt or wheel nut is
replaced on a dual wheel setup, check the wheel
nut torque after 100, 1,000 and 6,000 miles
(160, 1 600 and 10 000 km) of driving. For proper
torque, see “Wheel Nut Torque” underCapacities and
Speci�cations on page 5-134.
SeeChanging a Flat Tire on page 5-94for more
information.
Used Replacement Wheels
{CAUTION:
Putting a used wheel on your vehicle is
dangerous. You cannot know how it has been
used or how far it has been driven. It could fail
suddenly and cause a crash. If you have to
replace a wheel, use a new GM original
equipment wheel.
5-91
Page 512 of 594

{CAUTION:
Incorrect wheel nuts or improperly tightened
wheel nuts can cause the wheel to come loose
and even come off. This could lead to an
accident. Be sure to use the correct wheel
nuts. If you have to replace them, be sure to
get new GM original equipment wheel nuts.
Stop somewhere as soon as you can and have
the nuts tightened with a torque wrench to the
proper torque speci�cation. SeeCapacities
and Specifications on page 5-134for wheel nut
torque speci�cation.
Notice:Improperly tightened wheel nuts can lead
to brake pulsation and rotor damage. To avoid
expensive brake repairs, evenly tighten the wheel
nuts in the proper sequence and to the proper
torque speci�cation. SeeCapacities and
Specifications on page 5-134for the wheel nut
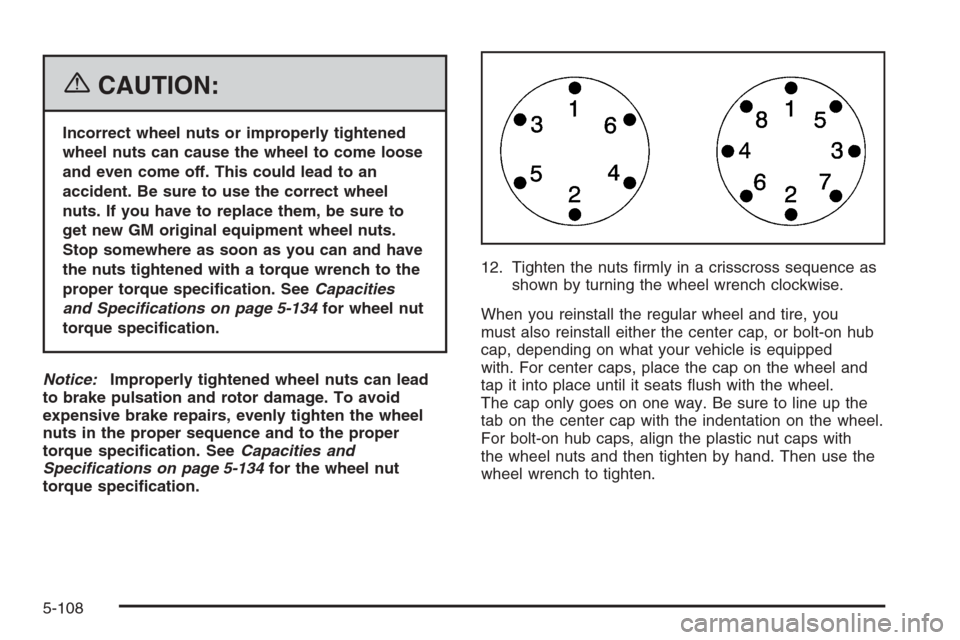
torque speci�cation.12. Tighten the nuts �rmly in a crisscross sequence as
shown by turning the wheel wrench clockwise.
When you reinstall the regular wheel and tire, you
must also reinstall either the center cap, or bolt-on hub
cap, depending on what your vehicle is equipped
with. For center caps, place the cap on the wheel and
tap it into place until it seats �ush with the wheel.
The cap only goes on one way. Be sure to line up the
tab on the center cap with the indentation on the wheel.
For bolt-on hub caps, align the plastic nut caps with
the wheel nuts and then tighten by hand. Then use the
wheel wrench to tighten.
5-108
Page 539 of 594
ApplicationCapacities
English Metric
8.1L V8 HD Automatic* 25.0 qt 23.7 L
8.1L V8 Automatic* 26.9 qt 25.5 L
8.1L V8 Manual* 27.1 qt 25.6 L
* Engine Fan Driven cooling system
** Electric Cooling Fan system
Engine Oil with Filter
4.3L V6 4.5 qt 4.3 L
4.8L V8; 5.3L V8; 6.0L V8 6.0 qt 5.7 L
8.1L V8 6.5 qt 6.1 L
Fuel Tank
Short Bed and 2500 LD 26.0 gal 98.0 L
Long Bed and Chassis Cab (Pickup Box Delete) 34.0 gal 128.7 L
Chassis Cab 3500 and 3500HD — front 27.0 gal 102.0 L
Chassis Cab 3500 and 3500HD — rear 23.0 gal 87.0 L
Transfer Case Fluid 2.0 qt 1.9 L
Wheel Nut Torque 140 ft lb 190Y
After re�ll, the level must be rechecked. Add enough engine coolant so that the �uid is within the proper
operating range.
5-135
Page 552 of 594

At the First 100, 1,000 and 6,000 Miles
(160, 1 600 and 10 000 km)
Check dual wheel nut torque. For proper torque, see
Capacities and Speci�cations on page 5-134.
At Each Fuel Fill
It is important to perform these underhood checks at
each fuel �ll.
Engine Oil Level Check
Check the engine oil level and add the proper oil if
necessary. SeeEngine Oil (Gasoline Engine) on
page 5-20for further details.
Notice:It is important to check your oil regularly
and keep it at the proper level. Failure to keep your
engine oil at the proper level can cause damage
to your engine not covered by your warranty.
Engine Coolant Level Check
Check the engine coolant level and add
DEX-COOL®coolant mixture if necessary.
SeeEngine Coolant on page 5-35for further details.
Windshield Washer Fluid Level Check
Check the windshield washer �uid level in the windshield
washer �uid reservoir and add the proper �uid if
necessary.
At Least Once a Month
Tire In�ation Check
Visually inspect your vehicle’s tires and make sure they
are in�ated to the correct pressures. Do not forget to
check the spare tire. SeeTires on page 5-74for further
details. Check to make sure the spare tire is stored
securely. SeeChanging a Flat Tire on page 5-94.
Tire Wear Inspection
Tire rotation may be required for high mileage highway
drivers prior to the Engine Oil Life System service
noti�cation. Check the tires for wear and, if necessary,
rotate the tires. SeeTire Inspection and Rotation on
page 5-83.
6-12