2006 CHEVROLET SILVERADO radio controls
[x] Cancel search: radio controlsPage 178 of 594

Up-Shift Light (Manual Transmission)...............3-40
Brake System Warning Light..........................3-41
Anti-Lock Brake System Warning Light.............3-42
Traction Off Light..........................................3-42
Engine Coolant Temperature Gage..................3-43
Transmission Temperature Gage.....................3-43
Malfunction Indicator Lamp.............................3-45
Oil Pressure Gage........................................3-47
Security Light...............................................3-48
Cruise Control Light......................................3-48
Highbeam On Light.......................................3-49
Four-Wheel-Drive Light..................................3-49
Tow/Haul Mode Light....................................3-49
Cargo Lamp Light.........................................3-49
Fuel Gage...................................................3-50
Low Fuel Warning Light.................................3-50
Driver Information Center (DIC).......................3-51
DIC Operation and Displays...........................3-52
DIC Warnings and Messages.........................3-54
DIC Vehicle Customization.............................3-64Audio System(s).............................................3-70
Setting the Time for Radios without Radio
Data Systems (RDS)..................................3-71
Setting the Time for Radios with Radio Data
Systems (RDS).........................................3-71
AM-FM Radio...............................................3-72
Radio with CD..............................................3-74
Radio with Cassette and CD..........................3-85
Radio with Six-Disc CD.................................3-99
Rear Seat Entertainment System...................3-114
Rear Seat Audio (RSA)................................3-125
Theft-Deterrent Feature................................3-126
Audio Steering Wheel Controls......................3-127
Radio Reception.........................................3-128
Care of the Cassette Tape Player.................3-128
Care of Your CDs and DVDs........................3-129
Care of the CD and DVD Player...................3-130
Fixed Mast Antenna....................................3-130
XM™ Satellite Radio Antenna System............3-130
Chime Level Adjustment...............................3-130
Section 3 Instrument Panel
3-2
Page 193 of 594
When the wiring is connected to an auxiliary roof
mounted lamp, pressing the button will activate the lamp
and illuminate an indicator light near the button. Pressing
the button again will turn off the roof mounted lamp.
If your vehicle has this button, your vehicle may have the
snow plow prep package. For further information see
Adding a Snow Plow or Similar Equipment on page 4-54.
Instrument Panel Brightness
D(Instrument Panel Brightness):This feature
controls the brightness of the instrument panel lights.
The thumbwheel for this feature is located next to
the headlamp control.
Turn the thumbwheel up to adjust the instrument panel
lights. Turn the thumbwheel up to return the radio
display to full brightness when the headlamps or parking
lamps are on. To turn on the dome lamps, turn the
thumbwheel all the way up.
Dome Lamps
The dome lamps will come on when you open a door.
You can also turn the dome lamps on by turning
the thumbwheel, located next to the exterior lamps
control, all the way up. In this position, the dome lamps
will remain on whether a door is opened or closed.
Dome Lamp Override
E(Dome Lamp Override):You can use the dome
override button, located below the exterior lamps control,
to set the dome lamps to come on automatically when
a door is opened, or to remain off. To turn the lamps off,
press the button into the in position. With the button
in this position, the dome lamps will remain off when
the doors are open. To return the lamps to automatic
operation, press the button again and return it to the out
position. With the button in this position, the dome
lamps will come on when you open a door.
3-17
Page 246 of 594

Audio System(s)
Determine which radio your vehicle has and then read the
pages following to familiarize yourself with its features.
Driving without distraction is a necessity for a safer
driving experience. SeeDefensive Driving on page 4-2.
By taking a few moments to read this manual and
get familiar with your vehicle’s audio system, you can
use it with less effort, as well as take advantage of
its features. While your vehicle is parked, set up your
audio system by presetting your favorite radio stations,
setting the tone and adjusting the speakers. Then,
when driving conditions permit, you can tune to your
favorite stations using the presets and steering
wheel controls if the vehicle has them.
{CAUTION:
This system provides you with a far greater
access to audio stations and song listings.
Giving extended attention to entertainment
tasks while driving can cause a crash and you
or others can be injured or killed. Always keep
your eyes on the road and your mind on the
drive — avoid engaging in extended searching
while driving.Keeping your mind on the drive is important for safe
driving. For more information, seeDefensive Driving on
page 4-2.
Here are some ways in which you can help avoid
distraction while driving.
While your vehicle is parked:
Familiarize yourself with all of its controls.
Familiarize yourself with its operation.
Set up your audio system by presetting your
favorite radio stations, setting the tone, and
adjusting the speakers. Then, when driving
conditions permit, you can tune to your favorite
radio stations using the presets and steering wheel
controls if the vehicle has them.
Notice:Before adding any sound equipment to
your vehicle, such as an audio system, CD player,
CB radio, mobile telephone, or two-way radio, make
sure that it can be added by checking with your
dealer. Also, check federal rules covering mobile
radio and telephone units. If sound equipment can
be added, it is very important to do it properly.
Added sound equipment may interfere with
the operation of your vehicle’s engine, radio, or
other systems, and even damage them. Your
vehicle’s systems may interfere with the operation
of sound equipment that has been added.
3-70
Page 249 of 594
Setting Preset Stations
Up to 18 stations (six FM1, six FM2, and six AM) can be
programmed on the six numbered pushbuttons, by
performing the following steps:
1. Turn the radio on.
2. Press AM FM to select FM1, FM2, or AM.
3. Tune in the desired station.
4. Press and hold one of the six numbered
pushbuttons until you hear a beep. Whenever that
numbered pushbutton is pressed, the station
that was set will return.
5. Repeat the steps for each pushbutton.
Setting the Tone (Bass/Treble)
AUDIO:To adjust bass or treble, press and release
AUDIO until BAS or TRE appears on the display. Then
press and hold the up or the down arrow to increase
or to decrease. If a station is weak or noisy, decrease
the treble.
To adjust bass or treble to the middle position, select
BAS or TRE. Then press and hold AUDIO for more than
two seconds until you hear a beep. B and a zero or T
and a zero will appear on the display.To adjust all tone and speaker controls to the middle
position, �rst end out of audio mode by pressing another
button, causing the radio to perform that function or
by waiting �ve seconds for the display to return to time
of day. Then press and hold AUDIO for more than
two seconds until you hear a beep. CEN will appear on
the display.
Adjusting the Speakers (Balance/Fade)
AUDIO:To adjust the balance between the right
and the left speakers, press and release AUDIO until
BAL appears on the display. Then press and hold the up
or the down arrow to move the sound toward the right
or the left speakers.
To adjust the fade between the front and the rear
speakers, press and release AUDIO until FAD appears
on the display. Then press and hold the up or the
down arrow to move the sound toward the front or the
rear speakers.
To adjust balance or fade to the middle position, select
BAL or FAD. Then press and hold AUDIO for more
than two seconds until you hear a beep. L (balance) and
a zero or F and a zero will appear on the display.
3-73
Page 250 of 594
To adjust all tone and speaker controls to the middle
position, �rst end out of audio mode by pressing another
button, causing the radio to perform that function or
by waiting �ve seconds for the display to return to time
of day. Then press and hold AUDIO for more than
two seconds until you hear a beep. CEN will appear on
the display.
Fade may not be available if the vehicle is a regular
cab model.
Radio Messages
CAL (Calibrated):The audio system has been
calibrated for your vehicle from the factory. If CAL
appears on the display it means that the radio has not
been con�gured properly for your vehicle and must
be returned to your GM dealer for service.
LOC (Locked):This message is displayed when the
THEFTLOCK
®system has locked up. Take the vehicle
to your GM dealer for service.
If any error occurs repeatedly or if an error cannot be
corrected, contact your GM dealer.
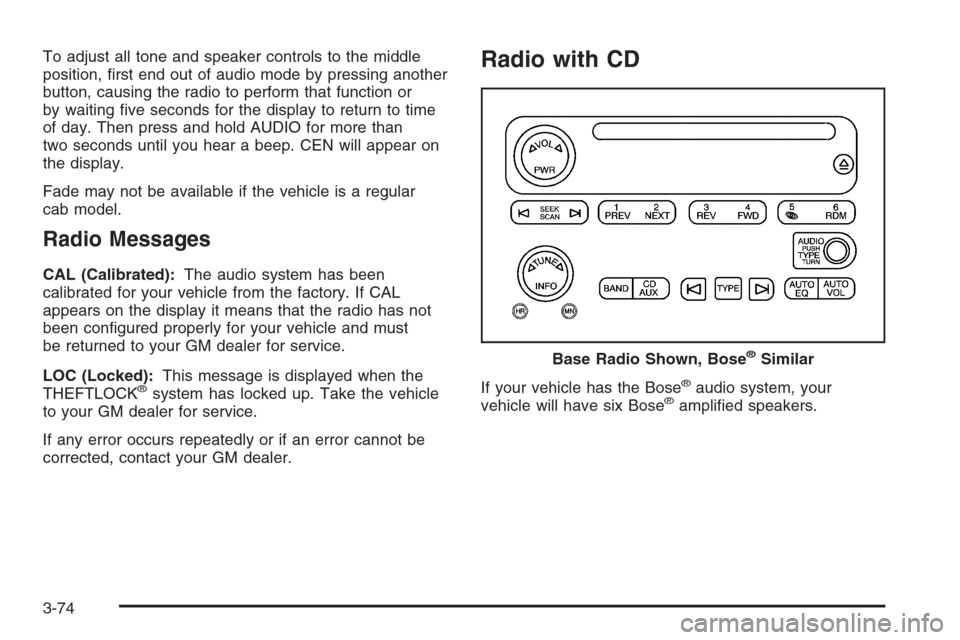
Radio with CD
If your vehicle has the Bose®audio system, your
vehicle will have six Bose®ampli�ed speakers. Base Radio Shown, Bose
®Similar
3-74
Page 253 of 594
Setting Preset Stations
Up to 30 stations (six FM1, six FM2, and six AM,
six XM1 and six XM2 (if equipped)), can be programed
on the six numbered pushbuttons, by performing the
following steps:
1. Turn the radio on.
2. Press BAND to select FM1, FM2, AM, or XM1
or XM2.
3. Tune in the desired station.
4. Press and hold one of the six numbered
pushbuttons until you hear a beep. Whenever that
numbered pushbutton is pressed, the station
that was set will return for that pushbutton.
5. Repeat the steps for each pushbutton.
To store an equalization setting to a preset station
perform the following:
1. Tune to the preset station.
2. Press and release the AUTO EQ button to select
the equalization setting.
Once the equalization no longer appears on the
display, the equalization will be set for that preset
station.
Setting the Tone (Bass/Treble)
AUDIO:Push and release the AUDIO knob until BASS
or TREB appears on the display. Turn the knob to
increase or to decrease. The display will show the bass
or treble level. If a station is weak or noisy, decrease
the treble.
To adjust the bass or treble to the middle position, while
it is displayed, push and hold the AUDIO knob. The
radio will produce one beep and adjust the display level
to the middle position.
To adjust all tone and speaker controls to the middle
position, push and hold the AUDIO knob when no tone
or speaker control is displayed. ALL CENTERED will
appear on the display, you will hear a beep, and
the display level will be adjusted to the middle position.
AUTO EQ (Automatic Equalization):Press this
button to select customized equalization settings
designed for country/western, jazz, talk, pop, rock, and
classical. Selecting CUSTOM or changing bass or
treble, returns the EQ to the manual bass and treble
settings.
The radio will save separate AUTO EQ settings for each
preset and source.
If the radio is equipped with the Bose
®audio system,
the equalization settings are either CUSTOM or TALK.
3-77
Page 254 of 594
Adjusting the Speakers (Balance/Fade)
AUDIO:To adjust the balance between the right
and the left speakers, push and release the AUDIO
knob until BAL appears on the display. Turn the knob to
move the sound toward the right or the left speakers.
To adjust the fade between the front and the rear
speakers, push and release the AUDIO knob until FADE
appears on the display. Turn the knob to move the
sound toward the front or the rear speakers.
To adjust the balance or fade to the middle position,
while it is displayed, push the AUDIO knob, then push it
again and hold it until the radio produces one beep.
The balance or fade will be adjusted to the middle
position and the display will show the speaker balance.
To adjust all tone and speaker controls to the middle
position, push and hold the AUDIO knob when no tone
or speaker control is displayed. ALL CENTERED will
appear on the display, you will hear a beep, and
the display level will be adjusted to the middle position.
Finding a Program Type (PTY) Station
(RDS and XM™)
To select and �nd a desired PTY perform the following:
1. Press the TYPE button to activate program type
select mode. TYPE and a PTY will appear on the
display.
2. Turn the TYPE knob or press and release the
TYPE button to select a PTY.
3. Once the desired PTY is displayed, press and
release either the TYPE or the SEEK arrows to
select and to take you to the PTY’s �rst station.
4. To go to another station within that PTY and the
PTY is displayed, press either the TYPE or the
SEEK arrows once. If the PTY is not displayed, go
back to Step 1.
5. Press either the TYPE or the SEEK arrows to exit
program type select mode.
If the radio cannot �nd the desired program type, NONE
will appear on the display and the radio will return to
the last station you were listening to.
3-78
Page 264 of 594
Setting Preset Stations
Up to 30 stations (six FM1, six FM2, and six AM,
six XM1 and six XM2 (if equipped)), can be programed
on the six numbered pushbuttons, by performing the
following steps:
1. Turn the radio on.
2. Press BAND to select FM1, FM2, AM, or XM1
or XM2.
3. Tune in the desired station.
4. Press and hold one of the six numbered
pushbuttons until you hear a beep. Whenever that
numbered pushbutton is pressed, the station
that was set will return for that pushbutton.
5. Repeat the steps for each pushbutton.
To store an equalization setting to a preset station
perform the following:
1. Tune to the preset station.
2. Press and release the AUTO EQ button to select
the equalization setting.
Once the equalization no longer appears on the
display, the equalization will be set for that preset
station.
Setting the Tone (Bass/Treble)
AUDIO:Push and release the AUDIO knob until BASS
or TREB appears on the display. Turn the knob to
increase or to decrease. The display will show the bass
or treble level. If a station is weak or noisy, decrease
the treble.
To adjust the bass or treble to the middle position while
it is displayed, push and hold the AUDIO knob. The
radio will produce one beep and adjust the display level
to the middle position.
To adjust all tone and speaker controls to the middle
position, push and hold the AUDIO knob when no tone
or speaker control is displayed. ALL CENTERED will
appear on the display, you will hear a beep, and
the display level will be adjusted to the middle position.
AUTO EQ (Automatic Equalization):Press this
button to select customized equalization settings
designed for country/western, jazz, talk, pop, rock, and
classical. Selecting CUSTOM or changing bass or
treble, returns the EQ to the manual bass and treble
settings.
The radio will save separate AUTO EQ settings for each
preset and source.
If the radio is equipped with the Bose
®audio system,
the equalization settings are either CUSTOM or TALK.
3-88