2006 CHEVROLET MALIBU start stop button
[x] Cancel search: start stop buttonPage 10 of 442
Heated Seats
Your vehicle may have heated front seats.
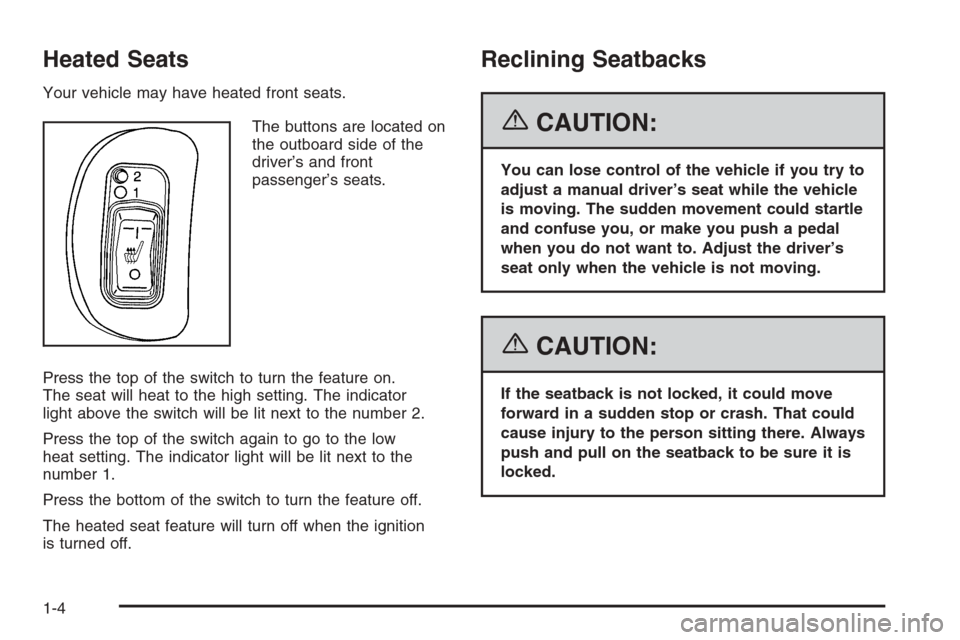
The buttons are located on
the outboard side of the
driver’s and front
passenger’s seats.
Press the top of the switch to turn the feature on.
The seat will heat to the high setting. The indicator
light above the switch will be lit next to the number 2.
Press the top of the switch again to go to the low
heat setting. The indicator light will be lit next to the
number 1.
Press the bottom of the switch to turn the feature off.
The heated seat feature will turn off when the ignition
is turned off.
Reclining Seatbacks
{CAUTION:
You can lose control of the vehicle if you try to
adjust a manual driver’s seat while the vehicle
is moving. The sudden movement could startle
and confuse you, or make you push a pedal
when you do not want to. Adjust the driver’s
seat only when the vehicle is not moving.
{CAUTION:
If the seatback is not locked, it could move
forward in a sudden stop or crash. That could
cause injury to the person sitting there. Always
push and pull on the seatback to be sure it is
locked.
1-4
Page 109 of 442
Make sure the shift lever is fully in PARK (P) before
starting the engine. Your vehicle has an automatic
transaxle shift lock control system. You have to apply
your regular brake and press the shift lever button
before you can shift from PARK (P) while the ignition
key is in ON. If you cannot shift out of PARK (P), ease
pressure on the shift lever and push the shift lever
all the way into PARK (P) as you maintain brake
application. Then move the shift lever into another gear.
SeeShifting Out of Park (P) on page 2-35later in
this section.
REVERSE (R):Use this gear to back up.
Notice:Shifting to REVERSE (R) while your vehicle
is moving forward could damage the transaxle.
The repairs would not be covered by your warranty.
Shift to REVERSE (R) only after your vehicle is
stopped.
To rock your vehicle back and forth to get out of snow,
ice, or sand without damaging your transaxle, see
If Your Vehicle is Stuck in Sand, Mud, Ice, or Snow on
page 4-32.
NEUTRAL (N):In this position, your engine does not
connect with the wheels. To restart when you are
already moving, use NEUTRAL (N) only. Also, use
NEUTRAL (N) when your vehicle is being towed.
{CAUTION:
Shifting into a drive gear while your engine is
running at high speed is dangerous. Unless
your foot is �rmly on the brake pedal, your
vehicle could move very rapidly. You could
lose control and hit people or objects. Do not
shift into a drive gear while your engine is
running at high speed.
Notice:Shifting out of PARK (P) or NEUTRAL (N)
while the engine is running at high speed may
damage the transaxle. The repairs would not be
covered by your warranty. Be sure the engine is not
running at high speeds when shifting your vehicle.
AUTOMATIC OVERDRIVE (D):This position is for
normal driving. If you need more power for passing,
and you are:
Going less than 35 mph (55 km/h), push your
accelerator pedal about halfway down.
Going about 35 mph (55 km/h) or more, push
the accelerator all the way down.
MANUAL MODE (M):This position, allows you to
change gears similar to a manual transaxle. If your
vehicle has this feature, see Driver Shift Control (DSC).
2-31
Page 111 of 442
SECOND (2) Gear Start Feature
When accelerating your vehicle from a stop in
snowy and icy conditions, you may want to shift
into SECOND (2) gear. A higher gear allows you
to gain more traction on slippery surfaces.
With the DSC feature, the vehicle can be set to pull
away in SECOND (2) gear.
1. Move the shift lever from AUTOMATIC
OVERDRIVE (D) into the MANUAL MODE (M).
2. With the vehicle stopped, press (+) end of the
button to select SECOND (2) gear. The vehicle
will start from a stop position in SECOND (2) gear.
3. Once moving select the desired drive gear.
Parking Brake
To set the parking brake, push down the parking
brake pedal with your left foot. If the ignition is on, the
brake system warning light will come on. SeeBrake
System Warning Light on page 3-36.
To release the parking brake, hold the regular brake
pedal down with your right foot. Push down momentarily
on the parking brake pedal with your left foot until you
feel the pedal release. If the parking brake is not
released when you begin to drive, the brake system
warning light will be on and a chime will sound warning
you that the parking brake is still on.
The PUSH PARK PEDAL message will also appear in
the Driver Information Center (DIC) to remind you
to release the parking brake. SeeDIC Warnings
and Messages on page 3-50.
Notice:Driving with the parking brake on can
overheat the brake system and cause premature
wear or damage to brake system parts. Verify that
the parking brake is fully released and the brake
warning light is off before driving.
If you are towing a trailer and are parking on a hill,
seeTowing a Trailer on page 4-42.
2-33
Page 190 of 442
Adjusting the Speakers (Balance/Fade)
BAL/FADE /S(Balance/Fade):To adjust the
balance between the right and the left speakers, press
and release the balance and fade button until BAL
appears on the display. Turn the ADJ knob to move the
sound toward the right or the left speakers.
To adjust the fade between the front and the rear
speakers, press and release the balance and fade
button until FADE appears on the display. Then turn
the ADJ knob to move the sound toward the front or
the rear speakers.
To adjust the balance or the fade to the middle position,
select BAL or FADE. Then press and hold the balance
and fade button for more than two seconds. You
will hear a beep and the level will be adjusted to the
middle position.
To adjust the speaker controls to the middle position,
�rst end out of balance and fade by pressing another
button, causing the radio to perform that function, or by
waiting �ve seconds for the display to return to the
default display. Then press and hold the balance and
fade button for more than two seconds until you hear a
beep. ALL CENTERED will appear on the display.
Radio Messages
CALIBRATE:The audio system has been calibrated for
your vehicle from the factory. If CALIBRATE appears
on the display it means that the radio has not been
con�gured properly for your vehicle and must be
returned to your GM dealer for service.
LOCKED:This message is displayed when the
THEFTLOCK
®system has locked up. Take the vehicle
to your GM dealer for service.
If any error occurs repeatedly or if an error cannot be
corrected, contact your GM dealer.
Playing a CD
Insert a CD partway into the slot, label side up. The
player will pull it in and the CD should begin playing.
If you want to insert a CD with the ignition off, �rst press
the eject button or the DISP knob.
As each new track starts to play, the track number will
appear on the display.
If the ignition or radio is turned off with a CD in the
player, it will stay in the player. When the ignition
or radio is turned on, the CD will start playing, where
it stopped, if it was the last selected audio source.
3-58
Page 192 of 442
SEEKw:Press this button to go to the next track.
The track number will appear on the display. If this
button is pressed more than once, the player will
continue moving forward through the CD.
If this button is held for more than two seconds, the
CD will enter CD scan mode and the CD will play the
�rst 10 seconds of each track. Press this button again
to stop scanning.
SEEK
x:Press this button to go to the start of the
current track if more than eight seconds have played.
The track number will appear on the display. If this
button is pressed more than once, the player will
continue moving backward through the CD.
If this button is held for more than two seconds, the
CD will enter CD scan mode and the CD will play the
�rst 10 seconds of each track. Press this button again
to stop scanning.
DISP (Display):Press this knob to see the current track
number, time, and temperature or the track number, the
elapsed time of the track, and the temperature.
To change the default on the display, press this knob
until you see the display you want, then hold the knob
for two seconds. You will hear a beep and the selected
display will now be the default.
AM/FM/CD:Press this button when listening to the
radio to play a CD.EJECT /
Z(Eject):Press this button to eject a CD.
Eject may be activated with either the ignition or
radio off. CDs may be loaded with the ignition and
radio off if this button is pressed �rst.
CD Messages
If the CD comes out, it could be for one of the following
reasons:
It is very hot. When the temperature returns to
normal, the CD should play.
You are driving on a very rough road. When the
road becomes smoother, the CD should play.
The CD is dirty, scratched, wet, or upside down.
The air is very humid. If so, wait about an hour
and try again.
There may have been a problem while burning
the CD.
The label may be caught in the CD player.
If the CD is not playing correctly, for any other reason,
try a known good CD.
If any error occurs repeatedly or if an error cannot be
corrected, contact your GM dealer. If the radio displays
an error message, write it down and provide it to
your GM dealer when reporting the problem.
3-60
Page 201 of 442
Playing a CD
Insert a CD partway into the slot, label side up. The
player will pull it in and the CD should begin playing.
If you want to insert a CD with the ignition off, �rst press
the eject button or the DISP knob.
As each new track starts to play, the track number will
appear on the display.
If the ignition or radio is turned off with a CD in the
player, it will stay in the player. When the ignition
or radio is turned on, the CD will start playing, where
it stopped, if it was the last selected audio source.
The CD player can play the smaller 3 inch (8 cm)
single CDs with an adapter ring. Full-size CDs and the
smaller CDs are loaded in the same manner.
If playing a CD-R, the sound quality may be reduced
due to CD-R quality, the method of recording, the quality
of the music that has been recorded, and the way the
CD-R has been handled. There may be an increase
in skipping, difficulty in �nding tracks, and/or difficulty in
loading and ejecting. If these problems occur, check
the bottom surface of the CD. If the surface of the CD
is damaged, such as cracked, broken, or scratched,
the CD will not play properly. If the surface of the CD is
soiled, seeCare of Your CDs and DVDs on page 3-107
for more information.If there is no apparent damage, try a known good CD.
Do not add any label to a CD, it could get caught in the
CD player. If a CD is recorded on a personal computer
and a description label is needed, try labeling the top
of the recorded CD with a marking pen instead.
Notice:If you add any label to a CD, insert more
than one CD into the slot at a time, or attempt
to play scratched or damaged CDs, you could
damage the CD player. When using the CD player,
use only CDs in good condition without any
label, load one CD at a time, and keep the CD player
and the loading slot free of foreign materials,
liquids, and debris.
If an error appears on the display, see “CD Messages”
later in this section.
s(Reverse):Press and hold this pushbutton to
reverse quickly within a track. You will hear sound at
a reduced volume. Release the button to play the
passage. The elapsed time of the track will appear on
the display.
\(Fast Forward):Press and hold this pushbutton
to advance quickly within a track. You will hear sound
at a reduced volume. Release the button to play
the passage. The elapsed time of the track will appear
on the display.
3-69
Page 202 of 442
RPT (Repeat):Press this button once to hear a track
over again. REPEAT ON and RPT will appear on
the display. The current track will continue to repeat.
Press RPT again to turn off repeat play. REPEAT OFF
will appear on the display and RPT will disappear
from the display.
RDM (Random):Press this button to hear the tracks in
random, rather than sequential, order. T#, RANDOM,
and RDM will appear on the display. T and the
track number will appear on the display when each
track starts to play. Press RDM again to turn off random
play. RANDOM OFF will appear on the display and
RDM will disappear from the display.
xSEEKw:Press the down arrow to go to the
start of the current track if more than eight seconds
have played. If this arrow is pressed more than once, the
player will continue moving backward through the CD.
Press the up arrow to go to the start of the next track.
If this arrow is pressed more than once, the player
will continue moving forward through the CD.
If either arrow is held or pressed for more than
two seconds, the CD will enter CD scan mode and
the CD will play the �rst 10 seconds of each track.
Press either arrow again to stop scanning.DISP (Display):Press this knob to see how long the
current track has been playing. T, the track number,
and the elapsed time of the track will appear on
the display. To change the default on the display,
time or elapsed time, press the knob until you see the
display you want, then hold the knob for two seconds.
The radio will produce one beep and the selected
display will now be the default. Pressing this button
will also display text on commercially recorded CDs
(if available).
AUTO TONE/AUTO EQ (Automatic Equalization):
Press this button to select the desired equalization
setting while playing a CD. The equalization will
be automatically recalled whenever a CD is played.
For more information, see AUTO TONE/AUTO EQ
listed previously in this section.
BAND:Press this button to listen to the radio when
a CD is playing. The inactive CD will remain safely
inside the radio for future listening.
SRCE (Source):Press this button to play a CD or to
access a remote device (if installed) when listening
to the radio.
EJECT /
Z(Eject):Press this button to eject a CD.
Eject may be activated with either the ignition or
radio off. CDs may be loaded with the ignition and
radio off if this button is pressed �rst.
3-70
Page 212 of 442
Playing a CD
If the ignition or radio is turned off, with a CD in the
player, it will stay in the player. When the ignition
or radio is turned on, the CD will start playing where
it stopped, if it was the last selected audio source.
When a CD is inserted, the CD symbol will appear on
the CD. As each new track starts to play, the track
number will appear on the display.
The CD player can play the smaller 3 inch (8 cm)
single CDs with an adapter ring. Full-size CDs and
the smaller CDs are loaded in the same manner.
If playing a CD-R, the sound quality may be reduced
due to CD-R quality, the method of recording, the quality
of the music that has been recorded, and the way the
CD-R has been handled. There may be an increase
in skipping, difficulty in �nding tracks, and/or difficulty in
loading and ejecting. If these problems occur, check
the bottom surface of the CD. If the surface of the CD
is damaged, such as cracked, broken, or scratched, the
CD will not play properly. If the surface of the CD is
soiled, seeCare of Your CDs and DVDs on page 3-107
for more information.If there is no apparent damage, try a known good CD.
Do not add any label to a CD, it could get caught in the
CD player. If a CD is recorded on a personal computer
and a description label is needed, try labeling the top of
the recorded CD with a marking pen instead.
Notice:If you add any label to a CD, insert more
than one CD into the slot at a time, or attempt
to play scratched or damaged CDs, you could
damage the CD player. When using the CD player,
use only CDs in good condition without any
label, load one CD at a time, and keep the CD player
and the loading slot free of foreign materials,
liquids, and debris.
If an error appears on the display, see “CD Messages”
later in this section.
LOAD:Press the LOAD button to load CDs into the
CD player. This CD player will hold up to six CDs.
To insert one CD, do the following:
1. Turn the ignition on.
2. Press and release the LOAD button.
3. Wait for INSERT CD to �ash on the display.
4. Load a CD. Insert the CD partway into the slot,
label side up. The player will pull the CD in.
3-80