2006 CHEVROLET MALIBU AUX
[x] Cancel search: AUXPage 153 of 442
Accessory Power Outlet(s)
With accessory power outlets you can plug in auxiliary
electrical equipment such as a cellular telephone.
For vehicles with Traction Control system, the accessory
power outlets are located on the front of the center
console storage area and also inside the console
storage compartment. The compartment has notches
that allow power cords to be routed outside of the
console while the lid is closed. On vehicles without
Traction Control, both outlets are located on the front
of the center console storage area. There is also
an outlet in the rear cargo area of the MAXX.
Notice:Leaving electrical equipment on for
extended periods will drain the battery. Always turn
off electrical equipment when not in use and do
not plug in equipment that exceeds the maximum
amperage rating.
Certain electrical accessories may not be compatible
with the accessory power outlet and could result
in blown vehicle or adapter fuses. If you experience
a problem see your dealer for additional information on
accessory power outlets.Notice:Adding any electrical equipment to your
vehicle may damage it or keep other components
from working as they should. The repairs would not
be covered by your warranty. Do not use equipment
exceeding maximum amperage rating of 20 amperes.
Check with your retailer before adding electrical
equipment.
When adding electrical equipment, be sure to follow
the proper installation instructions included with
the equipment.
Notice:Improper use of the power outlet can
cause damage not covered by your warranty.
Do not hang any type of accessory or accessory
bracket from the plug because the power outlets
are designed for accessory power plugs only.
3-21
Page 220 of 442
Stereo RCA Jacks
The RCA jacks are located on the DVD faceplate on
the �oor console. The RCA jacks allow audio and
video signals to be connected from an auxiliary device
such as a camcorder or a video game unit to the
RSE system. The yellow RCA jack is used for video
inputs, the red RCA jack for right audio inputs, and
the white RCA jack for left audio inputs. The system
requires standard RCA cables, not included, to connect
the auxiliary device to the RCA jacks. Refer to the
manufacturer’s instructions for proper usage.
To use the auxiliary audio and video inputs, connect
an external auxiliary device such as a camcorder to
the RCA jacks and turn on both the auxiliary device
power and the power on the front of the RSE system.
Press the play and source buttons at the same time
or the AUX button on the remote control to switch to
the auxiliary device. See “DVD Player” and “Remote
Control” later in this section for more information.
Audio Output
Audio from the DVD player or auxiliary devices can
be heard through the following possible sources:
Wireless Headphones
Vehicle’s Speakers
Wired Headphones (not included)Only one audio source can be heard through the
vehicles speakers at a time.
The RSE system or an auxiliary device can be heard
through all of the vehicles speakers when the following
occurs:
The RSE system is off
A DVD or auxiliary device is playing
The front audio system is on and the SRCE button
is pressed to enable the RSE system
The headphone symbol will appear on the radio display
when the RSE system is on and the headphone
symbol will disappear from the display when it is off.
To turn the vehicles rear speakers on and off, press
the power button on the RSE system or on the remote
control. When the rear speakers are off, the audio
from the RSE system can be heard through both the
wireless headphones and the vehicles front speakers
at the same time.
The RSE system can be heard through the wired
headphones, not included, on the RSE system when
the following occurs:
The RSE system is on
A DVD or auxiliary device is playing
3-88
Page 221 of 442
The volume on the radio may vary when switching
between a radio station, CD, DVD, cassette, or auxiliary
device.
If there is a decreased audio signal during CD or DVD
play, there may be a low hissing noise through the
speakers and/or headphones. If the hissing sound in
the wireless headphones seems excessive, make sure
that the headphone batteries are fully charged. Some
amount of hissing is normal.
Video Screen
The video screen is located on the back of the �oor
console. Open the video screen by rotating the screen
up and adjust its position as desired.
The video screen may not be able to be rotated up if
the rear seat is too far forward. See “Rear Sliding Seat
(MAXX Only)” underRear Seat Operation on page 1-10
for more information.
When the video screen is not in use, push it down into
its stored position.
The DVD player and display will continue to operate
when the video screen is in either the up or down
positions.The window on the RSE system contains the transmitter
for the wireless headphones and the remote control.
If the screen is in the closed position, the signals will not
be available for the operation of the headphones or
the remote control.
Notice:Avoid directly touching the video screen,
as damage may occur. See “Cleaning the Video
Screen” later in this section for more information.
DVD Player
The DVD player is located on the end of the �oor
console under the video screen.
The DVD player can be controlled by the buttons on
the RSE system and/or by the buttons on the remote
control. See “Remote Control” later in this section
for more information.
The DVD player is only compatible with DVDs of the
appropriate region code for the country that the vehicle
was sold in. The DVD region code is printed on the
jackets of most DVDs. Video CDs, standard audio CDs,
and audio CD-Rs can be played by the DVD player.
The video screen will display a menu when an audio CD
or CD-R is playing.
If an error message appears on the video screen, see
“DVD Messages” later in this section.
3-89
Page 225 of 442
w,x,o,p(Directional Arrows):Press these
buttons to navigate through DVD menus.
y(Main DVD Menu):Press this button to view the
media menu. The media menu is different on every disc.
Use the up, down, right, and left arrow buttons to
move the cursor around the media menu. After making
a selection, press the enter button. Press this button
again to start play of the disc.
u(Wired Headphone Volume):Press the plus and
minus buttons to increase or to decrease the volume of
both wired headphones (not included).
E(Screen Brightness):Press the plus and minus
buttons to increase or to decrease the intensity of
the video screen.
q(Return):Press this button to exit the current
active menu and return to the previous menu. This
button will operate only when a DVD is playing and/or a
menu is active.
s(Rewind):Press this button to rewind the DVD or
CD. To stop rewinding, press this button again. This
button may not work when the DVD is playing the
copyright information or the previews.
\(Fast Forward):Press this button to fast forward
the DVD or CD. To stop fast forwarding, press this
button again. This button may not work when the DVD
is playing the copyright information or the previews.
s(Play/Pause):Press this button to start play of
a DVD or CD. Press this button while a DVD or CD is
playing to pause it. Press this button again to continue
the play of the DVD or CD.
While in the menu, press this button to enter a selection.
When using RSA or an auxiliary device, pressing this
button will play a DVD or a CD if they are loaded.
g(Previous Chapter/Track):Press this button to
go to the beginning of the current track or chapter.
Press this button again to return to the previous track
or chapter. This button may not work when the DVD is
playing the copyright information or the previews.
l(Next Chapter/Track):Press this button to
advance to the beginning of the next chapter or track.
This button may not work when the DVD is playing
the copyright information or the previews.
c(Stop):Press this button to stop playing, rewinding,
or fast forwarding a DVD or CD. Press this button
twice to return to the beginning of the DVD.
3-93
Page 226 of 442
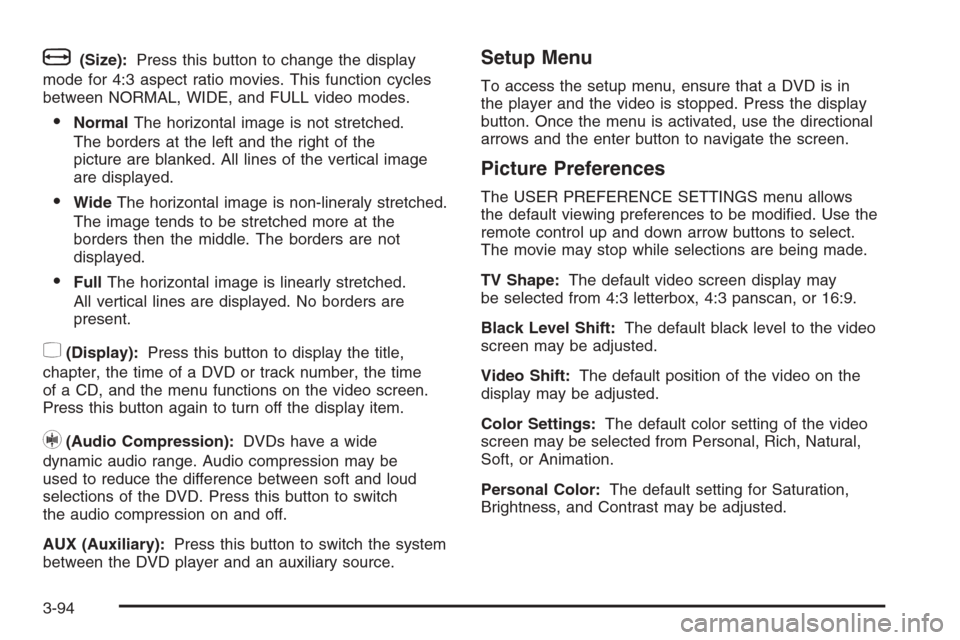
b(Size):Press this button to change the display
mode for 4:3 aspect ratio movies. This function cycles
between NORMAL, WIDE, and FULL video modes.
NormalThe horizontal image is not stretched.
The borders at the left and the right of the
picture are blanked. All lines of the vertical image
are displayed.
WideThe horizontal image is non-lineraly stretched.
The image tends to be stretched more at the
borders then the middle. The borders are not
displayed.
FullThe horizontal image is linearly stretched.
All vertical lines are displayed. No borders are
present.
z(Display):Press this button to display the title,
chapter, the time of a DVD or track number, the time
of a CD, and the menu functions on the video screen.
Press this button again to turn off the display item.
}(Audio Compression):DVDs have a wide
dynamic audio range. Audio compression may be
used to reduce the difference between soft and loud
selections of the DVD. Press this button to switch
the audio compression on and off.
AUX (Auxiliary):Press this button to switch the system
between the DVD player and an auxiliary source.
Setup Menu
To access the setup menu, ensure that a DVD is in
the player and the video is stopped. Press the display
button. Once the menu is activated, use the directional
arrows and the enter button to navigate the screen.
Picture Preferences
The USER PREFERENCE SETTINGS menu allows
the default viewing preferences to be modi�ed. Use the
remote control up and down arrow buttons to select.
The movie may stop while selections are being made.
TV Shape:The default video screen display may
be selected from 4:3 letterbox, 4:3 panscan, or 16:9.
Black Level Shift:The default black level to the video
screen may be adjusted.
Video Shift:The default position of the video on the
display may be adjusted.
Color Settings:The default color setting of the video
screen may be selected from Personal, Rich, Natural,
Soft, or Animation.
Personal Color:The default setting for Saturation,
Brightness, and Contrast may be adjusted.
3-94
Page 230 of 442
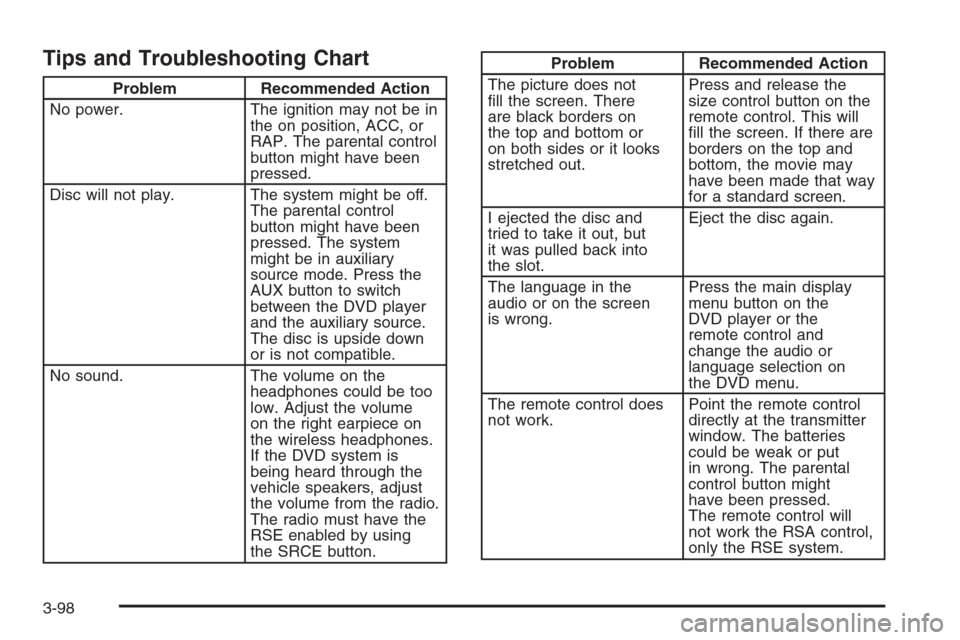
Tips and Troubleshooting Chart
Problem Recommended Action
No power. The ignition may not be in
the on position, ACC, or
RAP. The parental control
button might have been
pressed.
Disc will not play. The system might be off.
The parental control
button might have been
pressed. The system
might be in auxiliary
source mode. Press the
AUX button to switch
between the DVD player
and the auxiliary source.
The disc is upside down
or is not compatible.
No sound. The volume on the
headphones could be too
low. Adjust the volume
on the right earpiece on
the wireless headphones.
If the DVD system is
being heard through the
vehicle speakers, adjust
the volume from the radio.
The radio must have the
RSE enabled by using
the SRCE button.
Problem Recommended Action
The picture does not
�ll the screen. There
are black borders on
the top and bottom or
on both sides or it looks
stretched out.Press and release the
size control button on the
remote control. This will
�ll the screen. If there are
borders on the top and
bottom, the movie may
have been made that way
for a standard screen.
I ejected the disc and
tried to take it out, but
it was pulled back into
the slot.Eject the disc again.
The language in the
audio or on the screen
is wrong.Press the main display
menu button on the
DVD player or the
remote control and
change the audio or
language selection on
the DVD menu.
The remote control does
not work.Point the remote control
directly at the transmitter
window. The batteries
could be weak or put
in wrong. The parental
control button might
have been pressed.
The remote control will
not work the RSA control,
only the RSE system.
3-98
Page 231 of 442
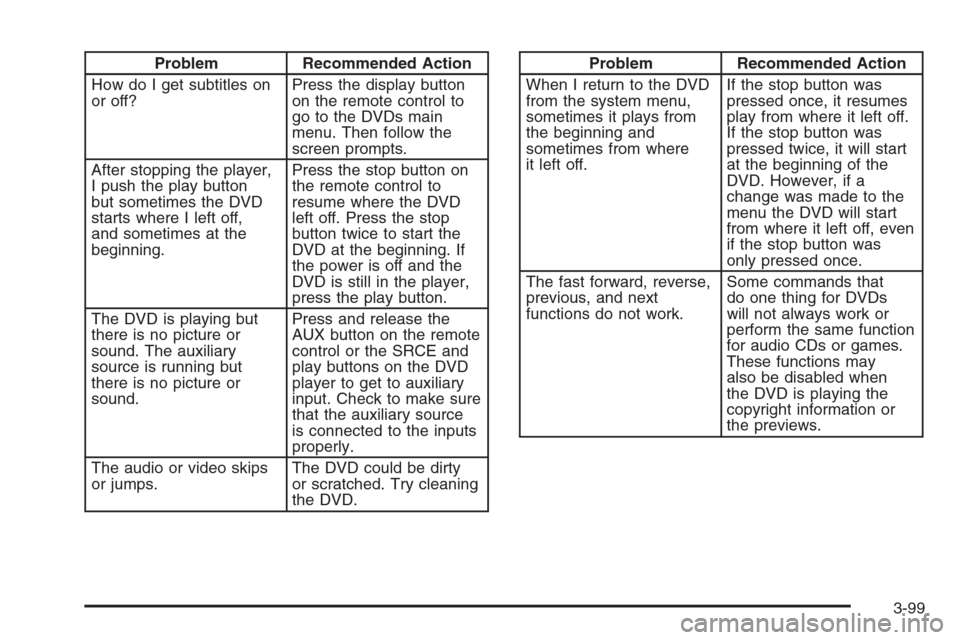
Problem Recommended Action
How do I get subtitles on
or off?Press the display button
on the remote control to
go to the DVDs main
menu. Then follow the
screen prompts.
After stopping the player,
I push the play button
but sometimes the DVD
starts where I left off,
and sometimes at the
beginning.Press the stop button on
the remote control to
resume where the DVD
left off. Press the stop
button twice to start the
DVD at the beginning. If
the power is off and the
DVD is still in the player,
press the play button.
The DVD is playing but
there is no picture or
sound. The auxiliary
source is running but
there is no picture or
sound.Press and release the
AUX button on the remote
control or the SRCE and
play buttons on the DVD
player to get to auxiliary
input. Check to make sure
that the auxiliary source
is connected to the inputs
properly.
The audio or video skips
or jumps.The DVD could be dirty
or scratched. Try cleaning
the DVD.Problem Recommended Action
When I return to the DVD
from the system menu,
sometimes it plays from
the beginning and
sometimes from where
it left off.If the stop button was
pressed once, it resumes
play from where it left off.
If the stop button was
pressed twice, it will start
at the beginning of the
DVD. However, if a
change was made to the
menu the DVD will start
from where it left off, even
if the stop button was
only pressed once.
The fast forward, reverse,
previous, and next
functions do not work.Some commands that
do one thing for DVDs
will not always work or
perform the same function
for audio CDs or games.
These functions may
also be disabled when
the DVD is playing the
copyright information or
the previews.
3-99
Page 232 of 442
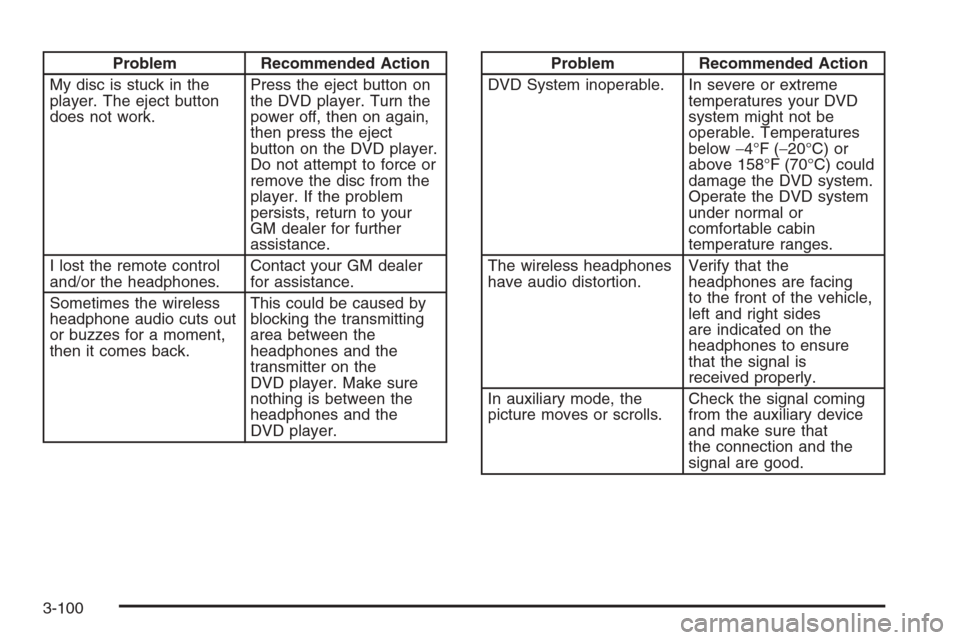
Problem Recommended Action
My disc is stuck in the
player. The eject button
does not work.Press the eject button on
the DVD player. Turn the
power off, then on again,
then press the eject
button on the DVD player.
Do not attempt to force or
remove the disc from the
player. If the problem
persists, return to your
GM dealer for further
assistance.
I lost the remote control
and/or the headphones.Contact your GM dealer
for assistance.
Sometimes the wireless
headphone audio cuts out
or buzzes for a moment,
then it comes back.This could be caused by
blocking the transmitting
area between the
headphones and the
transmitter on the
DVD player. Make sure
nothing is between the
headphones and the
DVD player.Problem Recommended Action
DVD System inoperable. In severe or extreme
temperatures your DVD
system might not be
operable. Temperatures
below−4°F (−20°C) or
above 158°F (70°C) could
damage the DVD system.
Operate the DVD system
under normal or
comfortable cabin
temperature ranges.
The wireless headphones
have audio distortion.Verify that the
headphones are facing
to the front of the vehicle,
left and right sides
are indicated on the
headphones to ensure
that the signal is
received properly.
In auxiliary mode, the
picture moves or scrolls.Check the signal coming
from the auxiliary device
and make sure that
the connection and the
signal are good.
3-100