2006 CHEVROLET IMPALA buttons
[x] Cancel search: buttonsPage 10 of 394
Manual Lumbar
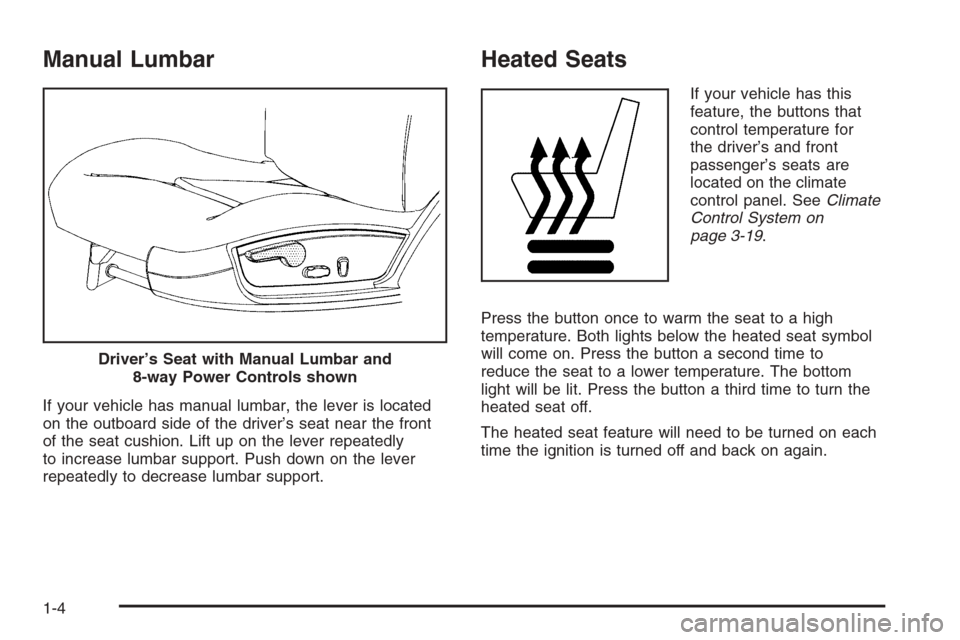
If your vehicle has manual lumbar, the lever is located
on the outboard side of the driver’s seat near the front
of the seat cushion. Lift up on the lever repeatedly
to increase lumbar support. Push down on the lever
repeatedly to decrease lumbar support.
Heated Seats
If your vehicle has this
feature, the buttons that
control temperature for
the driver’s and front
passenger’s seats are
located on the climate
control panel. SeeClimate
Control System on
page 3-19.
Press the button once to warm the seat to a high
temperature. Both lights below the heated seat symbol
will come on. Press the button a second time to
reduce the seat to a lower temperature. The bottom
light will be lit. Press the button a third time to turn the
heated seat off.
The heated seat feature will need to be turned on each
time the ignition is turned off and back on again. Driver’s Seat with Manual Lumbar and
8-way Power Controls shown
1-4
Page 29 of 394
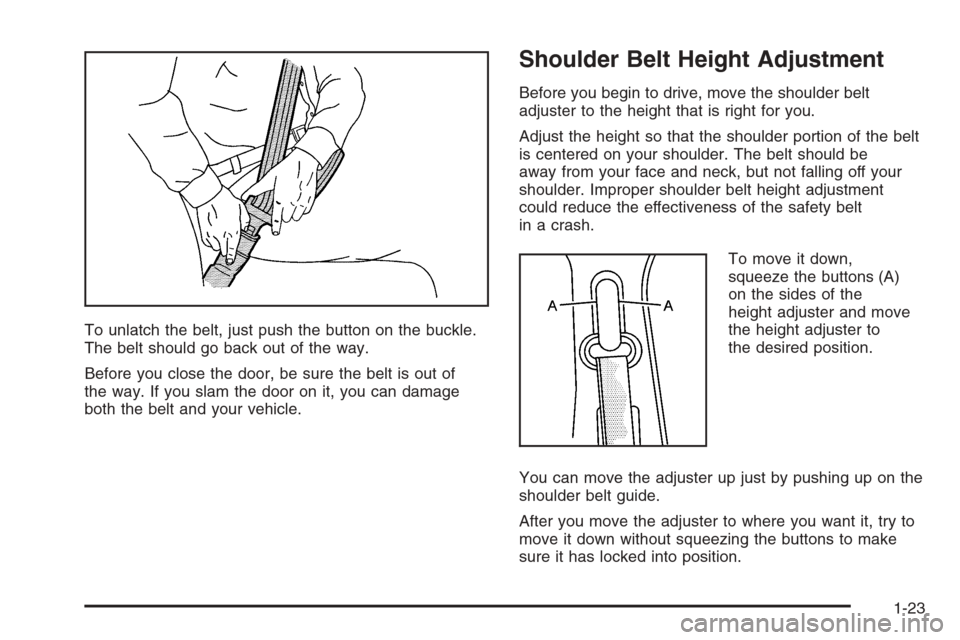
To unlatch the belt, just push the button on the buckle.
The belt should go back out of the way.
Before you close the door, be sure the belt is out of
the way. If you slam the door on it, you can damage
both the belt and your vehicle.
Shoulder Belt Height Adjustment
Before you begin to drive, move the shoulder belt
adjuster to the height that is right for you.
Adjust the height so that the shoulder portion of the belt
is centered on your shoulder. The belt should be
away from your face and neck, but not falling off your
shoulder. Improper shoulder belt height adjustment
could reduce the effectiveness of the safety belt
in a crash.
To move it down,
squeeze the buttons (A)
on the sides of the
height adjuster and move
the height adjuster to
the desired position.
You can move the adjuster up just by pushing up on the
shoulder belt guide.
After you move the adjuster to where you want it, try to
move it down without squeezing the buttons to make
sure it has locked into position.
1-23
Page 85 of 394
The remote vehicle start feature provides two separate
starts, each with 10 minutes of engine running, or it
provides one start with 10 minutes of engine running that
may be extended with 10 more minutes. If you press and
release the transmitter lock button and then press and
hold the remote start button, on the remote keyless entry
transmitter, again before the �rst 10 minutes of engine
running time has expired, 10 minutes are added to the
remaining minutes. For example, if the lock button and
then the remote start buttons are pressed again after
�ve minutes of the engine run time, 10 minutes are added
and you now have 15 minutes of engine running. The
added ten minutes are considered a second remote
vehicle start. Once two remote starts or a single start with
a time extension have been provided, the vehicle must be
started normally with the ignition key to get more remote
vehicle starts.
The remote vehicle start feature will not operate if the
key is in the ignition, the hood is not closed or if there is
an emission control system malfunction.Also, the engine will turn off during a remote vehicle
start if the coolant temperature gets too high or if the oil
pressure gets low.
Vehicles equipped with the remote vehicle start feature
are shipped from the factory with the remote vehicle
start system enabled. The system may be enabled
or disabled through the DIC. See “REMOTE START”
underDIC Vehicle Customization on page 3-52for
additional information.
Remote Start Ready
If your vehicle does not have the remote vehicle start
feature, it may have the remote start ready feature.
This feature allows your dealer to add the
manufacturer’s remote vehicle start feature.
If your vehicle has the remote start ready feature, your
remote keyless entry transmitter will have extended
range that will allow you to lock or unlock your vehicle
from about 195 feet (60 m) away.
See your dealer if you would like to add the
manufacturer’s remote vehicle start feature to your
vehicle.
2-9
Page 110 of 394
Mirrors
Manual Rearview Mirror
If the vehicle has this mirror, it has a lever located at
the bottom of the mirror between the two lamps.
The lever is used to change the mirror from the day to
the night position. To reduce glare from headlamps
behind you while driving at night, pull the lever toward
you. To return the mirror to the day position, return
the lever to its original position.
There are two map lamps located on the bottom of the
mirror. Press the button next to each lamp to turn it
on and off.
Manual Rearview Mirror
with OnStar
®
If the vehicle has this mirror, it has a lever located at
the bottom of the mirror between the two lamps.
The lever is used to change the mirror from the day to
the night position. To reduce glare from headlamps
behind you while driving at night, pull the lever toward
you. To return the mirror to the day position, return
the lever to its original position.There are two map lamps located on the bottom of the
mirror. Press the button next to each lamp to turn it
on and off.
There are also OnStar
®buttons located at the bottom of
the mirror face. See your dealer for more information
on the system and how to subscribe to OnStar
®.
SeeOnStar®System on page 2-36for more information
about the services OnStar®provides.
Automatic Dimming Rearview
Mirror with OnStar
®
The vehicle may have an automatic dimming rearview
mirror with the OnStar®System.
Press the button located below the mirror, on the far
left, for up to three seconds to turn the automatic
dimming feature off and on.
There are two map lamps located on the bottom of the
mirror. Press the button next to each lamp to turn it
on and off.
There are also OnStar
®buttons located at the bottom of
the mirror. See your dealer for more information on
the system and how to subscribe to OnStar
®. See
OnStar®System on page 2-36for more information
about the service OnStar®provides.
2-34
Page 115 of 394
Read the instructions completely before attempting to
program the Universal Home Remote. Because of
the steps involved, it may be helpful to have another
person available to assist you in the programming steps.
Keep the original hand-held transmitter for use in
other vehicles as well as for future Universal Home
Remote programming. It is also recommended that upon
the sale of the vehicle, the programmed Universal
Home Remote buttons should be erased for security
purposes. See “Erasing Universal Home Remote
Buttons” later in this section or, for assistance, see
Customer Assistance Offices on page 7-4.
Be sure that people and objects are clear of the garage
door or gate operator you are programming. When
programming a garage door, it is advised to park outside
of the garage.
It is recommended that a new battery be installed in
your hand-held transmitter for quicker and more
accurate transmission of the radio-frequency signal.Programming Universal Home Remote
Follow these steps to program up to three channels:
1. Press and hold down the two outside Universal
Home Remote buttons, releasing only when the
Universal Home Remote indicator light begins
to �ash, after 20 seconds. Do not hold down the
buttons for longer than 30 seconds and do not
repeat this step to program a second and/or third
hand-held transmitter to the remaining two Universal
Home Remote buttons.
2. Position the end of your hand-held transmitter
about 1 to 3 inches (3 to 8 cm) away from the
Universal Home Remote buttons while keeping the
indicator light in view.
3. Simultaneously press and hold both the desired
Universal Home Remote button and the hand-held
transmitter button. Do not release the buttons
until Step 4 has been completed.
Some entry gates and garage door openers may
require you to substitute Step 3 with the procedure
noted in “Gate Operator and Canadian
Programming” later in this section.
4. The indicator light will �ash slowly at �rst and then
rapidly after Universal Home Remote successfully
receives the frequency signal from the hand-held
transmitter. Release both buttons.
2-39
Page 116 of 394
5. Press and hold the newly-trained Universal Home
Remote button and observe the indicator light.
If the indicator light stays on constantly,
programming is complete and your device should
activate when the Universal Home Remote button is
pressed and released.
To program the remaining two Universal Home
Remote buttons, begin with Step 2 under
“Programming Universal Home Remote.” Do not
repeat Step 1 as this will erase all of the
programmed channels.
If the indicator light blinks rapidly for two seconds
and then turns to a constant light, continue with
Steps 6 through 8 following to complete the
programming of a rolling-code equipped device,
most commonly, a garage door opener.
6. Locate in the garage, the garage door opener
receiver (motor-head unit). Locate the “Learn”
or “Smart” button. This can usually be found where
the hanging antenna wire is attached to the
motor-head unit.7. Firmly press and release the “Learn” or “Smart”
button. The name and color of the button may
vary by manufacturer.
You will have 30 seconds to start Step 8.
8. Return to the vehicle. Firmly press and hold the
programmed Universal Home Remote button for
two seconds, then release. Repeat the
press/hold/release sequence a second time, and
depending on the brand of the garage door opener,
or other rolling code device, repeat this sequence
a third time to complete the programming.
The Universal Home Remote should now activate
your rolling-code equipped device.
To program the remaining two Universal Home Remote
buttons, begin with Step 2 of “Programming Universal
Home Remote.” You do not want to repeat Step 1,
as this will erase all previous programming from
the Universal Home Remote buttons.
2-40
Page 117 of 394
Gate Operator and Canadian
Programming
Canadian radio-frequency laws require transmitter
signals to time out or quit after several seconds of
transmission. This may not be long enough for Universal
Home Remote to pick up the signal during programming.
Similarly, some U.S. gate operators are manufactured
to time out in the same manner.
If you live in Canada, or you are having difficulty
programming a gate operator or garage door opener
by using the “Programming Universal Home Remote”
procedures, regardless of where you live, replace Step 3
under “Programming Universal Home Remote” with
the following:
Continue to press and hold the Universal Home Remote
button while you press and release every two seconds
(cycle) the hand-held transmitter button until the
frequency signal has been successfully accepted by the
Universal Home Remote. The Universal Home Remote
indicator light will �ash slowly at �rst and then rapidly.
Proceed with Step 4 under “Programming Universal
Home Remote” to complete.
Using Universal Home Remote
Press and hold the appropriate Universal Home Remote
button for at least half of a second. The indicator light
will come on while the signal is being transmitted.
Erasing Universal Home Remote
Buttons
To erase programming from the three Universal Home
Remote buttons do the following:
1. Press and hold down the two outside buttons until
the indicator light begins to �ash, after 20 seconds.
Do not hold the two outside buttons for longer
than 30 seconds.
2. Release both buttons.
The Universal Home Remote is now in the training
(learning) mode and can be programmed at any time
beginning with Step 2 under “Programming Universal
Home Remote” shown earlier in this section.
Individual buttons cannot be erased, but they can be
reprogrammed. See “Reprogramming a Single Universal
Home Remote Button” following this section.
2-41
Page 130 of 394
Cruise Control
With cruise control, you can maintain a speed of
about 25 mph (40 km/h) or more without keeping your
foot on the accelerator. This can really help on long trips.
Cruise control does not work at speeds below about
25 mph (40 km/h).
When you apply your brakes, cruise control is turned off.
{CAUTION:
Cruise control can be dangerous where you
cannot drive safely at a steady speed. So, do
not use your cruise control on winding roads
or in heavy traffic.
Cruise control can be dangerous on slippery
roads. On such roads, fast changes in tire
traction can cause excessive wheel slip, and
you could lose control. Do not use cruise
control on slippery roads.
If your vehicle is in cruise control when the traction
control system (if equipped) begins to limit wheel spin,
the cruise control will automatically disengage.SeeTraction Control System (TCS) on page 4-9. When
road conditions allow you to safely use it again, you
may turn the cruise control back on.
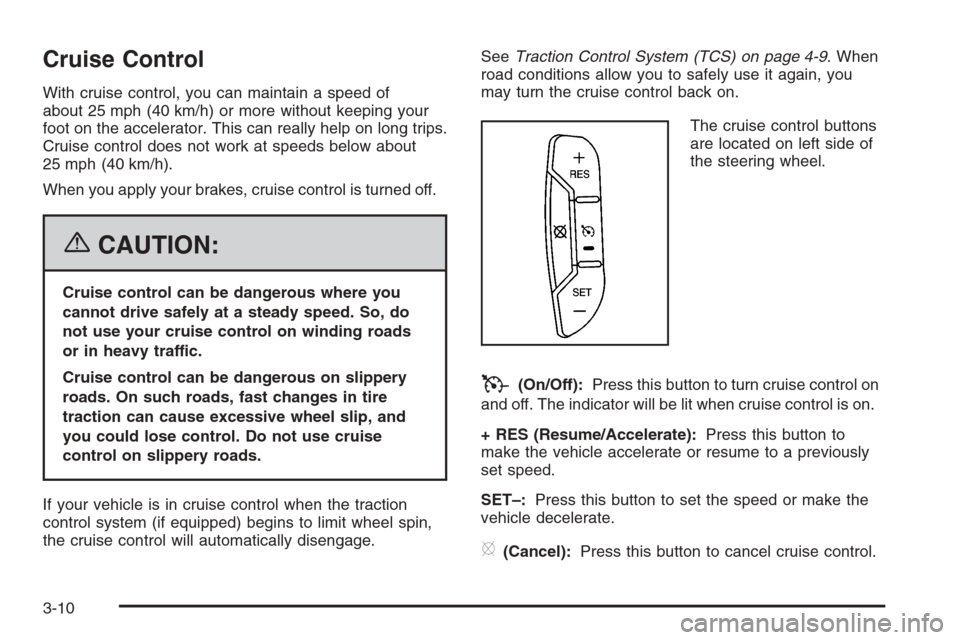
The cruise control buttons
are located on left side of
the steering wheel.
T(On/Off):Press this button to turn cruise control on
and off. The indicator will be lit when cruise control is on.
+ RES (Resume/Accelerate):Press this button to
make the vehicle accelerate or resume to a previously
set speed.
SET–:Press this button to set the speed or make the
vehicle decelerate.
[(Cancel):Press this button to cancel cruise control.
3-10