2006 CHEVROLET EXPRESS PASSANGER low beam
[x] Cancel search: low beamPage 125 of 406

Instrument Panel Overview...............................3-4
Hazard Warning Flashers................................3-6
Other Warning Devices...................................3-6
Horn .............................................................3-6
Tilt Wheel.....................................................3-6
Turn Signal/Multifunction Lever.........................3-7
Turn and Lane-Change Signals........................3-8
Headlamp High/Low-Beam Changer..................3-8
Flash-to-Pass.................................................3-9
Windshield Wipers..........................................3-9
Windshield Washer.......................................3-10
Cruise Control..............................................3-10
Exterior Lamps.............................................3-13
Headlamps on Reminder................................3-14
Daytime Running Lamps (DRL).......................3-14
Instrument Panel Brightness...........................3-15
Dome Lamps ...............................................3-15
Dome Lamp Override....................................3-15
Entry Lighting...............................................3-16
Exit Lighting.................................................3-16
Reading Lamps............................................3-16
Battery Run-Down Protection..........................3-16
Accessory Power Outlet(s).............................3-16
Ashtray(s) and Cigarette Lighter......................3-17Climate Controls............................................3-18
Climate Control System.................................3-18
Outlet Adjustment.........................................3-20
Rear Heating System....................................3-21
Rear Air Conditioning and Heating System.......3-21
Warning Lights, Gages, and Indicators............3-23
Instrument Panel Cluster................................3-24
Speedometer and Odometer...........................3-25
Trip Odometer..............................................3-25
Safety Belt Reminder Light.............................3-26
Passenger Safety Belt Reminder Light.............3-26
Airbag Readiness Light..................................3-27
Airbag Off Light............................................3-28
Passenger Airbag Status Indicator...................3-29
Charging System Light..................................3-32
Voltmeter Gage............................................3-32
Brake System Warning Light..........................3-33
Anti-Lock Brake System Warning Light.............3-34
StabiliTrak
®Not Ready Light..........................3-35
StabiliTrak®Indicator Light..............................3-35
Engine Coolant Temperature Gage..................3-36
Malfunction Indicator Lamp.............................3-36
Section 3 Instrument Panel
3-1
Page 131 of 406

To tilt the wheel, hold the steering wheel and pull the
lever. Move the steering wheel to a comfortable level,
then release the lever to lock the wheel in place.
Turn Signal/Multifunction Lever
The lever on the left side of the steering column
includes the following:
•GTurn and Lane Change Signals.Turn and
Lane-Change Signals on page 3-8.
•53Headlamp High/Low-Beam Changer.
Headlamp High/Low-Beam Changer on page 3-8.
•Flash-to-Pass Feature. SeeFlash-to-Pass
on page 3-9.
•NWindshield Wipers. SeeWindshield Wipers
on page 3-9.
•LWindshield Washer. SeeWindshield Washer on
page 3-10.
•ICruise Control.Cruise Control on page 3-10.
For information on the exterior lamps, seeExterior
Lamps on page 3-13later in this section.
3-7
Page 132 of 406

Turn and Lane-Change Signals
The turn signal has two upward (for right) and
two downward (for left) positions. These positions
allow you to signal a turn or a lane change.
To signal a turn, move the lever all the way up or
down. When the turn is finished, the lever will return
automatically.
An arrow on the instrument
panel cluster will flash in
the direction of the
turn or lane change.
To signal a lane change, just raise or lower the lever
until the arrow starts to flash. Hold it there until you
complete your lane change. The lever will return by itself
when you release it.
If you move the lever all the way up or down, and the
arrow flashes at twice the normal rate, a signal bulb may
be burned out and other drivers may not see your
turn signal.If a bulb is burned out, replace it to help avoid an
accident. If the arrows don’t go on at all when you signal
a turn, check for burned-out bulbs or a blown fuse.
SeeFuses and Circuit Breakers on page 5-94.
Turn Signal On Chime
If your turn signal is left on for more than 3/4 of a mile
(1.2 km), a chime will sound at each flash of the
turn signal. To turn off the chime, move the turn signal
lever to the off position.
Headlamp High/Low-Beam Changer
23(Headlamp High/Low-Beam Changer):
To change the headlamps from low to high beam, pull
the multifunction lever all the way toward you. Then
release it.
When the high beams
are on, this light on the
instrument panel cluster
also will be on.
3-8
Page 133 of 406

Flash-to-Pass
This feature allows you to use your high-beam
headlamps to signal a driver in front of you that you
want to pass. It works even if your headlamps are off.
To use it, pull the turn signal lever toward you, but not so
far that you hear it click.
If your headlamps are off or on low-beam, your
high-beam headlamps will turn on and stay on as long
as you hold the lever toward you and the high-beam
indicator on the instrument panel will come on. Release
the lever to turn the high-beam headlamps off.
Windshield Wipers
You control the windshield wipers by turning the band
with the wiper symbol on it.
8(Mist):For a single wiping cycle, turn the band to
mist. Hold it there until the wipers start, then let go.
The wipers will stop after one wipe. If you want more
wipes, hold the band on mist longer.Delay:You can set the wiper speed for a long or short
delay between wipes. This can be very useful in light rain
or snow. Turn the band to choose the delay time.
The closer to the top of the lever, the shorter the delay.
d(Low Speed):For steady wiping at low speed,
turn the band away from you to the first solid band past
the delay settings. position. For high-speed wiping,
turn the band further, to the second solid band past the
delay settings. To stop the wipers, move the band to
off position.
a(High Speed):For high-speed wiping, turn the
band further, to the second solid band past the delay
settings.
9(Off):To stop the wipers, move the band to off.
Be sure to clear ice and snow from the wiper blades
before using them. If they’re frozen to the windshield,
carefully loosen or thaw them. If your blades do become
worn or damaged, get new blades or blade inserts.
3-9
Page 138 of 406

;(Parking Lamps):Turn the control to this position
to turn on the parking lamps, together with the
following:
•Instrument Panel Lights
•Daytime Running Lamps (DRL) (Canada)
•Sidemarker Lamps
•Taillamps
•License Plate Lamps
If the DRL are active when the control is turned to this
position, the DRL will turn off.
For vehicles first sold in Canada, the DRL will remain
active along with the lamps mentioned above.
5(Headlamps):Turn the control to this position to
turn on the headlamps together with the parking lamps
and turn off the daytime running lamps.
You can switch your headlamps from high to low-beam
by pulling the turn signal/high-beam lever toward you.
A circuit breaker protects your headlamps. If you have
an electrical overload, your headlamps will flicker on
and off. Have your headlamp wiring checked right away
if this happens.
Headlamps on Reminder
A reminder chime will sound when your control is turned
to the headlamps or parking lamps position, your key
is out of the ignition, and your driver’s door is open.
To disable the chime, turn the control to the Daytime
Running Lamp (DRL) position and then back to the
parking lamps or headlamps position.
Daytime Running Lamps (DRL)
Daytime Running Lamps (DRL) can make it easier for
others to see the front of your vehicle during the
day. DRL can be helpful in many different driving
conditions, but they can be especially helpful in the short
periods after dawn and before sunset. Fully functional
daytime running lamps are required on all vehicles
first sold in Canada.
The DRL system will come on when the following
conditions are met:
•the ignition is on,
•the exterior lamps control is in DRL mode and not
in the defeat position.
When the DRL are on, only your parking lamps will be
on. The other lamps will not be on. The instrument
panel will be lit.
3-14
Page 166 of 406

Highbeam On Light
This light will come on
when the high-beam
headlamps are in use.
SeeHeadlamp High/Low-Beam Changer on page 3-8.
Daytime Running Lamps (DRL)
Indicator Light
You have this light on the
instrument panel. It will
light whenever the DRL are
on. It is also a reminder
to turn on your headlamps
when driving at night.
Tow/Haul Mode Light
This message is displayed
when the tow/haul mode
has been activated.
For more information, see “Tow/Haul Mode” inTowing a
Trailer on page 4-37.
Check Gages Warning Light
This light will come on briefly when you are starting
the engine.
If the light comes on and stays on while you are driving,
check your coolant temperature and engine oil
pressure gages to see if they are in the warning zones.
United StatesCanada
3-42
Page 221 of 406

Driving at Night
Night driving is more dangerous than day driving.
One reason is that some drivers are likely to be
impaired — by alcohol or drugs, with night vision
problems, or by fatigue.
Here are some tips on night driving.
•Drive defensively.
•Do not drink and drive.
•Adjust the inside rearview mirror to reduce the
glare from headlamps behind you.
•Since you cannot see as well, you may need to
slow down and keep more space between you
and other vehicles.
•Slow down, especially on higher speed roads.
Your vehicle’s headlamps can light up only so
much road ahead.
•In remote areas, watch for animals.
•If you are tired, pull off the road in a safe place
and rest.
No one can see as well at night as in the daytime.
But as we get older these differences increase.
A 50-year-old driver may require at least twice as much
light to see the same thing at night as a 20-year-old.What you do in the daytime can also affect your night
vision. For example, if you spend the day in bright
sunshine you are wise to wear sunglasses. Your eyes
will have less trouble adjusting to night. But if you
are driving, do not wear sunglasses at night. They may
cut down on glare from headlamps, but they also
make a lot of things invisible.
You can be temporarily blinded by approaching
headlamps. It can take a second or two, or even several
seconds, for your eyes to re-adjust to the dark. When
you are faced with severe glare, as from a driver who
does not lower the high beams, or a vehicle with
misaimed headlamps, slow down a little. Avoid staring
directly into the approaching headlamps.
Keep the windshield and all the glass on your vehicle
clean — inside and out. Glare at night is made much
worse by dirt on the glass. Even the inside of the glass
can build up a film caused by dust. Dirty glass makes
lights dazzle and flash more than clean glass would,
making the pupils of your eyes contract repeatedly.
Remember that the headlamps light up far less of
a roadway when you are in a turn or curve. Keep your
eyes moving; that way, it is easier to pick out dimly
lighted objects. Just as the headlamps should be
checked regularly for proper aim, so should your eyes
be examined regularly. Some drivers suffer from night
blindness — the inability to see in dim light — and are
not even aware of it.
4-17
Page 307 of 406

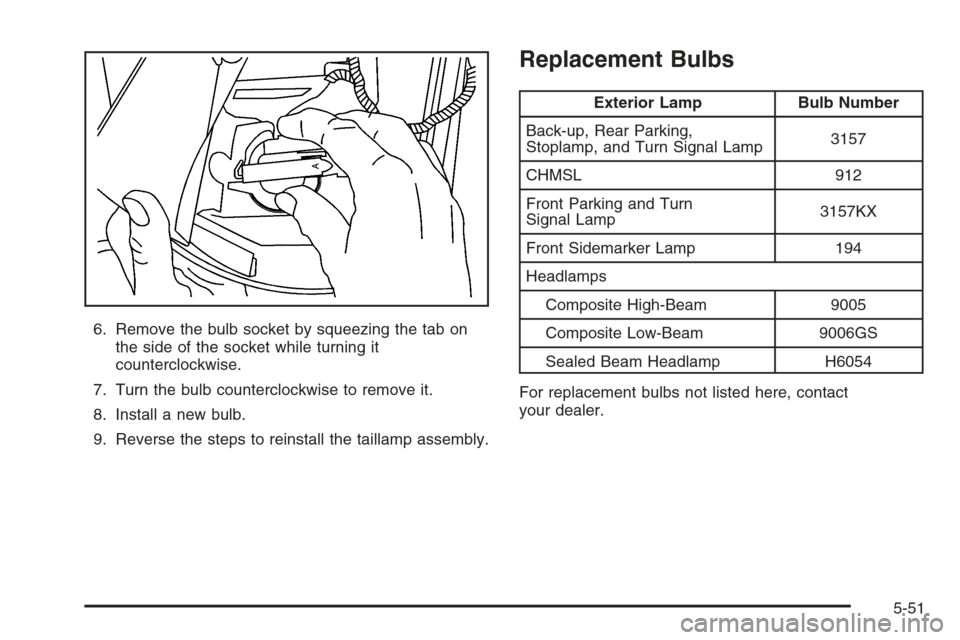
6. Remove the bulb socket by squeezing the tab on
the side of the socket while turning it
counterclockwise.
7. Turn the bulb counterclockwise to remove it.
8. Install a new bulb.
9. Reverse the steps to reinstall the taillamp assembly.
Replacement Bulbs
Exterior Lamp Bulb Number
Back-up, Rear Parking,
Stoplamp, and Turn Signal Lamp3157
CHMSL 912
Front Parking and Turn
Signal Lamp3157KX
Front Sidemarker Lamp 194
Headlamps
Composite High-Beam 9005
Composite Low-Beam 9006GS
Sealed Beam Headlamp H6054
For replacement bulbs not listed here, contact
your dealer.
5-51