2006 CHEVROLET EQUINOX wheel size
[x] Cancel search: wheel sizePage 248 of 382
Buying New Tires.........................................5-56
Different Size Tires and Wheels......................5-57
Uniform Tire Quality Grading..........................5-58
Wheel Alignment and Tire Balance..................5-59
Wheel Replacement......................................5-60
Tire Chains..................................................5-61
If a Tire Goes Flat........................................5-62
Changing a Flat Tire.....................................5-63
Removing the Spare Tire and Tools................5-64
Removing the Flat Tire and Installing
the Spare Tire..........................................5-65
Storing a Flat or Spare Tire and Tools............5-72
Compact Spare Tire......................................5-73
Appearance Care............................................5-74
Cleaning the Inside of Your Vehicle.................5-74
Fabric/Carpet...............................................5-75
Leather.......................................................5-77
Instrument Panel, Vinyl, and Other
Plastic Surfaces........................................5-77
Care of Safety Belts......................................5-78
Weatherstrips...............................................5-78
Washing Your Vehicle...................................5-78Cleaning Exterior Lamps/Lenses.....................5-78
Finish Care..................................................5-79
Windshield and Wiper Blades.........................5-79
Aluminum Wheels.........................................5-80
Tires...........................................................5-80
Sheet Metal Damage.....................................5-81
Finish Damage.............................................5-81
Underbody Maintenance................................5-81
Chemical Paint Spotting.................................5-81
Vehicle Care/Appearance Materials..................5-82
Vehicle Identi�cation......................................5-83
Vehicle Identi�cation Number (VIN).................5-83
Service Parts Identi�cation Label.....................5-83
Electrical System............................................5-84
Add-On Electrical Equipment..........................5-84
Windshield Wiper Fuses................................5-84
Power Windows and Other Power Options.......5-84
Fuses and Circuit Breakers............................5-84
Instrument Panel Fuse Block..........................5-85
Engine Compartment Fuse Block....................5-86
Capacities and Speci�cations..........................5-89
Section 5 Service and Appearance Care
5-2
Page 296 of 382
Tire Size
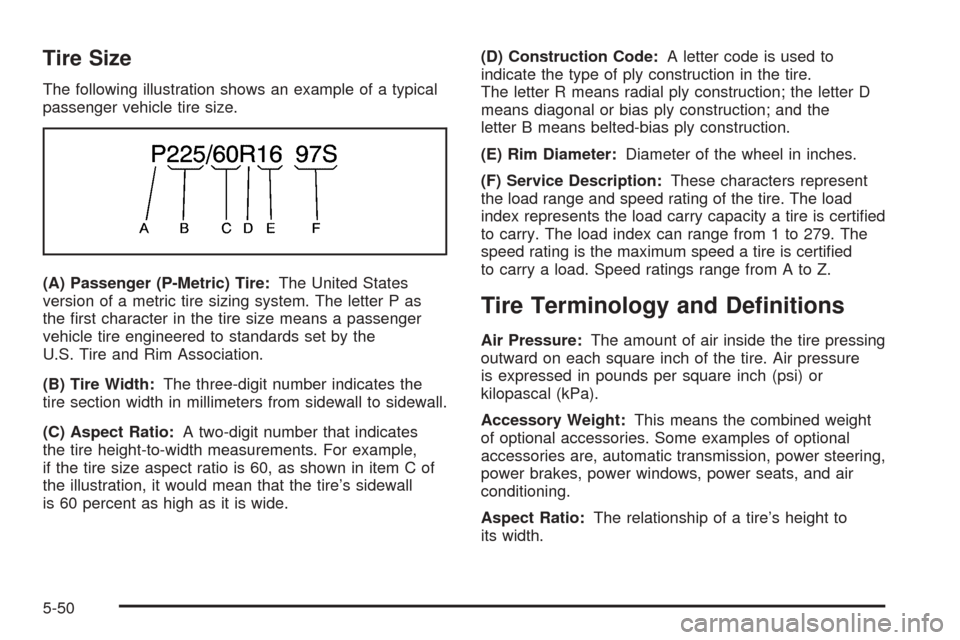
The following illustration shows an example of a typical
passenger vehicle tire size.
(A) Passenger (P-Metric) Tire:The United States
version of a metric tire sizing system. The letter P as
the �rst character in the tire size means a passenger
vehicle tire engineered to standards set by the
U.S. Tire and Rim Association.
(B) Tire Width:The three-digit number indicates the
tire section width in millimeters from sidewall to sidewall.
(C) Aspect Ratio:A two-digit number that indicates
the tire height-to-width measurements. For example,
if the tire size aspect ratio is 60, as shown in item C of
the illustration, it would mean that the tire’s sidewall
is 60 percent as high as it is wide.(D) Construction Code:A letter code is used to
indicate the type of ply construction in the tire.
The letter R means radial ply construction; the letter D
means diagonal or bias ply construction; and the
letter B means belted-bias ply construction.
(E) Rim Diameter:Diameter of the wheel in inches.
(F) Service Description:These characters represent
the load range and speed rating of the tire. The load
index represents the load carry capacity a tire is certi�ed
to carry. The load index can range from 1 to 279. The
speed rating is the maximum speed a tire is certi�ed
to carry a load. Speed ratings range from A to Z.
Tire Terminology and De�nitions
Air Pressure:The amount of air inside the tire pressing
outward on each square inch of the tire. Air pressure
is expressed in pounds per square inch (psi) or
kilopascal (kPa).
Accessory Weight:This means the combined weight
of optional accessories. Some examples of optional
accessories are, automatic transmission, power steering,
power brakes, power windows, power seats, and air
conditioning.
Aspect Ratio:The relationship of a tire’s height to
its width.
5-50
Page 301 of 382
Do not include the compact spare tire in your tire
rotation.
After the tires have been rotated, adjust the front and
rear in�ation pressures as shown on the Tire and
Loading Information label.
Make certain that all wheel nuts are properly tightened.
See “Wheel Nut Torque” underCapacities and
Speci�cations on page 5-89.
{CAUTION:
Rust or dirt on a wheel, or on the parts to
which it is fastened, can make wheel nuts
become loose after a time. The wheel could
come off and cause an accident. When you
change a wheel, remove any rust or dirt from
places where the wheel attaches to the vehicle.
In an emergency, you can use a cloth or a
paper towel to do this; but be sure to use a
scraper or wire brush later, if needed, to get all
the rust or dirt off. SeeChanging a Flat Tire on
page 5-63.
When It Is Time for New Tires
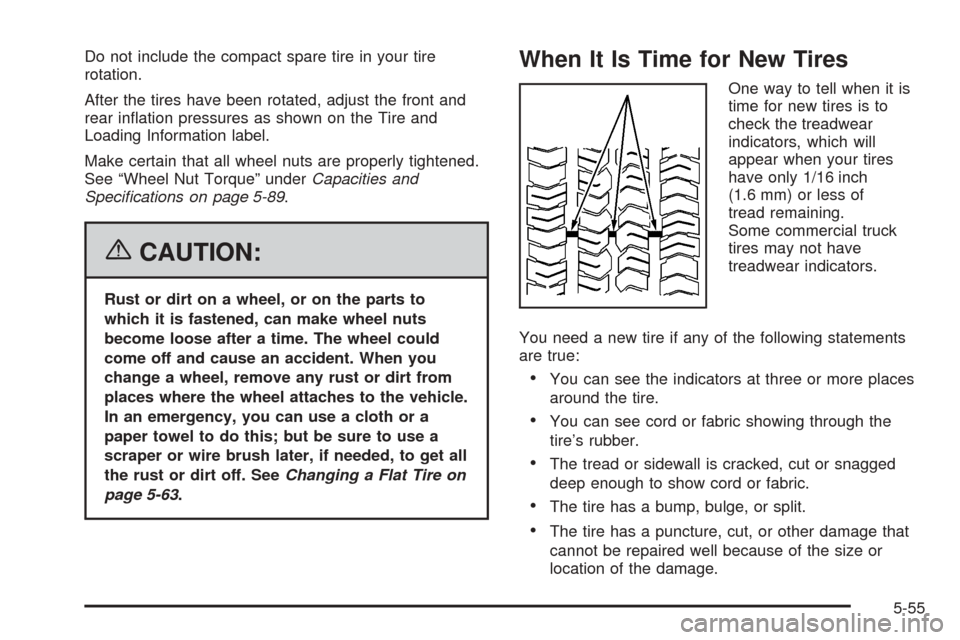
One way to tell when it is
time for new tires is to
check the treadwear
indicators, which will
appear when your tires
have only 1/16 inch
(1.6 mm) or less of
tread remaining.
Some commercial truck
tires may not have
treadwear indicators.
You need a new tire if any of the following statements
are true:
You can see the indicators at three or more places
around the tire.
You can see cord or fabric showing through the
tire’s rubber.
The tread or sidewall is cracked, cut or snagged
deep enough to show cord or fabric.
The tire has a bump, bulge, or split.
The tire has a puncture, cut, or other damage that
cannot be repaired well because of the size or
location of the damage.
5-55
Page 302 of 382
Buying New Tires
GM has developed and matched speci�c tires for your
vehicle. The original equipment tires installed on
your vehicle, when it was new, were designed to meet
General Motors Tire Performance Criteria Speci�cation
(TPC spec) system rating. If you need replacement
tires, GM strongly recommends that you get tires with
the same TPC Spec rating. This way, your vehicle
will continue to have tires that are designed to give the
same performance and vehicle safety, during normal
use, as the original tires.
GM’s exclusive TPC Spec system considers over a
dozen critical speci�cations that impact the overall
performance of your vehicle, including brake system
performance, ride and handling, traction control, and tire
pressure monitoring performance. GM’s TPC Spec
number is molded onto the tire’s sidewall by the
tire manufacturer. If the tires have an all-season tread
design, the TPC spec number will be followed by an
MS for mud and snow. SeeTire Sidewall Labeling
on page 5-48for additional information.{CAUTION:
Mixing tires could cause you to lose control
while driving. If you mix tires of different sizes,
brands, or types (radial and bias-belted tires),
the vehicle may not handle properly, and you
could have a crash. Using tires of different
sizes, brands, or types may also cause damage
to your vehicle. Be sure to use the correct size,
brand, and type of tires on all wheels. It is
all right to drive with your compact spare
temporarily, as it was developed for use on your
vehicle. SeeCompact Spare Tire on page 5-73.
5-56
Page 303 of 382
{CAUTION:
If you use bias-ply tires on your vehicle, the
wheel rim �anges could develop cracks after
many miles of driving. A tire and/or wheel
could fail suddenly, causing a crash. Use only
radial-ply tires with the wheels on your vehicle.
If you must replace your vehicle’s tires with those that
do not have a TPC Spec number, make sure they
are the same size, load range, speed rating, and
construction type (radial and bias-belted tires) as your
vehicle’s original tires.
Your vehicle’s original equipment tires are listed on
the Tire and Loading Information Label. This label
is attached to the vehicle’s center pillar (B-pillar). See
Loading Your Vehicle on page 4-31, for more information
about the Tire and Loading Information Label and its
location on your vehicle.
Different Size Tires and Wheels
If you add wheels or tires that are a different size than
your original equipment wheels and tires, this may
affect the way your vehicle performs, including its
braking, ride and handling characteristics, stability, and
resistance to rollover. Additionally, if your vehicle
has electronic systems such as, anti-lock brakes,
traction control, and electronic stability control, the
performance of these systems can be affected.
{CAUTION:
If you add different sized wheels, your vehicle
may not provide an acceptable level of
performance and safety if tires not
recommended for those wheels are selected.
You may increase the chance that you will
crash and suffer serious injury. Only use GM
speci�c wheel and tire systems developed for
your vehicle, and have them properly installed
by a GM certi�ed technician.
SeeBuying New Tires on page 5-56andAccessories
and Modi�cations on page 5-3for additional information.
5-57
Page 307 of 382
Used Replacement Wheels
{CAUTION:
Putting a used wheel on your vehicle is
dangerous. You cannot know how it has been
used or how far it has been driven. It could fail
suddenly and cause a crash. If you have to
replace a wheel, use a new GM original
equipment wheel.
Tire Chains
{CAUTION:
Do not use tire chains. There is not enough
clearance. Tire chains used on a vehicle
without the proper amount of clearance can
cause damage to the brakes, suspension or
other vehicle parts. The area damaged by the
tire chains could cause you to lose control of
your vehicle and you or others may be injured
in a crash.
Use another type of traction device only if its
manufacturer recommends it for use on your
vehicle and tire size combination and road
conditions. Follow that manufacturer’s
instructions. To help avoid damage to your
vehicle, drive slowly, readjust or remove the
device if it is contacting your vehicle, and do
not spin your vehicle’s wheels. If you do �nd
traction devices that will �t, install them on the
front tires.
5-61
Page 317 of 382
{CAUTION:
Incorrect wheel nuts or improperly tightened
wheel nuts can cause the wheel to come loose
and even come off. This could lead to an
accident. Be sure to use the correct wheel
nuts. If you have to replace them, be sure to
get new GM original equipment wheel nuts.
Stop somewhere as soon as you can and have
the nuts tightened with a torque wrench to the
proper torque speci�cation. SeeCapacities
and Specifications on page 5-89for wheel nut
torque speci�cation.
Notice:Improperly tightened wheel nuts can lead to
brake pulsation and rotor damage. To avoid
expensive brake repairs, evenly tighten the wheel
nuts in the proper sequence and to the proper torque
speci�cation. SeeCapacities and Specifications on
page 5-89for the wheel nut torque speci�cation.15. Tighten the wheel nuts
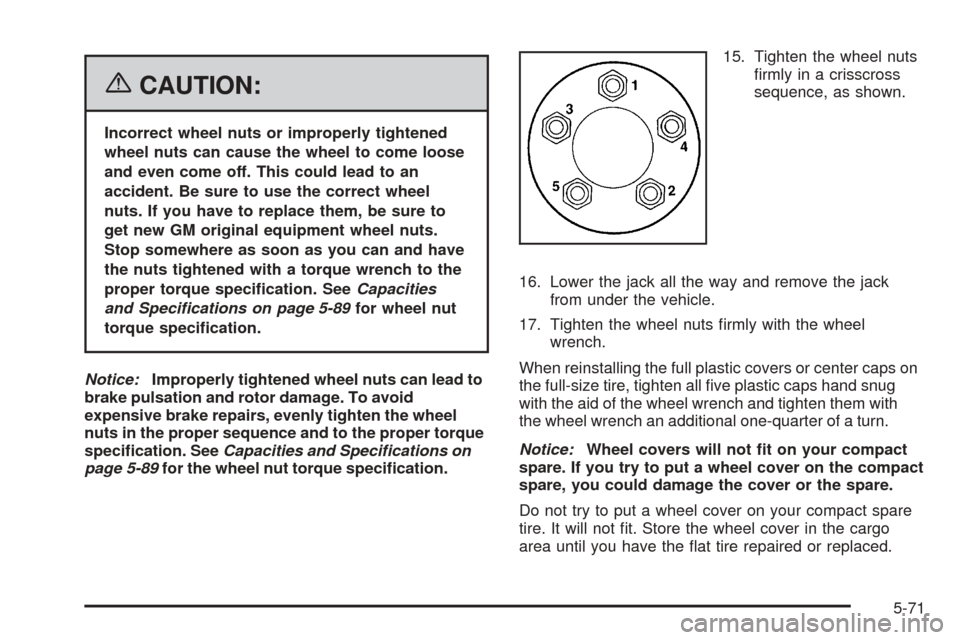
�rmly in a crisscross
sequence, as shown.
16. Lower the jack all the way and remove the jack
from under the vehicle.
17. Tighten the wheel nuts �rmly with the wheel
wrench.
When reinstalling the full plastic covers or center caps on
the full-size tire, tighten all �ve plastic caps hand snug
with the aid of the wheel wrench and tighten them with
the wheel wrench an additional one-quarter of a turn.
Notice:Wheel covers will not �t on your compact
spare. If you try to put a wheel cover on the compact
spare, you could damage the cover or the spare.
Do not try to put a wheel cover on your compact spare
tire. It will not �t. Store the wheel cover in the cargo
area until you have the �at tire repaired or replaced.
5-71
Page 319 of 382
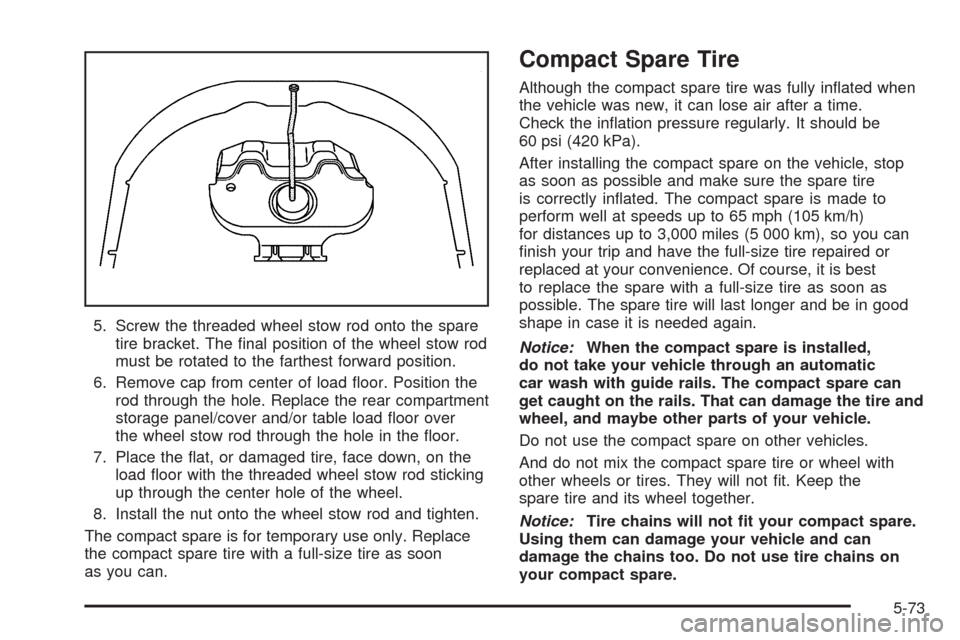
5. Screw the threaded wheel stow rod onto the spare
tire bracket. The �nal position of the wheel stow rod
must be rotated to the farthest forward position.
6. Remove cap from center of load �oor. Position the
rod through the hole. Replace the rear compartment
storage panel/cover and/or table load �oor over
the wheel stow rod through the hole in the �oor.
7. Place the �at, or damaged tire, face down, on the
load �oor with the threaded wheel stow rod sticking
up through the center hole of the wheel.
8. Install the nut onto the wheel stow rod and tighten.
The compact spare is for temporary use only. Replace
the compact spare tire with a full-size tire as soon
as you can.
Compact Spare Tire
Although the compact spare tire was fully in�ated when
the vehicle was new, it can lose air after a time.
Check the in�ation pressure regularly. It should be
60 psi (420 kPa).
After installing the compact spare on the vehicle, stop
as soon as possible and make sure the spare tire
is correctly in�ated. The compact spare is made to
perform well at speeds up to 65 mph (105 km/h)
for distances up to 3,000 miles (5 000 km), so you can
�nish your trip and have the full-size tire repaired or
replaced at your convenience. Of course, it is best
to replace the spare with a full-size tire as soon as
possible. The spare tire will last longer and be in good
shape in case it is needed again.
Notice:When the compact spare is installed,
do not take your vehicle through an automatic
car wash with guide rails. The compact spare can
get caught on the rails. That can damage the tire and
wheel, and maybe other parts of your vehicle.
Do not use the compact spare on other vehicles.
And do not mix the compact spare tire or wheel with
other wheels or tires. They will not �t. Keep the
spare tire and its wheel together.
Notice:Tire chains will not �t your compact spare.
Using them can damage your vehicle and can
damage the chains too. Do not use tire chains on
your compact spare.
5-73