2006 CHEVROLET EQUINOX ECO mode
[x] Cancel search: ECO modePage 78 of 382
Remote Keyless Entry System
Operation
With this feature, you can lock and unlock the doors
from about 26 feet (8 m) away using the remote keyless
entry transmitter supplied with your vehicle.
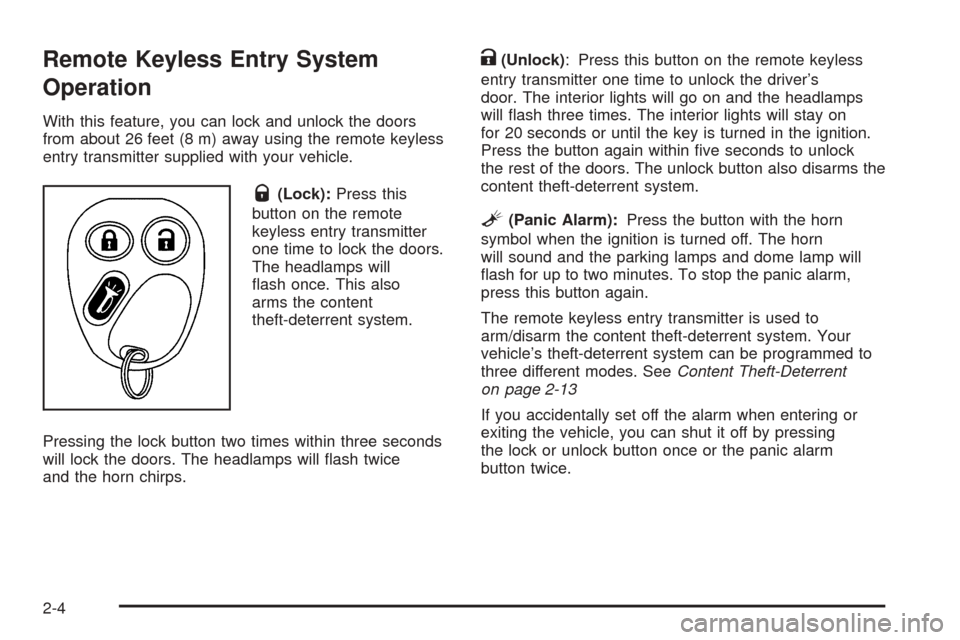
Q(Lock):Press this
button on the remote
keyless entry transmitter
one time to lock the doors.
The headlamps will
�ash once. This also
arms the content
theft-deterrent system.
Pressing the lock button two times within three seconds
will lock the doors. The headlamps will �ash twice
and the horn chirps.
K(Unlock): Press this button on the remote keyless
entry transmitter one time to unlock the driver’s
door. The interior lights will go on and the headlamps
will �ash three times. The interior lights will stay on
for 20 seconds or until the key is turned in the ignition.
Press the button again within �ve seconds to unlock
the rest of the doors. The unlock button also disarms the
content theft-deterrent system.
L(Panic Alarm):Press the button with the horn
symbol when the ignition is turned off. The horn
will sound and the parking lamps and dome lamp will
�ash for up to two minutes. To stop the panic alarm,
press this button again.
The remote keyless entry transmitter is used to
arm/disarm the content theft-deterrent system. Your
vehicle’s theft-deterrent system can be programmed to
three different modes. SeeContent Theft-Deterrent
on page 2-13
If you accidentally set off the alarm when entering or
exiting the vehicle, you can shut it off by pressing
the lock or unlock button once or the panic alarm
button twice.
2-4
Page 87 of 382
Theft-Deterrent Systems
Vehicle theft is big business, especially in some cities.
Although your vehicle has a number of theft-deterrent
features, we know that nothing we put on it can make it
impossible to steal.
Content Theft-Deterrent
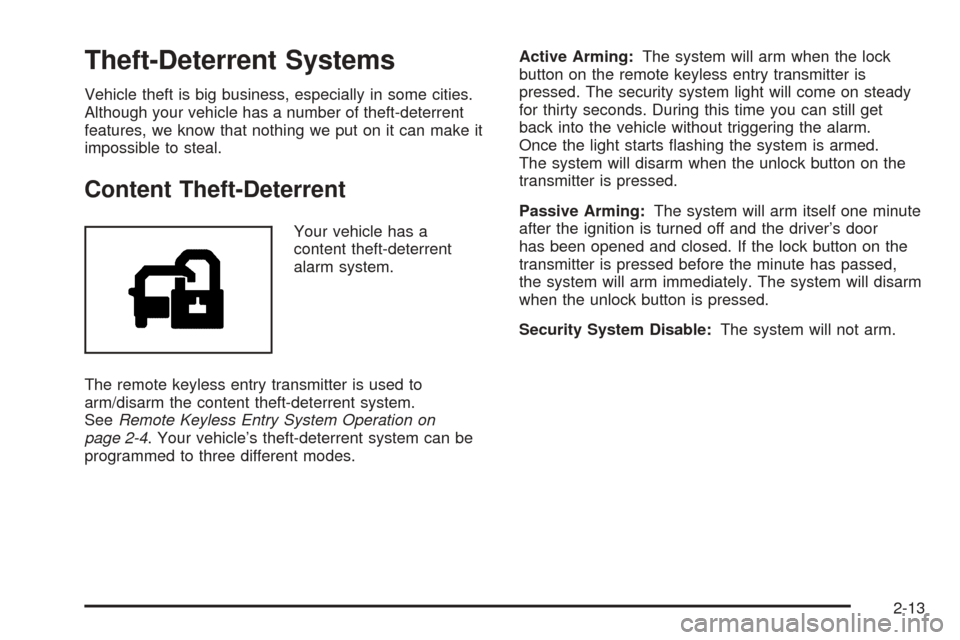
Your vehicle has a
content theft-deterrent
alarm system.
The remote keyless entry transmitter is used to
arm/disarm the content theft-deterrent system.
SeeRemote Keyless Entry System Operation on
page 2-4. Your vehicle’s theft-deterrent system can be
programmed to three different modes.Active Arming:The system will arm when the lock
button on the remote keyless entry transmitter is
pressed. The security system light will come on steady
for thirty seconds. During this time you can still get
back into the vehicle without triggering the alarm.
Once the light starts �ashing the system is armed.
The system will disarm when the unlock button on the
transmitter is pressed.
Passive Arming:The system will arm itself one minute
after the ignition is turned off and the driver’s door
has been opened and closed. If the lock button on the
transmitter is pressed before the minute has passed,
the system will arm immediately. The system will disarm
when the unlock button is pressed.
Security System Disable:The system will not arm.
2-13
Page 88 of 382
Content Theft-Deterrent Personalization
To change the mode that your vehicle is programmed to,
do the following:
1. Turn the ignition to RUN or ACC (Accessory).
2. Press the panic alarm button on the transmitter
slowly four times within �ve seconds.
3. You must complete one of the following within
three seconds to change the mode.
To select the active arming mode, press the
lock button on the transmitter once within
three seconds. A chime will sound two times to
acknowledge that the active arming mode
has been selected.
To select the passive arming mode, press the
lock button on the transmitter twice within
three seconds. A chime will sound three times to
acknowledge that the passive arming mode
has been selected.
To select the security system disable mode,
press the unlock button on the transmitter
once within three seconds. A chime will sound
one time to acknowledge that the security system
disabled mode has been selected.If you accidentally set off the alarm when entering or
exiting the vehicle, you can shut it off by pressing either
the lock or unlock button once on the remote keyless
entry transmitter. The panic alarm button needs to
be pressed twice to turn off the alarm. There is
a ten second pre-alarm grace period indicated by a
rapid beeping. By pressing the transmitter buttons as
indicated above, you can disarm the system before
the horn begins to sound and the exterior lights begin
to �ash.
If you hear three horn chirps when you press the unlock
button on the transmitter, that means the vehicle’s
alarm was triggered while you were away.
2-14
Page 95 of 382

LOW TWO (L2):This position gives you more
power but lower fuel economy than AUTOMATIC
OVERDRIVE (D). You can use LOW TWO (L2) on hills.
It can help control your speed as you go down steep
mountain roads, but then you would also want to
use your brakes off and on.
Notice:Do not drive in LOW TWO (L2) for more
than 25 miles (40 km), or at speeds over 55 mph
(90 km/h), or you can damage your transaxle.
Use AUTOMATIC OVERDRIVE (D) or LOW
FOUR (L4) as much as possible. Do not shift into
LOW TWO (L2) unless you are going slower
than 65 mph (105 km/h) or you can damage
your engine.
Notice:Spinning the tires or holding the vehicle in
one place on a hill using only the accelerator pedal
may damage the transaxle. If you are stuck, do not
spin the tires. When stopping on a hill, use the brakes
to hold the vehicle in place.Transaxle Overheating
If the transaxle �uid temperature rises above
284°F (140°C) or rises rapidly, the Engine Coolant
Temperature Warning Light will �ash. SeeEngine
Coolant Temperature Warning Light on page 3-30for
more information. When the transaxle overheats it
will go into a protection mode and will default shift into
�fth gear if in the AUTOMATIC OVERDRIVE (D)
position, or second gear if in the LOW TWO (L2)
position. Continue driving the vehicle in either position
depending on the required vehicle speed and load.
Once the �uid temperature lowers to the normal
temperature range, the transaxle will return to the
normal shift patterns. Towing or driving on long hills
can cause the transaxle �uid temperature to be higher
than normal. If the transaxle �uid temperature will
not cool, you may need to pull over and check the
transaxle �uid level. You should also check the engine
coolant temperature. If it is hot, seeEngine Overheating
on page 5-24.
2-21
Page 102 of 382
Compass Variance
Press the on/off button twice to turn on the compass.
Compass variance is the difference between earth’s
magnetic north and true geographic north. If not
adjusted to account for compass variance, the mirror’s
compass could give false readings. The mirror is
set in zone eight upon leaving the factory. It will be
necessary to adjust the compass to compensate
for compass variance if you live outside of zone eight.
Under certain circumstances, as during a long distance
cross-country trip, it will also be necessary to adjust
for compass variance.
To adjust for compass variance do the following:
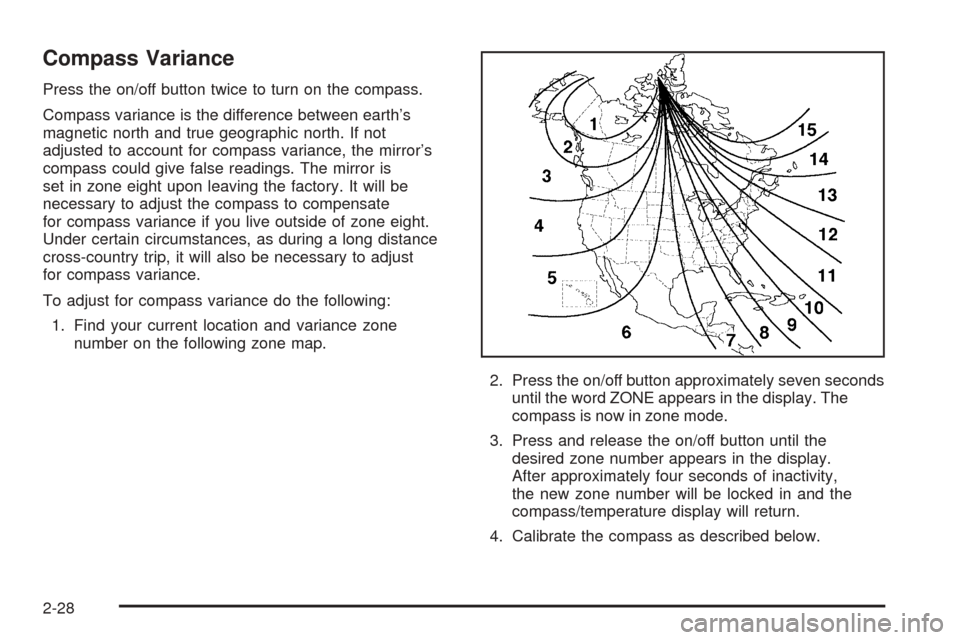
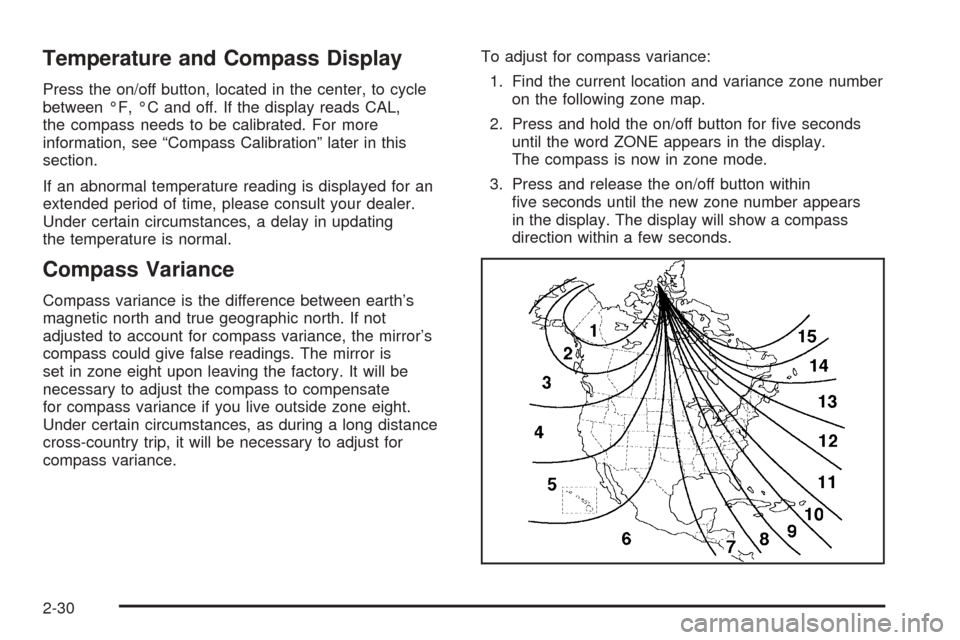
1. Find your current location and variance zone
number on the following zone map.
2. Press the on/off button approximately seven seconds
until the word ZONE appears in the display. The
compass is now in zone mode.
3. Press and release the on/off button until the
desired zone number appears in the display.
After approximately four seconds of inactivity,
the new zone number will be locked in and the
compass/temperature display will return.
4. Calibrate the compass as described below.
2-28
Page 104 of 382
Temperature and Compass Display
Press the on/off button, located in the center, to cycle
between °F, °C and off. If the display reads CAL,
the compass needs to be calibrated. For more
information, see “Compass Calibration” later in this
section.
If an abnormal temperature reading is displayed for an
extended period of time, please consult your dealer.
Under certain circumstances, a delay in updating
the temperature is normal.
Compass Variance
Compass variance is the difference between earth’s
magnetic north and true geographic north. If not
adjusted to account for compass variance, the mirror’s
compass could give false readings. The mirror is
set in zone eight upon leaving the factory. It will be
necessary to adjust the compass to compensate
for compass variance if you live outside zone eight.
Under certain circumstances, as during a long distance
cross-country trip, it will be necessary to adjust for
compass variance.To adjust for compass variance:
1. Find the current location and variance zone number
on the following zone map.
2. Press and hold the on/off button for �ve seconds
until the word ZONE appears in the display.
The compass is now in zone mode.
3. Press and release the on/off button within
�ve seconds until the new zone number appears
in the display. The display will show a compass
direction within a few seconds.
2-30
Page 129 of 382
Using Cruise Control on Hills
How well your cruise control will work on hills depends
upon your speed, load and the steepness of the hills.
When going up steep hills, you may have to step on the
accelerator pedal to maintain your speed. When going
downhill, you may have to brake or shift to a lower gear to
keep your speed down. Applying the brake or shifting into
a lower gear will take you out of cruise control. If you
need to apply the brake or shift to a lower gear due to the
grade of the downhill slope, you may not want to attempt
to use your cruise control feature.
Ending Cruise Control
To end a cruise control session, step lightly on the
brake pedal.
Stepping on the brake will end the current cruise control
session only. Press the cruise on/off button to turn off
the system completely.
If the driver takes over the acceleration pedal for more
than sixty seconds, cruise control will shut off.
Erasing Speed Memory
When you turn off the cruise control with the button on
the steering wheel or turn the ignition to LOCK, your
cruise control set speed memory is erased.
Headlamps
The exterior lamp control is located on the turn
signal/multifunction lever.
O(Exterior Lamp Control):Turn the control with this
symbol on it to operate the exterior lamps.
The exterior lamp control has the following positions:
AUTO (Off/Automatic Headlamps):Turn the control to
this position to put the headlamps in automatic mode.
Automatic mode will turn the exterior lamps on and
off depending upon how much light is available outside
of the vehicle.
;(Parking Lamps):Turn the control to this position to
turn on the parking lamps together with the following:
Sidemarker Lamps
Taillamps
License Plate Lamps
Instrument Panel Lights
53(Headlamps):Turning the control to this
position turns on the headlamps, together with the
previously listed lamps and lights.
3-13
Page 141 of 382
Speedometer and Odometer
Your speedometer lets you see your speed in both
miles per hour (mph) and kilometers per hour (km/h).
Your odometer shows how far your vehicle has
been driven, in either miles (used in the United States)
or kilometers (used in Canada).
Your vehicle has a tamper resistant odometer. The
digital odometer will read 999,999 if someone tries to
turn it back.
The ERROR message is displayed on the odometer
indicating that the speedometer reading is approximately
10 percent above the actual speed. Press the trip
odometer button to return to the odometer/trip mode.
This message will appear every 10 minutes. If this
occurs, see your dealer for service.
You may wonder what happens if your vehicle needs a
new odometer installed. If the new one can be set to
the mileage total of the old odometer, then it must
be. But if it can’t, then it’s set at zero and a label must
be put on the driver’s door to show the old mileage
reading when the new odometer was installed.
Trip Odometer
Your trip odometer is located on the instrument panel
and shows how far your vehicle has been driven
since the trip odometer was last reset. To reset the trip
odometer to zero, press and hold the trip/reset button
on the speedometer for about two seconds.
Tachometer
The tachometer shows your engine speed in revolutions
per minute (rpm).
3-25