2006 CHEVROLET EPICA hood
[x] Cancel search: hoodPage 1 of 368
Seats and Restraint Systems........................... 1-1
Front Seats
............................................... 1-2
Rear Seats
............................................... 1-8
Safety Belts
.............................................1-10
Child Restraints
.......................................1-28
Airbag System
.........................................1-50
Restraint System Check
............................1-63
Features and Controls..................................... 2-1
Keys
........................................................ 2-2
Doors and Locks
....................................... 2-7
Windows
.................................................2-12
Theft-Deterrent Systems
............................2-14
Starting and Operating Your Vehicle
...........2-17
Mirrors
....................................................2-31
Storage Areas
.........................................2-34
Sunroof
..................................................2-36
Instrument Panel............................................. 3-1
Instrument Panel Overview
.......................... 3-4
Climate Controls
......................................3-19
Warning Lights, Gages, and Indicators
........3-29
Audio System(s)
.......................................3-46Driving Your Vehicle....................................... 4-1
Your Driving, the Road, and Your Vehicle
..... 4-2
Towing
...................................................4-33
Service and Appearance Care.......................... 5-1
Service
..................................................... 5-3
Fuel
......................................................... 5-5
Checking Things Under the Hood
...............5-11
Headlamp Aiming
.....................................5-38
Bulb Replacement
....................................5-39
Windshield Wiper Blade Replacement
.........5-45
Tires
......................................................5-46
Appearance Care
.....................................5-68
Vehicle Identification
.................................5-75
Electrical System
......................................5-76
Capacities and Specifications
.....................5-83
Normal Maintenance Replacement Parts
......5-84
Maintenance Schedule..................................... 6-1
Maintenance Schedule
................................ 6-2
Customer Assistance and Information.............. 7-1
Customer Assistance and Information
........... 7-2
Reporting Safety Defects
...........................7-13
Index................................................................ 1
2006 Chevrolet Epica Owner ManualM
Page 84 of 368
Theft-Deterrent Systems
Vehicle theft is big business, especially in some cities.
Although your vehicle has a number of theft-deterrent
features, we know that nothing we put on it can make it
impossible to steal.
Theft-Deterrent System
Your vehicle has a theft-deterrent system.
The theft-deterrent system will not arm when you lock
the doors using the key or the manual door lock.
It activates only when you use the remote keyless
entry transmitter.
Arming the System
To arm the system, do the following:
1. Turn the ignition to LOCK and remove the key
from the ignition.
If the key is inserted in the ignition, the transmitter
will not operate the theft-deterrent system.
2. Close the doors, the windows, the hood, and
the trunk.
Ensure that the windows are closed, as the system
can be activated even if the windows are open.3. Lock the door using the remote keyless entry
transmitter. The transmitter must be used to activate
the theft-deterrent system.
•The LED light on the transmitter will flash.
•All of the doors will lock.
•The hazard warning lamps will flash once and
the horn will chirp.
•The theft-deterrent mode will arm.
•The security light will flash once every second to
indicate that the theft-deterrent system is armed.
The security light is located on the top center
of the instrument panel, near the windshield.
To avoid activating the alarm by accident, do one of
the following:
•Unlock the driver’s or passenger’s front door
using the key.
•Press the lock/unlock button on the remote keyless
entry transmitter.
Unlocking a door any other way will activate the alarm
when a door or the trunk is opened.
If you do not want to arm the theft-deterrent system,
lock the vehicle using the key or the manual door locks.
2-14
Page 90 of 368
Engine Coolant Heater
Your vehicle may have an engine coolant heater. In
very cold weather, 0°F (−18°C) or colder, the engine
coolant heater can help. You will get easier starting
and better fuel economy during engine warm-up.
Usually, the coolant heater should be plugged in a
minimum of four hours prior to starting your vehicle.
At temperatures above 32°F (0°C), use of the coolant
heater is not required.
To Use the Engine Coolant Heater
1. Turn off the engine.
2. Open the hood and unwrap the electrical cord.
The cord is located on the driver’s side of the
engine compartment, behind the battery.
3. Plug it into a normal, grounded 110-Volt AC outlet.
{CAUTION:
Plugging the cord into an ungrounded outlet
could cause an electrical shock. Also, the
wrong kind of extension cord could overheat
and cause a �re. You could be seriously
injured. Plug the cord into a properly grounded
three-prong 110-volt AC outlet. If the cord will
not reach, use a heavy-duty three-prong
extension cord rated for at least 15 amps.
4. Before starting the engine, be sure to unplug and
store the cord as it was before to keep it away
from moving engine parts. If you do not, it could
be damaged.
How long should you keep the coolant heater plugged
in? The answer depends on the outside temperature,
the kind of oil you have, and some other things.
Instead of trying to list everything here, we ask that
you contact your dealer in the area where you will
be parking your vehicle. The dealer can give you the
best advice for that particular area.
2-20
Page 111 of 368
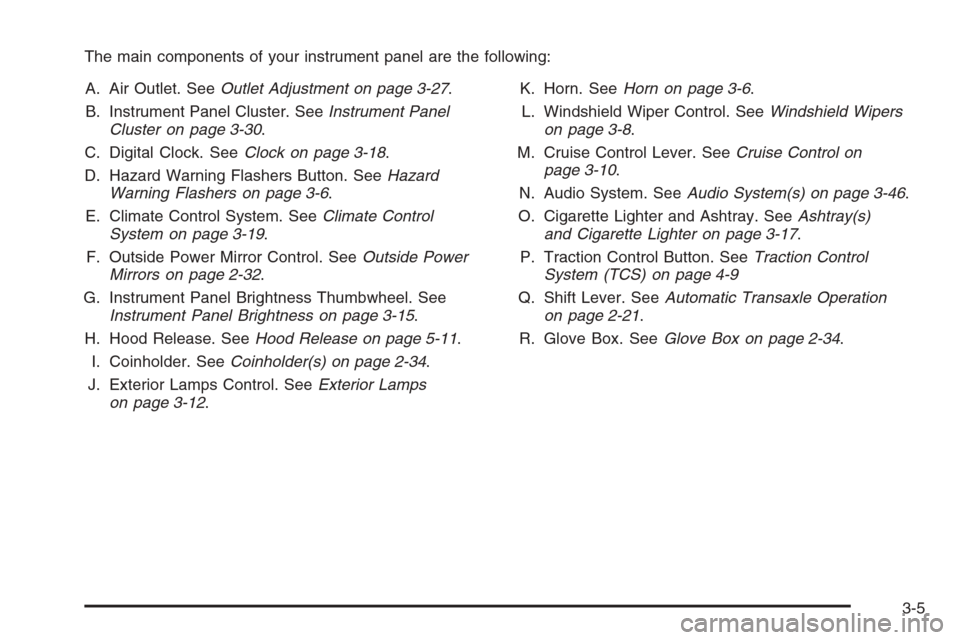
The main components of your instrument panel are the following:
A. Air Outlet. SeeOutlet Adjustment on page 3-27.
B. Instrument Panel Cluster. SeeInstrument Panel
Cluster on page 3-30.
C. Digital Clock. SeeClock on page 3-18.
D. Hazard Warning Flashers Button. SeeHazard
Warning Flashers on page 3-6.
E. Climate Control System. SeeClimate Control
System on page 3-19.
F. Outside Power Mirror Control. SeeOutside Power
Mirrors on page 2-32.
G. Instrument Panel Brightness Thumbwheel. See
Instrument Panel Brightness on page 3-15.
H. Hood Release. SeeHood Release on page 5-11.
I. Coinholder. SeeCoinholder(s) on page 2-34.
J. Exterior Lamps Control. SeeExterior Lamps
on page 3-12.K. Horn. SeeHorn on page 3-6.
L. Windshield Wiper Control. SeeWindshield Wipers
on page 3-8.
M. Cruise Control Lever. SeeCruise Control on
page 3-10.
N. Audio System. SeeAudio System(s) on page 3-46.
O. Cigarette Lighter and Ashtray. SeeAshtray(s)
and Cigarette Lighter on page 3-17.
P. Traction Control Button. SeeTraction Control
System (TCS) on page 4-9
Q. Shift Lever. SeeAutomatic Transaxle Operation
on page 2-21.
R. Glove Box. SeeGlove Box on page 2-34.
3-5
Page 133 of 368
Front Heated Windshield
Your vehicle may have a heated front windshield which
can be used to defrost it. This feature will only work
when the ignition is turned to ON.
There is a heated element along the bottom of the
windshield used to heat the windshield.
system. An indicator light in the button will come on
to let you know that the feature is activated.
The front windshield heater will turn off about 10 minutes
after the button is pressed. It can also be turned off
by pressing the button again or by turning off the engine.
Outlet Adjustment
Use the lever located in the center of each outlet
to change the direction of the airflow. Use the
thumbwheel located above the side outlets to turn
them on and off.
Operation Tips
•
Clear away any ice, snow or leaves from the
air inlets at the base of the windshield that
may block the flow of air into your vehicle.
•Use of non-GM approved hood deflectors may
adversely affect the performance of the system.
•Keep the path under the front seats clear of
objects to help circulate the air inside of your
vehicle more effectively.
3-27
Page 134 of 368
Passenger Compartment Air Filter
Your vehicle has a passenger compartment air filter.
It is located on the passenger side at the base of
the windshield and can be accessed through a
removable panel under the hood of the vehicle.
The filter traps most of the pollen from air entering
the module. Like your engine’s air cleaner/filter,
it may need to be changed periodically.
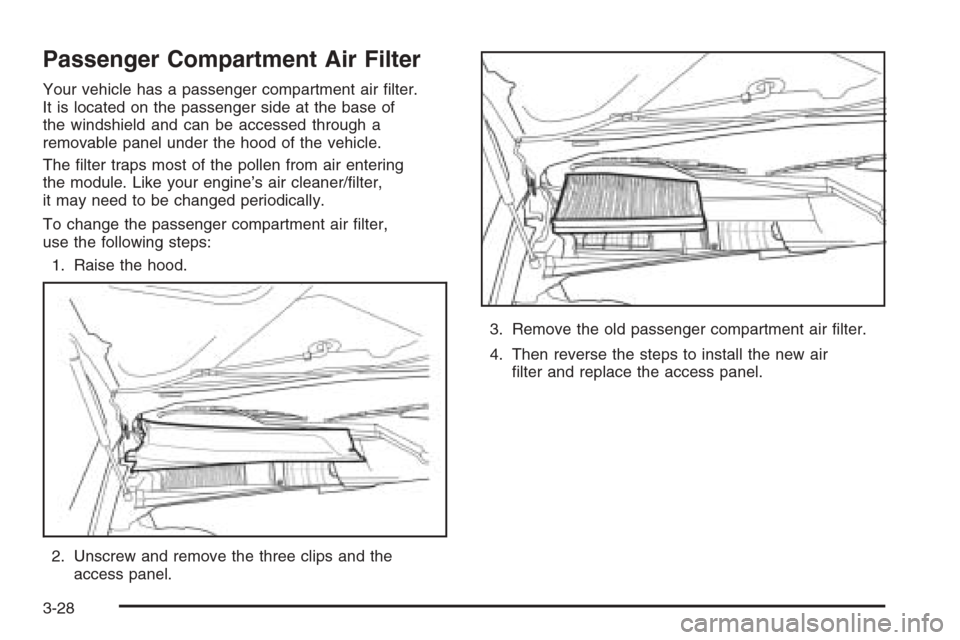
To change the passenger compartment air filter,
use the following steps:
1. Raise the hood.
2. Unscrew and remove the three clips and the
access panel.3. Remove the old passenger compartment air filter.
4. Then reverse the steps to install the new air
filter and replace the access panel.
3-28
Page 225 of 368
Service............................................................5-3
Accessories and Modifications..........................5-3
California Proposition 65 Warning.....................5-4
Doing Your Own Service Work.........................5-4
Adding Equipment to the Outside
of Your Vehicle...........................................5-5
Fuel................................................................5-5
Gasoline Octane............................................5-5
Gasoline Specifications....................................5-5
California Fuel...............................................5-6
Additives.......................................................5-6
Fuels in Foreign Countries...............................5-7
Filling the Tank..............................................5-8
Filling a Portable Fuel Container.....................5-10
Checking Things Under the Hood....................5-11
Hood Release..............................................5-11
Engine Compartment Overview.......................5-12
Engine Oil...................................................5-13
Engine Air Cleaner/Filter................................5-17
Automatic Transaxle Fluid..............................5-19
Engine Coolant.............................................5-19
Coolant Surge Tank Pressure Cap..................5-22
Engine Overheating.......................................5-22
Cooling System............................................5-24
Power Steering Fluid.....................................5-29Windshield Washer Fluid................................5-30
Brakes........................................................5-31
Battery........................................................5-34
Jump Starting...............................................5-35
Headlamp Aiming...........................................5-38
Bulb Replacement..........................................5-39
Halogen Bulbs..............................................5-39
Headlamps..................................................5-39
Front Turn Signal Lamps...............................5-41
Center High-Mounted Stoplamp (CHMSL).........5-42
Parking Lamps.............................................5-43
Taillamps, Turn Signal, Stoplamps and
Back-up Lamps.........................................5-44
Replacement Bulbs.......................................5-44
Windshield Wiper Blade Replacement..............5-45
Tires..............................................................5-46
Tire Sidewall Labeling...................................5-47
Tire Terminology and Definitions.....................5-49
Inflation - Tire Pressure.................................5-52
Tire Inspection and Rotation...........................5-53
When It Is Time for New Tires.......................5-54
Buying New Tires.........................................5-55
Different Size Tires and Wheels......................5-56
Uniform Tire Quality Grading..........................5-56
Section 5 Service and Appearance Care
5-1
Page 230 of 368
California Fuel
If your vehicle is certified to meet California Emissions
Standards, it is designed to operate on fuels that
meet California specifications. See the underhood
emission control label. If this fuel is not available
in states adopting California emissions standards,
your vehicle will operate satisfactorily on fuels meeting
federal specifications, but emission control system
performance may be affected. The malfunction
indicator lamp may turn on and your vehicle may fail
a smog-check test. SeeMalfunction Indicator Lamp
on page 3-40. If this occurs, return to your authorized
GM dealer for diagnosis. If it is determined that the
condition is caused by the type of fuel used, repairs
may not be covered by your warranty.
Additives
To provide cleaner air, all gasolines in the United States
are now required to contain additives that will help
prevent engine and fuel system deposits from forming,
allowing your emission control system to work
properly. In most cases, you should not have to add
anything to your fuel. However, some gasolines contain
only the minimum amount of additive required to
meet U.S. Environmental Protection Agency regulations.
To help keep fuel injectors and intake valves clean,
or if your vehicle experiences problems due to
dirty injectors or valves, look for gasoline that is
advertised as TOP TIER Detergent Gasoline. Also,
your GM dealer has additives that will help correct
and prevent most deposit-related problems.
Gasolines containing oxygenates, such as ethers and
ethanol, and reformulated gasolines may be available
in your area. General Motors recommends that you use
these gasolines if they comply with the specifications
described earlier. However, E85 (85% ethanol) and
other fuels containing more than 10% ethanol must
not be used in vehicles that were not designed for
those fuels.
5-6