2006 CHEVROLET EPICA steering
[x] Cancel search: steeringPage 273 of 368
Tire Size
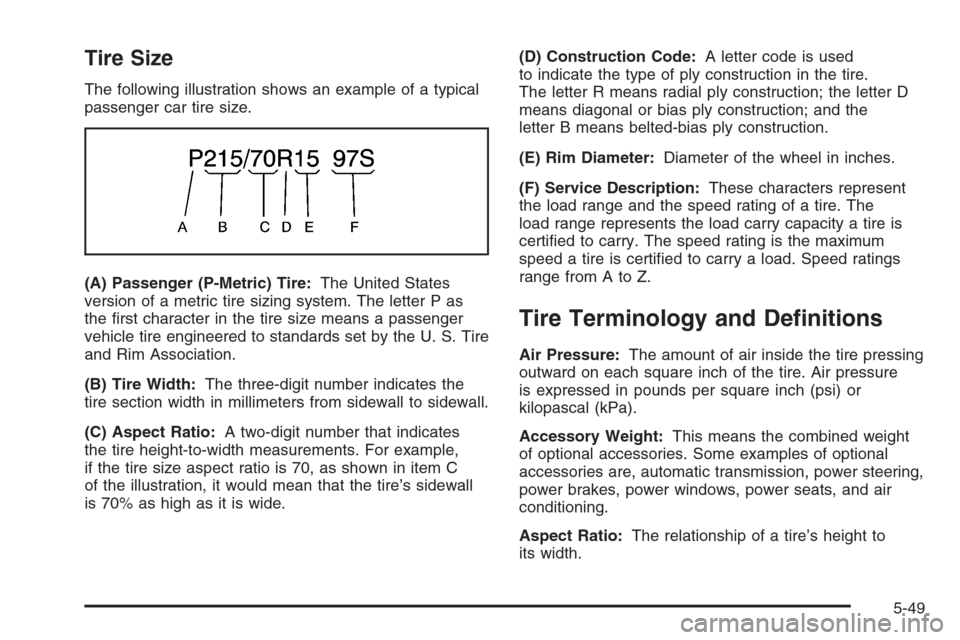
The following illustration shows an example of a typical
passenger car tire size.
(A) Passenger (P-Metric) Tire:The United States
version of a metric tire sizing system. The letter P as
the first character in the tire size means a passenger
vehicle tire engineered to standards set by the U. S. Tire
and Rim Association.
(B) Tire Width:The three-digit number indicates the
tire section width in millimeters from sidewall to sidewall.
(C) Aspect Ratio:A two-digit number that indicates
the tire height-to-width measurements. For example,
if the tire size aspect ratio is 70, as shown in item C
of the illustration, it would mean that the tire’s sidewall
is 70% as high as it is wide.(D) Construction Code:A letter code is used
to indicate the type of ply construction in the tire.
The letter R means radial ply construction; the letter D
means diagonal or bias ply construction; and the
letter B means belted-bias ply construction.
(E) Rim Diameter:Diameter of the wheel in inches.
(F) Service Description:These characters represent
the load range and the speed rating of a tire. The
load range represents the load carry capacity a tire is
certified to carry. The speed rating is the maximum
speed a tire is certified to carry a load. Speed ratings
range from A to Z.
Tire Terminology and De�nitions
Air Pressure:The amount of air inside the tire pressing
outward on each square inch of the tire. Air pressure
is expressed in pounds per square inch (psi) or
kilopascal (kPa).
Accessory Weight:This means the combined weight
of optional accessories. Some examples of optional
accessories are, automatic transmission, power steering,
power brakes, power windows, power seats, and air
conditioning.
Aspect Ratio:The relationship of a tire’s height to
its width.
5-49
Page 284 of 368
If a Tire Goes Flat
It is unusual for a tire to blowout while you are driving,
especially if you maintain your vehicle’s tires properly.
If air goes out of a tire, it is much more likely to leak out
slowly. But if you should ever have a blowout, here
are a few tips about what to expect and what to do:
If a front tire fails, the flat tire will create a drag that pulls
the vehicle toward that side. Take your foot off the
accelerator pedal and grip the steering wheel firmly.
Steer to maintain lane position, and then gently brake
to a stop well out of the traffic lane.
A rear blowout, particularly on a curve, acts much like a
skid and may require the same correction you would
use in a skid. In any rear blowout remove your foot from
the accelerator pedal. Get the vehicle under control
by steering the way you want the vehicle to go. It may
be very bumpy and noisy, but you can still steer.
Gently brake to a stop, well off the road if possible.{CAUTION:
Lifting a vehicle and getting under it to
do maintenance or repairs is dangerous
without the appropriate safety equipment and
training. The jack provided with your vehicle
is designed only for changing a �at tire. If it
is used for anything else, you or others could
be badly injured or killed if the vehicle slips
off the jack. Use the jack provided with your
vehicle only for changing a �at tire.
If a tire goes flat, the next part shows how to use the
jacking equipment to change a flat tire safely.
5-60
Page 302 of 368
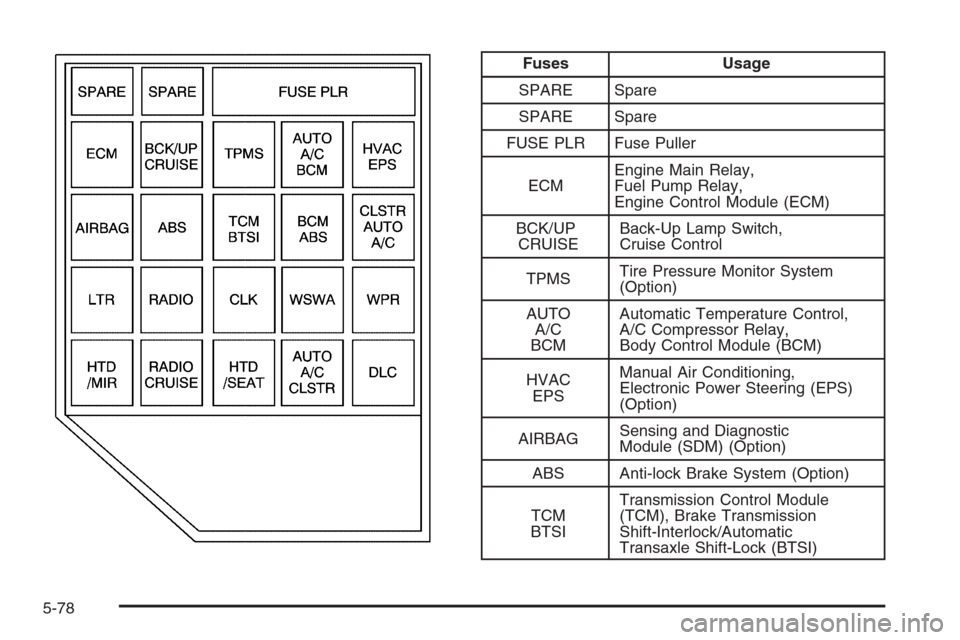
Fuses Usage
SPARE Spare
SPARE Spare
FUSE PLR Fuse Puller
ECMEngine Main Relay,
Fuel Pump Relay,
Engine Control Module (ECM)
BCK/UP
CRUISEBack-Up Lamp Switch,
Cruise Control
TPMSTire Pressure Monitor System
(Option)
AUTO
A/C
BCMAutomatic Temperature Control,
A/C Compressor Relay,
Body Control Module (BCM)
HVAC
EPSManual Air Conditioning,
Electronic Power Steering (EPS)
(Option)
AIRBAGSensing and Diagnostic
Module (SDM) (Option)
ABS Anti-lock Brake System (Option)
TCM
BTSITransmission Control Module
(TCM), Brake Transmission
Shift-Interlock/Automatic
Transaxle Shift-Lock (BTSI)
5-78
Page 309 of 368
Maintenance Schedule......................................6-2
Introduction...................................................6-2
Maintenance Requirements..............................6-2
Your Vehicle and the Environment....................6-2
How This Section is Organized.........................6-3
Part A: Scheduled Maintenance Services...........6-4
Using the Maintenance Schedule......................6-4
Selecting the Right Schedule...........................6-5
Short Trip/City Scheduled Maintenance..............6-7
Long Trip/Highway Scheduled Maintenance......6-14
Part B: Owner Checks and Services................6-19
At Each Fuel Fill..........................................6-19
At Least Once a Month.................................6-19At Least Twice a Year...................................6-20
At Least Once a Year...................................6-20
Part C: Periodic Maintenance Inspections.........6-23
Steering, Suspension and Front Drive Axle
Boot and Seal Inspection............................6-23
Exhaust System Inspection............................6-23
Fuel System Inspection..................................6-24
Engine Cooling System Inspection...................6-24
Throttle System Inspection.............................6-24
Brake System Inspection................................6-24
Part D: Recommended Fluids and
Lubricants................................................6-25
Part E: Maintenance Record...........................6-27
Section 6 Maintenance Schedule
6-1
Page 331 of 368
Part C: Periodic Maintenance
Inspections
Listed in this part are inspections and services which
should be performed at least twice a year (for instance,
each spring and fall).You should let your dealer’s
service department do these jobs. Make sure any
necessary repairs are completed at once.
Proper procedures to perform these services may be
found in a service manual. SeeService Publications
Ordering Information on page 7-14.
Steering, Suspension and Front
Drive Axle Boot and Seal Inspection
Inspect the front and rear suspension and steering
system for damaged, loose or missing parts, signs of
wear or lack of lubrication. Inspect the power steering
lines and hoses for proper hook-up, binding, leaks,
cracks, chafing, etc. Clean and then inspect the drive
axle boot seals for damage, tears or leakage. Replace
seals if necessary.
Exhaust System Inspection
Inspect the complete exhaust system. Inspect the body
near the exhaust system. Look for broken, damaged,
missing or out-of-position parts as well as open seams,
holes, loose connections or other conditions which
could cause a heat build-up in the floor pan or could let
exhaust fumes into the vehicle. SeeEngine Exhaust
on page 2-29.
6-23
Page 334 of 368
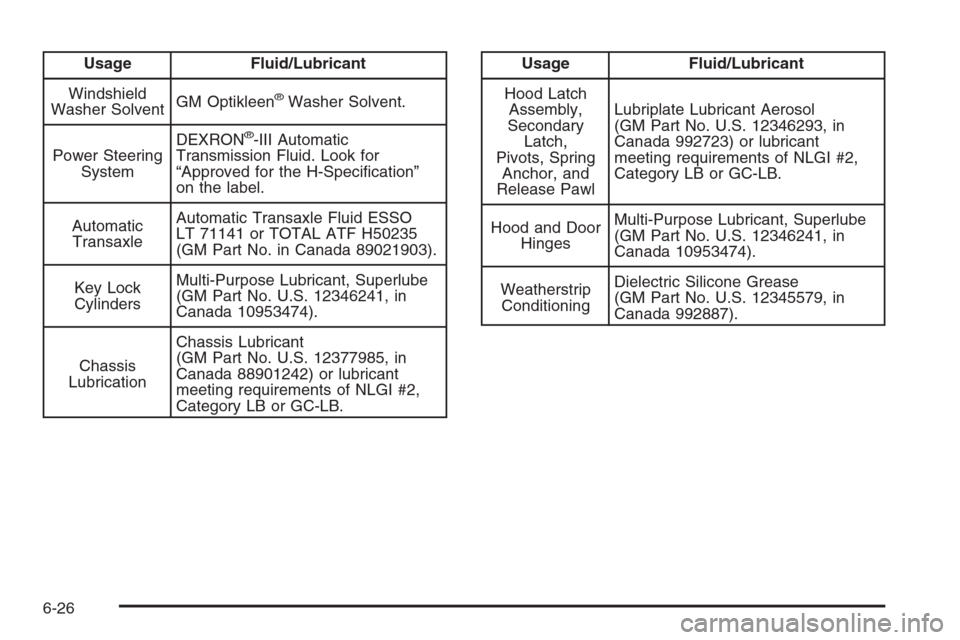
Usage Fluid/Lubricant
Windshield
Washer SolventGM Optikleen
®Washer Solvent.
Power Steering
SystemDEXRON
®-III Automatic
Transmission Fluid. Look for
“Approved for the H-Specification”
on the label.
Automatic
TransaxleAutomatic Transaxle Fluid ESSO
LT 71141 or TOTAL ATF H50235
(GM Part No. in Canada 89021903).
Key Lock
CylindersMulti-Purpose Lubricant, Superlube
(GM Part No. U.S. 12346241, in
Canada 10953474).
Chassis
LubricationChassis Lubricant
(GM Part No. U.S. 12377985, in
Canada 88901242) or lubricant
meeting requirements of NLGI #2,
Category LB or GC-LB.
Usage Fluid/Lubricant
Hood Latch
Assembly,
Secondary
Latch,
Pivots, Spring
Anchor, and
Release PawlLubriplate Lubricant Aerosol
(GM Part No. U.S. 12346293, in
Canada 992723) or lubricant
meeting requirements of NLGI #2,
Category LB or GC-LB.
Hood and Door
HingesMulti-Purpose Lubricant, Superlube
(GM Part No. U.S. 12346241, in
Canada 10953474).
Weatherstrip
ConditioningDielectric Silicone Grease
(GM Part No. U.S. 12345579, in
Canada 992887).
6-26
Page 352 of 368
Reporting Safety Defects to the
Canadian Government
If you live in Canada, and you believe that your vehicle
has a safety defect, you should immediately notify
Transport Canada, in addition to notifying General
Motors of Canada Limited. You may call them at
1-800-333-0510 or write to:
Transport Canada
Place de Ville Tower C
330 Sparks Street
Ottawa, Ontario K1A 0N5
Reporting Safety Defects to
General Motors
In addition to notifying NHTSA (or Transport Canada)
in a situation like this, we certainly hope you will
notify General Motors. Please call the Chevrolet
Customer Assistance Center at 1-800-222-1020,
or write:
Chevrolet Motor Division
Chevrolet Customer Assistance Center
P.O. Box 33170
Detroit, MI 48232-5170In Canada, please call us at 1-800-263-3777 (English)
or 1-800-263-7854 (French). Or, write:
General Motors of Canada Limited
Customer Communication Centre, 163-005
1908 Colonel Sam Drive
Oshawa, Ontario L1H 8P7
Service Publications Ordering
Information
Service Manuals
Service Manuals have the diagnosis and repair
information on engines, transmission, axle suspension,
brakes, electrical, steering, body, etc.
Transmission, Transaxle, Transfer
Case Unit Repair Manual
This manual provides information on unit repair
service procedures, adjustments, and specifications
for GM transmissions, transaxles, and transfer cases.
7-14
Page 355 of 368
A
Accessories and Modifications............................ 5-3
Accessory Power Outlet(s)...............................3-16
Adding Equipment to Your Airbag-Equipped
Vehicle.......................................................1-62
Additives, Fuel................................................. 5-6
Add-On Electrical Equipment............................5-76
Air Cleaner/Filter, Engine.................................5-17
Air Conditioning......................................3-19, 3-22
Airbag
Passenger Status Indicator...........................3-33
Readiness Light..........................................3-32
Airbag Sensing and Diagnostic Module (SDM)...... 7-9
Airbag System................................................1-50
Adding Equipment to Your Airbag-Equipped
Vehicle...................................................1-62
How Does an Airbag Restrain?......................1-56
Passenger Sensing System...........................1-58
Servicing Your Airbag-Equipped Vehicle..........1-62
What Makes an Airbag Inflate?......................1-56
What Will You See After an Airbag Inflates?....1-56
When Should an Airbag Inflate?....................1-55
Where Are the Airbags?...............................1-53
Antenna, Backglass.........................................3-80
Antenna, Integrated Windshield.........................3-81Anti-Lock Brake System (ABS)........................... 4-7
Anti-Lock Brake, System Warning Light..............3-37
Appearance Care
Aluminum Wheels........................................5-72
Chemical Paint Spotting...............................5-73
Cleaning Exterior Lamps/Lenses....................5-71
Cleaning the Inside of Your Vehicle................5-68
Fabric/Carpet..............................................5-69
Finish Care.................................................5-71
Finish Damage............................................5-73
Instrument Panel, Vinyl, and Other
Plastic Surfaces.......................................5-70
Leather......................................................5-70
Sheet Metal Damage...................................5-73
Tires..........................................................5-73
Underbody Maintenance...............................5-73
Vehicle Care/Appearance Materials................5-74
Washing Your Vehicle...................................5-70
Weatherstrips..............................................5-70
Windshield and Wiper Blades........................5-72
Ashtray(s)......................................................3-17
Audio System(s).............................................3-46
Audio Steering Wheel Controls......................3-78
Backglass Antenna......................................3-80
Care of Your CD Player...............................3-80
Care of Your CDs ........................................3-80
1