2006 CHEVROLET CORVETTE window
[x] Cancel search: windowPage 133 of 426
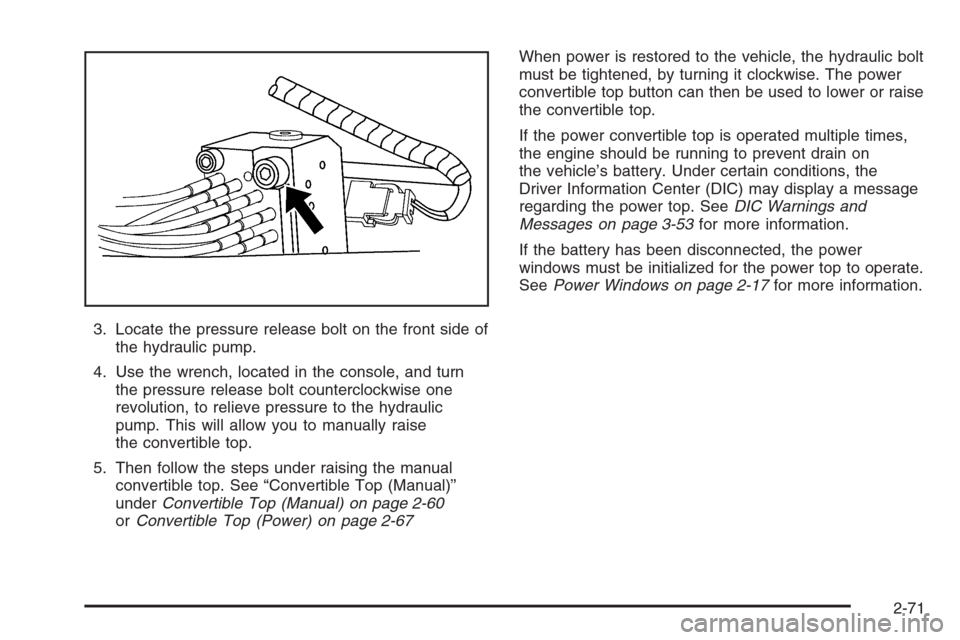
3. Locate the pressure release bolt on the front side of
the hydraulic pump.
4. Use the wrench, located in the console, and turn
the pressure release bolt counterclockwise one
revolution, to relieve pressure to the hydraulic
pump. This will allow you to manually raise
the convertible top.
5. Then follow the steps under raising the manual
convertible top. See “Convertible Top (Manual)”
underConvertible Top (Manual) on page 2-60
orConvertible Top (Power) on page 2-67When power is restored to the vehicle, the hydraulic bolt
must be tightened, by turning it clockwise. The power
convertible top button can then be used to lower or raise
the convertible top.
If the power convertible top is operated multiple times,
the engine should be running to prevent drain on
the vehicle’s battery. Under certain conditions, the
Driver Information Center (DIC) may display a message
regarding the power top. SeeDIC Warnings and
Messages on page 3-53for more information.
If the battery has been disconnected, the power
windows must be initialized for the power top to operate.
SeePower Windows on page 2-17for more information.
2-71
Page 146 of 426
9(Off):Move the lever to this position to turn off the
windshield wipers.
8(Mist):Move the lever all the way down to mist
and release for a single wiping cycle. The windshield
wipers will stop after one wipe. If you want more wipes,
hold the band on mist longer.
Heavy snow or ice can overload the wipers. If this
occurs, a circuit breaker will stop the wipers until the
motor cools. So, be sure to clear any ice and snow from
the windshield wiper blades before using them. If the
wiper blades are frozen to the windshield, carefully
loosen them or warm the windshield before turning
the wipers on. If your blades do become worn or
damaged, get new blades or blade inserts.
Windshield Washer
The lever on the right side of the steering column also
controls the windshield washer. There is a button at the
end of the lever. To spray washer �uid on the windshield,
press the button and hold it. The washer will spray until
you release the button. The wipers will continue to clear
the window for about six seconds after the button is
released and then stop or return to your preset speed.
{CAUTION:
In freezing weather, do not use your washer
until the windshield is warmed. Otherwise the
washer �uid can form ice on the windshield,
blocking your vision.
If the �uid in the windshield washer �uid reservoir is
low, the message CHECK WASHER FLUID will appear
on the Driver Information Center (DIC) display. It will
take 15 seconds after the bottle is re�lled for this
message to turn off. For information on the correct
washer �uid to use, seeWindshield Washer Fluid on
page 5-41andRecommended Fluids and Lubricants on
page 6-12.
3-10
Page 162 of 426
Automatic Operation
AUTO (Automatic):Press the AUTO button to
place the entire system in the automatic mode.
When automatic operation is active, the system will
automatically control the inside temperature, the
air delivery mode and the fan speed.
After a ten second display of the current settings,
the word AUTO, the driver’s temperature setting and
the outside temperature will be shown. The system will
operate to achieve your comfort set temperature as
quickly as possible. The AUTO control system works
best with the windows up and the removable roof
installed or the convertible top up.
1. Press the AUTO button.
2. Adjust the temperature to a comfortable setting
between 60°F (16°C) and 90°F (32°C). Choosing
the coldest or warmest temperature setting will
not cause the system to heat or cool any faster.
A setting of 73°F (23°C) is suggested.
In cold weather, the system will start at reduced fan
speeds to avoid blowing cold air into your vehicle
until warmer air is available. The system will
start out blowing air at the �oor but may change
modes automatically as the vehicle warms up
to maintain the chosen temperature setting. The
length of time needed for warm up will depend on
the outside temperature and the length of time
that has elapsed since your vehicle was last driven.3. Wait for the system to regulate. This may take from
10 to 30 minutes. Then adjust the temperature, if
necessary.
Do not cover the solar sensor located in the center of
the instrument panel, near the windshield. For more
information on the solar sensor, see “Sensor” later in
this section.
Manual Operation
Driver Power/Temperature:Press the driver
temperature knob on the driver side of the climate
control panel to turn the climate control system off.
This is the only setting that completely shuts off the
fan. The digital display will show only the outside
temperature. You can still adjust the driver and the
passenger set temperature and the air intake mode
when the climate control is off.
Passenger Power/Temperature:Press the passenger
temperature knob on the passenger side of the
climate control panel to turn the passenger’s climate
control system on or off. Turn the knob to increase
or decrease the temperature for the passenger. If the
passenger’s climate control system is off, the driver’s
temperature knob will control the temperature for
the entire vehicle.
3-26
Page 163 of 426
N(MODE):Press this button to manually lock in the
current air delivery setting and to stop the automatic
mode control. Pressing the MODE button will delete
AUTO from the digital display and the mode graphics
will be shown. To change the setting, press the MODE
button again. The AUTO button must be pressed to return
to the automatic mode selection.
To change the current mode, select one of the following:
H(Vent):This mode directs most of the air to the
instrument panel outlets, with a very small amount of air
directed to the �oor outlets.
%(Bi-Level):This mode directs about half of the
air to the instrument panel outlets, and directs the
remaining air to the �oor outlets. Cooler air is directed
to the upper outlets and warmer air to the �oor outlets.
6(Floor):This mode directs most of the air to the
�oor outlets with some air directed to the side window
defogger outlets and some air directed toward the
windshield.
The MODE button can also be used to select the defog
mode. Information on defogging and defrosting can
be found later in this section.
x9w(Fan):Press the button with the fan symbol
to manually increase or decrease the fan speed.Keep pressing the up or down arrow on this switch until
the desired fan speed appears on the display.
Pressing the arrows will delete AUTO from the digital
display. The fan graphics with the fan speed bars will
be shown. To increase the fan speed so that more
air �ows into the vehicle, press the up arrow on the fan
switch. To decrease the fan speed and air�ow, press
the down arrow. The AUTO button must be pressed to
return to the automatic fan control.
If the air�ow seems low when the fan speed is at the
highest setting, the passenger compartment air �lter
may need to be replaced. For more information,
seePassenger Compartment Air Filter on page 3-31
andScheduled Maintenance on page 6-4.
?(Recirculation):Press this button to turn the
recirculation mode on or off. When the climate control
system is in recirculation mode an indicator light will
come on. This mode prevents outside air from entering
your vehicle. It can be used to prevent outside air and
odors from entering your vehicle and to help cool the air
inside your vehicle more quickly. Recirculation mode is
not available in defrost or defog mode.
^(Air Conditioning Off):Press this button to turn
the air conditioning compressor off. Press AUTO
to return to automatic operation. When in AUTO, the air
conditioning compressor will come on automatically,
as needed.
3-27
Page 164 of 426
Air conditioning does not operate at temperatures below
about 35°F to 40°F (2°C to 4°C). In temperatures
above 40°F (4°C), the air conditioning cannot be turned
off in defrost and defog, as it helps to remove moisture
from the vehicle. It also helps to keep the windows clear.
You may notice a slight change in engine performance
when the air-conditioning compressor shuts off and
turns on again. This is normal. The system is designed
to make adjustments to help with fuel economy while
still maintaining the selected temperature.
On hot days, open the windows to let hot inside air
escape; then close them. This helps to reduce the time
it takes for your vehicle to cool down. It also helps
the system to operate more efficiently.
For quick cool down on hot days press the AUTO button
and adjust the temperature to a cool, comfortable setting.
To achieve maximum cool down, do the following:
1. Select the vent mode.
2. Select recirculation mode.
3. Select the A/C on.
4. Select the coolest temperature.
5. Select the highest fan speed.Using these settings together for long periods of time
may cause the air inside of your vehicle to become too
dry. To prevent this from happening, after the air in
your vehicle has cooled, turn the recirculation mode off.
The air conditioning system removes moisture from
the air, so you may sometimes notice a small amount of
water dripping underneath your vehicle while idling or
after turning off the engine. This is normal.
Sensors
The solar sensor on your vehicle monitors the solar
radiation and uses the information to maintain the
selected temperature when operating in AUTO mode by
initiating needed adjustments to the temperature, the
fan speed and the air delivery system. The system may
also supply cooler air to the side of the vehicle facing
the sun. The recirculation mode will also be activated, as
necessary. Do not cover the solar sensor located on
the top of the instrument panel near the windshield
or the system will not work properly.
There is also a sensor located behind the front bumper.
This sensor reads the outside air temperature and
helps to maintain the temperature inside the vehicle.
Any cover on the front of the vehicle could give a false
reading in the temperature.
3-28
Page 165 of 426
If the outside temperature goes up, the displayed
temperature will not change until:
The vehicle’s speed is above 12 mph (19 km/h) for
�ve minutes.
The vehicle’s speed is above 32 mph (52 km/h) for
two and a half minutes.
These delays prevent false readings. If the temperature
goes down, the outside temperature will be shown
when you start the vehicle. If it has been turned off for
less than three hours, the temperature will be recalled
from the previous vehicle operation.
There is also an inside temperature sensor located to the
left of the ignition switch. The automatic climate control
system uses this sensor to receive information, so if you
block or cover it, the system will not function properly.
Defogging and Defrosting
Fog on the inside of windows is a result of high humidity
and moisture condensing on the cool window glass. This
can be minimized if the climate control system is used
properly. There are two modes to clear fog or frost from
your windshield. Use the �oor/defog mode to clear the
windows of fog or moisture and warm the passengers.
Use defrost to remove fog or frost from the windshield
more quickly. To prevent fogging on the inside of the
windows in modes other than �oor/defog and defrost,
make sure the air conditioning compressor is on and
recirculation mode is off.Press the mode button until the defog mode appears on
the display.
-(Floor/Defog):This mode directs the air equally
between the windshield and the �oor outlets with a small
amount to the side window outlets. When you select
this mode, the system turns off recirculation and runs
the air-conditioning compressor unless the outside
temperature is at or below freezing. The recirculation
mode cannot be selected while in the defog mode.
1(Defrost):Pressing this button directs most of the
air to the windshield, with a small amount directed to the
side window outlets. The light on the button will come on
and the digital display will show the defrost mode symbol
and fan speed when the front defrost mode is being used.
In this mode, the system will automatically turn off the
recirculation and run the air-conditioning compressor,
unless the outside temperature is at or below freezing.
Recirculation cannot be selected while in the defrost
mode. Pressing this button again will return the system to
the last operating mode.
For severe ice conditions, turn the driver’s temperature
knob to 90°F (32°C) while in defrost mode.
Do not drive the vehicle until all the windows are clear.
3-29
Page 166 of 426
Rear Window Defogger
The rear window defogger uses a warming grid to
remove fog or frost from the rear window.
The rear window defogger will only work when the
engine is running.
=(Rear Window Defogger):Press this button to
turn the rear window defogger on. Be sure to clear
as much snow from the rear window as possible. An
indicator light in the button will come on to let you know
that the rear window defogger is activated.
The rear window defogger will turn off about 10 minutes
after the button is pressed when traveling less than
30 mph (48 km/h). If turned on again, the defogger
will only run for about �ve minutes before turning off.
The defogger can also be turned off by pressing
the button again or by turning off the engine.
Your vehicle has heated outside rearview mirrors.
The mirrors will heat to help clear fog or frost from the
surface of the mirrors when the rear window defog
button is pressed.If your vehicle is equipped with the power convertible
top, the rear window defogger and heated mirrors
are automatically disabled when the power convertible
top is moving or down.
Notice:Do not use anything sharp on the inside
of the rear window. If you do, you could cut or
damage the warming grid, and the repairs would
not be covered by your warranty. Do not attach
a temporary vehicle license, tape, a decal or
anything similar to the defogger grid.
Outlet Adjustment
Use the tab located on the air outlets to change the
direction of the air�ow.
Operation Tips
Clear away any ice, snow or leaves from the air
inlets at the base of the windshield that may
block the �ow of air into your vehicle.
Use of non-GM approved hood de�ectors may
adversely affect the performance of the system.
Keep the area around the base of the instrument
panel console and air path under the seats clear
of objects to help circulate the air inside of
your vehicle more effectively.
3-30
Page 263 of 426
Here are some things you can check before a trip:
Windshield Washer Fluid:Is the reservoir full? Are
all windows clean inside and outside?
Wiper Blades:Are they in good shape?
Fuel, Engine Oil, Other Fluids:Have you checked
all levels?
Lamps:Are they all working? Are the lenses clean?
Tires:They are vitally important to a safe,
trouble-free trip. Is the tread good enough for
long-distance driving? Are the tires all in�ated to the
recommended pressure?
Weather Forecasts:What is the weather outlook
along your route? Should you delay your trip a
short time to avoid a major storm system?
Maps:Do you have up-to-date maps?
Highway Hypnosis
Is there actually such a condition as highway hypnosis?
Or is it just plain falling asleep at the wheel? Call it
highway hypnosis, lack of awareness, or whatever.
There is something about an easy stretch of road with
the same scenery, along with the hum of the tires on
the road, the drone of the engine, and the rush of
the wind against the vehicle that can make you sleepy.
Do not let it happen to you! If it does, your vehicle
can leave the road in less than a second, and you could
crash and be injured.
What can you do about highway hypnosis? First, be
aware that it can happen.
Then here are some tips:
Make sure your vehicle is well ventilated, with a
comfortably cool interior.
Keep your eyes moving. Scan the road ahead and
to the sides. Check your rearview mirrors and your
instruments frequently.
If you get sleepy, pull off the road into a rest,
service, or parking area and take a nap, get some
exercise, or both. For safety, treat drowsiness
on the highway as an emergency.
4-25